---
title: "Prepare online store orders for a sales dashboard"
description: "Find out how to load two years of online store orders into the Lakehouse, concatenate them and clean them with a Custom action"
url: https://docs.ovhcloud.com/it/guides/public-cloud/data-platform/tutorials-ecommerce-sales
lang: en
lastUpdated: 2026-10-05
---
> For AI agents: the complete documentation index is available at https://docs.ovhcloud.com/it/llms.txt, the full documentation bundle is available at https://docs.ovhcloud.com/it/llms-full.txt.
# Prepare online store orders for a sales dashboard
## Objective
This guide walks you through loading two years of orders from an online store (about 1 million order lines) into the Lakehouse, concatenating them into a single table and cleaning them with a Custom action. You upload the files with [Connectors](https://docs.ovhcloud.com/it/guides/public-cloud/data-platform/connectors-sources-upload-files.md), create the tables in [Lakehouse Manager](https://docs.ovhcloud.com/it/guides/public-cloud/data-platform/lakehouse-manager-tables.md), then concatenate and clean the orders with [Data Processing Engine](https://docs.ovhcloud.com/it/guides/public-cloud/data-platform/dpe-actions-load.md).
By the end you will have the table `online_retail_ii_clean`, ready to query from Apache Superset. The second part of the guide, [Build a sales dashboard for an online store in Superset](https://docs.ovhcloud.com/it/guides/public-cloud/data-platform/tutorials-ecommerce-sales-superset-dashboard.md), turns it into a sales dashboard.
## Requirements
To follow this guide you need:
- A Data Platform project. This guide uses a project named `ecommerce-sales`.
- The orders of the store and the cleaning script of the Custom action:
| Type | Name |
| -------------------------------------- | --------------------------------------------------------------------------------------------------------------------------------------------------------- |
| Orders, December 2009 to December 2011 | [Online Retail II](https://archive.ics.uci.edu/dataset/502/online+retail+ii), UCI Machine Learning Repository |
| Cleaning Python script | online\_retail\_cleaning.py |
The UCI publishes the orders as one Excel workbook, `online_retail_II.xlsx`, with one sheet per year. Before Step 1, save each sheet as its own file:
| Sheet | File to create |
| ---------------- | ------------------------------ |
| `Year 2009-2010` | `online_retail_II_200910.xlsx` |
| `Year 2010-2011` | `online_retail_II_201011.xlsx` |
:::info
**About the data:** [Online Retail II](https://archive.ics.uci.edu/dataset/502/online+retail+ii), UCI Machine Learning Repository, is licensed under CC BY 4.0 (DOI 10.24432/C5CG6D).
:::
We recommend completing the [Getting Started guides](https://docs.ovhcloud.com/it/guides/public-cloud/data-platform/landing-page-getting-started.md) first. This guide assumes you are comfortable with the main components of Data Platform.
## What you will build
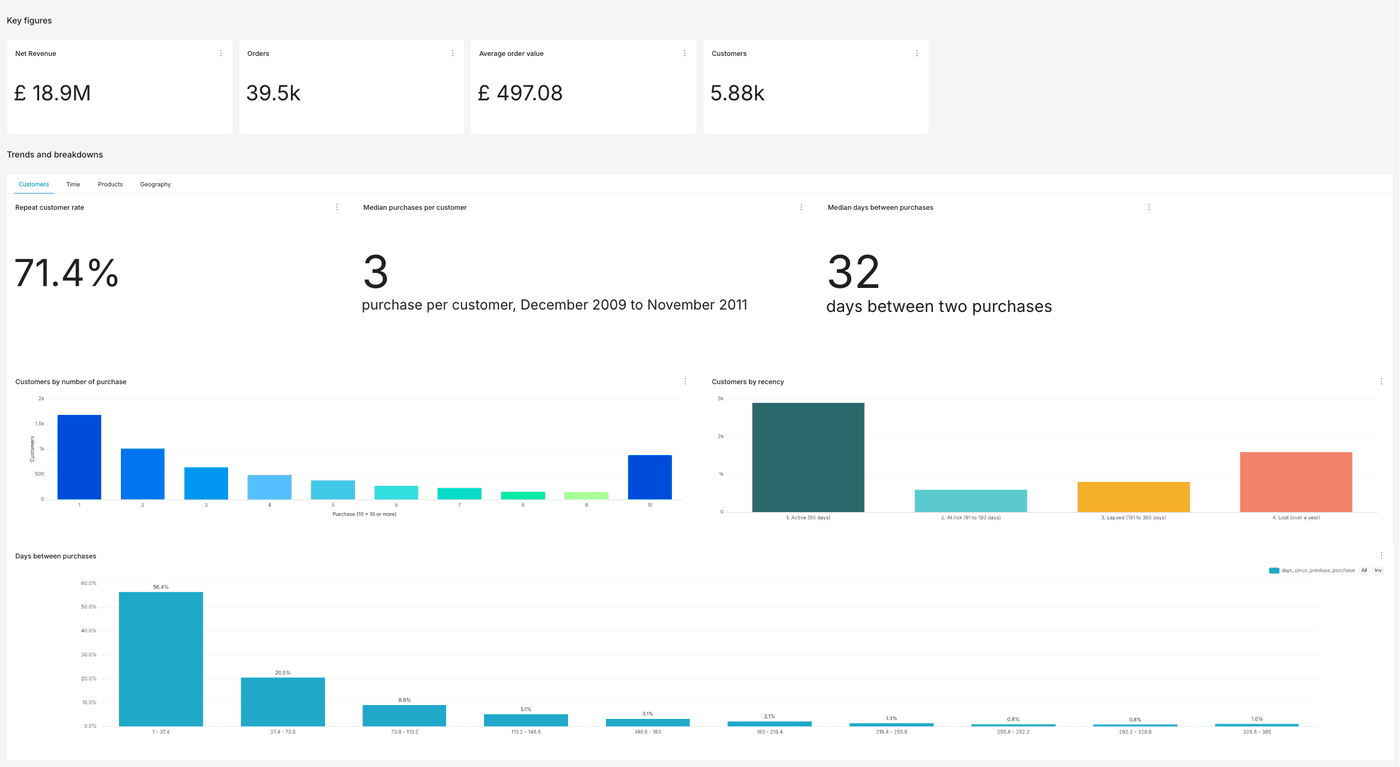
The two parts of this guide end with this dashboard in Superset:
| Stage | Component | Result |
| ------------------------ | ----------------------------------------------------------------------------------------------------------------------------------------------------------------------------------------------------------------------------------------- | ------------------------------------------------------- |
| 1. Upload the files | [File Upload source](https://docs.ovhcloud.com/it/guides/public-cloud/data-platform/connectors-sources-upload-files.md) | A source holding the two files |
| 2. Analyse the files | [Analyzer](https://docs.ovhcloud.com/it/guides/public-cloud/data-platform/landing-page-connectors-analyzer.md) | Detected attributes and types |
| 3. Create the tables | [Lakehouse Manager tables](https://docs.ovhcloud.com/it/guides/public-cloud/data-platform/lakehouse-manager-tables.md) | One table per year, one table for all orders |
| 4. Concatenate the years | [Load actions](https://docs.ovhcloud.com/it/guides/public-cloud/data-platform/dpe-actions-load.md) and a [workflow](https://docs.ovhcloud.com/it/guides/public-cloud/data-platform/dpe-workflows.md) | 1,067,371 order lines in `online_retail_ii` |
| 5. Clean the orders | [Custom action](https://docs.ovhcloud.com/it/guides/public-cloud/data-platform/dpe-actions-custom.md) | 1,021,128 clean order lines in `online_retail_ii_clean` |
| 6. Connect Superset | [Trino consumer](https://docs.ovhcloud.com/it/guides/public-cloud/data-platform/connectors-consumers-trino.md) and [Apache Superset](https://docs.ovhcloud.com/it/guides/public-cloud/data-platform/tutorials-install-apache-superset.md) | A Superset dataset on the clean table |
## Instructions
### Step 1: Upload the files
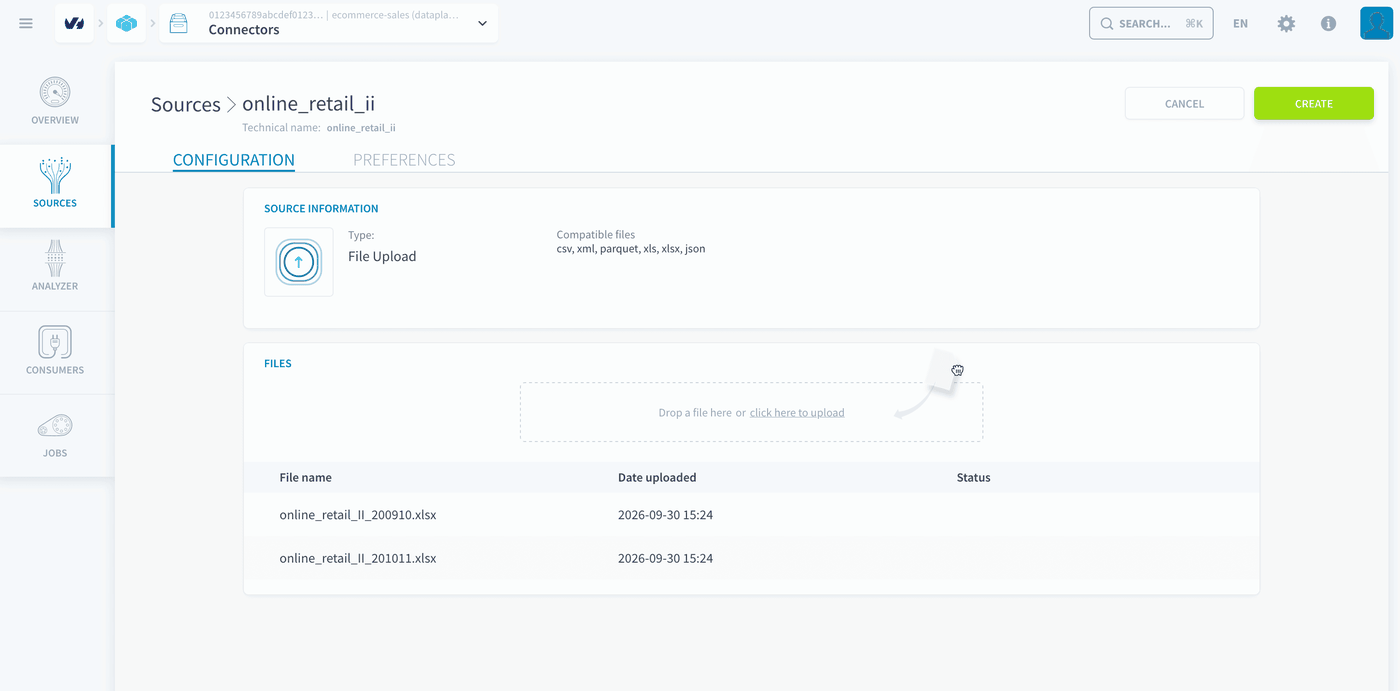
1. Open **Connectors** > **Sources** and create a new source of type _File Upload_.
2. Name it `online_retail_ii`.
3. Drop `online_retail_II_200910.xlsx` and `online_retail_II_201011.xlsx` in the _Files_ area.
4. Click **Create**.
### Step 2: Analyse the files
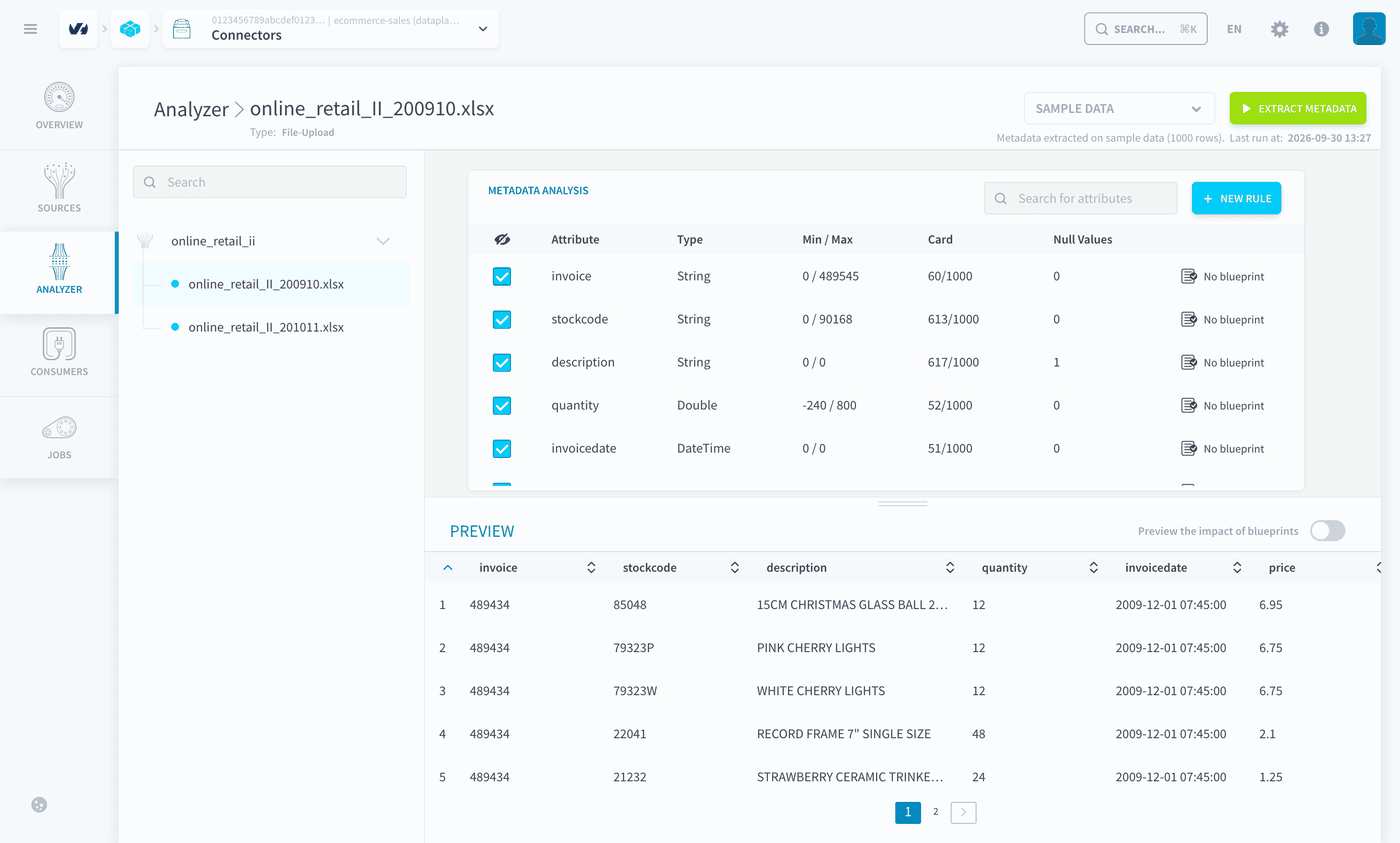
1. Open **Connectors** > **Analyzer**.
2. Select the source `online_retail_ii`, then the file `online_retail_II_200910.xlsx`.
3. Click **Extract metadata**.
4. Do the same for `online_retail_II_201011.xlsx`.
The [Analyzer](https://docs.ovhcloud.com/it/guides/public-cloud/data-platform/connectors-analyzer-extract-metadata.md) detects 8 attributes: `invoice`, `stockcode`, `description`, `quantity`, `invoicedate`, `price`, `customer_id` and `country`. Check that `invoice` and `stockcode` are detected as **String**: invoice numbers such as `C489449` and product codes such as `85123A` are not numbers.
### Step 3: Create the tables
#### Create one table per year
1. Open **Lakehouse Manager** > **Tables**.
2. Click **New table** > **Create from a Connectors source**.
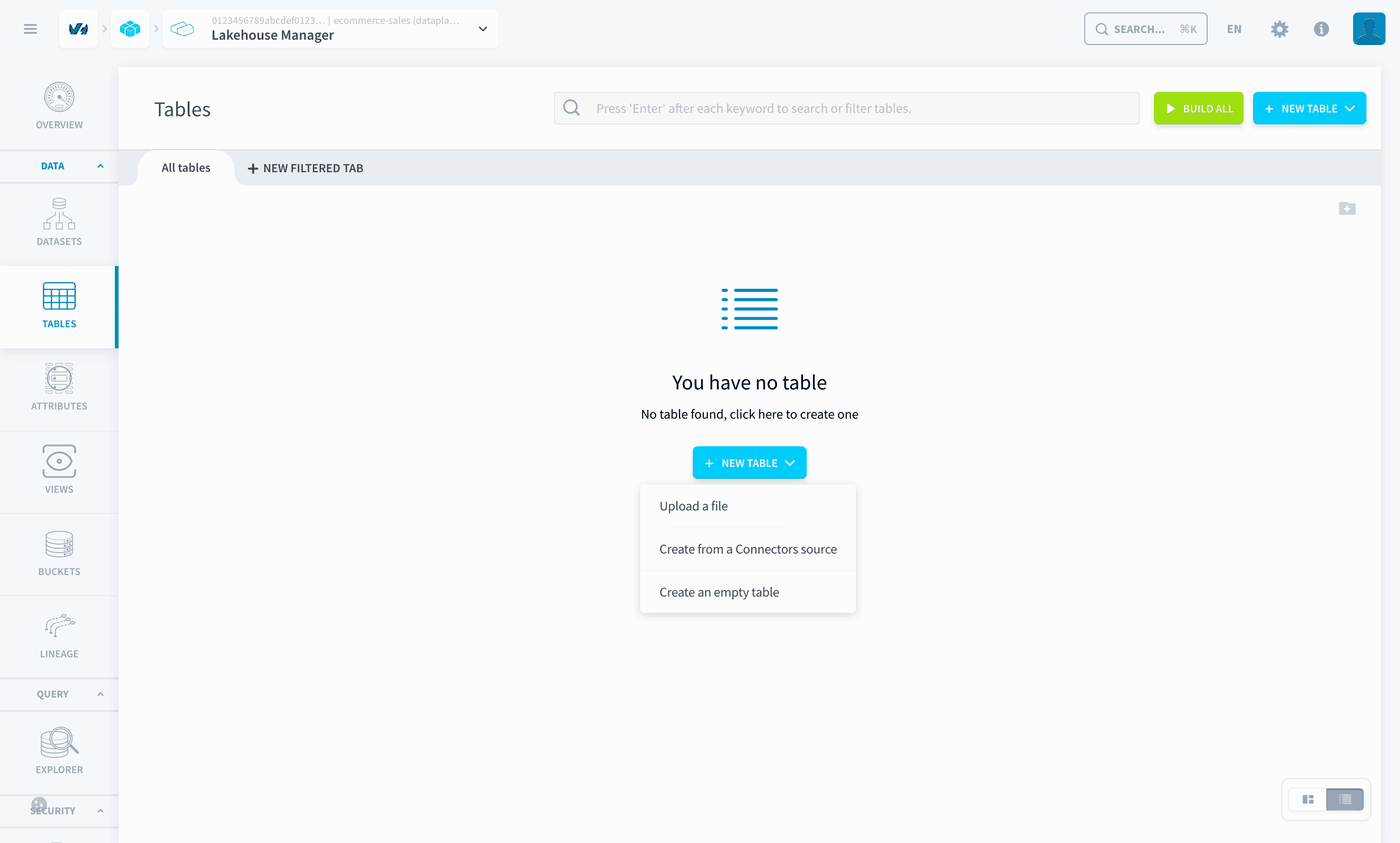 3. Select the file `online_retail_II_200910.xlsx` from the source `online_retail_ii`, then click **Next**.
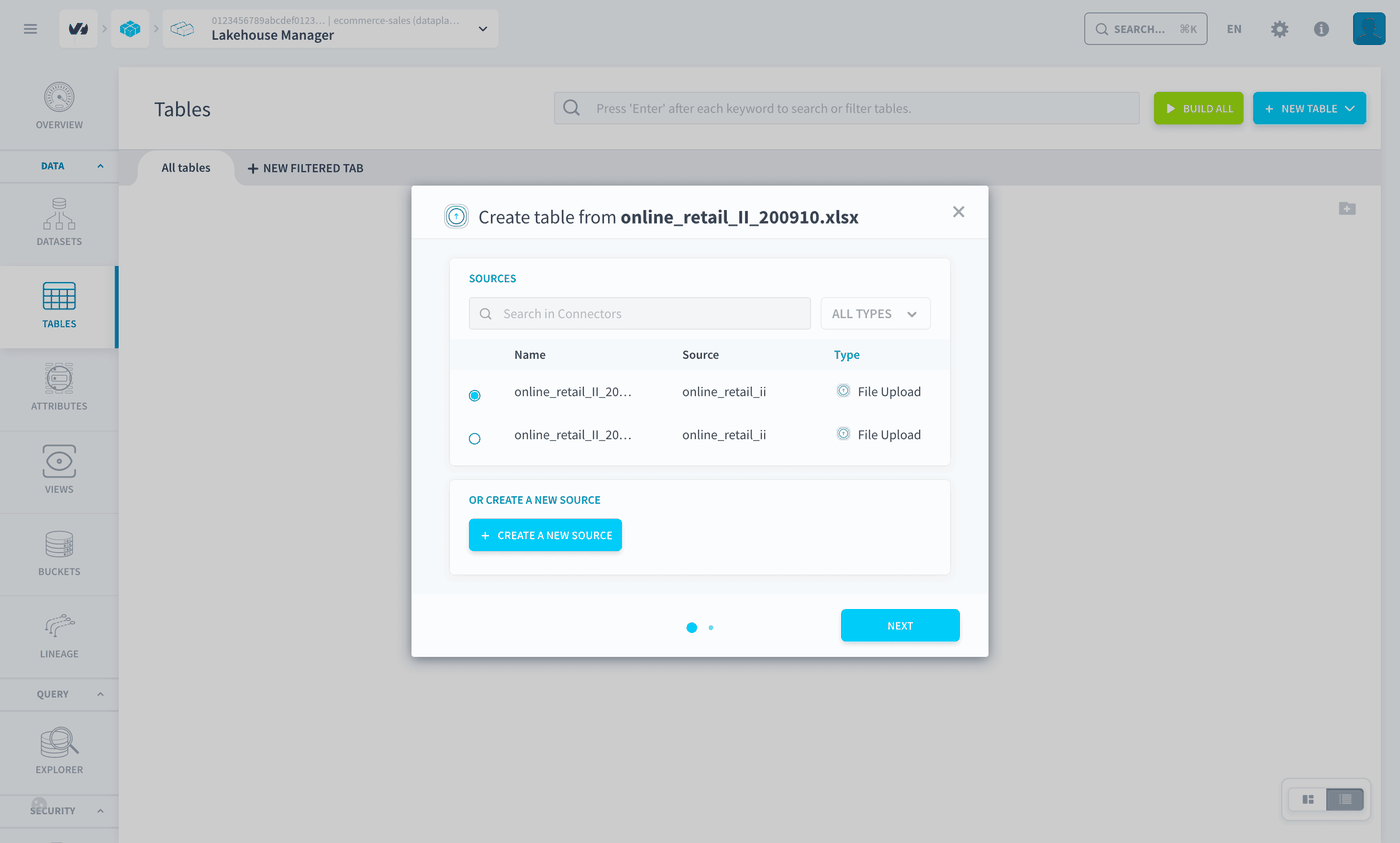 4. Keep the default settings and click **Create**. The table is named `online_retail_ii_200910`, in the dataset `default_dataset`.
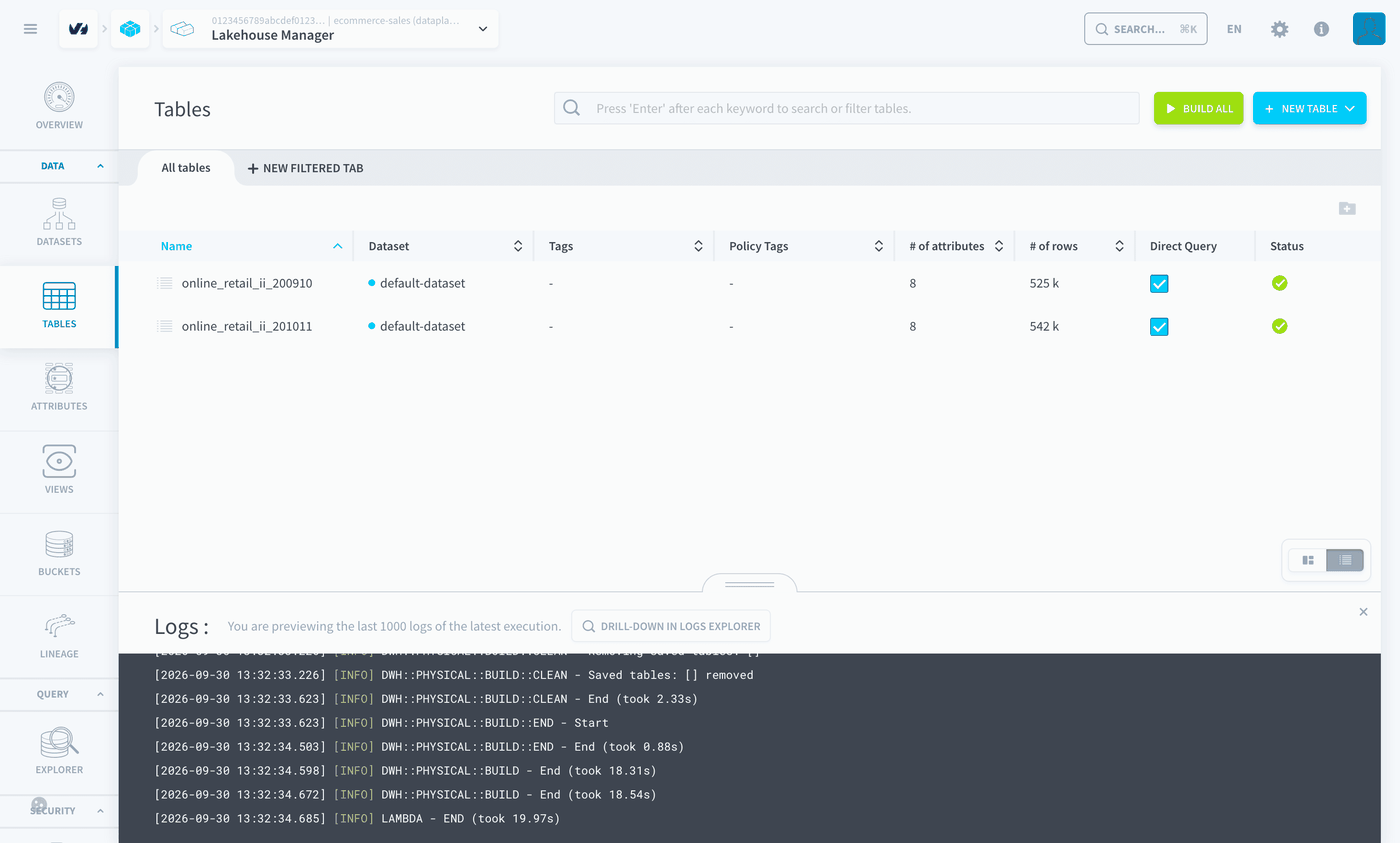
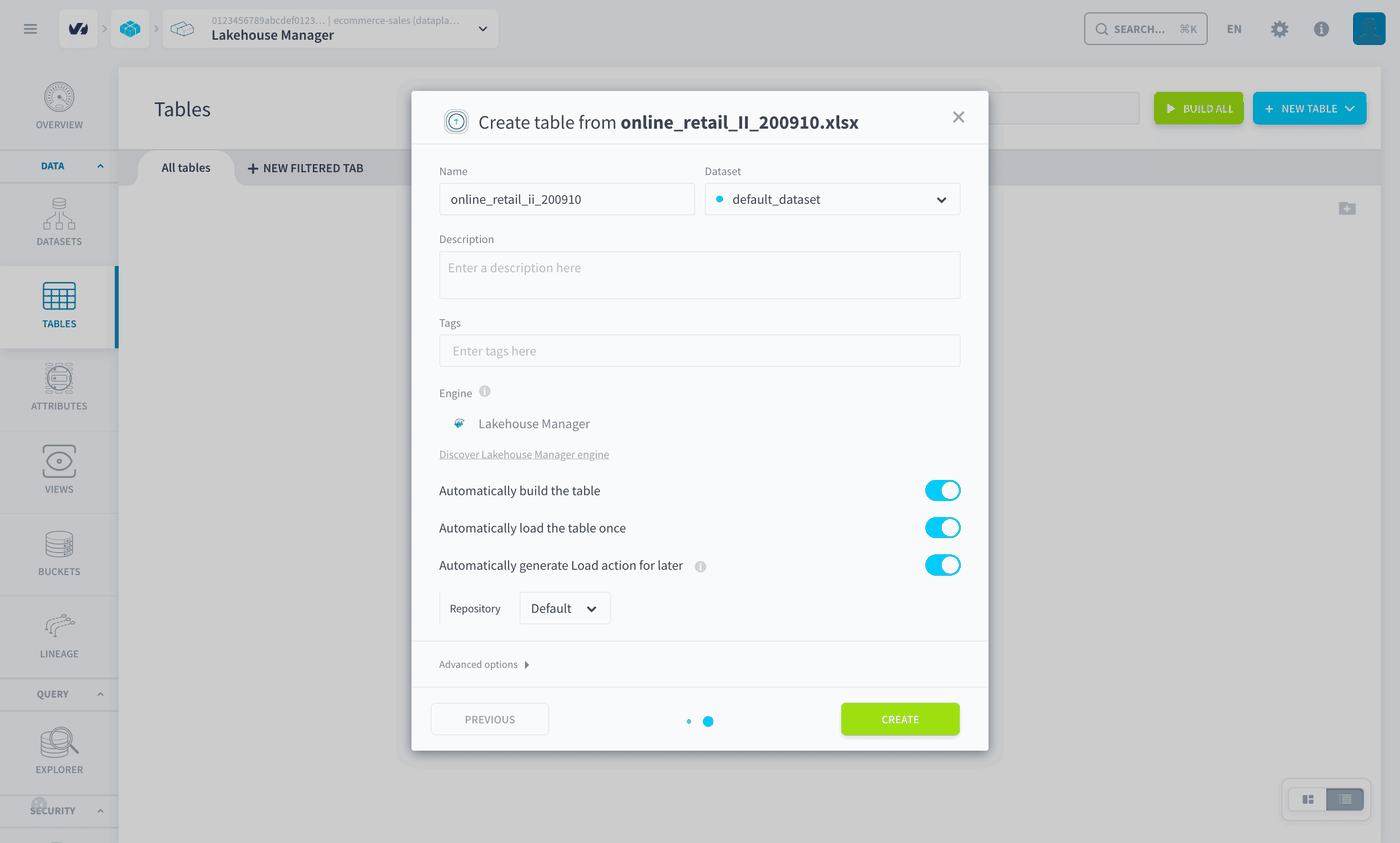 5. Repeat with `online_retail_II_201011.xlsx`. The table is named `online_retail_ii_201011`.
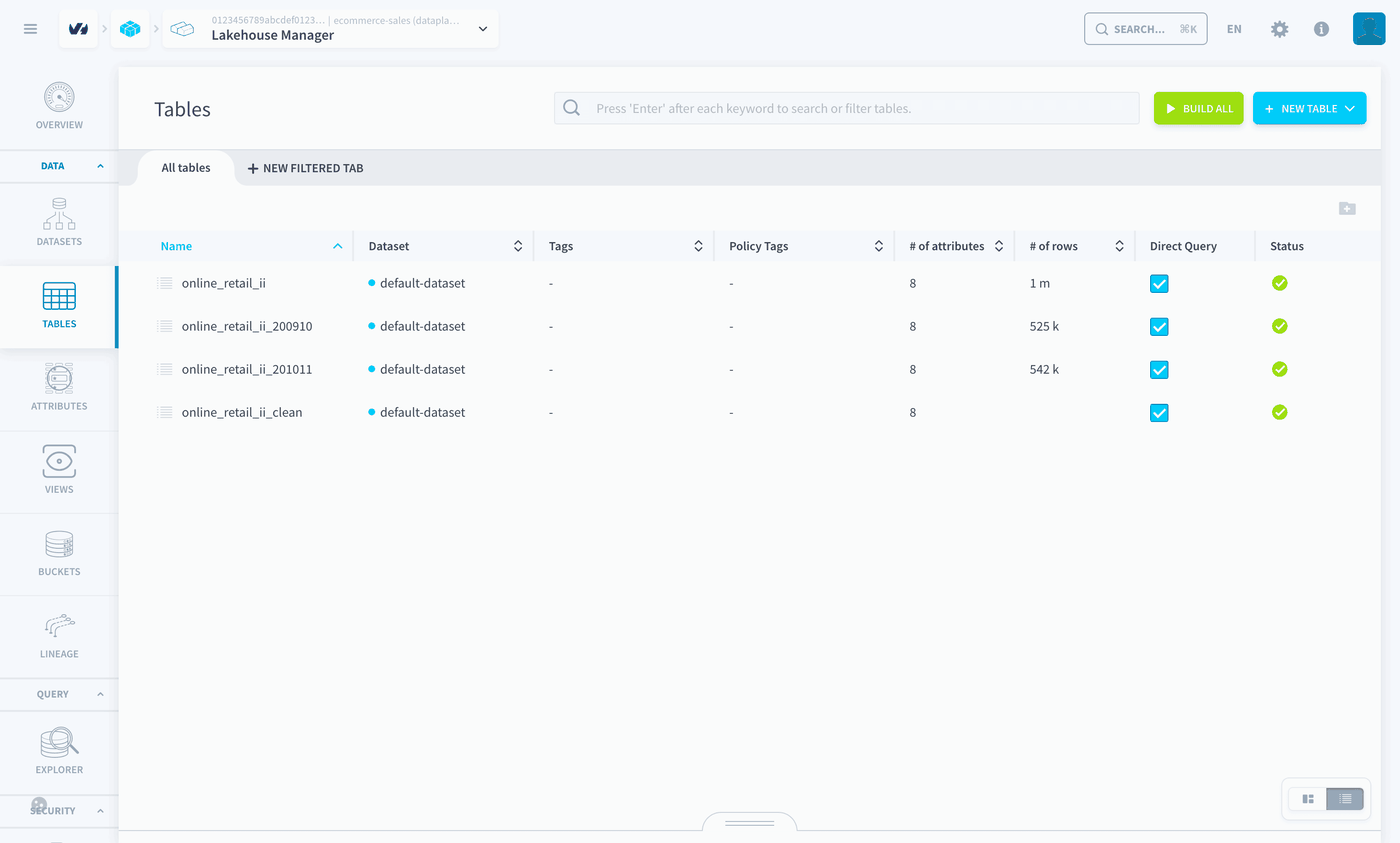
Both tables appear with 8 attributes and about 525k and 542k rows.
#### Create the table for all orders
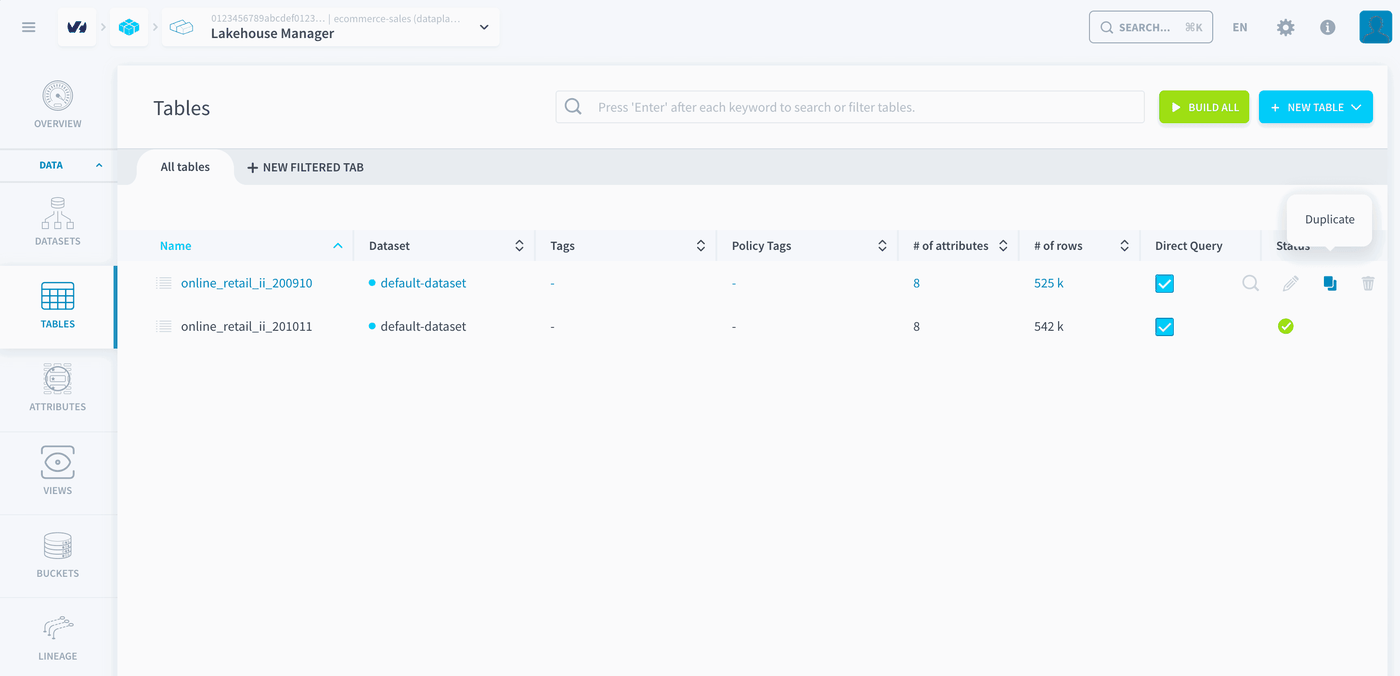
1. [Duplicate](https://docs.ovhcloud.com/it/guides/public-cloud/data-platform/lakehouse-manager-manage-tables.md#duplicate) the table `online_retail_ii_200910`. Hover over its row and click the **Duplicate** icon.
5. Repeat with `online_retail_II_201011.xlsx`. The table is named `online_retail_ii_201011`.
Both tables appear with 8 attributes and about 525k and 542k rows.

#### Create the table for all orders
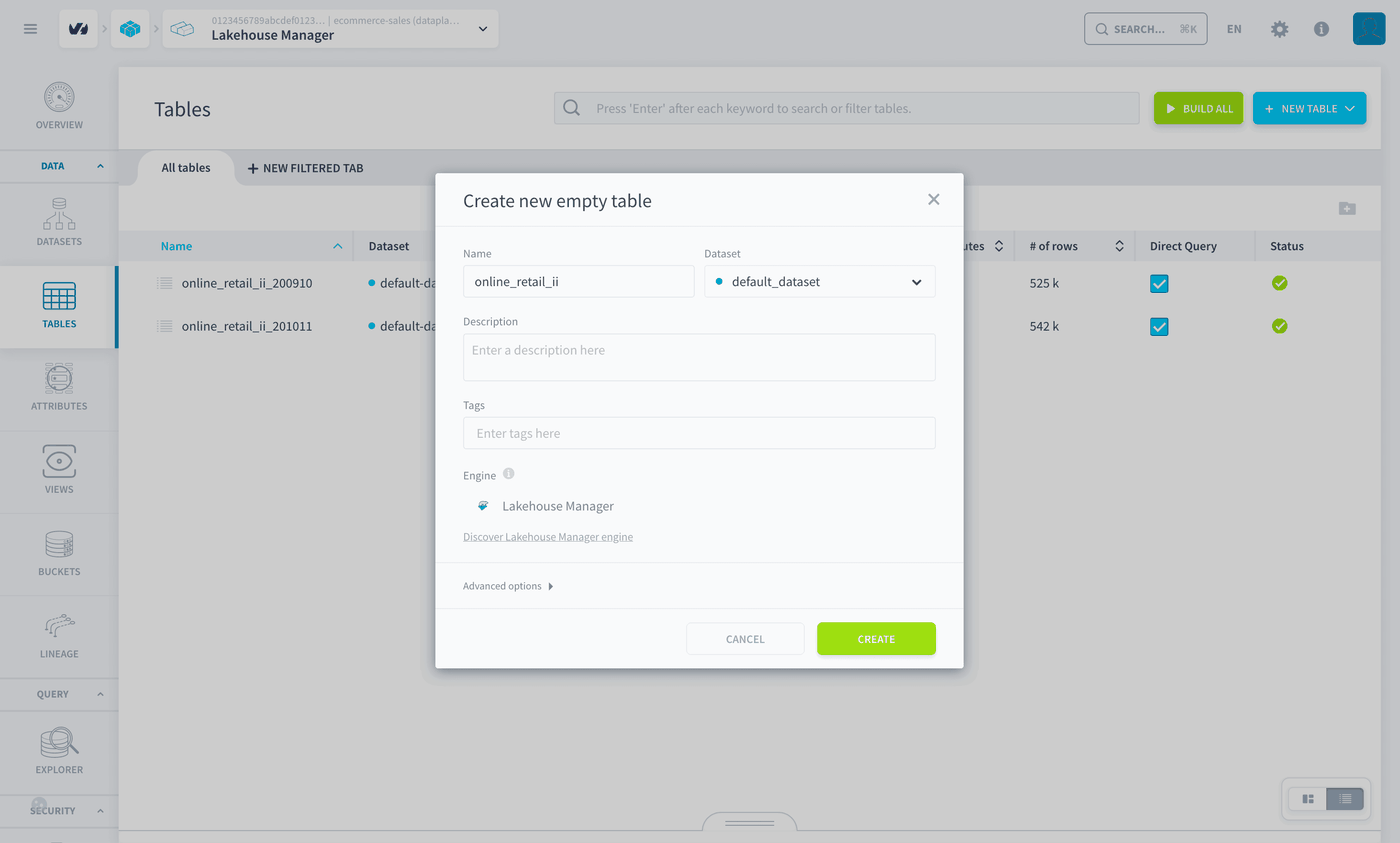
1. [Duplicate](https://docs.ovhcloud.com/it/guides/public-cloud/data-platform/lakehouse-manager-manage-tables.md#duplicate) the table `online_retail_ii_200910`. Hover over its row and click the **Duplicate** icon.
 2. Name the new table `online_retail_ii`, in the dataset `default_dataset`, and click **Create**.
3. [Build](https://docs.ovhcloud.com/it/guides/public-cloud/data-platform/lakehouse-manager-manage-tables.md#build-table) the table.
The table has the same 8 attributes, and no rows yet.
### Step 4: Concatenate the two years
#### Create the Load actions
1. Open **Data Processing Engine** > **Actions** and click **New action**.
2. Search for `load`, select the _Load_ action and click **Select**.
2. Name the new table `online_retail_ii`, in the dataset `default_dataset`, and click **Create**.
3. [Build](https://docs.ovhcloud.com/it/guides/public-cloud/data-platform/lakehouse-manager-manage-tables.md#build-table) the table.
The table has the same 8 attributes, and no rows yet.

### Step 4: Concatenate the two years
#### Create the Load actions
1. Open **Data Processing Engine** > **Actions** and click **New action**.
2. Search for `load`, select the _Load_ action and click **Select**.
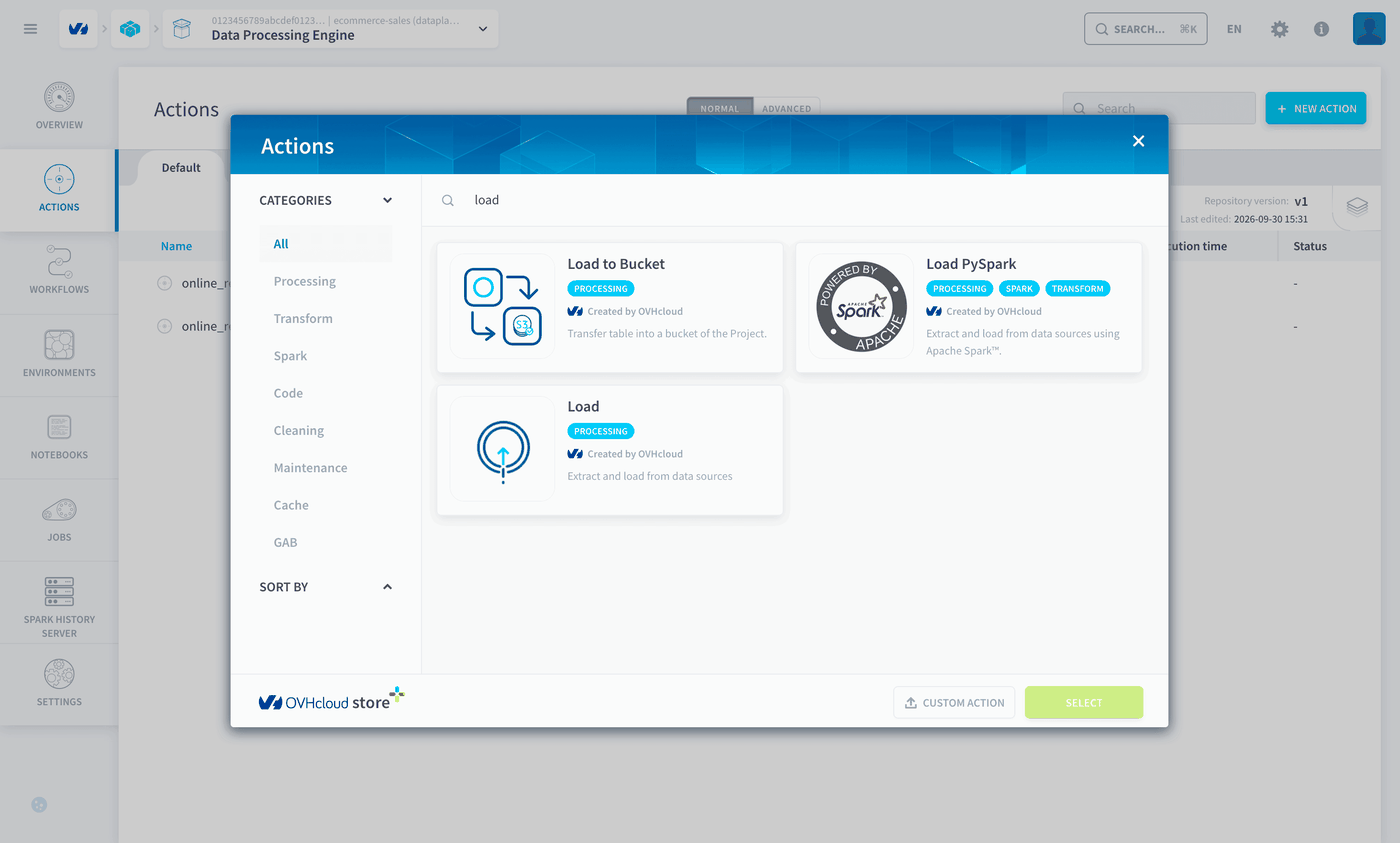 3. Fill in the action:
| Setting | Value |
| ------------ | -------------------------------------------------------------------------- |
| Source table | `online_retail_II_200910.xlsx` from `online_retail_ii` |
| Destination | `online_retail_ii` from `default_dataset` |
| Attributes | each source attribute mapped to the destination attribute of the same name |
4. Click **Create**.
3. Fill in the action:
| Setting | Value |
| ------------ | -------------------------------------------------------------------------- |
| Source table | `online_retail_II_200910.xlsx` from `online_retail_ii` |
| Destination | `online_retail_ii` from `default_dataset` |
| Attributes | each source attribute mapped to the destination attribute of the same name |
4. Click **Create**.
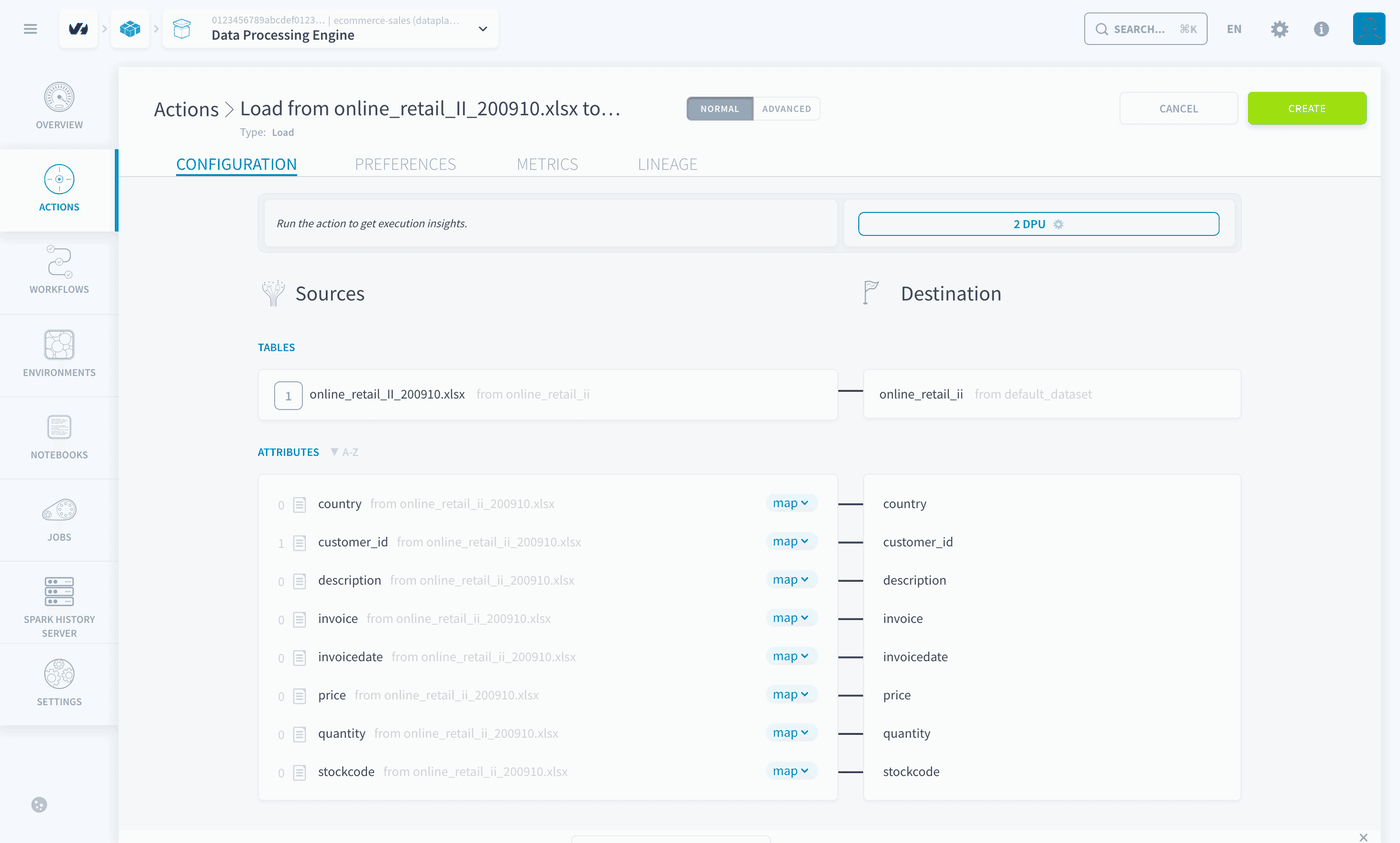 5. Create a second _Load_ action, with `online_retail_II_201011.xlsx` as source and the same destination.
The list of actions shows your two _Load_ actions, next to the two actions generated automatically when you created the yearly tables.
#### Run both actions with a workflow
1. In **Data Processing Engine** > **Workflows**, click **New workflow**.
2. Name it `Concat`.
3. In _Stage 1_, add your two _Load_ actions.
4. Click **Create**, then run the workflow.
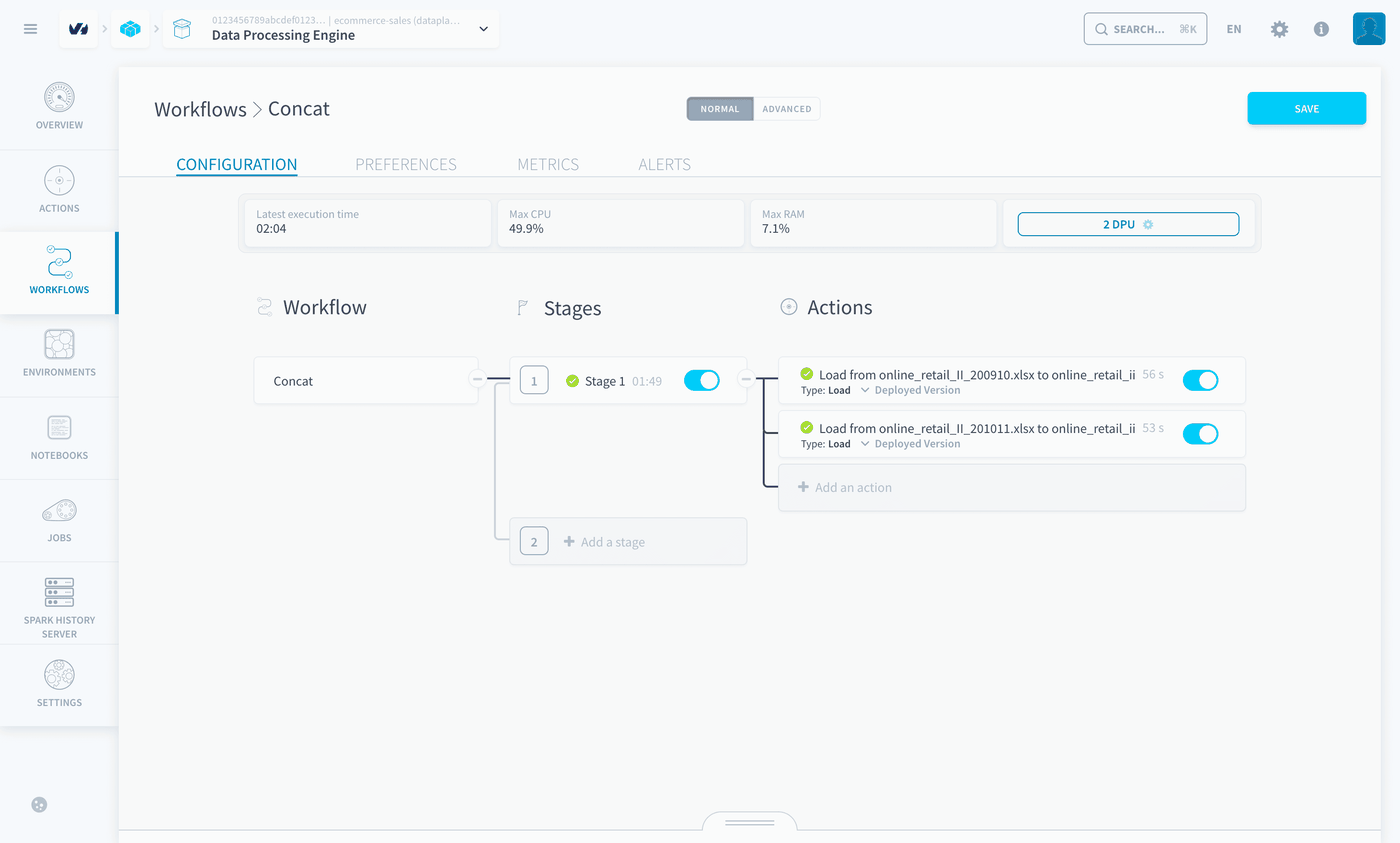
The workflow takes a couple of minutes. When its status turns green, open **Lakehouse Manager** > **Tables**: `online_retail_ii` holds the rows of both yearly tables, **1,067,371 rows**.
:::warning
Run the `Concat` workflow once. Running it again may add the same order lines a second time. After each run, check that `online_retail_ii` holds 1,067,371 rows.
To run the workflow again, you can create a [Delete action](https://docs.ovhcloud.com/it/guides/public-cloud/data-platform/dpe-actions-delete.md) that empties `online_retail_ii`, and run it before the workflow.
:::
### Step 5: Clean the orders
#### Create the clean table
1. In **Lakehouse Manager** > **Tables**, duplicate `online_retail_ii`.
2. Name the new table `online_retail_ii_clean` and build it.
You now have 4 tables. `online_retail_ii_clean` has the same 8 attributes and no rows yet.
#### Create the cleaning action
1. In **Data Processing Engine** > **Actions**, click **New action**.
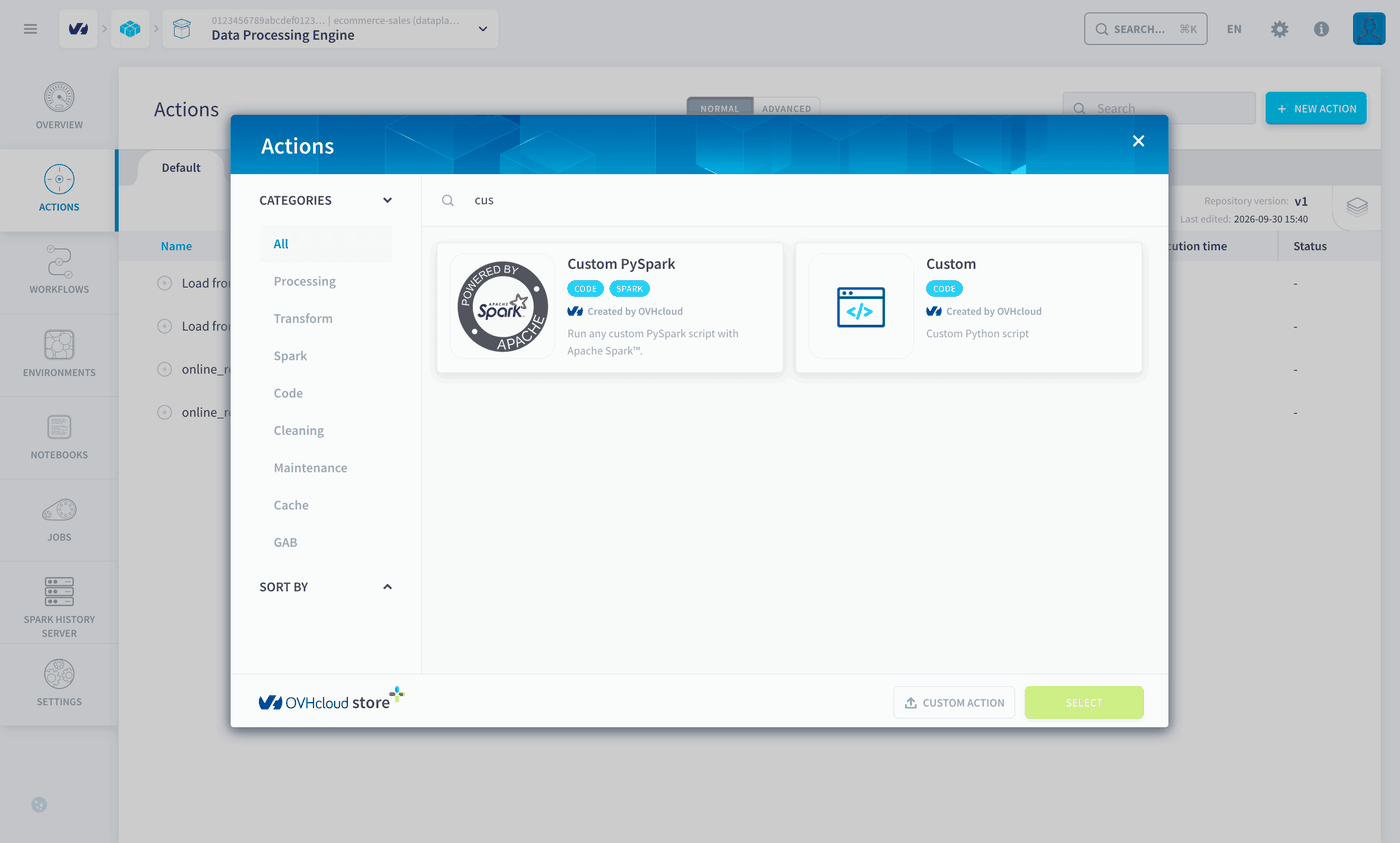
2. Search for `custom`, select the _Custom_ action and click **Select**.
5. Create a second _Load_ action, with `online_retail_II_201011.xlsx` as source and the same destination.
The list of actions shows your two _Load_ actions, next to the two actions generated automatically when you created the yearly tables.

#### Run both actions with a workflow
1. In **Data Processing Engine** > **Workflows**, click **New workflow**.
2. Name it `Concat`.
3. In _Stage 1_, add your two _Load_ actions.
4. Click **Create**, then run the workflow.

The workflow takes a couple of minutes. When its status turns green, open **Lakehouse Manager** > **Tables**: `online_retail_ii` holds the rows of both yearly tables, **1,067,371 rows**.
:::warning
Run the `Concat` workflow once. Running it again may add the same order lines a second time. After each run, check that `online_retail_ii` holds 1,067,371 rows.
To run the workflow again, you can create a [Delete action](https://docs.ovhcloud.com/it/guides/public-cloud/data-platform/dpe-actions-delete.md) that empties `online_retail_ii`, and run it before the workflow.
:::
### Step 5: Clean the orders
#### Create the clean table
1. In **Lakehouse Manager** > **Tables**, duplicate `online_retail_ii`.
2. Name the new table `online_retail_ii_clean` and build it.
You now have 4 tables. `online_retail_ii_clean` has the same 8 attributes and no rows yet.

#### Create the cleaning action
1. In **Data Processing Engine** > **Actions**, click **New action**.
2. Search for `custom`, select the _Custom_ action and click **Select**.
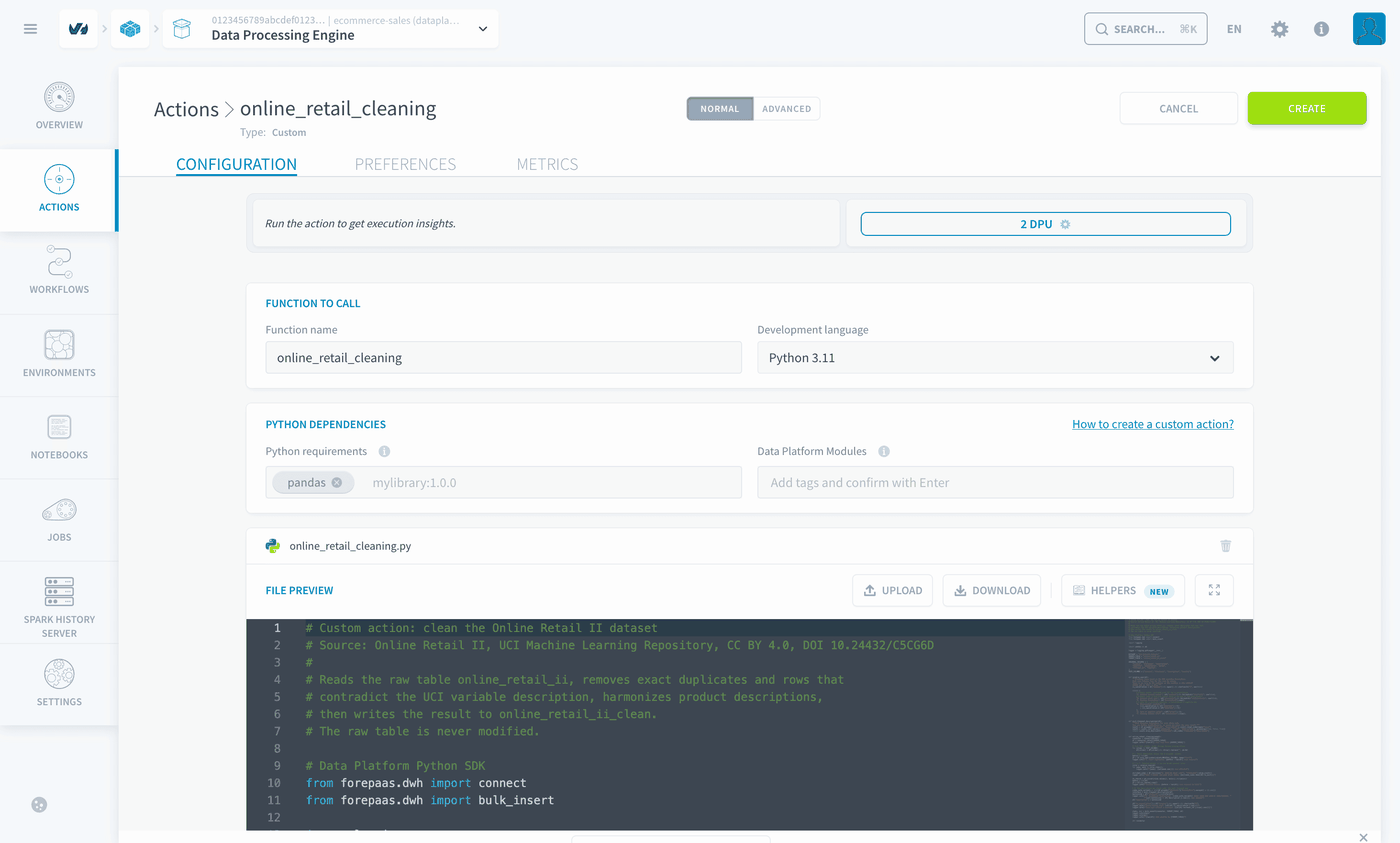
 3. Fill in the action:
| Setting | Value |
| -------------------- | ---------------------------------- |
| Action name | `online_retail_cleaning` |
| Function name | `online_retail_cleaning` |
| Development language | `Python 3.11` |
| Python requirements | `pandas` |
| File | upload `online_retail_cleaning.py` |
4. Click **Create**, then run the action.
:::info
**Note:** the function name is the entry point of the script and must be `online_retail_cleaning`. The other functions of the file are helpers: setting one of them as the function name returns `'Event' object is not subscriptable`.
:::
The action reads `online_retail_ii`, applies the cleaning rules and writes the result to `online_retail_ii_clean`. Open its logs: each rule reports how many rows it affects, and the last line gives the number of rows written to `online_retail_ii_clean`: **1,021,128 rows**.
| Rule | A row is removed when |
| ------------------------- | --------------------------------------------------------- |
| 1. Exact duplicates | it is identical to another row on the 8 columns |
| 2. Invalid invoice number | the invoice is not 6 digits, with an optional `C` |
| 3. Invalid stock code | the stock code is not 5 digits, with optional letters |
| 4. Missing description | the description is empty |
| 5. Inconsistent quantity | a sale is not positive, or a cancellation is not negative |
| 6. Zero or negative price | the price is not strictly positive |
| 7. Missing invoice date | the date is empty |
A final step, **8. Harmonized descriptions**, gives each stock code its most frequent description, so a product never shows under two names.
#### Create an action to empty the clean table
The cleaning action adds rows to `online_retail_ii_clean`. Before running it again, empty the table with a [Delete action](https://docs.ovhcloud.com/it/guides/public-cloud/data-platform/dpe-actions-delete.md), as for `online_retail_ii` before running the `Concat` workflow again.
1. Click **New action**, search for `delete`, select the _Delete_ action and click **Select**.
2. In _Table list_, move `online_retail_ii_clean` to _Table to empty_.
3. Click **Create**.
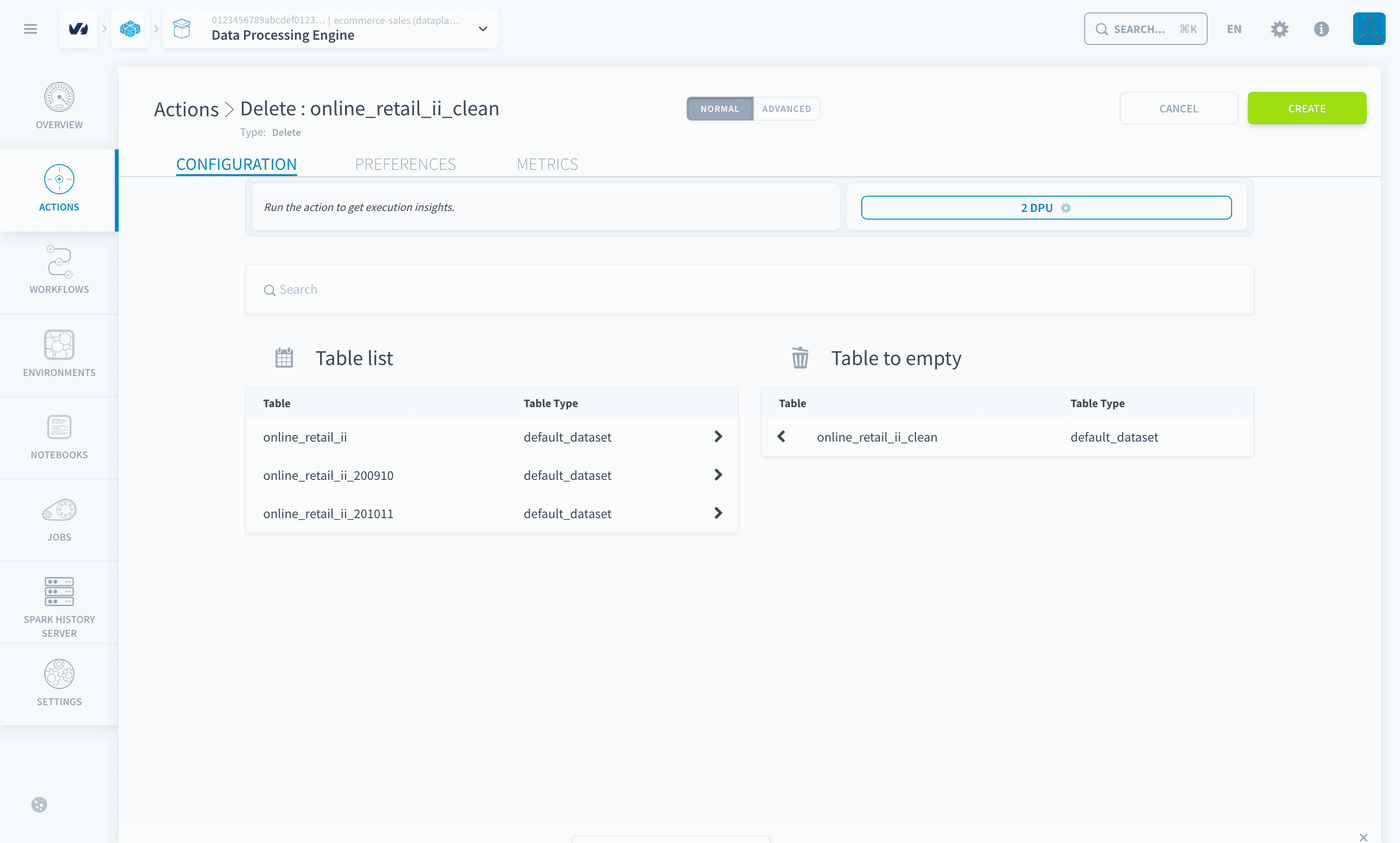
To clean the data again, run this _Delete_ action first, then `online_retail_cleaning`.
### Step 6: Connect Superset
All the data is now ready in the Lakehouse. To analyse it, create an Apache Superset application:
1. Create a Trino connection by following the [Generate a Trino connection string for external tools](https://docs.ovhcloud.com/it/guides/public-cloud/data-platform/connectors-consumers-trino.md) guide.
2. Create the application and connect it to Trino by following Steps 1 to 3 of the [Deploying Apache Superset on OVHcloud Data Platform](https://docs.ovhcloud.com/it/guides/public-cloud/data-platform/tutorials-install-apache-superset.md) guide.
#### Create the dataset in Superset
1. In Superset, open **Datasets** and click **+ Dataset**.
2. Select the database connection you created, named `Trino DP` in this guide, then the schema `default_dataset` and the table `online_retail_ii_clean`.
3. Check the columns, then click **Create and explore dataset**.
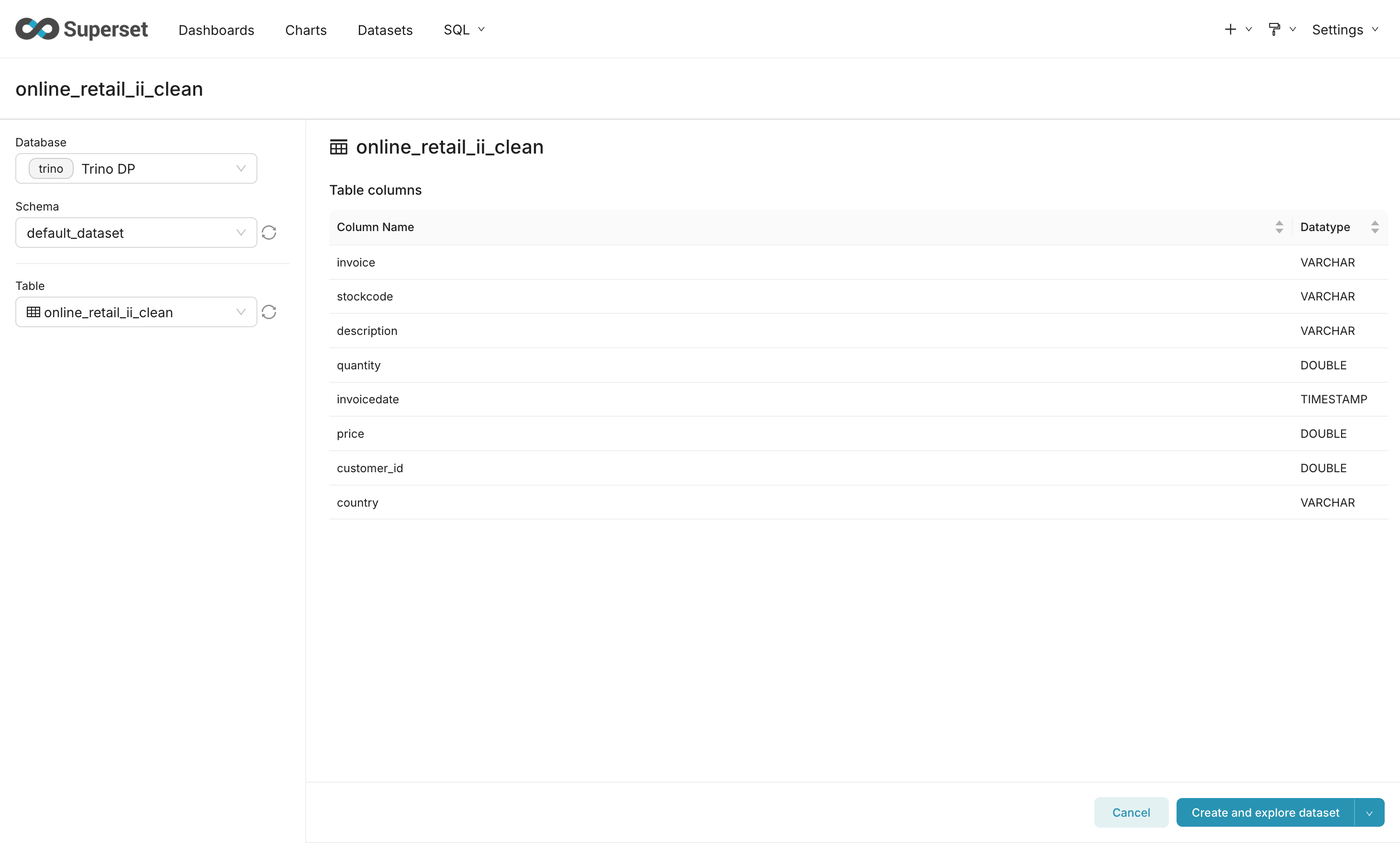
Every chart of the dashboard then starts from **Charts** > **+ Chart**: choose the dataset `online_retail_ii_clean`, then the chart type.
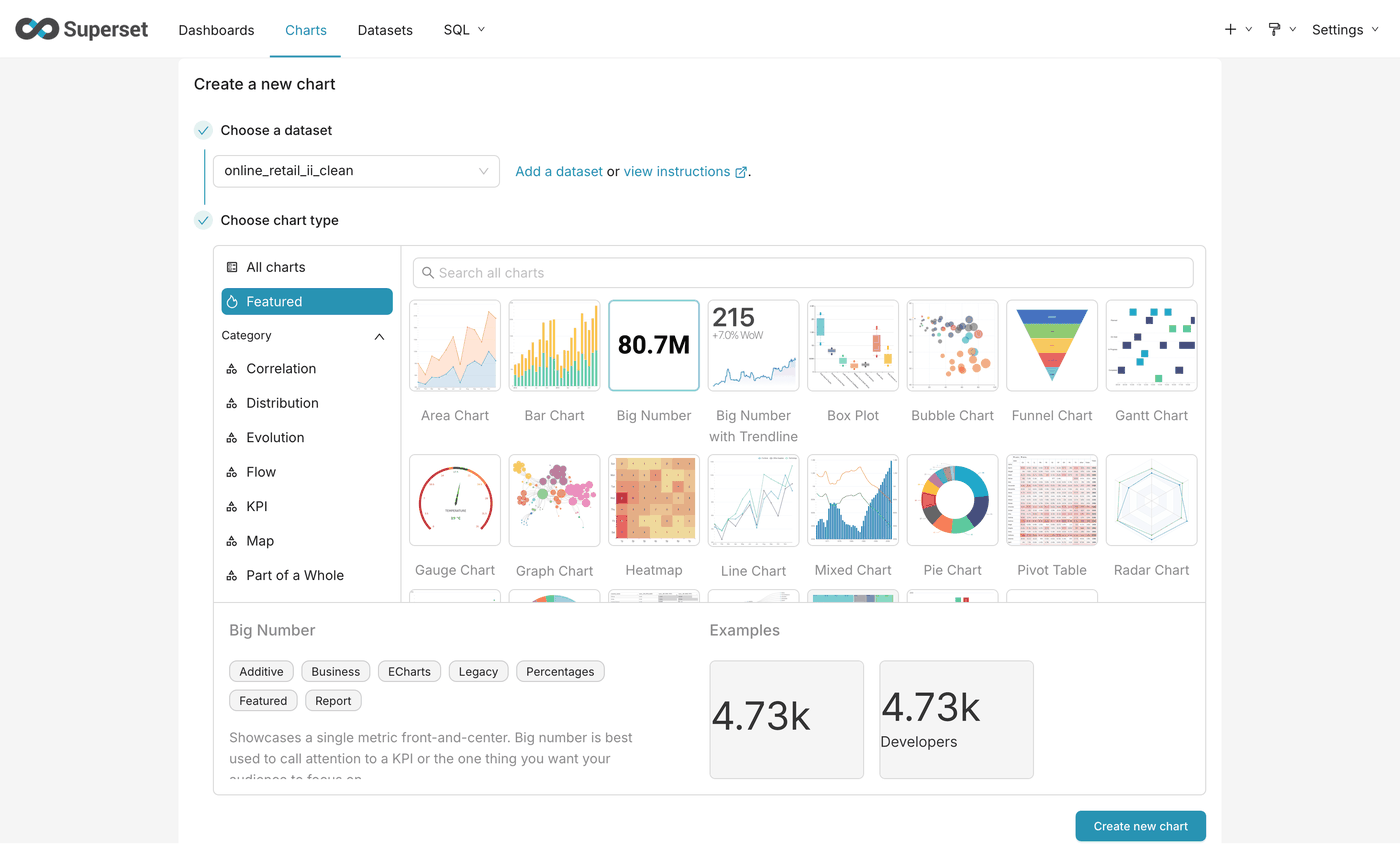
Continue with [Build a sales dashboard for an online store in Superset](https://docs.ovhcloud.com/it/guides/public-cloud/data-platform/tutorials-ecommerce-sales-superset-dashboard.md).
## Good to know
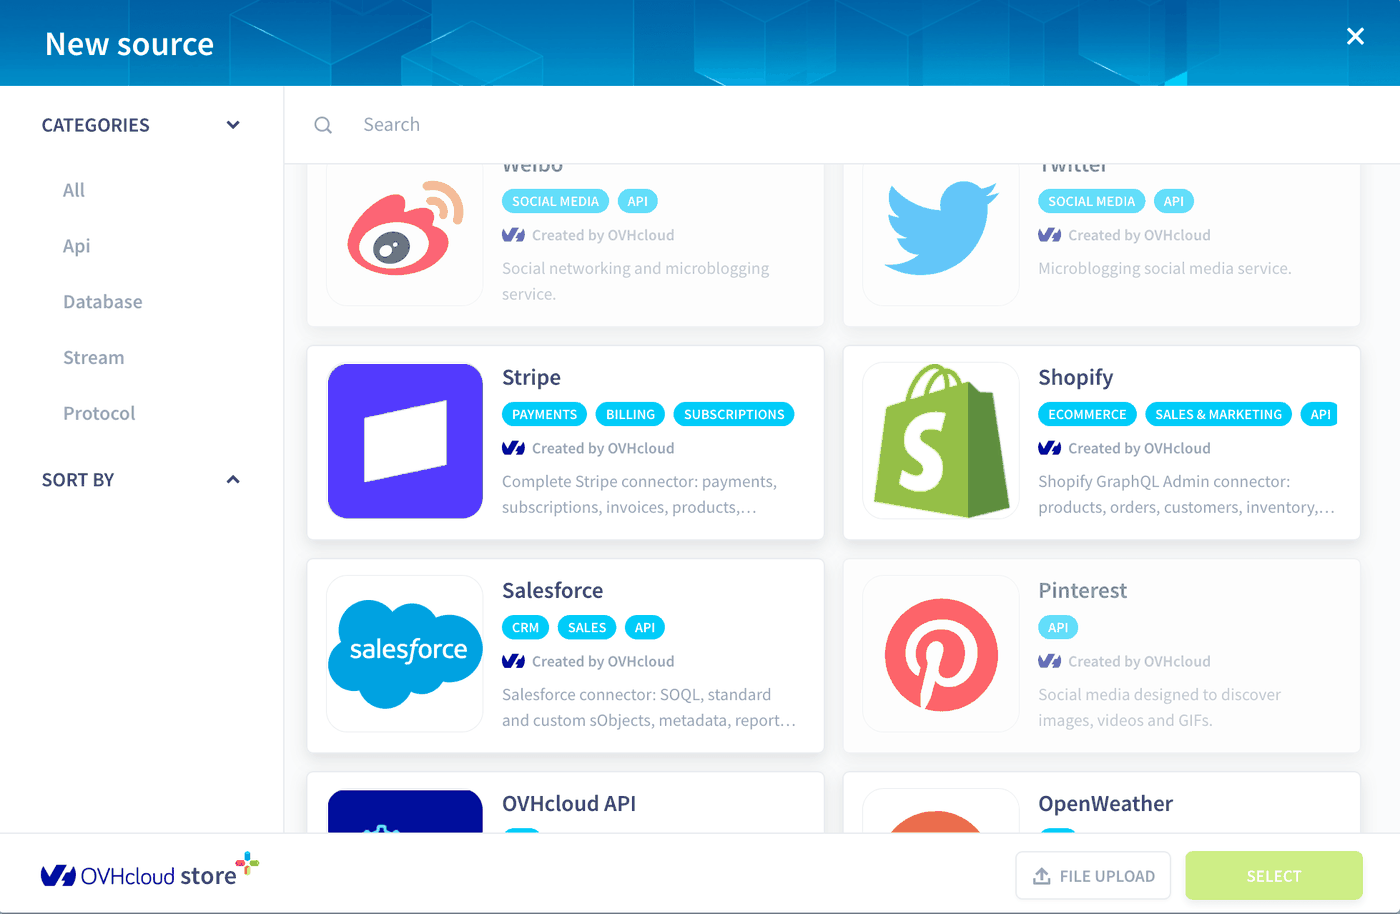
- **You can connect a real store.** This guide uses a public dataset, uploaded as files. To analyse the orders of your own store, create a [Shopify](https://docs.ovhcloud.com/it/guides/public-cloud/data-platform/connectors-sources-shopify.md) or [Stripe](https://docs.ovhcloud.com/it/guides/public-cloud/data-platform/connectors-sources-stripe.md) source instead of the File Upload source: in **Connectors** > **Sources**, both appear in the _New source_ window. The tables then follow the attributes of that source, and the cleaning script must be adapted to them.
## What you have built
You have a raw table with every order line of the store, a clean table that follows the UCI description of the variables, and a Superset dataset on top of it.
The next part, [Build a sales dashboard for an online store in Superset](https://docs.ovhcloud.com/it/guides/public-cloud/data-platform/tutorials-ecommerce-sales-superset-dashboard.md), turns the clean table into a dashboard: key figures, revenue over time, best-selling products, sales by country and customer loyalty.
## Go further
For training or technical assistance implementing our solutions, contact your sales representative or visit our [Professional Services](https://www.ovhcloud.com/it/professional-services/) page to request a quote and have your project analysed by our experts.
Ask questions, give your feedback and interact directly with the team building the Data Platform on the dedicated [Discord channel](https://discord.gg/ovhcloud).
If you need support with your OVHcloud services, create a request in our [Help Centre](https://help.ovhcloud.com/csm?id=csm_get_help).
Join our [community of users](https://community.ovhcloud.com/).
3. Fill in the action:
| Setting | Value |
| -------------------- | ---------------------------------- |
| Action name | `online_retail_cleaning` |
| Function name | `online_retail_cleaning` |
| Development language | `Python 3.11` |
| Python requirements | `pandas` |
| File | upload `online_retail_cleaning.py` |
4. Click **Create**, then run the action.

:::info
**Note:** the function name is the entry point of the script and must be `online_retail_cleaning`. The other functions of the file are helpers: setting one of them as the function name returns `'Event' object is not subscriptable`.
:::
The action reads `online_retail_ii`, applies the cleaning rules and writes the result to `online_retail_ii_clean`. Open its logs: each rule reports how many rows it affects, and the last line gives the number of rows written to `online_retail_ii_clean`: **1,021,128 rows**.
| Rule | A row is removed when |
| ------------------------- | --------------------------------------------------------- |
| 1. Exact duplicates | it is identical to another row on the 8 columns |
| 2. Invalid invoice number | the invoice is not 6 digits, with an optional `C` |
| 3. Invalid stock code | the stock code is not 5 digits, with optional letters |
| 4. Missing description | the description is empty |
| 5. Inconsistent quantity | a sale is not positive, or a cancellation is not negative |
| 6. Zero or negative price | the price is not strictly positive |
| 7. Missing invoice date | the date is empty |
A final step, **8. Harmonized descriptions**, gives each stock code its most frequent description, so a product never shows under two names.
#### Create an action to empty the clean table
The cleaning action adds rows to `online_retail_ii_clean`. Before running it again, empty the table with a [Delete action](https://docs.ovhcloud.com/it/guides/public-cloud/data-platform/dpe-actions-delete.md), as for `online_retail_ii` before running the `Concat` workflow again.
1. Click **New action**, search for `delete`, select the _Delete_ action and click **Select**.
2. In _Table list_, move `online_retail_ii_clean` to _Table to empty_.
3. Click **Create**.

To clean the data again, run this _Delete_ action first, then `online_retail_cleaning`.
### Step 6: Connect Superset
All the data is now ready in the Lakehouse. To analyse it, create an Apache Superset application:
1. Create a Trino connection by following the [Generate a Trino connection string for external tools](https://docs.ovhcloud.com/it/guides/public-cloud/data-platform/connectors-consumers-trino.md) guide.
2. Create the application and connect it to Trino by following Steps 1 to 3 of the [Deploying Apache Superset on OVHcloud Data Platform](https://docs.ovhcloud.com/it/guides/public-cloud/data-platform/tutorials-install-apache-superset.md) guide.
#### Create the dataset in Superset
1. In Superset, open **Datasets** and click **+ Dataset**.
2. Select the database connection you created, named `Trino DP` in this guide, then the schema `default_dataset` and the table `online_retail_ii_clean`.
3. Check the columns, then click **Create and explore dataset**.

Every chart of the dashboard then starts from **Charts** > **+ Chart**: choose the dataset `online_retail_ii_clean`, then the chart type.

Continue with [Build a sales dashboard for an online store in Superset](https://docs.ovhcloud.com/it/guides/public-cloud/data-platform/tutorials-ecommerce-sales-superset-dashboard.md).
## Good to know
- **You can connect a real store.** This guide uses a public dataset, uploaded as files. To analyse the orders of your own store, create a [Shopify](https://docs.ovhcloud.com/it/guides/public-cloud/data-platform/connectors-sources-shopify.md) or [Stripe](https://docs.ovhcloud.com/it/guides/public-cloud/data-platform/connectors-sources-stripe.md) source instead of the File Upload source: in **Connectors** > **Sources**, both appear in the _New source_ window. The tables then follow the attributes of that source, and the cleaning script must be adapted to them.

## What you have built
You have a raw table with every order line of the store, a clean table that follows the UCI description of the variables, and a Superset dataset on top of it.
The next part, [Build a sales dashboard for an online store in Superset](https://docs.ovhcloud.com/it/guides/public-cloud/data-platform/tutorials-ecommerce-sales-superset-dashboard.md), turns the clean table into a dashboard: key figures, revenue over time, best-selling products, sales by country and customer loyalty.
## Go further
For training or technical assistance implementing our solutions, contact your sales representative or visit our [Professional Services](https://www.ovhcloud.com/it/professional-services/) page to request a quote and have your project analysed by our experts.
Ask questions, give your feedback and interact directly with the team building the Data Platform on the dedicated [Discord channel](https://discord.gg/ovhcloud).
If you need support with your OVHcloud services, create a request in our [Help Centre](https://help.ovhcloud.com/csm?id=csm_get_help).
Join our [community of users](https://community.ovhcloud.com/).