---
title: "AI Deploy - Tutorial - Deploy an ONNX model using FastAPI"
description: "Learn how to deploy the DenseNet model in ONNX format for optimized inference"
url: https://docs.ovhcloud.com/it/guides/public-cloud/ai-machine-learning/ai-deploy-densenet-onnx-fastapi
lang: it
lastUpdated: 2025-06-27
---
# AI Deploy - Tutorial - Deploy an ONNX model using FastAPI
## Objective
The purpose of this tutorial is to show you how to deploy an **ONNX model** for optimized inference thanks to **AI Deploy**.
In order to do this, you will use a **DenseNet model** trained on [CIFAR-10 dataset](https://www.cs.toronto.edu/~kriz/cifar.html) to classify images and the [FastAPI](https://fastapi.tiangolo.com/) Python framework to create the API. Developing an API will enable you to use your Machine Learning model for inference.
You will also learn how to build and use a custom Docker image for a FastAPI deployment.
For more information on how to train DenseNet on a CIFAR-10 dataset, refer to the following [documentation](/it/guides/public-cloud/ai-machine-learning/ai-notebooks-finetune-model-export-onnx.md).
Here is an overview of the **image classification** API:
## Requirements
- Access to the OVHcloud Control Panel
- An AI Deploy project created inside a Public Cloud project
- A [user for AI Deploy](/it/guides/public-cloud/ai-machine-learning/ai-users.md)
- [Docker](https://www.docker.com/get-started) installed on your local computer or a deployed Public Cloud Docker Instance
- Some knowledge about building images and [Dockerfile](https://docs.docker.com/engine/reference/builder/)
- Your weights obtained from fine-tuning **DenseNet model** on the **CIFAR-10 dataset** (refer to the _"Export ONNX model for inference"_ part of the [notebook about DenseNet fine-tuning](https://github.com/ovh/ai-training-examples/blob/main/notebooks/go-further/onnx/notebook_finetune_densenet_export_onnx.ipynb))
## Instructions
You are going to follow different steps to build your FastAPI app.
- More information about FastAPI capabilities can be found [here](https://fastapi.tiangolo.com/).
- A direct link to the full code can be found [here](https://github.com/ovh/ai-training-examples/tree/main/apps/fastapi/image-classification-densenet-onnx-api).
:::warning
**Warning**
You must have previously created a `densenet-cifar10-onnx-model` Object Storage bucket when training your model via [AI Notebooks](/it/guides/public-cloud/ai-machine-learning/ai-notebooks-finetune-model-export-onnx.md).
Check that this container contains your **DenseNet weights in ONNX**. They will be necessary for the deployment of the API!
:::
Here we will mainly discuss how to write the `app.py` code, the `requirements.txt` file and the `Dockerfile`.
### Create the FastAPI app
Create a Python file named `app.py`.
Inside that file, import your required modules:
```python
import uvicorn
import numpy as np
from fastapi import FastAPI, File, UploadFile, Request
from torchvision import transforms
import onnxruntime
from PIL import Image
from io import BytesIO
import itertools
```
Initialize an instance of **FastAPI**:
```python
app = FastAPI()
```
Load the **DenseNet model** in ONNX format:
```python
session = onnxruntime.InferenceSession("/workspace/models/densenet_onnx_cifar10/1/densenet_onnx_cifar10.onnx", device="cuda")
```
Create the dictionary with class index and name:
_Find more information about these classes ID and name on the notebook [tutorial](https://github.com/ovh/ai-training-examples/blob/main/notebooks/go-further/onnx/notebook_finetune_densenet_export_onnx.ipynb)._
```python
idx_to_class = {0: 'AIRPLANE', 1: 'AUTOMOBILE', 2: 'BIRD', 3: 'CAT', 4: 'DEER', \
5: 'DOG', 6: 'FROG', 7: 'HORSE', 8: 'SHIP', 9: 'TRUCK'}
```
Define the Python function that processes the input images:
```python
def process_img(file) -> Image.Image:
transform = transforms.Compose([
transforms.Resize(size=224),
transforms.CenterCrop(size=224),
transforms.ToTensor(),
transforms.Normalize([0.485, 0.456, 0.406],
[0.229, 0.224, 0.225])
])
test_image = Image.open(BytesIO(file))
test_image_tensor = transform(test_image).unsqueeze(0)
test_image_tensor = test_image_tensor.view(1, 3, 224, 224)
np_image = test_image_tensor.numpy()
return np_image.astype(np.float32)
```
Create the Python function to get the prediction result:
```python
def get_prediction(data):
input_name = session.get_inputs()[0].name
output_name = session.get_outputs()[0].name
result = session.run([output_name], {input_name: data})
return result
```
Define the `GET` method:
```python
@app.get('/')
def root():
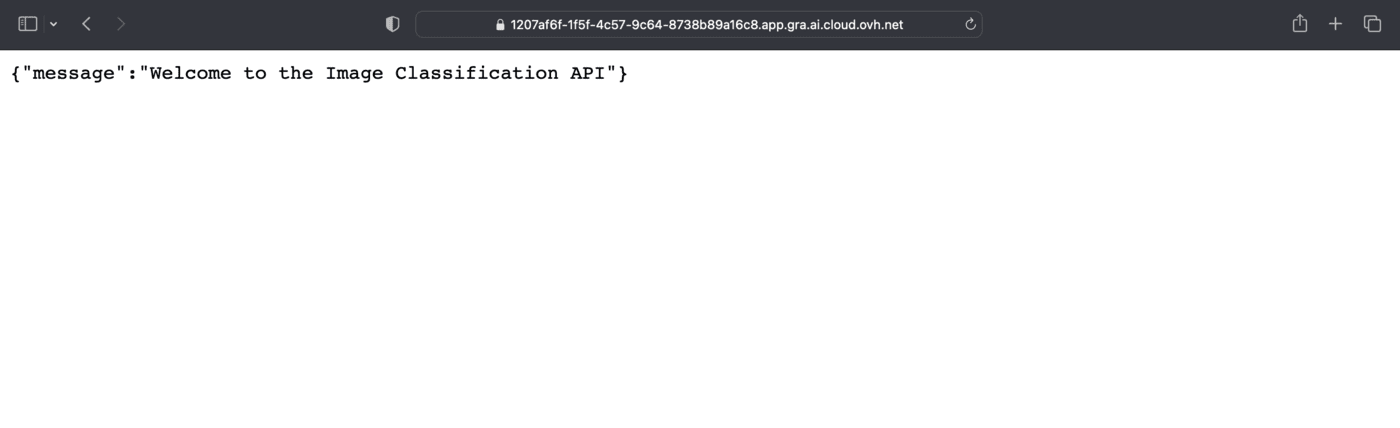
return {'message': 'Welcome to the Image Classification API'}
```
Create the `POST` method:
```python
@app.post("/uploadimage/")
async def create_upload_file(file: bytes = File(...)):
data = process_img(file)
result = get_prediction(data)
predictions_result = {}
for i in range(10):
p = np.array(result).squeeze()
predictions_result[idx_to_class[i]]=p[i]
top_classes = dict(sorted(predictions_result.items(), key=lambda x:x[1], reverse=True))
for value in top_classes:
top_classes[value] = top_classes[value].item()
return dict(itertools.islice(top_classes.items(), 3))
```
### Write the requirements.txt file for the application
The `requirements.txt` file will allow us to write all the modules needed to make our application work. This file will be useful when writing the `Dockerfile`.
```console
uvicorn==0.23.2
numpy==1.25.2
fastapi==0.103.1
python-multipart==0.0.6
torch==2.0.1
torchvision==0.15.2
onnx==1.14.1
onnxruntime==1.15.1
pillow==10.0.0
```
### Write the Dockerfile for the application
Your Dockerfile should start with the `FROM` instruction indicating the parent image to use. In our case we choose to start from a `python:3.10` image:
```console
FROM python:3.10
```
Create the home directory and add your files to it:
```console
WORKDIR /workspace
ADD . /workspace
```
Install the `requirements.txt` file which contains your needed Python modules using a `pip install ...` command:
```console
RUN pip install -r requirements.txt
```
Define your default launching command to start the application:
```console
ENTRYPOINT ["uvicorn"]
CMD ["app:app", "--host", "0.0.0.0", "--port", "8080"]
```
Give correct access rights to the **OVHcloud user** (`42420:42420`):
```console
RUN chown -R 42420:42420 /workspace
ENV HOME=/workspace
```
### Build the Docker image from the Dockerfile
From the directory containing your **Dockerfile**, run one of the following commands to build your application image:
```console
# Build the image using your machine's default architecture
docker build . -t densenet-onnx-fastapi:latest
# Build image targeting the linux/amd64 architecture
docker buildx build --platform linux/amd64 -t densenet-onnx-fastapi:latest .
```
- The **first command** builds the image using your system’s default architecture. This may work if your machine already uses the `linux/amd64` architecture, which is required to run containers with our AI products. However, on systems with a different architecture (e.g. `ARM64` on `Apple Silicon`), the resulting image will not be compatible and cannot be deployed.
- The **second command** explicitly targets the `linux/AMD64` architecture to ensure compatibility with our AI services. This requires `buildx`, which is not installed by default. If you haven’t used `buildx` before, you can install it by running: `docker buildx install`
:::info
The dot `.` argument indicates that your build context (place of the **Dockerfile** and other needed files) is the current directory.
The `-t` argument allows you to choose the identifier to give to your image. Usually image identifiers are composed of a **name** and a **version tag** `:`. For this example we chose **densenet-onnx-fastapi:latest**.
:::
### Push the image into the shared registry
:::warning
**Warning**
The shared registry of AI Deploy should only be used for testing purposes. Please consider attaching your own Docker registry. More information about this can be found [here](/it/guides/public-cloud/ai-machine-learning/ai-manage-registries.md). The images pushed to this registry are for AI Tools workloads only, and will not be accessible for external uses.
:::
:::warning
In order to run containers using AI products, please make sure that the docker image you will push respects the **linux/AMD64** target architecture. You could, for instance, build your image using **buildx** as follows:
`docker buildx build --platform linux/amd64 ...`
:::
Find the address of your shared registry by launching this command:
```console
ovhai registry list
```
Log in to the shared registry with your usual AI Platform user credentials:
```console
docker login -u `` -p ``
```
Push the compiled image into the shared registry:
```console
docker tag densenet-onnx-fastapi:latest ``/densenet-onnx-fastapi:latest
docker push ``/densenet-onnx-fastapi:latest
```
### Launch the AI Deploy app
The following command starts a new app running your FastAPI app:
```console
ovhai app run ``/densenet-onnx-fastapi:latest \
--gpu 1 \
--volume densenet-cifar10-onnx-model@GRA/:/workspace/models:RO
```
:::info
**Notes**
- `--gpu 1` : The use of the model requires **GPU** (`device="cuda"`). Please choose at least 1 GPU.
- Consider adding the `--unsecure-http` attribute if you want your application to be reachable without any authentication.
:::
## Interact with the deployed API through the dashboard
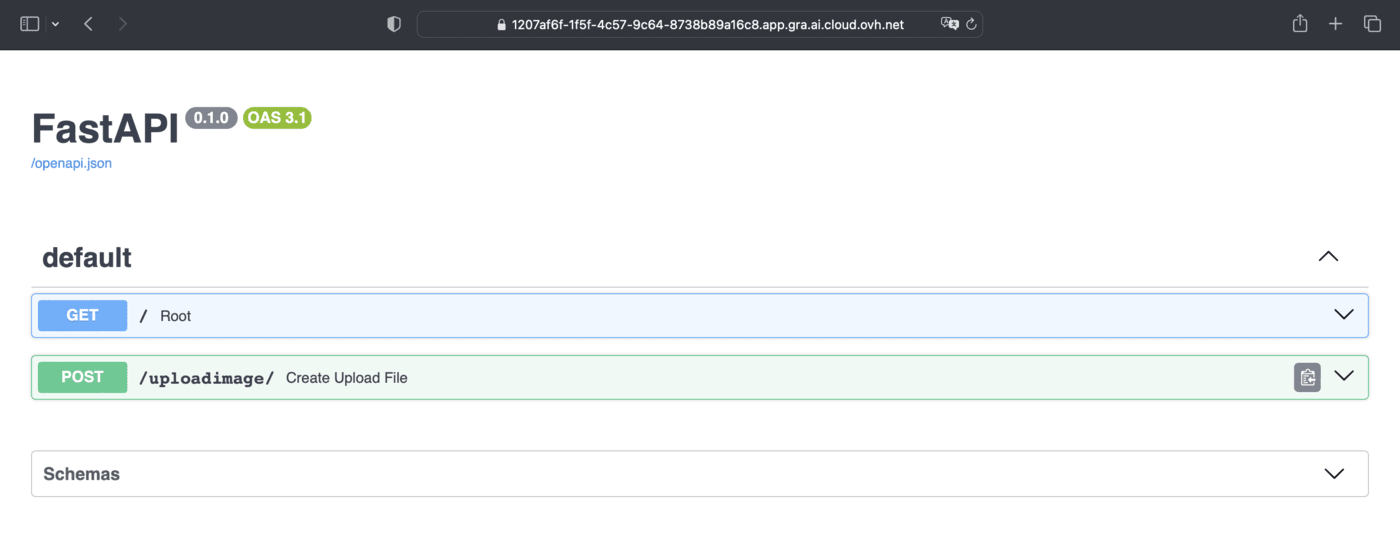
By clicking on the link of your AI Deploy app, you will land on the following page.
**How to interact with your API?**
You can add `/docs` at the end of the URL of your app.
In our example, the URL is as follows: [https://1207af6f-1f5f-4c57-9c64-8738b89a16c8.app.gra.ai.cloud.ovh.net/docs](https://1207af6f-1f5f-4c57-9c64-8738b89a16c8.app.gra.ai.cloud.ovh.net/docs)
It provides a complete dashboard for interacting with the API!
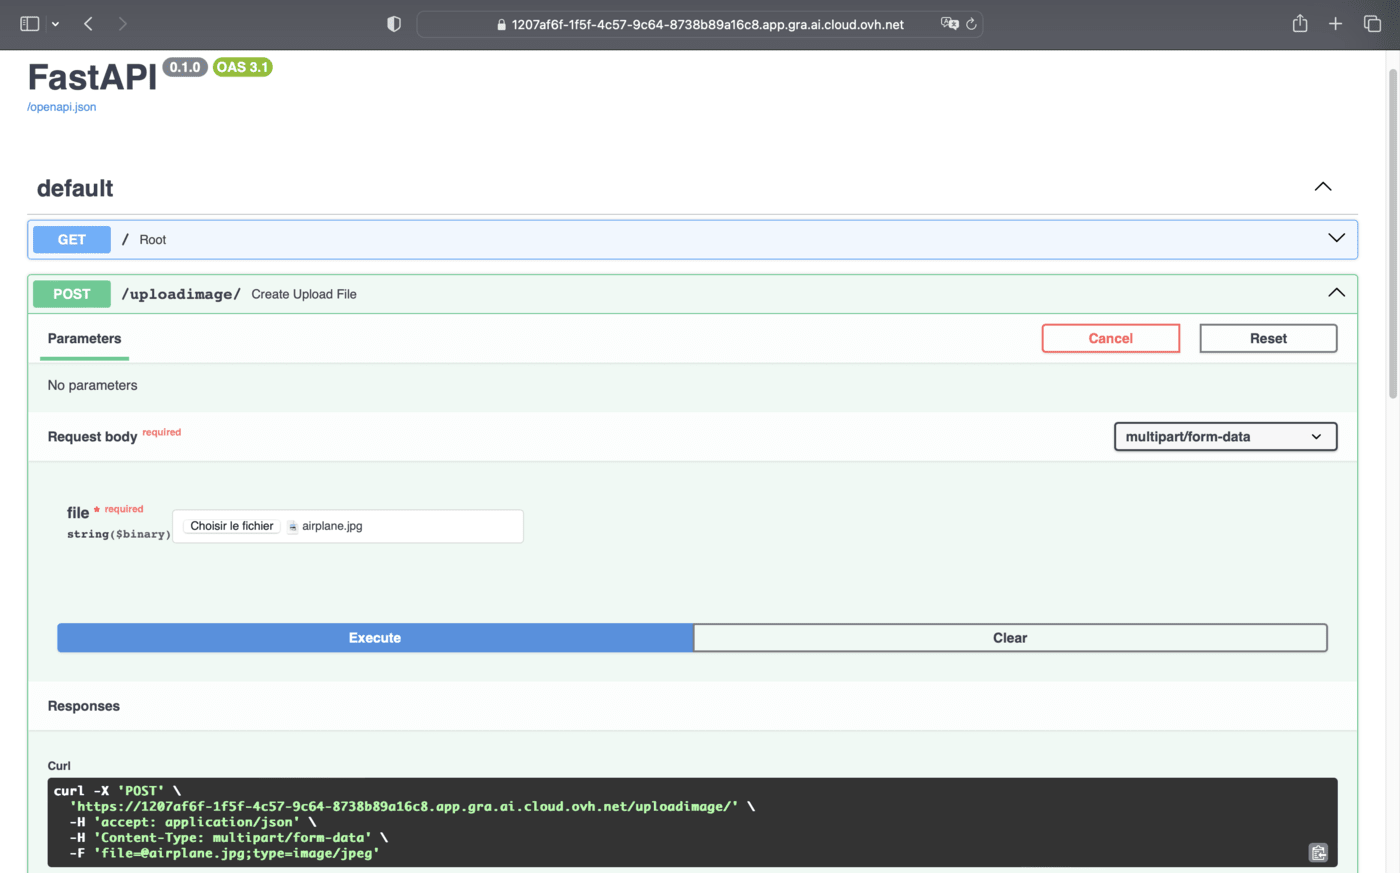
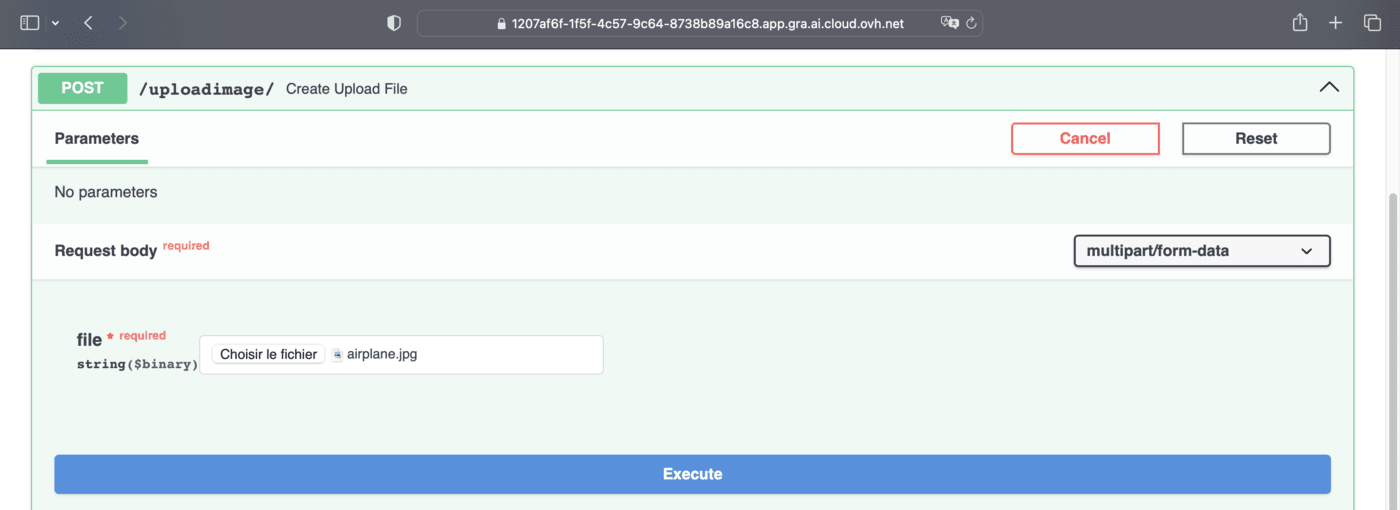
To be able to send an image for classification, select `/uploadimage/` in the green box. Click on `Try it out` and add the image of your choice in the dedicated zone.
To get the result of the prediction, click on the `Execute
` button.
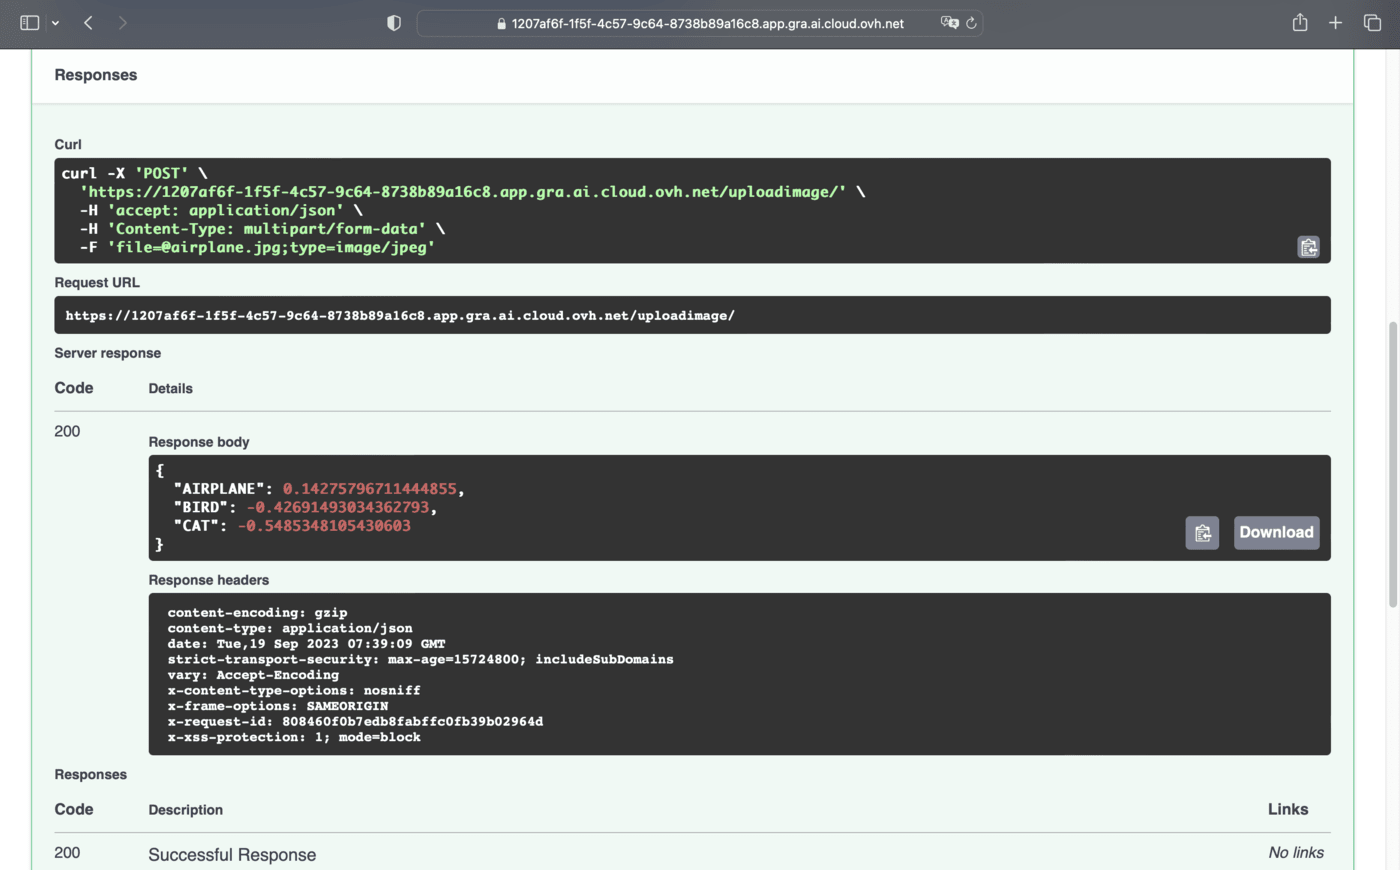
Congratulations! You have obtained the results of the prediction with the labels and the confidence scores.
## Go further
- You can imagine deploying an image segmentation app through this [tutorial](/it/guides/public-cloud/ai-machine-learning/ai-deploy-streamlit-image-segmentation-unet-brain-tumors.md).
- Feel free to use **Streamlit** to [deploy a Speech-to-Text app](/it/guides/public-cloud/ai-machine-learning/ai-deploy-streamlit-speech-to-text-app.md).
If you need training or technical assistance to implement our solutions, contact your sales representative or click on [this link](https://www.ovhcloud.com/it/professional-services/) to get a quote and ask our Professional Services experts for a custom analysis of your project.