---
title: "OpenSearch - Getting started"
description: "Find out how to set up and manage your Public Cloud Databases for OpenSearch"
url: https://docs.ovhcloud.com/es/guides/public-cloud/databases/opensearch-getting-started
lang: es
lastUpdated: 2023-03-03
---
# OpenSearch - Getting started
## Objectives
OpenSearch is an open-source search and analytics suite used for a variety of use cases related to log and data analysis, real-time monitoring, and application searching. Forked from Elasticsearch and Kibana, OpenSearch offers users a highly-scalable system with easy access to large amounts of data and integrated metrics.
This guide explains how to successfully configure a Public Cloud Databases for an OpenSearch service in the OVHcloud Control Panel.
## Requirements
- a [Public Cloud project](https://www.ovhcloud.com/es-es/public-cloud/) in your OVHcloud account
***
### OVHcloud Control Panel Access
- **Direct link:** Public Cloud Projects
- **Navigation path:** Public Cloud > Select your project
***
## Instructions
### Subscribe to the service
Click on `Databases
` in the left-hand navigation bar under **Storage**
.
Click on the button `Create a database instance
`. (`Create a service
` if your project already contains databases.)
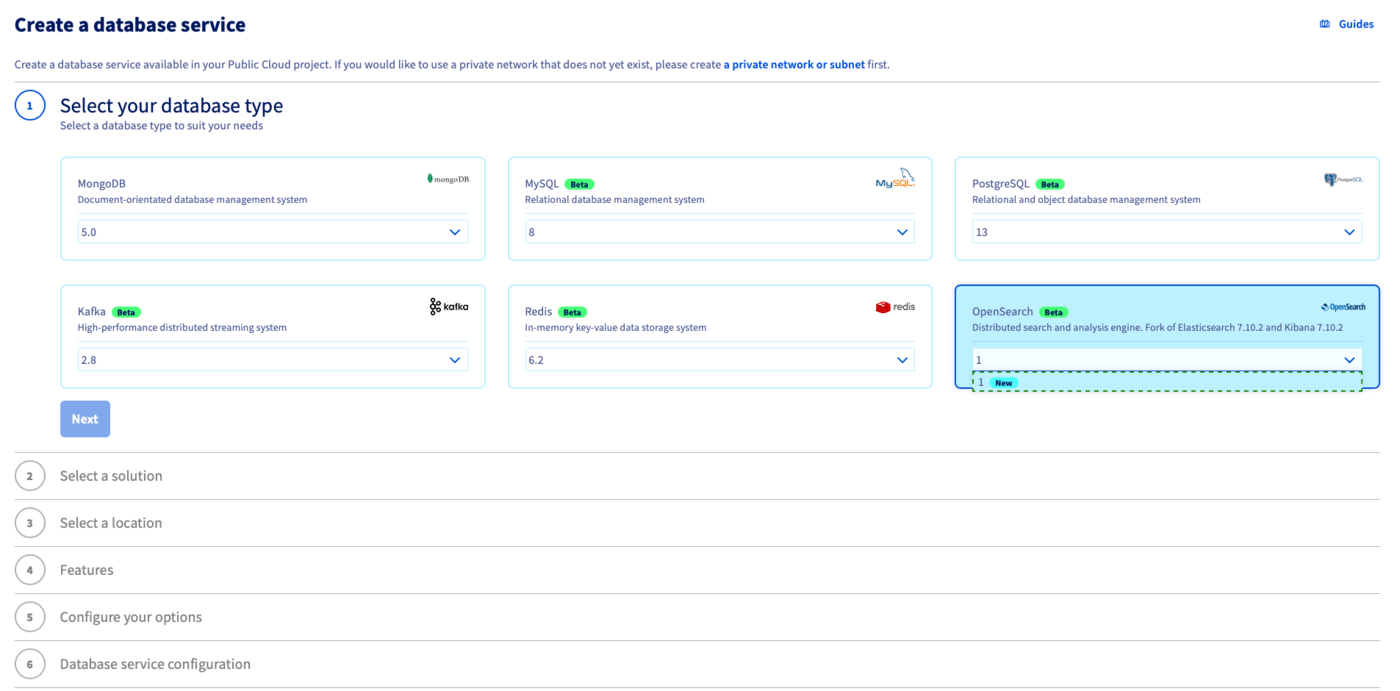
#### Step 1: Select your database type
Click on the type of database you want to use and then select the version to install from the respective drop-down menu. Click on `Next
` to continue.
#### Step 2: Select a solution
In this step, choose an appropriate service plan. If needed, you will be able to upgrade the plan after creation.
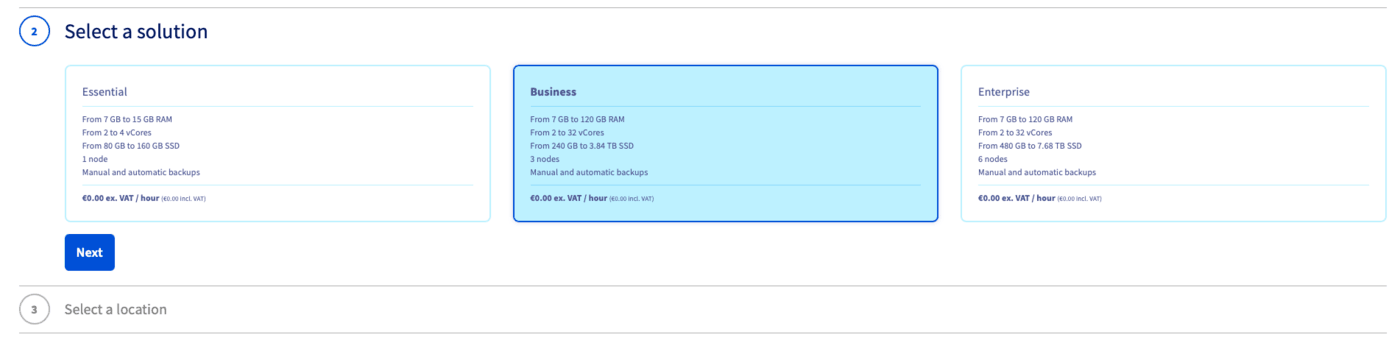
Please visit the [capabilities page](/es/guides/public-cloud/databases/overview.md) of your selected database type for detailed information on each plan's properties.
Click on `Next
` to continue.
#### Step 3: Select a location
Choose the geographical region of the datacenter in which your service will be hosted.
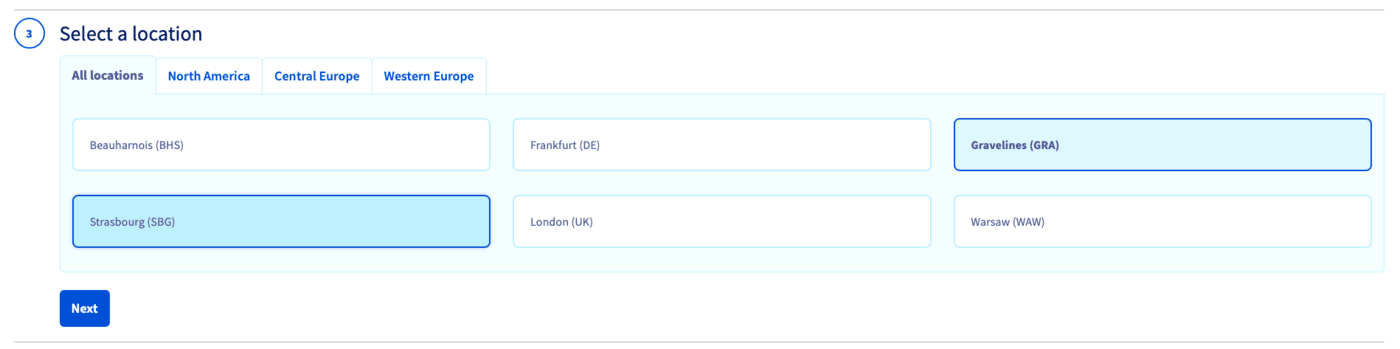
Click on `Next
` to continue.
#### Step 4: Size the database nodes
You can increase the number of nodes and choose the node template in this step. The initial and maximum number of nodes depends on the solution chosen in step 2.
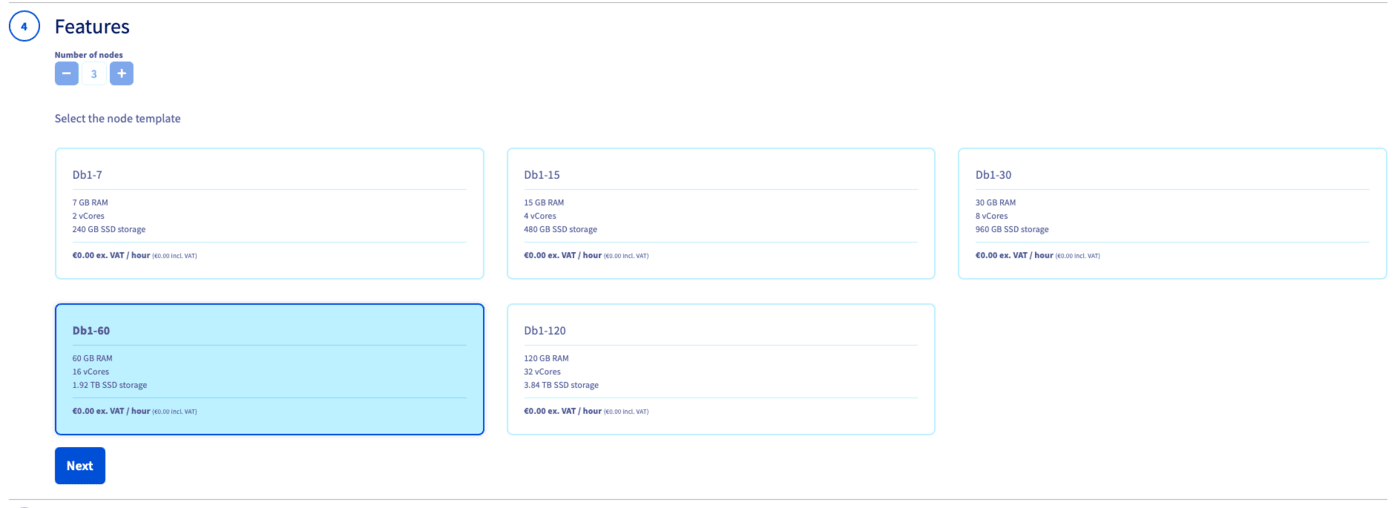
Please visit the [capabilities page](/es/guides/public-cloud/databases/overview.md) of your selected database type for detailed information on the hardware resources and other properties of the database installation.
Take note of the pricing information and click on `Next
` to continue.
#### Step 5: Configure your options
You can name your database in this step and decide to attach a public or private network.
#### Step 6: Review and confirm
The final section will display a summary of your order as well as the API equivalent of creating this database instance with the [OVHcloud API](/es/guides/manage-and-operate/api/first-steps.md).
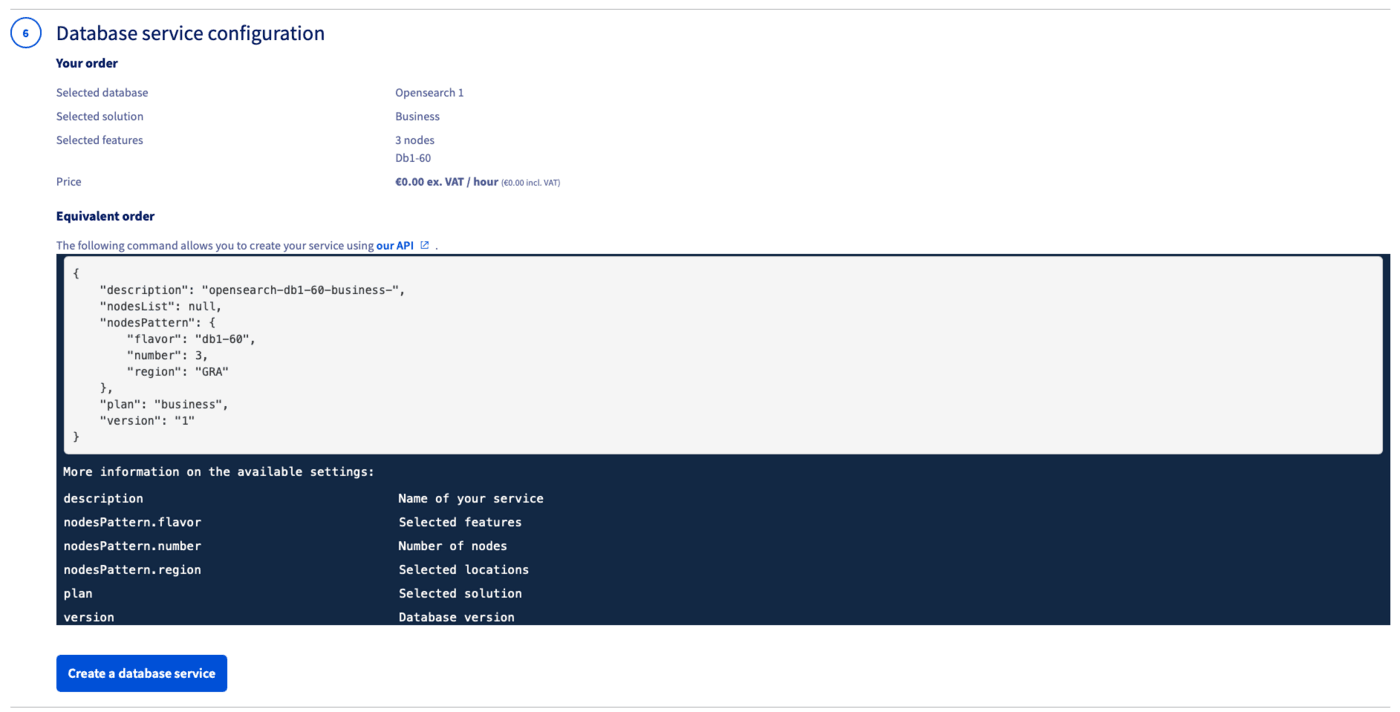
In a matter of minutes, your new database service will be deployed. Messages in the OVHcloud Control Panel will inform you when the database is ready to use.
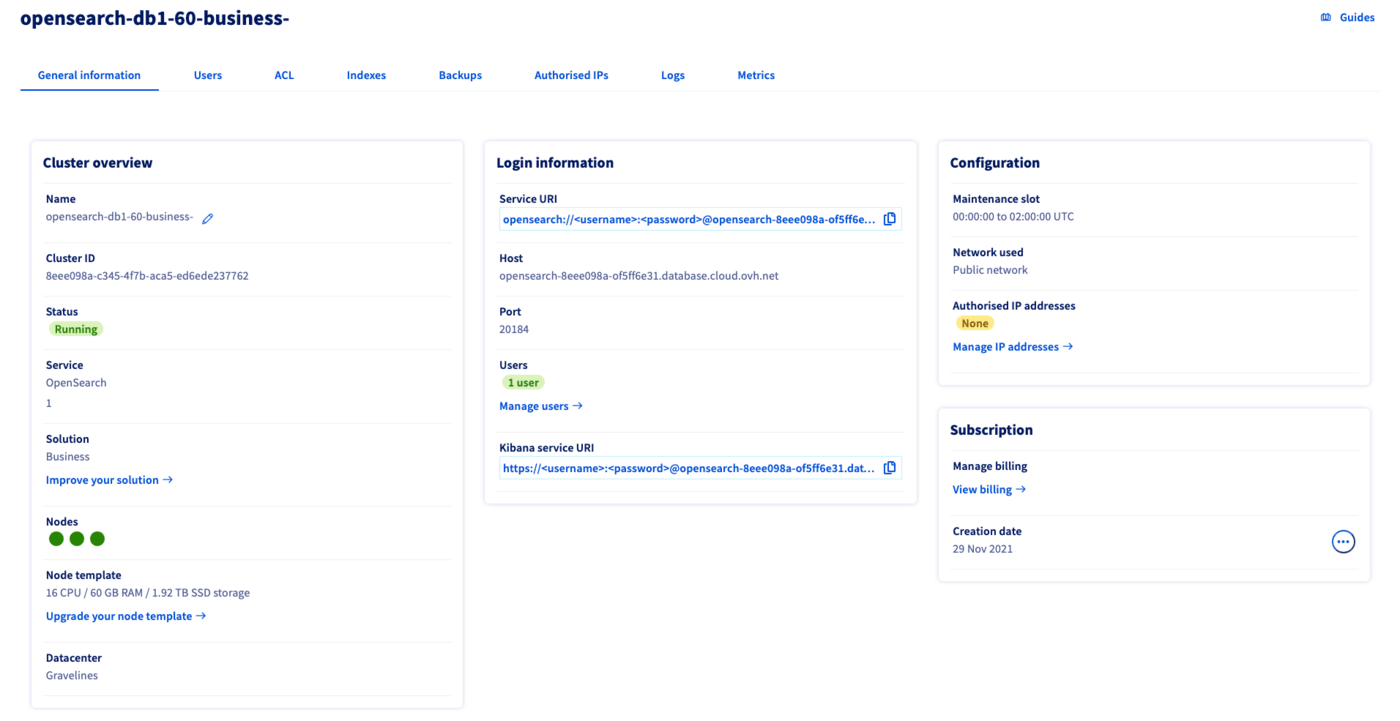
### Configure the OpenSearch service
Once the Public Cloud Databases for OpenSearch service is up and running, you will have to define at least one user and one authorized IP in order to fully connect to the service.
The `General information
` tab should inform you to create users and authorized IPs.
#### Step 1 (mandatory): set up a user
Switch to the `Users
` tab. An admin user is pre-configured during the service installation. You can add more users by clicking on the button `Add user
`.
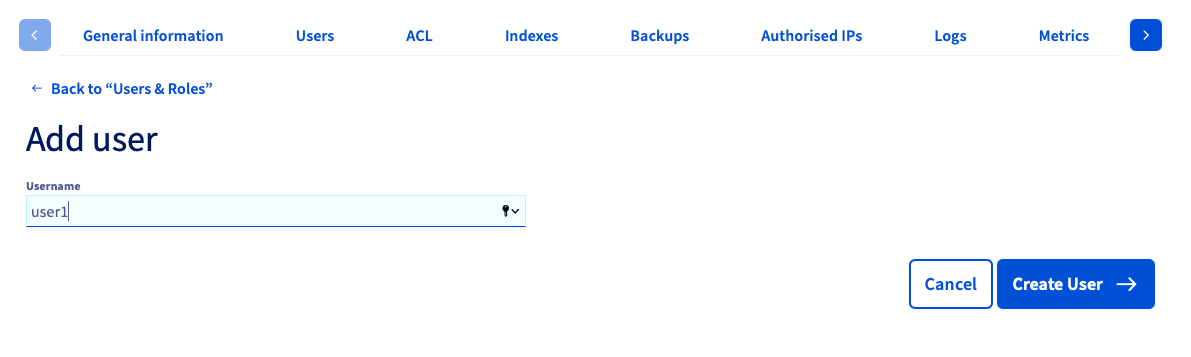
Enter a username, then click `Create User
`.
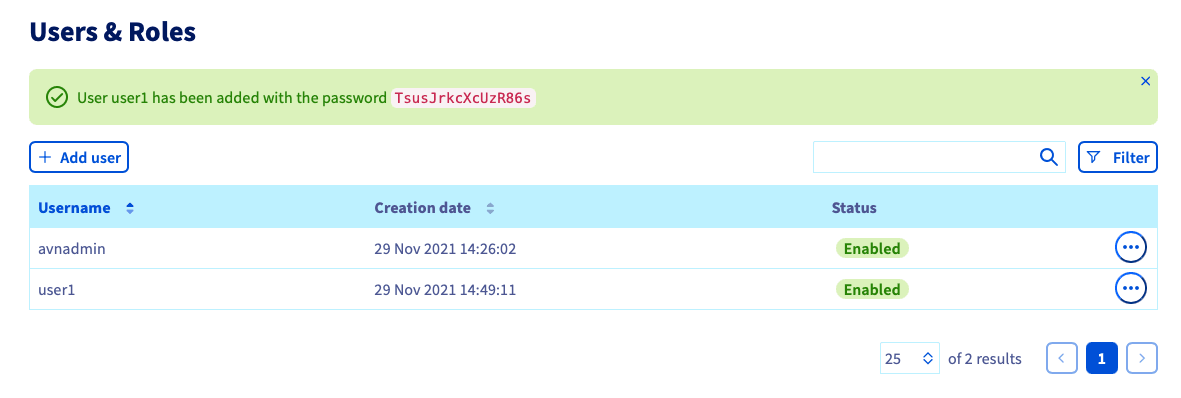
Once the user is created, the password is generated. Please keep it securely as it will not be shown again.
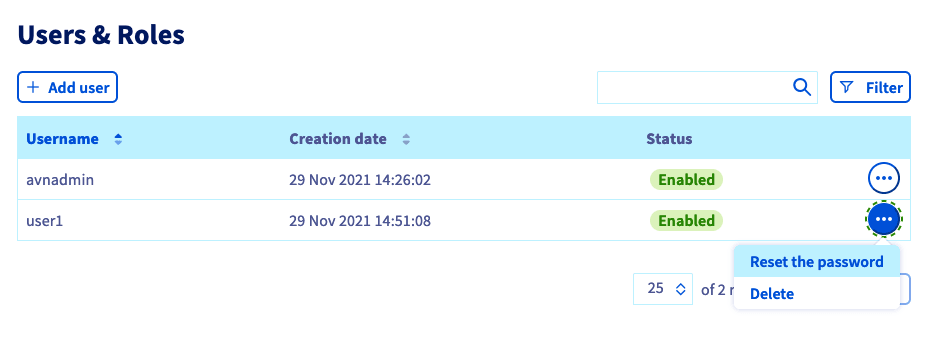
Passwords can be initialized for the admin user or changed for all afterwards in the `Users
` tab.
#### Step 2 (mandatory): configure authorised IPs
:::warning
For security reasons the default network configuration doesn't allow any incoming connections. It is thus critical you authorize the suitable IP addresses in order to successfully access your database.
:::
Switch to the `Authorized IPs
` tab. At least one IP address must be authorised here before you can connect to your database.
It can be your laptop IP for example.
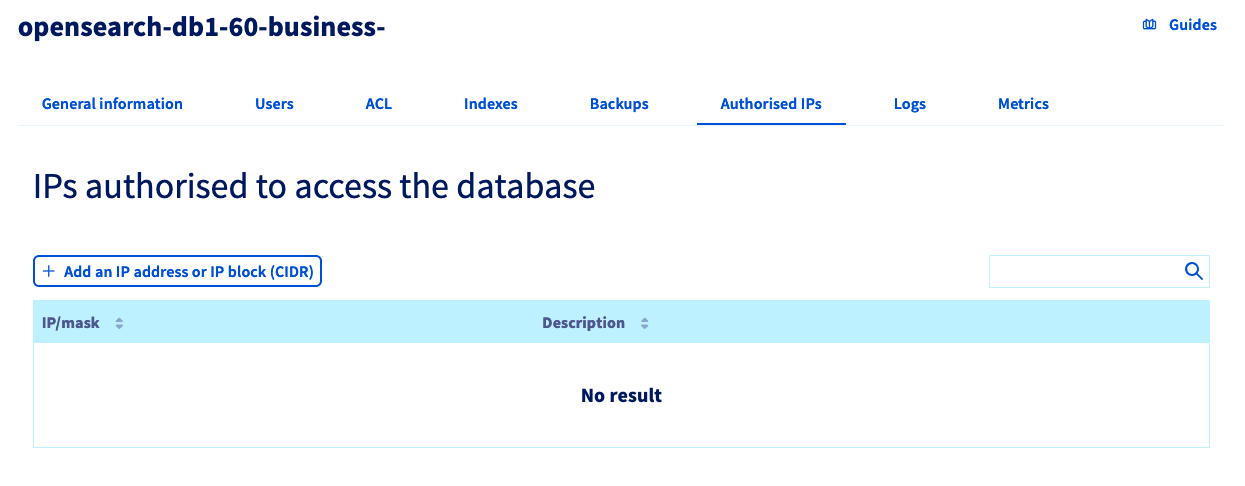
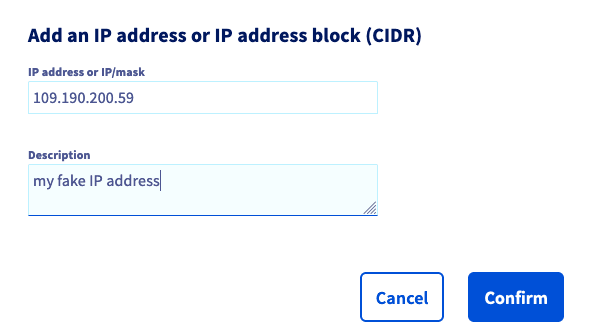
Clicking on `Add an IP address or IP address block (CIDR)
` opens a new window in which you can add single IP addresses or blocks to allow access to the database.
You can edit and remove database access via the `...
` button in the IP table.
If you don't know how to get your IP, please visit a website such as [www.WhatismyIP.com](https://www.whatismyip.com/).
Copy the IP address shown on this website and save them for later.
Your OpenSearch service is now fully accessible!
Optionally, you can configure access control lists (ACL) for granular permissions.
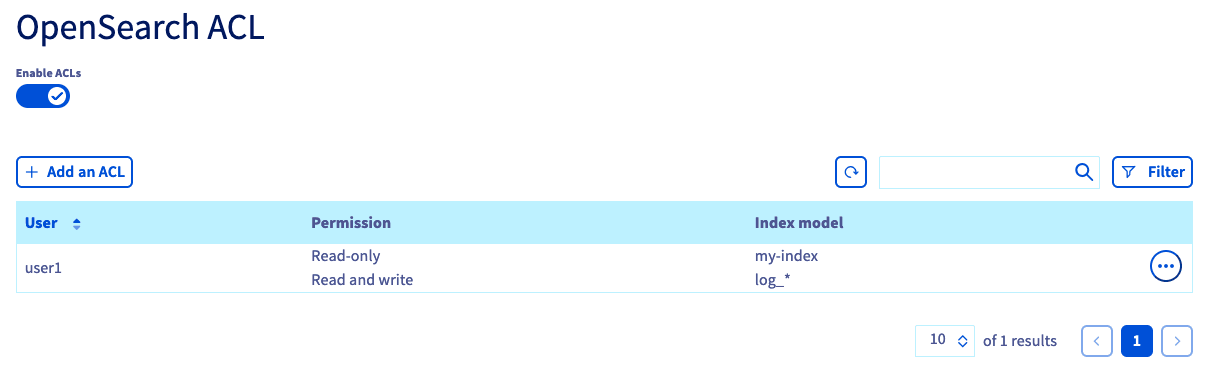
#### Optional: configure ACLs
OpenSearch database supports index-level access control lists (ACLs) to control permissions. This approach allows you to limit the operations that are available to specific connections and to restrict access to certain data sets, which improves the security of your data.
You first have to enable the ACLs functionality, and then you can add ACLs for all users:
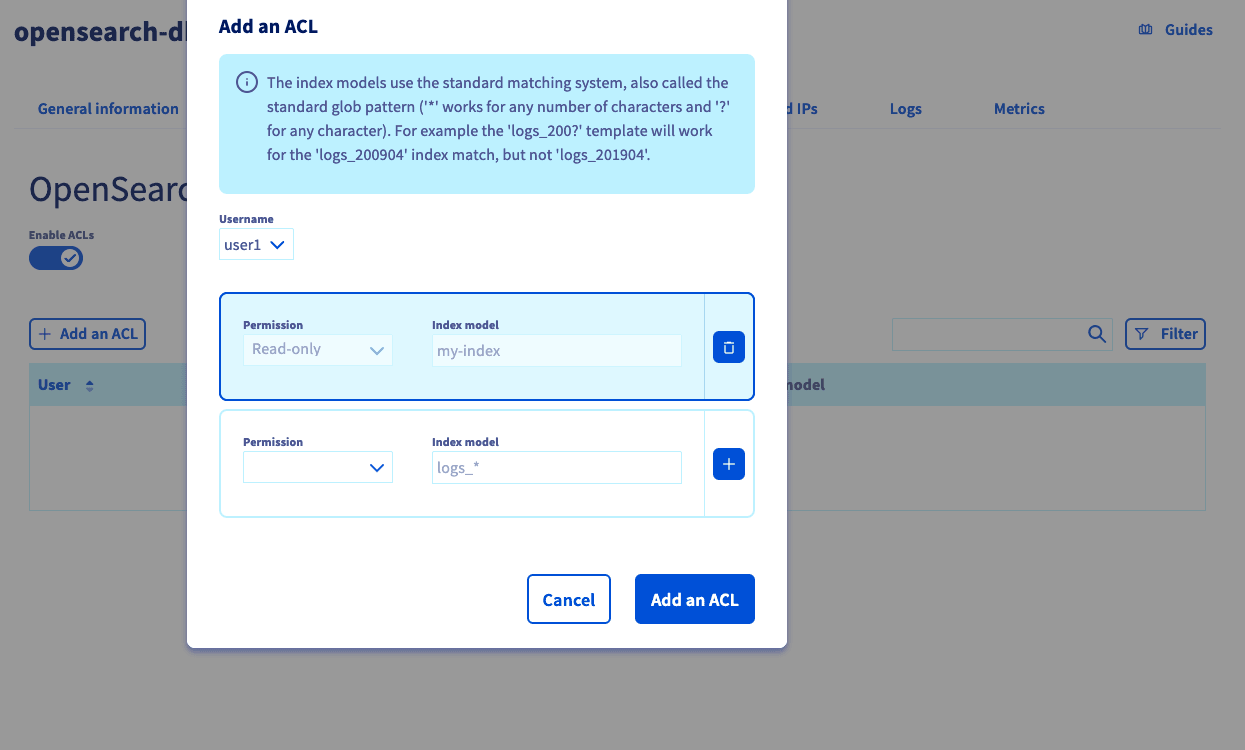
You can grant the following permissions:
- **Administrator**: full access to APIs and documents
- **Read-only**: allows only searching and retrieving documents
- **Write**: allows updating, adding, and deleting documents
- **Read and write**: full access to documents
- **none**: no access
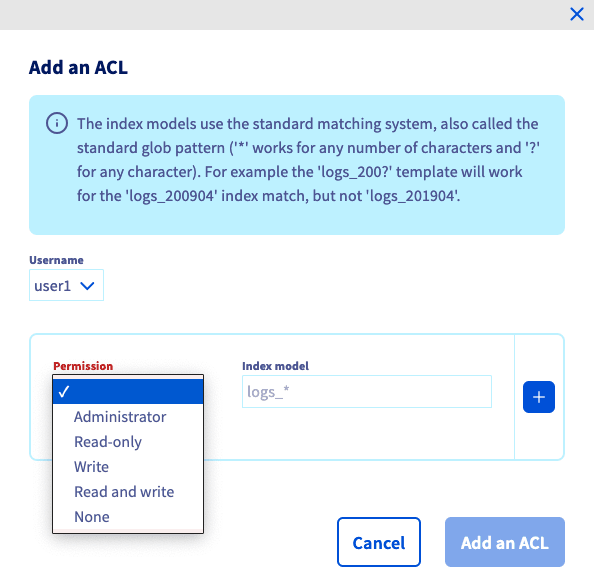
_Note_: Write permission allows the service user to create new indexes that match the pattern, but it does not allow deletion of those indexes.
Rules are defined separately for each user as **permission / index model** combinations. The **index model**, also called **pattern**, defines the indexes that the permission applies to. Patterns are glob-style, where **\*** matches any number of characters and **?** matches any character.
When multiple rules match, they are applied in the order listed above. If ACLs are enabled and no rules match, access is denied.
##### **Control access to top-level APIs**
OpenSearch has several “top-level” API endpoints (_\_mget_, _\_msearch_, and so on), where you have to grant access separately. To do this, use patterns similar to the index patterns, for example:
- Administrator/\_\* would grant unlimited access to all top-level APIs
- Administrator/\_msearch grants unlimited access to the \_msearch API only
##### **Access control and OpenSearch Dashboards**
Enabling ACLs does not restrict access to OpenSearch Dashboards itself, but all requests done by OpenSearch Dashboards are checked against the current user’s ACLs.
In practice, for OpenSearch Dashboards to work properly, you must grant the user admin-level access to the _\_msearch_ interface (permission: Administrator, pattern: _\_msearch_).
### Advanced configuration
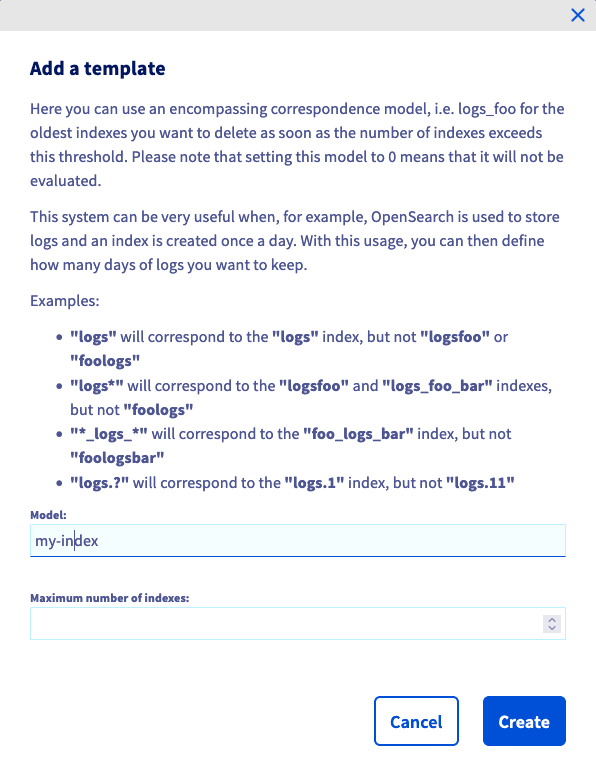
#### Indexes
An index contains a database schema. Each data is based on a basic unit which is a JSON document, indexed with a unique ID. Indexing is the method used to store data and by the search engine for fast retrieval.
You can learn more browsing the [OpenSearch official documentation - Index data](https://opensearch.org/docs/latest/opensearch/index-data/)
It's not mandatory, but if needed, you can add new indexes in the OpenSearch database.

Please enter the name of the index that you want to create.
#### Automatic backups
OVHcloud performs daily backups for your Public Cloud Databases for the OpenSearch service.
To find them, switch to the `Backups
` tab. Backups will be created automatically, and retention time depends on the service plan. Please visit the [Public Cloud Databases for OpenSearch capabilities page](/es/guides/public-cloud/databases/opensearch-capabilities.md)
for detailed information on each plan's properties.
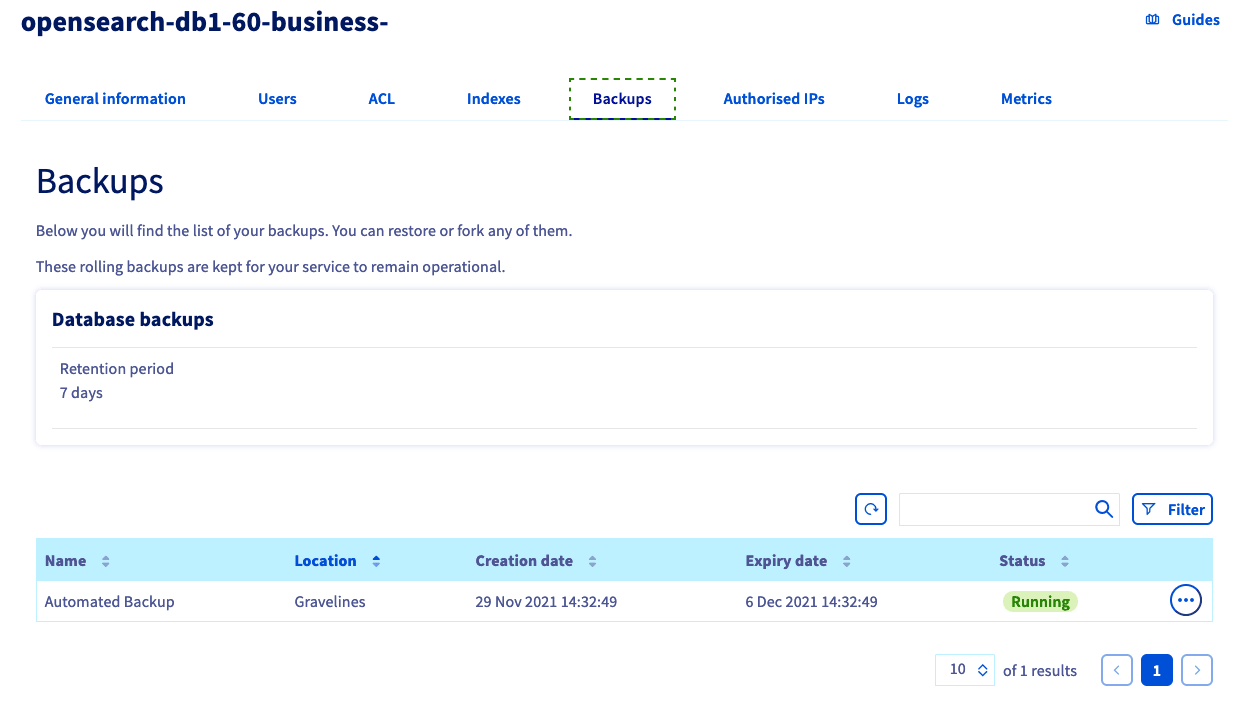
You can restore and delete backups via the `...
` button.
### Connection to the OpenSearch Dashboard
:::warning
Verify that the IP address visible from your browser application is part of the "Authorized IPs" defined for this OpenSearch Database service.
:::
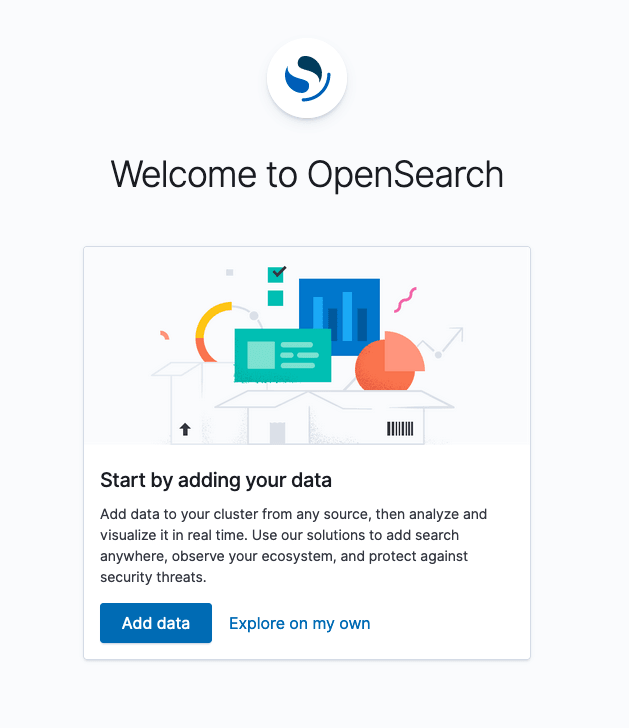
From the _General information_ tab from the Public Cloud Databases for OpenSearch service, you can get the Kibana service URI. Use it to combine with the user login and password in a web browser and you will go to this page:
#### Load sample data
:::warning
If you have enabled ACLs in a previous step and don't want to disable them, then make sure your user is granted read and write permissions to:
- opensearch\_dashboards\_sample\_data\_\*
- \_bulk
- \_mget
Without these permissions you will not be able to add the sample data and view the corresponding dashboard.
:::
As proposed natively in OpenSearch, we can load sample data to the OpenSearch database:
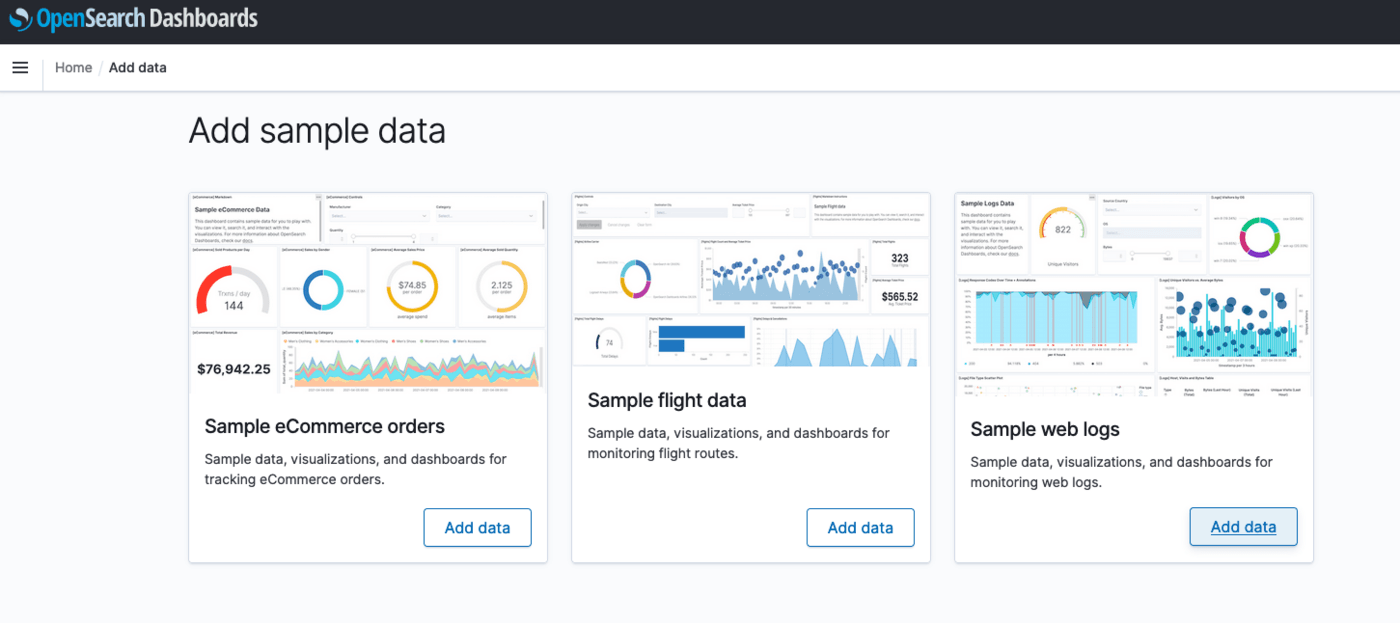
For the following example, we will use the **Sample web logs**.
Once imported, you can get access to the main OpenSearch dashboard created for this sample. Click on the View Data button:
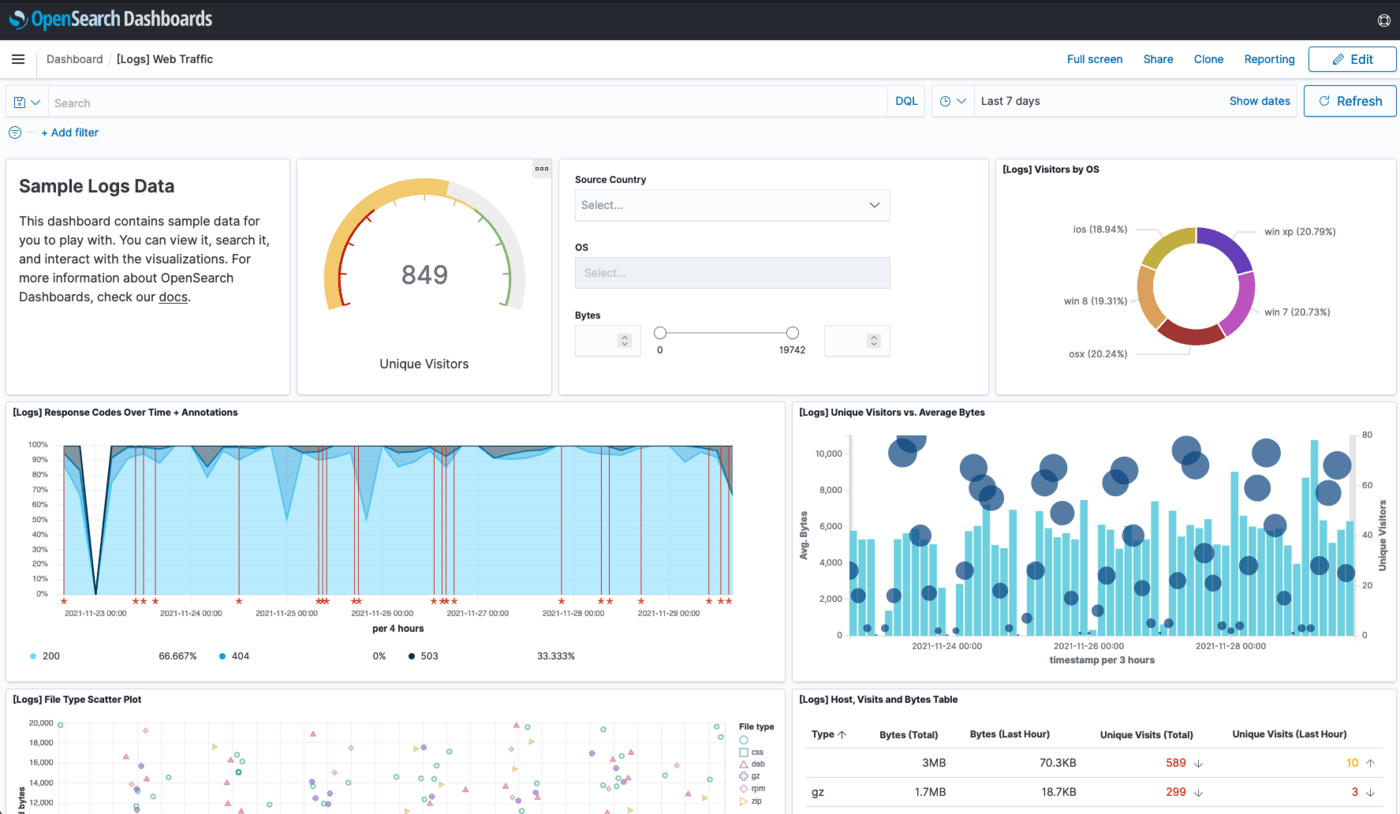
Dashboard and queries can be edited directly through this web interface.
#### Load your data
If you want to load your own data, you have multiple ways. Please take a look at the official documentation: [https://opensearch.org/docs/latest/clients/agents-and-ingestion-tools/index/](https://opensearch.org/docs/latest/clients/agents-and-ingestion-tools/index/).
### Query the OpenSearch service
#### DB queries with cURL
Once the service is up and configured, you can try to connect from a remote session to it. You need to have at least:
- the user login and password, with accurate ACLs if enabled;
- the URI of the OpenSearch database service. It can be found in the General information tab.
:::warning
Verify that the IP address of your system running the cURL command is part of the Authorized IPs defined for this OpenSearch Database service.
:::
Once ready, try this in a command line, with your personal user and password:
```bash
export OPENSEARCH_URI=https://user1:2fakeSVV5wvyPykF@opensearch-682faf00-682faf00.database.cloud.ovh.net:20184
```
Then try to connect :
```bash
curl $OPENSEARCH_URI
```
The database response should be similar to:
```json
{
"name" : "opensearch-682faf00-1",
"cluster_name" : "ba1b1006-776a-4686-9c3c-9f65d4d73467",
"cluster_uuid" : "UoyMAkrISd6r1rIVYn4q5g",
"version" : {
"distribution" : "opensearch",
"number" : "1.1.0",
"build_type" : "unknown",
"build_hash" : "unknown",
"build_date" : "2021-11-15T16:09:53.881093Z",
"build_snapshot" : false,
"lucene_version" : "8.9.0",
"minimum_wire_compatibility_version" : "6.8.0",
"minimum_index_compatibility_version" : "6.0.0-beta1"
},
"tagline" : "The OpenSearch Project: https://opensearch.org/"
}
```
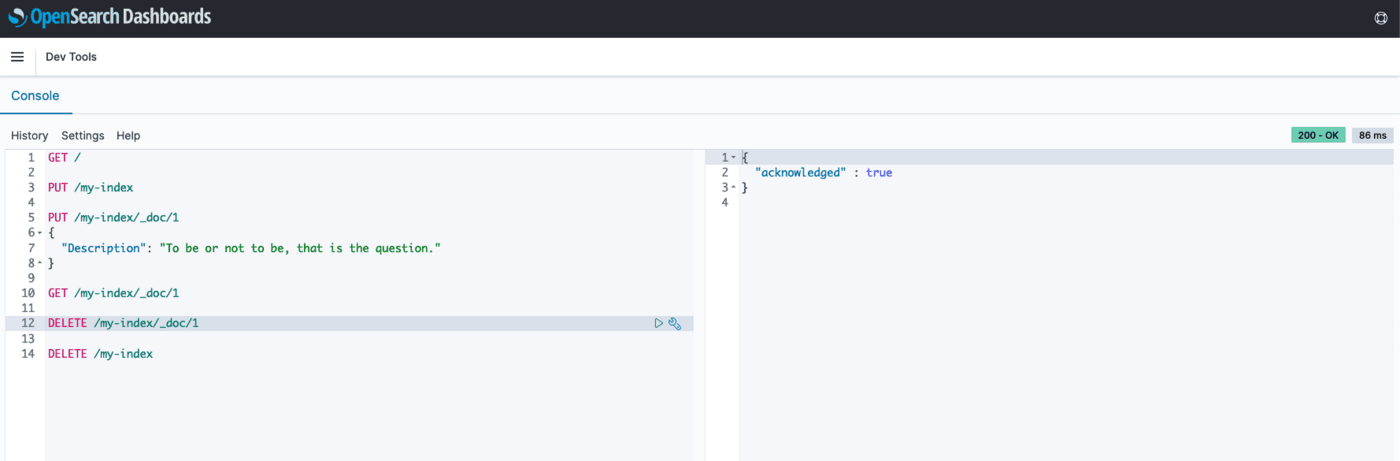
Now create an index:
```bash
curl -X PUT $OPENSEARCH_URI/my-index
```
In case of a wrongly defined ACL for the user, the response will be similar to :
```bash
403 Forbidden
Request forbidden by administrative rules.
(reason: PUT /my-index/ not allowed)
```
Try to add a document:
```bash
curl -X PUT $OPENSEARCH_URI/my-index/_doc/1' -H 'Content-Type: application/json' -d '{"Description": "To be or not to be, that is the question."}'
```
Retrieve the data:
```bash
curl -X GET $OPENSEARCH_URI/my-index/_doc/1
```
Delete the data:
```bash
curl -X DELETE $OPENSEARCH_URI/my-index/_doc/1
```
Delete the index:
```bash
curl -X DELETE $OPENSEARCH_URI/my-index/
```
#### DB queries with the Dashboard Dev Tool
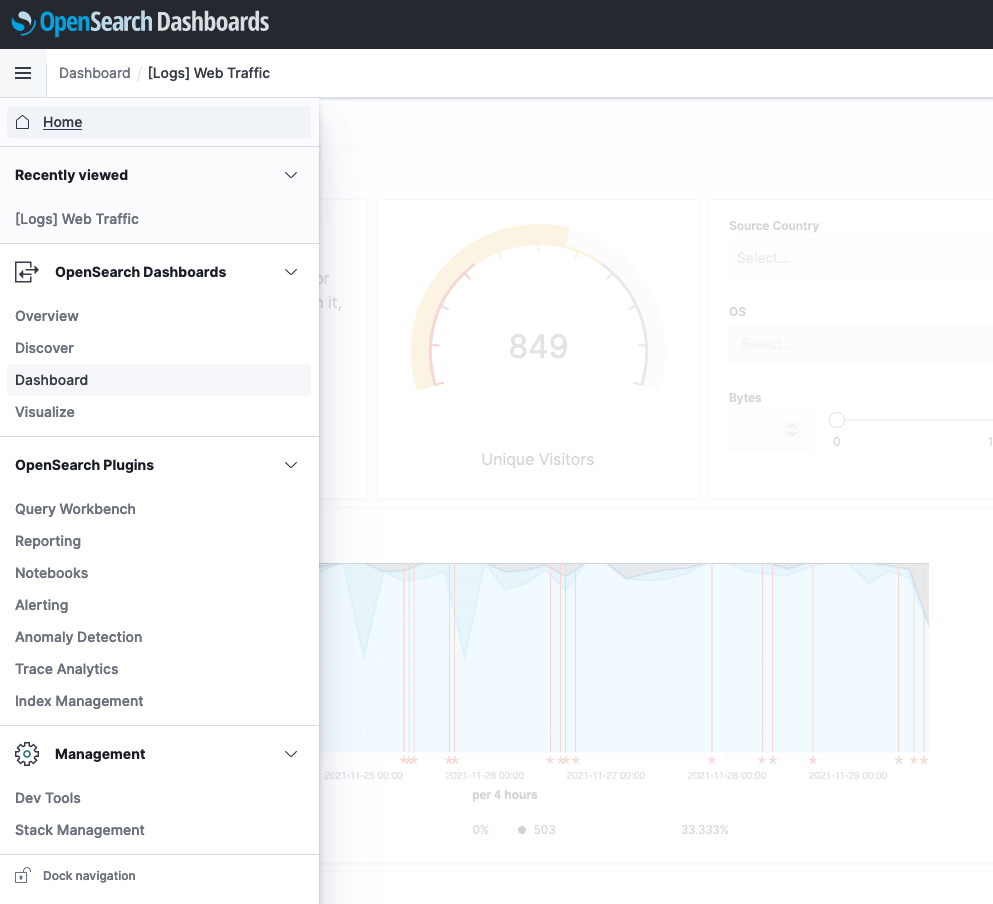
For direct queries with a web interface to the OpenSearch database you can use the **Dev Tools** available in the menu:
The Console is split in two, a left column for the command to execute, and the right one for the results.
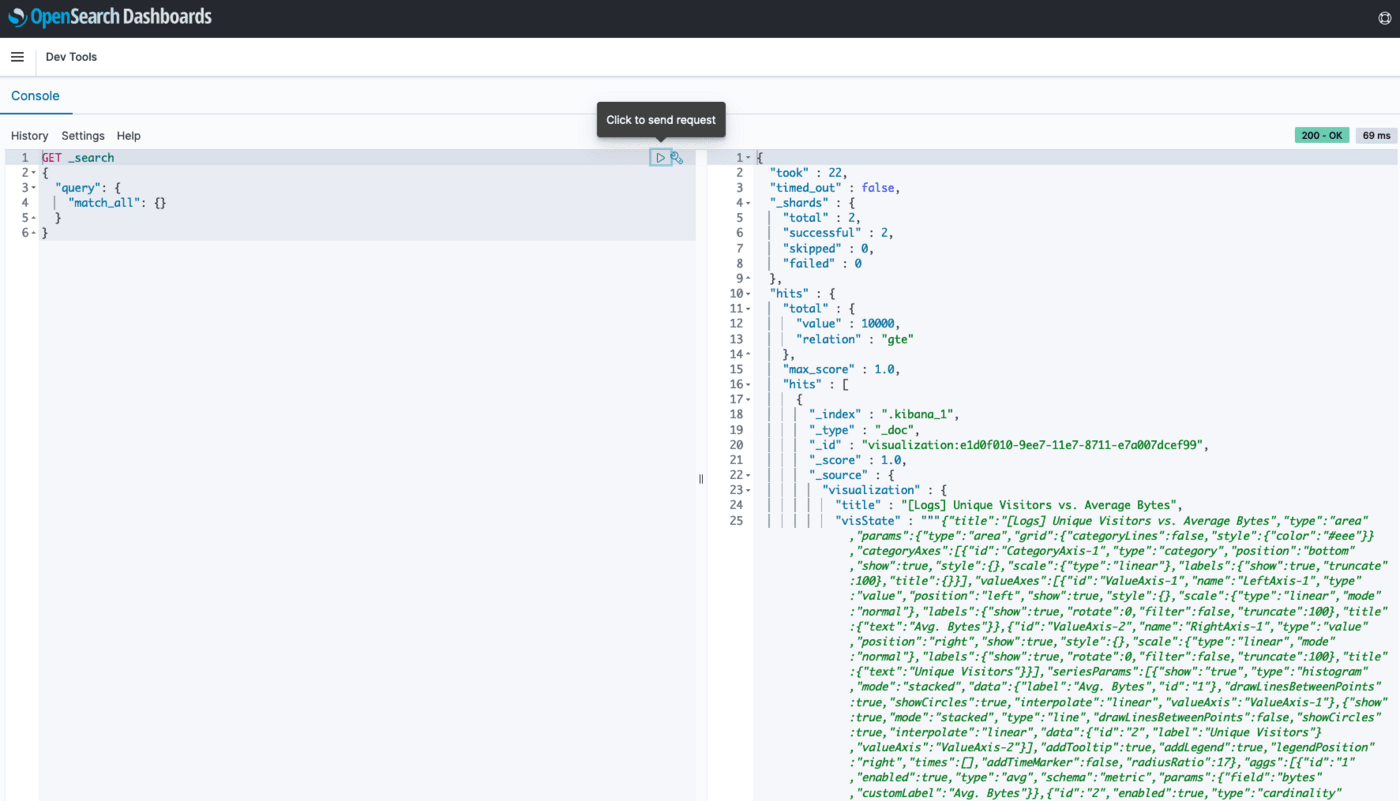
Click on the triangle to execute the highlighted request.
We can execute the same commands as we did with cURL:
## Go further
You service is now configured. To go further,
[OpenSearch capabilities](/es/guides/public-cloud/databases/opensearch-capabilities.md)
[OpenSearch Official documentation](https://opensearch.org/docs/latest)
Visit the [Github examples repository](https://github.com/ovh/public-cloud-databases-examples/tree/main/databases/opensearch) to find how to connect to your database with several languages.
Visit our dedicated Discord channel: [https://discord.gg/ovhcloud](https://discord.gg/ovhcloud). Ask questions, provide feedback and interact directly with the team that builds our databases services.
If you need training or technical assistance to implement our solutions, contact your sales representative or click on [this link](https://www.ovhcloud.com/es-es/professional-services/) to get a quote and ask our Professional Services experts for a custom analysis of your project.