---
title: "AI Training - Tutorial - Train a Rasa chatbot inside a Docker container"
description: "Understand how simple it is to train a chatbot with AI Training"
url: https://docs.ovhcloud.com/es/guides/public-cloud/ai-machine-learning/ai-training-train-rasa-chatbot
lang: es
lastUpdated: 2025-06-27
---
# AI Training - Tutorial - Train a Rasa chatbot inside a Docker container
## Objective
The aim of the tutorial is to understand how to train a Rasa model with AI Training.
Deployment will be performed in the second part of the tutorial which you can find here: [How to deploy a chatbot](/es/guides/public-cloud/ai-machine-learning/ai-deploy-rasa-chatbot.md).
If you want to access the code, you can find it [here](https://github.com/ovh/ai-training-examples/tree/main/jobs/rasa-chatbot).
If you want to create a Rasa chatbot with a notebook, please follow this tutorial: [Create and train a Rasa chatbot](/es/guides/public-cloud/ai-machine-learning/ai-notebooks-create-rasa-chatbot.md).
We will use the famous open source framework [Rasa](https://rasa.community/) to build the chatbot and the framework [Chatette](https://github.com/SimGus/Chatette) to generate examples of human sentences.
Both of the frameworks are Python packages.
## Requirements
- Access to the OVHcloud Control Panel
- A Public Cloud project created
- The ovhai CLI interface installed on your system (more information [here](/es/guides/public-cloud/ai-machine-learning/ai-cli-install-client.md))
- A [user for AI Training](/es/guides/public-cloud/ai-machine-learning/ai-users.md)
- [Docker](https://www.docker.com/get-started) installed on your local computer
- A [Docker Hub account](https://hub.docker.com/)
- Knowledge about building images with [Dockerfile](https://docs.docker.com/engine/reference/builder/)
## Instructions
### Create a token to access your AI services
The first step is to create an AI applicative token. With this token, you will be able to securely access all of your AI services.
To do this, launch this command on the terminal once the ovhai CLI is installed:
```bash
ovhai token create -l model=rasabotRW --role operator token-RW-chatbot
```
The token is now created. Don't forget to save the token to use it later.
Now, let's upload the data to train our model on a object container.
### Understand storage concepts
For this tutorial, we will create two object storage buckets.
One will be used to read the data we provide to the chatbot and the other will be for saving the chatbot model created.
We can specify during creation if we want them in read-only, read-write and co.
Splitting input data and output data is a good practice, allowing you faster development code and avoids risk of deleting data.
The obvious goal about using object storage and not the local storage of the AI Notebook is to decorrelate compute and storage, allowing us to stop or delete the notebook while keeping the data safe.
If you want to know more about data storage concept, read this guide: [Create an object container](/es/guides/storage-and-backup/object-storage/pcs-create-container.md).
For the chatbot, we will create two object storage buckets. One with all the data to train and the other will be filled over time by our trained model output. The container in which the model will be saved does not need to be created. When we will launch our notebook, the container will be automatically created.
To create the volume in GRA (Gravelines data centre), clone the [GitHub repo](https://github.com/ovh/ai-training-examples/) and then go into the folder `jobs/rasa-chatbot`.
After, you will just have to type:
```bash
ovhai bucket object upload @GRA data
```
Your data will be uploaded and created in the container `` and mounted with the prefix `data`. 3 files will be uploaded: The `nlu.yml` file, the `stories.yml` file and the `rules.yml` file.
Let's train our model!
### Train your model
To train the model, we will use AI Training. This tool is much more powerful. It will allow you to automate your pipelines and build fine-tuning phases easily.
AI Training allows you to train models directly from your own Docker images.
First, you need a Dockerfile compliant with AI Training. You don't have to create this file since an example of it can be found in our GitHub repository. This Dockerfile is [here](https://github.com/ovh/ai-training-examples/tree/main/jobs/rasa-chatbot) and looks like the following:
```docker
FROM tensorflow/tensorflow:2.12.0-gpu
WORKDIR /workspace
ADD . /workspace
RUN pip install --no-cache-dir -r requirements_rasa.txt
RUN chown -R 42420:42420 /workspace
ENV HOME=/workspace
#If you deploy the chatbot you expose at port 5005.
EXPOSE 5005
CMD rasa train --force --out trained-models
```
Secondly, you have to build the Docker image and push it inside your public repository (such as Dockerhub) or in a private directory. To do that, run one of the following commands inside the folder `rasa_bot`:
```console
# Build the image using your machine's default architecture
docker build . -f rasa.Dockerfile -t ``/rasa-chatbot:latest
# Build image targeting the linux/amd64 architecture
docker buildx build --platform linux/amd64 -f rasa.Dockerfile -t ``/rasa-chatbot:latest .
```
Then, push your image:
```bash
docker push ``/rasa-chatbot:latest
```
To do this, you must be logged in to the terminal. To log in, just run `docker login` inside a terminal and fill with your Dockerhub credentials.
Once your Docker image is created and pushed into the repository, you can directly use the `ovhai` command to create your model training. Here is the full command. The training is about 5 minutes. You can change the time of the training if you change the number of **GPUs** or the config file for the Rasa training.
```bash
ovhai job run --name rasa-chatbot \
--gpu 1 \
--volume @GRA/data:/workspace/data:RO \
--volume @GRA:/workspace/trained-models:RW \
``/rasa-chatbot:latest
```
For more explanation about the CLI command for AI Training, please read this guide: [CLI Reference](/es/guides/public-cloud/ai-machine-learning/ai-cli-overview.md).
Explanation for the command inside the Dockerfile:
- **rasa train**: This command will start to train a model with the NLU data you provide. The training launches some component and follows a pipeline defined in your file `config.yml`.
- **--force**: This line is an option for the Rasa train command. It allows to force Rasa to train a model and not only search if the data provided as been already trained. This option will retrain a model even if the data hasn't changed.
- **--out**: This argument permits to say how you want to save your model. Here we saved the model in the folder "trained-models" and in the container ``.
### Test your model
Once you have trained your model and you want to see if it is returning good results, let's create a Visual Studio Code notebook. You can run this command to be fast:
```bash
ovhai notebook run conda vscode \
--name vscode-ovh-chatbot \
--framework-version conda-py39-cuda11.2-v22-4 \
--volume @GRA:/workspace/trained-models:RW \
--cpu 10 \
--token \
```
Then install all the requirements by running in a terminal (Click the menu icon > Terminal > New Terminal):
```bash
pip install -r ~/ai-training-examples/jobs/rasa-chatbot/requirements_rasa.txt
```
Now we can test our model!
Open two terminals. In one we will run a custom action and in the second we will speak with the chatbot. Here is the command for the first terminal:
```bash
cd ~/ai-training-examples/jobs/rasa-chatbot
rasa run actions
```
In Rasa, an interaction with a user is described by an intent from an user and a response from the chatbot. The response from the chatbot is called an action. Sometimes and in this case, we need to create some custom actions (filling a form with the user and collect some data). This is the purpose of the command `rasa run actions`.
In the other terminal, launch:
```bash
rasa shell -m ~/trained-models --endpoints ~/ai-training-examples/jobs/rasa-chatbot/endpoints.yml
```
Explication of the command:
- `rasa shell`: Load a model and speak with it to test it.
- `-m ~/trained-models`: This is to specify the path of where your model is saved. As seen before, your model has been trained and is saved in this folder. If you have several models in the folder `trained-models`, you can specify the specific name of the model you want to train in this argument.
- `--endpoints ~/ai-training-examples/notebooks/natural-language-processing/chatbot/conda/rasa_bot/endpoints.yml`: You specify the way of your `endpoints.yml` file. This file is used to tell where your model is running and the where the ports of your custom actions are running.
This is a small example of a discussion with the bot :
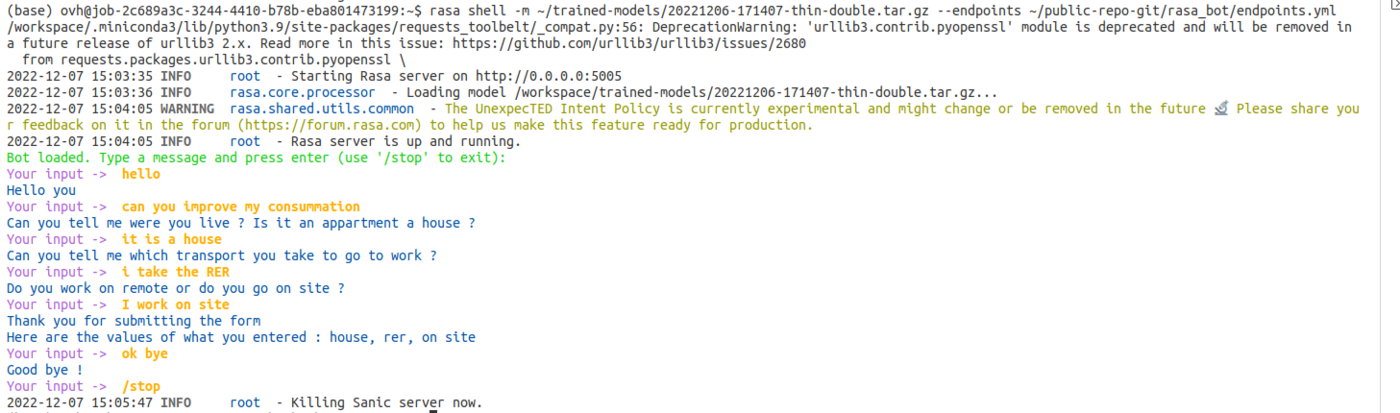
Congrats! You can test your first Rasa model and speak with it. If you have several models in your folder `trained-models`, you can specify the folder after the option `-m` and add the specific model you want to train.
If you're not satisfied with the model because your chatbot doesn't respond very well, you can run this command. It will run the job again and create a new model.
```bash
ovhai job rerun
```
To get the `job_id` of the previous job, just run this command to get the list of the jobs you've run before.
```bash
ovhai job ls
```
More explanations are here: [CLI Reference](/es/guides/public-cloud/ai-machine-learning/ai-cli-overview.md).
Once you have your model ready, deploy the model to use it. This will be done with the tool AI Deploy from the Public Cloud.
## Go further
If you want to use more functionalities of Rasa, please follow this link. We use Rasa Open Source and not Rasa X.
[Rasa Open source](https://rasa.com/docs/rasa/)
If you want to see how the model is created and trained with AI Notebooks, please follow this tutorial.
[How to create and train a rasa chatbot](/es/guides/public-cloud/ai-machine-learning/ai-notebooks-create-rasa-chatbot.md)
If you want to deploy your model created with the chatbot, you can follow this tutorial.
[How to deploy a chatbot](/es/guides/public-cloud/ai-machine-learning/ai-deploy-rasa-chatbot.md)
If you need training or technical assistance to implement our solutions, contact your sales representative or click on [this link](https://www.ovhcloud.com/es-es/professional-services/) to get a quote and ask our Professional Services experts for a custom analysis of your project.
## Feedback
Please send us your questions, feedback and suggestions to improve the service:
- On the OVHcloud [Discord server](https://discord.gg/ovhcloud)