---
title: "AI Deploy - Tutorial - Create and deploy a Speech to Text application using Streamlit"
description: "How to create and deploy a Streamlit Application for Speech To Text"
url: https://docs.ovhcloud.com/es/guides/public-cloud/ai-machine-learning/ai-deploy-streamlit-speech-to-text-app
lang: es
lastUpdated: 2025-06-27
---
# AI Deploy - Tutorial - Create and deploy a Speech to Text application using Streamlit
:::info
AI Deploy is covered by **[OVHcloud Public Cloud Special Conditions](https://storage.gra.cloud.ovh.net/v1/AUTH_325716a587c64897acbef9a4a4726e38/contracts/d2a208c-Conditions_particulieres_OVH_Stack-WE-9.0.pdf)**.
:::
## Objective
The purpose of this documentation is to **Deploy the Speech to Text Application** we have realised in our [blog article](https://blog.ovhcloud.com/how-to-build-a-speech-to-text-application-with-python-1-3/) using [Streamlit](https://streamlit.io/) and pre-trained models.
Deploying your app will allow you to benefit from **very powerful resources** which will make the speech to text application extremely fast. It can also be easily shared, unlike a local application.
Here, the use case is **English Speech Recognition**, but you can choose another model as explained in our [blog article](https://blog.ovhcloud.com/how-to-build-a-speech-to-text-application-with-python-1-3/). Some models work with Chinese, French, German, Japanese, Russian, etc.
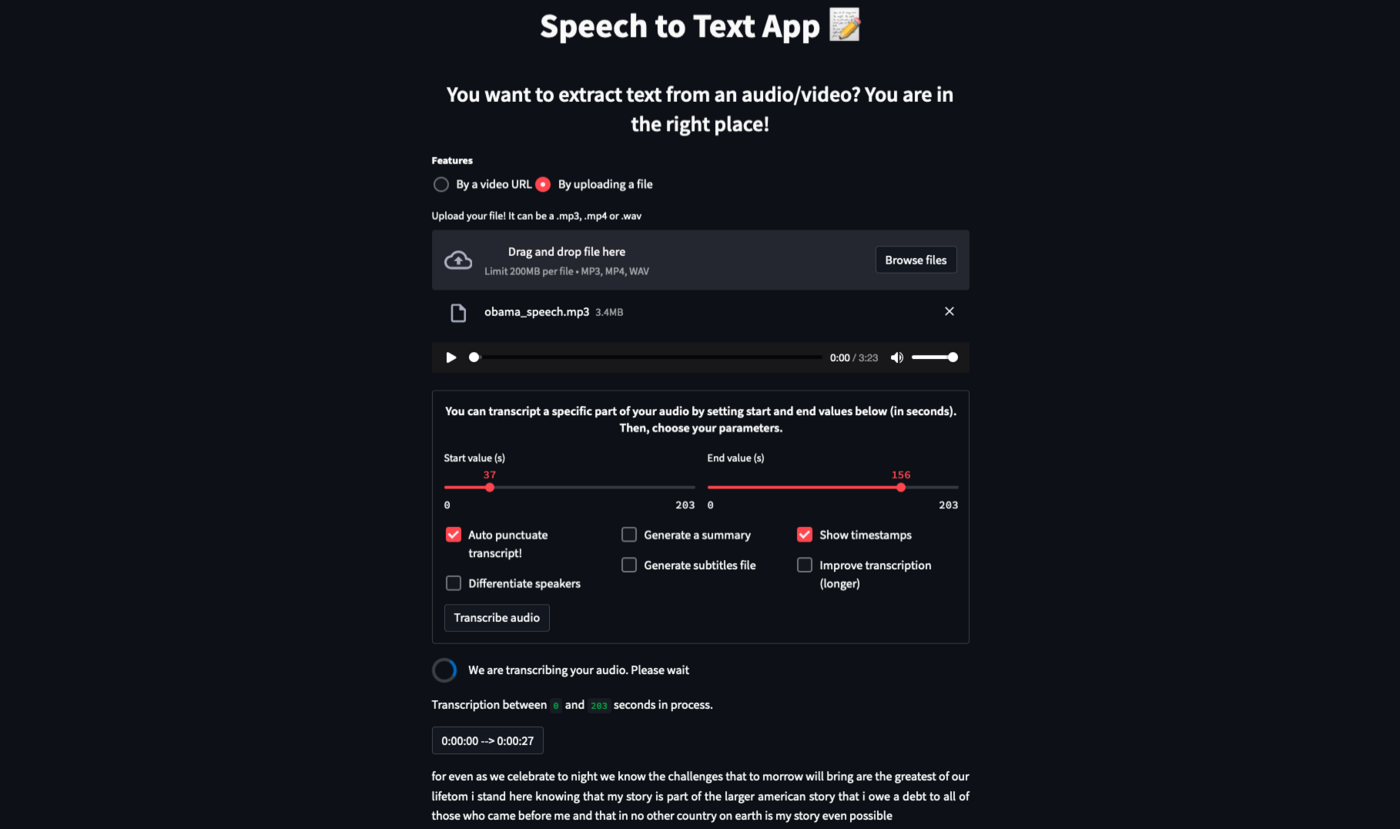
Overview of the Speech to text app:
## Requirements
To deploy your app, you need:
- An AI Deploy Project created inside a [Public Cloud project](https://www.ovhcloud.com/es-es/public-cloud/) in your OVHcloud account
- A [user for AI Deploy](/es/guides/public-cloud/ai-machine-learning/ai-users.md).
- [The OVHcloud AI CLI](/es/guides/public-cloud/ai-machine-learning/ai-cli-install-client.md) **and** [Docker](https://www.docker.com/get-started) installed on your local computer, **or** only an access to a Debian Docker Instance on the Public Cloud.
- To deploy your app, you must have the full code of the application, either by cloning the [GitHub repository](https://github.com/ovh/ai-training-examples/tree/main/apps/streamlit/speech-to-text), or by having followed our [blog article](https://blog.ovhcloud.com/how-to-build-a-speech-to-text-application-with-python-1-3/) that taught you how to build this app step by step.
- If you want the diarization option (speakers differentiation), you will need an access token. This token will be requested at the launch of the application. To create your token, follow the steps indicated on the [model page](https://huggingface.co/pyannote/speaker-diarization). If the token is not specified, the application will be launched without this feature.
## Instructions
You are going to follow different steps to deploy your **Streamlit Speech to Text application**:
- **Write & Install** the libraries and packages in our environment so that our application can work.
- **Write the `Dockerfile`** that contains all the commands to launch our speech to text app.
- **Build the Docker image** from the Dockerfile
- **(Optional) - Import the models and save them locally** in an _Object Storage (volume)_ to speed up the initialization of the app.
- **Deploy your app**.
_If you have cloned the [GitHub repository](https://github.com/ovh/ai-training-examples/tree/main/apps/streamlit/speech-to-text), you will not need to rewrite the files (requirements.txt and Dockerfile) since you already have them. In this case, you can go directly to the "Build the Docker image" step, even if it is better to understand the global operation._
### Write the requirements.txt file for the application
The `requirements.txt` file will allow us to write all the modules needed by our application. This file will be useful for the `Dockerfile`.
Put this file (and the next ones) in the same directory as your python scripts.
```console
librosa==0.9.1
youtube_dl==2021.12.17
numba==0.56.4
streamlit==1.9.0
transformers==4.18.0
httplib2==0.20.2
torch==1.11.0
torchtext==0.12.0
torchaudio==0.11.0
sentencepiece==0.1.96
tokenizers==0.12.1
pyannote.audio==2.1.1
pyannote.core==4.4
pydub==0.25.1
```
### Write the Dockerfile for the application
A `Dockerfile` is a text document that contains all the commands a user could call on the command line to build an image.
This file should start with the `FROM` instruction, indicating the parent image to use. In our case, we choose to start from the official `python:3.8` image:
```console
FROM python:3.8
```
We recommend that you do not downgrade the version of python. Indeed, according to _pyannote.audio's_ [documentation](https://github.com/pyannote/pyannote-audio), only python 3.8+ is officially supported for the moment.
Then, define the home directory and add all your files (python scripts, requirements.txt and the Dockerfile) to it thanks to the following commands:
```console
WORKDIR /workspace
ADD . /workspace
```
With AI Deploy, `workspace` will be your home directory.
We can now install our needed system packages. To do this, use `apt-get`, which is a command-line tool which helps in handling packages:
```console
RUN apt-get update && apt-get install -y ffmpeg libsndfile1-dev
```
Use a `pip install ...` command to install our needed python modules that are in the `requirements.txt` file:
```console
RUN pip install -r requirements.txt
```
Once your environment is set up, define your default launching command to start the application:
```console
CMD [ "streamlit" , "run" , "/workspace/main.py", "--server.address=0.0.0.0" ]
```
Finally, create a `data` folder which will temporarily store users' audio files until they are transcribed. Then, give correct access rights to the **OVHcloud user** (`42420:42420`):
```console
RUN mkdir /data ; chown -R 42420:42420 /workspace /data
ENV HOME=/workspace
```
### Build the Docker image from the Dockerfile
From the directory containing your **Dockerfile**, run one of the following commands to build your application image:
```console
# Build the image using your machine's default architecture
docker build . -t streamlit_app:latest
# Build image targeting the linux/amd64 architecture
docker buildx build --platform linux/amd64 -t streamlit_app:latest .
```
- The **first command** builds the image using your system’s default architecture. This may work if your machine already uses the `linux/amd64` architecture, which is required to run containers with our AI products. However, on systems with a different architecture (e.g. `ARM64` on `Apple Silicon`), the resulting image will not be compatible and cannot be deployed.
- The **second command** explicitly targets the `linux/AMD64` architecture to ensure compatibility with our AI services. This requires `buildx`, which is not installed by default. If you haven’t used `buildx` before, you can install it by running: `docker buildx install`
:::info
The dot `.` argument indicates that your build context (place of the **Dockerfile** and other needed files) is the current directory.
The `-t` argument allows you to choose the identifier to give to your image. Usually image identifiers are composed of a **name** and a **version tag** `:`. For this example we chose **streamlit\_app:latest**.
:::
### Push the image into the shared registry
:::warning
The shared registry should only be used for testing purposes. Please consider creating and attaching your own registry. More information about this can be found [here](/es/guides/public-cloud/ai-machine-learning/ai-manage-registries.md). The images pushed to this registry are for AI Tools workloads only, and will not be accessible for external uses.
:::
Find the address of your shared registry by launching this command:
```console
ovhai registry list
```
Log in on your shared registry with your usual AI Platform user credentials:
```console
docker login -u -p
```
Tag the compiled image and push it into your shared registry:
```console
docker tag streamlit_app:latest /streamlit_app:latest
docker push /streamlit_app:latest
```
### Import the models and save them locally (Optional)
As we explained in the blog article, you will considerably reduce the initialization time of the app if you download the models and store them in a local folder. This will allow you not to have to download them again every time you relaunch the application.
To do this, we will use **AI Training**. This will allow us to launch a python script from _GitHub_ that will **download the models and store them in an OVHcloud volume** named `speech_to_text_app_models`.
When the models will be downloaded and added to this volume, the status of the job will automatically switch from `Running` to `Done` and the **job will be immediately stopped**. This operation should be quite fast.
_Unfortunately, the diarization model can't be saved anymore since pyannote.audio v2. The application will load it in the classical way, by using your model access token, which will be requested by the application once launched._
To launch this **AI Training** job and download the models, use the following OVHcloud's CLI command:
```console
ovhai job run /streamlit_app:latest \
--cpu 12 \
--volume speech_to_text_app_models@GRA/:/workspace/speech_to_text_app_models:RW \
--volume https://github.com/ovh/ai-training-examples.git:/workspace/github_repo:rw \
-- bash -c 'python /workspace/github_repo/apps/streamlit/speech-to-text/download_models.py'
```
:::info
`streamlit_app:latest` corresponds to the name of your Docker image.
`--volume` allows you to specify what volume you want to add to your job. As mentioned, we add the volume `speech_to_text_app_models` and we put it in `RW` (read and write) mode since we want to add our models to this volume. If you do not have this volume in your Object Storage list, do not worry, it will be created automatically. As you can see, the `--volume` parameter also allows you to get files from a GitHub repository, which in our case contains the script to download the models.
`--bash` allows you to provide commands through which you install the libraries mentioned in your `requirements.txt` file, and run the python script.
:::
When you run this command, an `Info url` will appear. Opening it will allow you to **track the status of the job**.
Once the _GitHub_ repository is recovered, the python script will be launched and the job status will switch to `Running`. Then, you just have to wait for the job to end.
We advise you to **turn on the auto-refresh option** (`Running` status automatically disables it). This will allow you to see when the job will end (job status switches to `Done`). Otherwise, you can refresh the page manually.
Once the models have been uploaded and the status is `Done`, you can continue.
### Launch the app on AI Deploy
:::info
If you followed the optional part `Import the models and save them locally`, you can load the volume where your models are stored with the `--volume` parameter. This time, we put this volume in read-only (`RO`) mode because we only need to have an access to the models so we can use them. We don't need to write or delete anything in this Object Storage container.
Otherwise, you can remove the `--volume` line, since it will not bring anything to your app.
:::
The following command starts a new app running your Streamlit application:
```console
ovhai app run \
--default-http-port 8501 \
--gpu 1 \
--volume speech_to_text_app_models@GRA/:/workspace/models:RO \
/streamlit_app:latest
```
:::info
`default-http-port 8501` indicates that the port to reach on the app URL is the `8501`.
`--gpu 1` indicates that we request 1 GPU for our app.
:::
If you want your app to be accessible without the need to authenticate, specify it as follows:
:::info
Consider adding the `--unsecure-http` attribute if you want your application to be reachable without any authentication.
:::
## Feedback
Please send us your questions, feedback and suggestions to improve the service:
- On the OVHcloud [Discord server](https://discord.gg/ovhcloud)
If you need training or technical assistance to implement our solutions, contact your sales representative or click on [this link](https://www.ovhcloud.com/es-es/professional-services/) to get a quote and ask our Professional Services experts for a custom analysis of your project.