---
title: "How to use PuTTY for SSH connections and authentication"
description: "Find out how to access your cloud server or web hosting and manage SSH keys with the PuTTY SSH client software"
url: https://docs.ovhcloud.com/en/guides/web-cloud/web-hosting/ssh-using-putty-on-windows
lang: en
lastUpdated: 2024-11-11
---
# How to use PuTTY for SSH connections and authentication
## Objective
[PuTTY](https://www.chiark.greenend.org.uk/~sgtatham/putty/latest.html) is an open-source SSH client software with a graphical user interface. It was developed for Windows but is available for other operating systems as well and includes useful features, such as SSH key management.
**This tutorial explains how to use PuTTY for secured connections to your OVHcloud service via the SSH protocol.**
## Requirements
- [PuTTY](https://www.chiark.greenend.org.uk/~sgtatham/putty/latest.html) installed on your local device
- A basic understanding of the [SSH protocol and its usage](/en/guides/bare-metal-cloud/dedicated-servers/ssh-introduction.md)
:::warning
OVHcloud provides services for which you are responsible with regard to their configuration and management. This tutorial will illustrate how to use OVHcloud solutions with external tools. You may need to adapt some specific instructions to the operating system of your local device or your server.
We recommend that you contact a [specialist service provider](https://partner.ovhcloud.com/en-gb/directory/) or reach out to [our community](https://community.ovhcloud.com/) if you experience any issues.
:::
***
### OVHcloud Control Panel Access
- **Direct link:** Hosting plans
- **Navigation path:** Web Cloud > Hosting plans > Select your web hosting plan
***
## Instructions
### Content overview
- [Installing PuTTY](#installation)
- [SSH connections with username and password](#sshconnect1)
- [Web hosting plan](#webhosting)
- [Dedicated server or VPS](#cloudserver)
- [SSH connections with username and SSH key authentication](#sshconnect2)
- [Creating SSH keys with PuTTY](#puttygen)
- [Transferring public SSH keys to your server](#transferkeys)
- [Connecting to your server](#puttykeys)
- [Managing private SSH keys on a local device (PuTTY authentication agent)](#pageant)
- [Using PuTTY connection sessions](#sessions)
- [Use case example: How to use PuTTY tools to configure secure connections to OVHcloud servers (VPS, dedicated server, Public Cloud instance)](#example)
[](#)
### Installing PuTTY
Download the latest release version of the PuTTY client from [the official website](https://www.chiark.greenend.org.uk/~sgtatham/putty/latest.html) and install it on your system (or extract the executable files). Ported versions of PuTTY might also be available via your software package manager or [Homebrew](https://brew.sh/).
The recommended standard installation package includes several applications that enhance the functionality of PuTTY, namely for file transfers (`psftp`, `pscp`, not covered in this tutorial) and SSH key management (`PuTTYgen`, `Pageant`, required for the corresponding parts below).
:::info
The following instructions are based on a Windows operating system. The functionality of the PuTTY software itself should be consistent across operating systems. However, if you are not using PuTTY on a Windows device, you may need to consult the documentation of your operating system or the [official FAQ](https://www.chiark.greenend.org.uk/~sgtatham/putty/faq.html) and [documentation](https://www.chiark.greenend.org.uk/~sgtatham/putty/docs.html) of PuTTY.
:::
:::tip
You can have multiple instances of PuTTY and its companion tools opened simultaneously. For example, you can open one window to follow the tutorial steps and a second one to test connections.
:::
[](#)
### SSH connections with PuTTY - Username and password
This section explains how to establish a first SSH connection to the following OVHcloud services:
- [FTP storage space of a web hosting plan that is capable of SSH](https://www.ovhcloud.com/en-gb/web-hosting/compare/)
- [Dedicated server](https://www.ovhcloud.com/en-gb/bare-metal/)
- [VPS](https://www.ovhcloud.com/en-gb/vps/)
[](#)
#### Web hosting plan
You will need the cluster name of your web hosting plan which you can find in the OVHcloud Control Panel
, as well as the FTP username and password. Consult [the corresponding guide](/en/guides/web-cloud/web-hosting/ftp-connection.md)
if you need further information on this access method.
How to connect to a web hosting plan
Open PuTTY and enter the FTP login credentials for your web hosting plan into the appropriate fields.
- `Host Name (or IP address)`: **ftp\_username\@hosting\_cluster\_name** (example: **[yourlogin@ssh.cluster042.hosting.ovh.net](mailto:yourlogin@ssh.cluster042.hosting.ovh.net)**)
- `Port`: 22
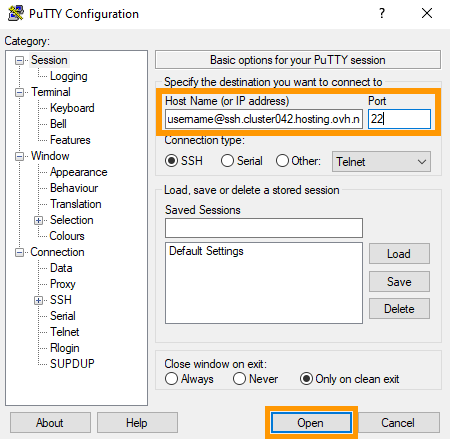Click on Open.
At the first connection, the "PuTTY Security Alert" will appear, informing you about possible risks. This is usually not a concern, as long as you are connecting to a trusted host (such as a web hosting plan's FTP storage).\
Click Accept to proceed. If you select Connect Once, the web hosting's fingerprint will not be saved to the cache and the alert window will show up at the next connection. You can find further details in our [SSH introduction](/en/guides/bare-metal-cloud/dedicated-servers/ssh-introduction.md).
The command line window (PuTTY terminal) will open and prompt you to enter the FTP login password.
Enter the password you have [assigned to this user](/en/guides/web-cloud/web-hosting/ftp-connection.md). You can paste the password string into this window with a right-click.
Note that **a password prompt will not display your keyboard inputs** in a PuTTY terminal. Example output:
```console
Using username "yourlogin".
yourlogin@ssh.cluster042.hosting.ovh.net's password:
```
```console
Welcome to OVH
yourlogin@ssh.cluster042.hosting.ovh.net (php/7.3/production/stable) ~ $
```
Consult our guide on [SSH access for OVHcloud web hosting plans](/en/guides/web-cloud/web-hosting/ssh-on-webhosting.md) to learn which actions are possible on your web hosting's FTP storage space.
PuTTY can save credentials and parameters of an SSH connection as a "session". This allows you to connect to known hosts or local network devices without entering their respective details each time. Learn how to use PuTTY sessions in the [section below](#sessions).
[](#)
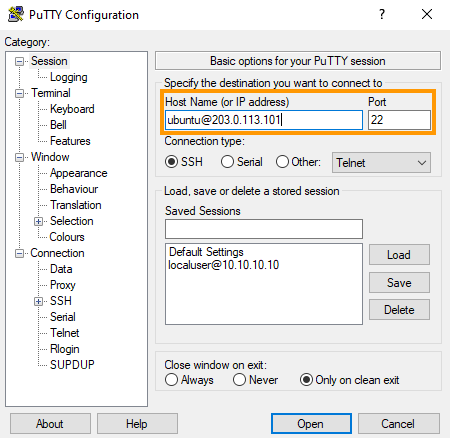
#### Dedicated server or VPS
You will need the IP address of your server which you can find in the OVHcloud Control Panel
and the name of the user account you want to use for this login session. Consult our "Getting started" guides if you require further details on this topic:
- [Dedicated server](/en/guides/bare-metal-cloud/dedicated-servers/getting-started-with-dedicated-server.md)
- [Dedicated server of the **Eco** product line](/en/guides/bare-metal-cloud/dedicated-servers/getting-started-with-dedicated-server-eco.md)
- [VPS](/en/guides/bare-metal-cloud/virtual-private-servers/starting-with-a-vps.md)
How to connect to a remote host
Open PuTTY and enter the login credentials into the appropriate fields.
- `Host Name (or IP address)`: **username\@IPv4\_server** (example: **ubuntu\@203.0.113.101**)
- `Port`: 22 (unless you have changed the SSH port number of your server)
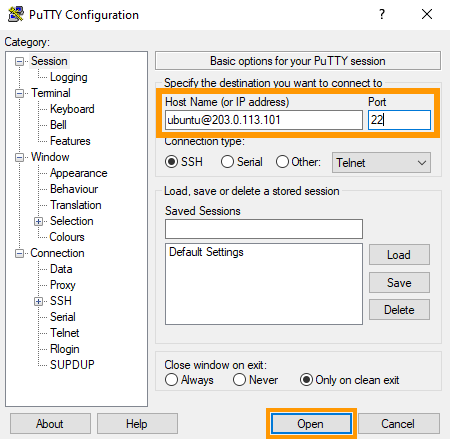Click the button Open.
At the first connection, the "PuTTY Security Alert" window will appear, informing you about possible risks. This is usually not a concern, as long as you are connecting to a trusted host (such as your own secured server).\
Click Accept to proceed. If you select Connect Once, the server's fingerprint will not be saved to the cache and the alert will show up again at the next connection. You can find further details in our [SSH introduction](/en/guides/bare-metal-cloud/dedicated-servers/ssh-introduction.md).
The command line window (PuTTY terminal) will open and prompt you to enter the user account's password. You can paste the password string into this window with a right-click.
Note that **a password prompt will not display your keyboard inputs** in a PuTTY terminal. Example output:
```console
Using username "ubuntu".
ubuntu@203.0.113.101's password:
```
```console
Welcome to Ubuntu 24.04.1 LTS (GNU/Linux 6.8.0-47-generic x86_64)
```
You can learn more about SSH connections in our [SSH introduction](/en/guides/bare-metal-cloud/dedicated-servers/ssh-introduction.md).
PuTTY can save the parameters of an SSH connection as a "session". This allows you to connect to known remote hosts or local network devices without entering their respective details each time. Learn how to use **PuTTY sessions** in the [corresponding section of this tutorial](#sessions).
[](#)
### SSH connections with PuTTY - Username and authentication key (SSH key files)
This part of the tutorial explains how to use SSH with **key pair authentication** in PuTTY to connect to the following OVHcloud services:
- [Public Cloud instance](https://www.ovhcloud.com/en-gb/public-cloud/)
- [Dedicated server](https://www.ovhcloud.com/en-gb/bare-metal/)
- [VPS](https://www.ovhcloud.com/en-gb/vps/)
You will need the IP address of your server which you can find in the OVHcloud Control Panel
and the name of the user account you want to use for this login session. Consult our "Getting started" guides if you require further details on this topic:
- [Public Cloud instance](/en/guides/public-cloud/compute/first-steps-with-public-cloud-instance.md)
- [Dedicated server](/en/guides/bare-metal-cloud/dedicated-servers/getting-started-with-dedicated-server.md)
- [Dedicated server of the **Eco** product line](/en/guides/bare-metal-cloud/dedicated-servers/getting-started-with-dedicated-server-eco.md)
- [VPS](/en/guides/bare-metal-cloud/virtual-private-servers/starting-with-a-vps.md)
:::info
PuTTY stores key files in a specific format which makes them incompatible with SSH key files created with the **OpenSSH** client. If you want to use a **private key** previously created with the command line SSH client (e.g. for a [server](/en/guides/bare-metal-cloud/dedicated-servers/creating-ssh-keys.md) or a [Public Cloud instance](/en/guides/public-cloud/compute/creating-ssh-keys.md)), you will need to [convert it to the PuTTY format](https://www.chiark.greenend.org.uk/~sgtatham/putty/faq.html#faq-ssh2-keyfmt) first.
:::
[](#)
#### Creating SSH keys (PuTTY key generator)
This step requires the PuTTY companion tool **PuTTY key generator** (PuTTYgen).
How to create SSH keys with PuTTYgen
##### Step 1: Create a key pair
Open the PuTTYgen application and select the encryption algorithm. This example uses **RSA**. Enter "4096" into the field `Number of bits in a generated key:` at the bottom.
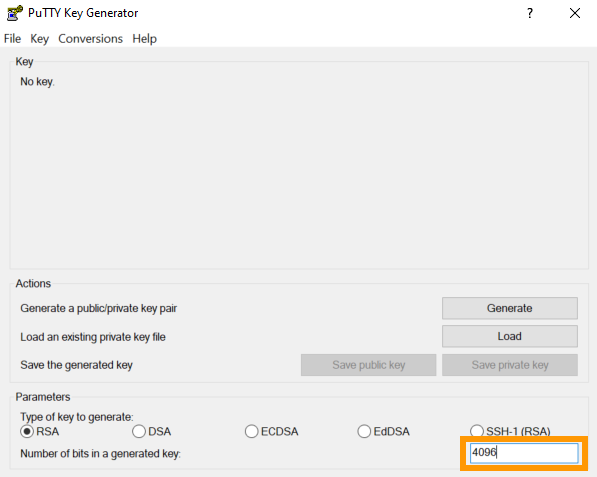Click on the button Generate.
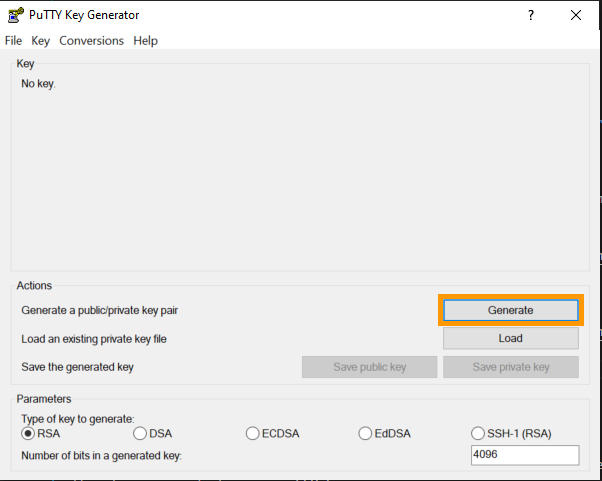A progress bar will appear. Move your mouse cursor about the area below the progress bar until PuTTYgen has enough randomized data to start generating your key.
You now have a **key pair**, consisting of two elements:
- **Public key**: The key string that will be stored on the remote host(s) to which you want to connect.
- **Private key**: The key string that remains on the local device from which you connect to a remote host (or several).
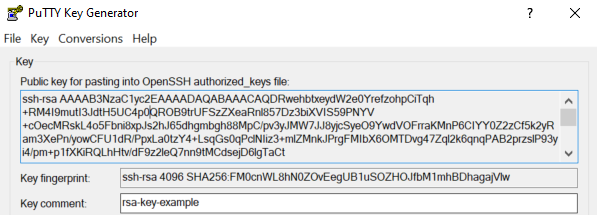You can optionally edit the field `Comment` with your own description. It will be displayed by PuTTY tools when using the key.
##### Step 2: Save the private key
Enter a passphrase to protect your private key file into the fields `Key passphrase` and `Confirm`. The best practice approach is to use a password manager to create and store a password consisting of multiple words (passphrase).
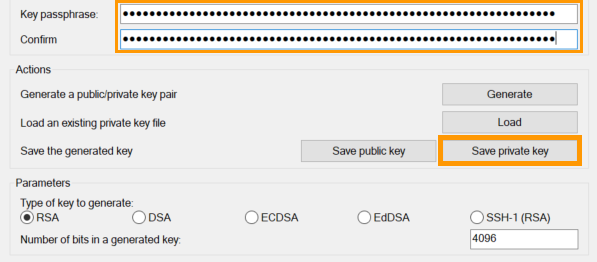Click on the button Save private key. Select a folder for your key files or create a new one, named `putty_key_files` for example.\
Enter a name for your file and save it. You should now have a new **private key** file with the extension `ppk` (_PuTTY private key_) in your folder.
:::warning
Access to remote servers is only as secure as the client device storing the private key. Protecting your device and the key files stored on it from unauthorized access is therefore crucial.
For increased convenience, store passphrases in a password manager on your device, such as the open-source solution **KeePass**, and use the [Pageant tool](#pageant) for key-based connections.
:::
The button Save public key in the PuTTYgen interface will convert the **public key** string into the "SSH-2 standard format" and then create a file containing this string. Key strings of that format however are not relevant for this tutorial.
##### Step 3: Prepare the public key
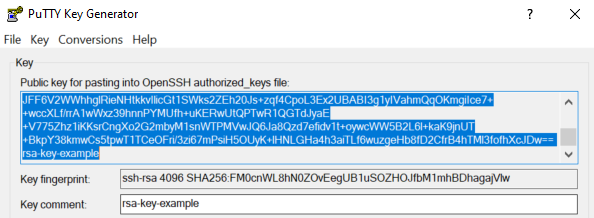
The next step will be to store the **public key** on the remote host to which you want to connect. The format of the key string as it is displayed in the PuTTYgen window under `Public key for pasting into OpenSSH authorized_keys file` is compatible with OpenSSH. You will need the exact key string as one line.
:::info
There is no need to store the public key as a file since you can always retrieve it from the **private key** file. To do this, open PuTTYgen and click on the button Load. Select your `ppk` key file and enter your passphrase to open it.
:::
Alternatively, you can copy the public key string and paste it into a plain text file (without interrupting the key string with line breaks).
To follow up with [the next step](#transferkeys), be sure to highlight **the entire key string** and copy it.
[](#)
#### Transferring public SSH keys to your server
The actions in this step depend on the type of service you are using and whether you are going to install a new operating system or add the key to a system that is in use.
How to add a public SSH key when installing or reinstalling an OS (OVHcloud Control Panel)
Click on the tab for your service:
**Public Cloud instance**
Highlight and copy **the entire public key string** you have [created in the previous step](#puttygen) from the PuTTYgen window. (Open the corresponding **private key file** first if necessary.) Then use it as instructed in the corresponding section of our [guide on how to create a Public Cloud instance in the OVHcloud Control Panel](/en/guides/public-cloud/compute/first-steps-with-public-cloud-instance.md).

**Dedicated server**
Highlight and copy **the entire public key string** you have [created in the previous step](#puttygen) from the PuTTYgen window. (Open the corresponding **private key file** first if necessary.) Then enter it into the appropriate field during the installation process. You can find the details in our [guide on how to get started with a dedicated server](/en/guides/bare-metal-cloud/dedicated-servers/getting-started-with-dedicated-server.md).

**VPS**
Highlight and copy **the entire public key string** you have [created in the previous step](#puttygen) from the PuTTYgen window. (Open the corresponding **private key file** first if necessary.) Then enter it into the appropriate field during the installation process. You can find the details in our [guide on how to get started with a VPS](/en/guides/bare-metal-cloud/virtual-private-servers/starting-with-a-vps.md).

**How to add a public SSH key on a running OS**
Select your service type:
Public Cloud instance
Highlight and copy **the entire public key string** you have [created in the previous step](#puttygen) from the PuTTYgen window. (Open the corresponding **private key file** first if necessary.) Then follow the instructions in the appropriate guide:
- [How to configure additional SSH keys on an instance](/en/guides/public-cloud/compute/configuring-additional-ssh-keys.md)
- [How to replace an SSH key pair on a Public Cloud instance](/en/guides/public-cloud/compute/replacing-lost-ssh-key-pair.md)

Dedicated server or VPS
[Connect to your server](#cloudserver) with the user account concerned. Create the folder `.ssh` (if it does not exist):
```bash
mkdir ~/.ssh
```
To store the key for the current user, open (or create) the file `authorized_keys` with your preferred text editor (`nano` is used in this example):
```bash
nano ~/.ssh/authorized_keys
```
Highlight and copy **the entire public key string** you have [created in the previous step](#puttygen) from the PuTTYgen window. (Open the corresponding **private key file** first if necessary.)
Paste your **the entire public key string** into this file. Ensure that the key string is still uninterrupted, with no line breaks.
Save the file and exit the editor. Reboot your server (`sudo reboot`) or only restart the OpenSSH service with one of the following commands (the appropriate command may vary depending on your OS):
```bash
sudo systemctl restart ssh
```
```bash
sudo systemctl restart sshd
```
Quit the current PuTTY session:
```bash
logout
```
To verify that your key is set up properly, connect to your server by following the [steps described below](#puttykeys).
[](#)
#### Connecting to your server
In order to connect to a remote host (Public Cloud instance, dedicated server or VPS), you need to have [created the key pair](#puttygen) and [added the public key string to your server](#transferkeys).
|  |
| ------------------------------------------------------------------------------------------------------------------------------------------------------------------------------------------------------------------------------------------------------------------------------------------------------------------------------------------------------------ |
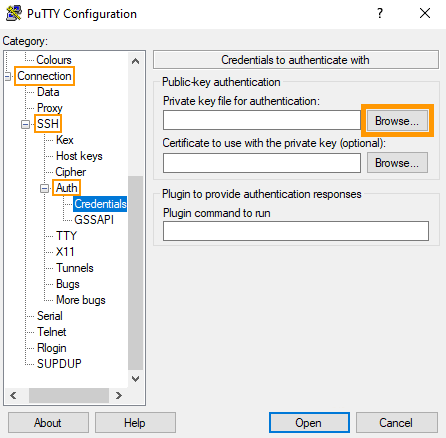
| 1. Open PuTTY.
|
| ------------------------------------------------------------------------------------------------------------------------------------------------------------------------------------------------------------------------------------------------------------------------------------------------------------------------------------------------------------ |
| 1. Open PuTTY.
2. Expand the node `SSH` under `Connection` in the `Category` tree.
3. Expand the node `Auth`.
4. Click `Credentials` to see the corresponding settings.
5. Click the button Browse.
6. Select the private key file (`keyfile.ppk`) from the folder in which you have saved it. |
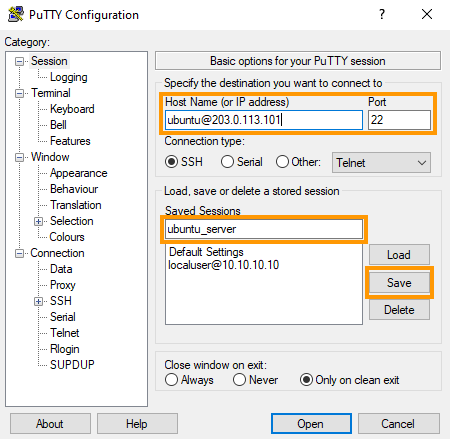
Navigate back to `Session` in the left-hand menu. Enter the login credentials into the appropriate fields.

- `Host Name (or IP address)`: **username\@IPv4\_server** (example: **ubuntu\@203.0.113.101**)
- `Port`: 22 (unless you have changed the SSH port number of your server)
Click the button `Open
`. The PuTTY terminal will prompt you for the password of the key file. You can paste the password string into this window with a right-click.
Note that **a password prompt will not display your keyboard inputs** in a PuTTY terminal. Example output:
```console
Using username "ubuntu".
Authenticating with public key "rsa-key-example"
Passphrase for key "rsa-key-example":
```
```console
Welcome to Ubuntu 24.04.1 LTS (GNU/Linux 6.8.0-47-generic x86_64)
```
For a more convenient process, find out how to associate a key file with Pageant and [save this connection](#sessions) in the sections below.
[](#)
#### Managing SSH keys on a local device with Pageant (PuTTY authentication agent)
If you have followed the instructions above, you can access your remote host via key authentication. While the connection itself does not require a password, PuTTY will still ask for the password of the corresponding private key file.

Using Pageant enables faster connections in two ways:
- You do not need to select the private key file for each connection in PuTTY.
- You only need to enter the passphrase for the private key file once, when the key file is opened by Pageant.
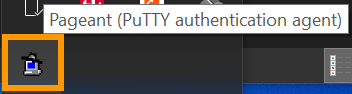
Open the Pageant application [on your device](#installation). Since the Pageant key window will not open automatically, you need to (double-)click on its icon in your taskbar ("system tray" in Windows).
This will open the **Pageant Key List**
. Click the button `Add Key
`, and select the private key file (`keyfile.ppk`
) from the folder in which you have saved it.
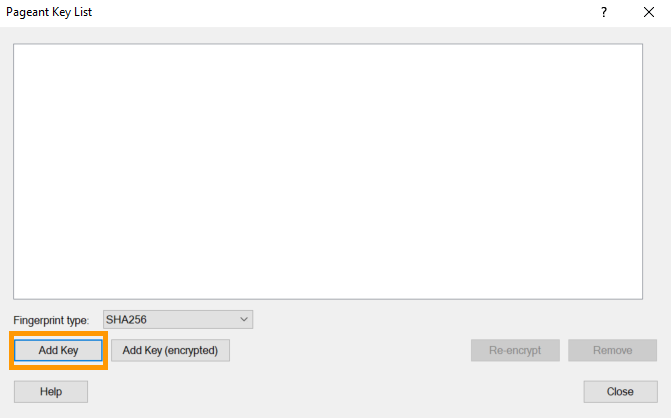
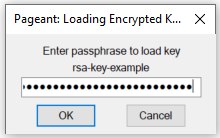
Enter the passphrase for this key file. The key is now on the list and will be used by PuTTY as long as Pageant is running.
Even if you close this window, Pageant will continue to run in the background. It will function as long as the icon is present in the taskbar.
If you also save your connection as a session in PuTTY as described in the following section, you will be able to open remote connections with only a few clicks.
[](#)
### Using PuTTY connection sessions
PuTTY has the ability to store parameters for different connections as sessions, enabling you to establish a connection to the destination host (web hosting, server, instance, local network device) faster.
Select the relevant connection method:
Login with username and password
To store a [password-based connection session](#sshconnect1), carry out the following actions:
|  |
| ------------------------------------------------------------------------------------------------------------------------------------------------------------------------------------------------------------------------------------------------------------------------------------------------------------------------------------------------------------------------------------------------- |
| 1. Open PuTTY.
|
| ------------------------------------------------------------------------------------------------------------------------------------------------------------------------------------------------------------------------------------------------------------------------------------------------------------------------------------------------------------------------------------------------- |
| 1. Open PuTTY.
2. Enter the connection details into the field under `Host Name (or IP address)`: **username\@IPv4\_server** (example: **ubuntu\@203.0.113.101**)
3. If relevant, edit the SSH port number in the field under `Port`.
4. Enter a name for this connection into the field under `Saved Sessions`.
5. Click the button Save. |
To open a connection saved previously, carry out the following actions:
| 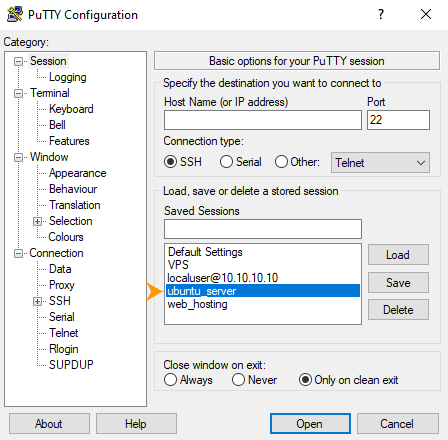 |
| ------------------------------------------------------------------------------------------------------------------------------------------------------------------- |
| 1. Open PuTTY.
|
| ------------------------------------------------------------------------------------------------------------------------------------------------------------------- |
| 1. Open PuTTY.
2. Double-click the desired session in the list under `Saved Sessions` or select it and click the button Open. |
|  |
| ---------------------------------------------------------------------------------------------------------------------------- |
| In the PuTTY terminal window, enter the user password of the remote host. |
[](#)
Login with username and authentication keys
To store a [key-based connection session](#puttykeys), carry out the following actions:
|
|
| ---------------------------------------------------------------------------------------------------------------------------- |
| In the PuTTY terminal window, enter the user password of the remote host. |
[](#)
Login with username and authentication keys
To store a [key-based connection session](#puttykeys), carry out the following actions:
|  |
| ------------------------------------------------------------------------------------------------------------------------------------------------------------------------------------------------------------------------------------------------ |
| 1. Open PuTTY.
|
| ------------------------------------------------------------------------------------------------------------------------------------------------------------------------------------------------------------------------------------------------ |
| 1. Open PuTTY.
2. Enter the connection details into the field under `Host Name (or IP address)`: **username\@IPv4\_server** (example: **ubuntu\@203.0.113.101**)
3. If relevant, edit the SSH port number in the field under `Port`. |
| |
| ----------------------------------------------------------------------------------------------------------------------------------------------------------------------------------------------------------------------------------------------------------------------------------------------------------------------------------------------------------------------- |
| 4. Expand the node `SSH` under `Connection` in the `Category` tree.
5. Expand the node `Auth` in the `Category` tree.
6. Click `Credentials` to see the corresponding settings.
7. Click the button Browse.
8. Navigate to the folder that stores your private key files.
9. Open the key file concerned. |
|  |
| ------------------------------------------------------------------------------------------------------------------------------------------------------------------------------------------------------------------------------- |
| 10. Go back to the configuration category `Session` in the menu on the left.
|
| ------------------------------------------------------------------------------------------------------------------------------------------------------------------------------------------------------------------------------- |
| 10. Go back to the configuration category `Session` in the menu on the left.
11. Enter a name for this connection into the field under `Saved Sessions`.
12. Click the button Save. |
[](#)You can now open any previously saved key-based connection quickly from the PuTTY window or via Pageant:
| **PuTTY** | **Pageant** |
| ------------------------------------------------------------------------------------------------------------------------------------------------------------------------------------------------------------------------------- | --------------------------------------------------------------------------------------------------------------------------------------------------------------------------------------------------------------------------------------------------------- |
|
1. Open PuTTY.
2. Double-click the desired session in the list under `Saved Sessions`. | 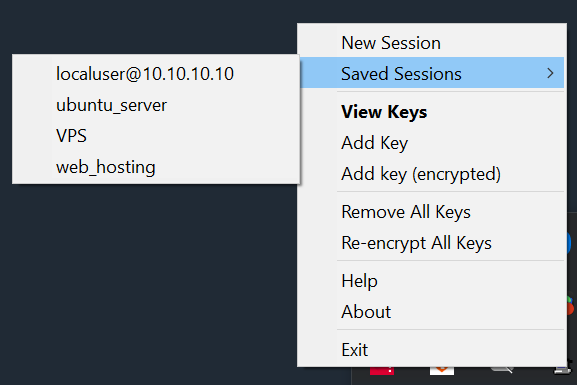
1. Right-click the icon of Pageant in the taskbar.
2. Click the desired session from the submenu `Saved Sessions`. |
To edit the parameters of a session, select it from the list and click the button `Load
`.
[](#)
### Use case example: How to use PuTTY tools to configure secure connections to OVHcloud servers (VPS, dedicated server, Public Cloud instance)
This tutorial can be applied to various scenarios and different types of connections.\
By following these steps in order, you can configure your connections so that they can be opened with a few clicks:
- Step 1: [Install the PuTTY package](#installation)
- Step 2: [Create a key pair in PuTTYgen](#puttygen)
- Step 3: [Add the public key to your remote host](#transferkeys)
- Step 4: [Add the private key to Pageant](#pageant)
- Step 5: [Save the connection as a session in PuTTY](#sessions)
- Step 6: [Connect to your remote host via the corresponding saved session](#qconnect)
## Go further
[Introduction to SSH](/en/guides/bare-metal-cloud/dedicated-servers/ssh-introduction.md)
[How to create SSH keys with OpenSSH](/en/guides/bare-metal-cloud/dedicated-servers/creating-ssh-keys.md)
[How to create SSH keys with OpenSSH for Public Cloud instances](/en/guides/public-cloud/compute/creating-ssh-keys.md)
For specialized services (SEO, development, etc.), contact [OVHcloud partners](https://partner.ovhcloud.com/en-gb/directory/).
If you would like assistance using and configuring your OVHcloud solutions, please refer to our [support offers](https://www.ovhcloud.com/en-gb/support-levels/).
Join our [community of users](https://community.ovhcloud.com/).