---
title: "How to associate a domain name with an existing website?"
description: "Discover how to associate a domain name or subdomain with an existing website on your web hosting"
url: https://docs.ovhcloud.com/en/guides/web-cloud/web-hosting/my-websites-add-domain-existing-website
lang: en
lastUpdated: 2026-09-25
---
> For AI agents: the complete documentation index is available at https://docs.ovhcloud.com/en/llms.txt, the full documentation bundle is available at https://docs.ovhcloud.com/en/llms-full.txt.
# How to associate a domain name with an existing website?
## Objective
You can host multiple websites on the same web hosting plan, even if the domain names are not registered with OVHcloud. In addition, you can associate one or more domain names or subdomains with the same website.
:::info
If you have not yet created the relevant website on your web hosting, please consult **directly** [this guide](https://docs.ovhcloud.com/en/guides/web-cloud/web-hosting/multisites-configure-multisite.md).
:::
**Discover how to associate a domain name or subdomain with an existing website on your web hosting.**
## Requirements
- A compatible [OVHcloud web hosting plan](https://www.ovhcloud.com/en-gb/web-hosting/uc-multisite/)
- One or more [domain names](https://www.ovhcloud.com/en-gb/domains/)
- Access to modify the configuration of the [DNS zones of your domain names](https://docs.ovhcloud.com/en/guides/web-cloud/domains/dns-zone-edit.md)
***
### OVHcloud Control Panel Access
- **Direct link:** Hosting plans
- **Navigation path:** Web Cloud > Hosting plans > Select your web hosting plan
***
## Instructions
### Add a domain name or subdomain to an existing website
**Click on one of the titles below to display the explanations.**
[](#)
Add a domain name managed from your OVHcloud Control Panel
This section applies only if your domain name and/or its active DNS zone are **in your OVHcloud Control Panel**.
Click on the tabs below to view each of the **6** steps.
**Step 1**
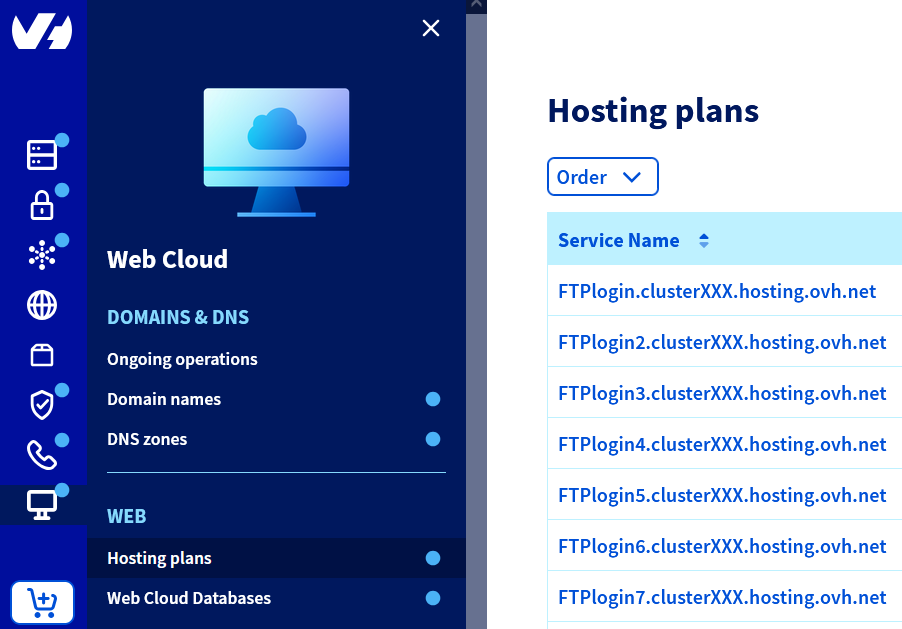
Go to the Hosting plans page, then select the web hosting plan concerned.
**Step 2**
On the page that opens, click on the My sites tab.

**Step 3**
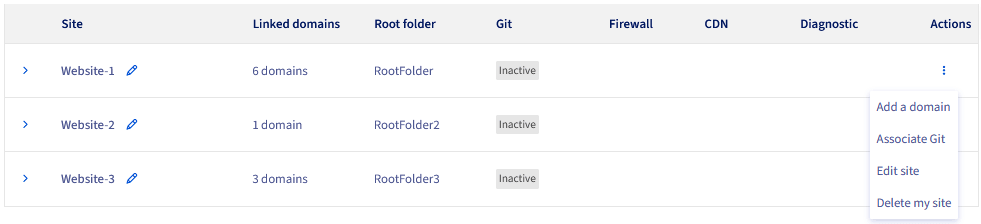
In the table that appears, click on the ⁝ button to the right of the relevant website, then on Add a domain.
**Step 4**
Tick the option Associate an existing OVHcloud domain and click on Continue.
Then select the domain name to associate from the drop-down menu **Domain name - required** that appears below.
:::info
To add a subdomain, first select the domain name from the list (e.g., domain.tld). Then tick the box labeled Create a subdomain. A field will appear for you to enter the subdomain (e.g., **sub**.domain.tld).
**Special case**: The subdomain `www` (e.g., **www**.domain.tld) is automatically added in addition to the domain name. Therefore, it is unnecessary to specify this particular subdomain in the input field.
:::
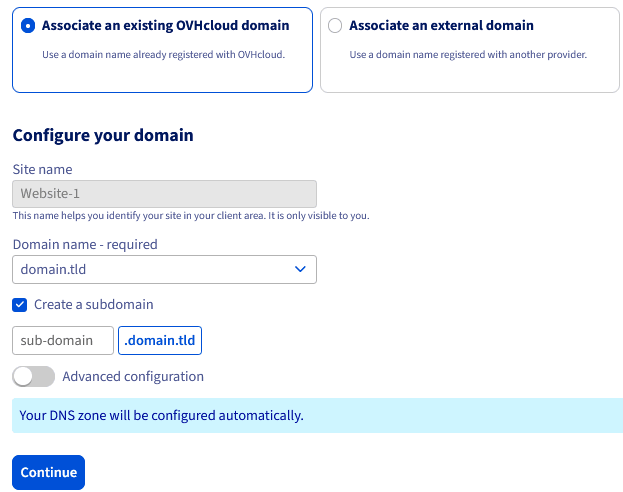If you wish to use one of the **advanced options** available, activate the Advanced configuration button and go directly to **Step 7**. Otherwise, proceed to **Step 6**.
**Step 5**
Check that all the previously entered information is correct, then click on Continue to finalise the addition of your domain name or subdomain to your website.
This addition may take up to an hour.
The DNS configuration will be done automatically if the active DNS zone of your domain name is managed in your OVHcloud Control Panel.
Otherwise, consult the following guides to manually configure your DNS zone:
- [Web hosting - List of IP addresses by cluster](https://docs.ovhcloud.com/en/guides/web-cloud/web-hosting/clusters-and-shared-hosting-ip.md)
- [Edit an OVHcloud DNS zone](https://docs.ovhcloud.com/en/guides/web-cloud/domains/dns-zone-edit.md)
:::info
Modifying the DNS configuration of your domain name requires a propagation delay that can take up to 24 hours before it is fully effective.
:::
**Step 6**
:::info
This step is **optional**. It is only for customers who wish to activate certain features available via the Advanced configuration button.
**All these features can be activated later, once the domain name has been added to your website.** In this specific case, please consult directly [this guide](https://docs.ovhcloud.com/en/guides/web-cloud/web-hosting/multisites-modify-domain.md).
Below is a description of these options.
Depending on your [web hosting](https://www.ovhcloud.com/en-gb/web-hosting/) plan, some of the options proposed may not be selectable.
:::
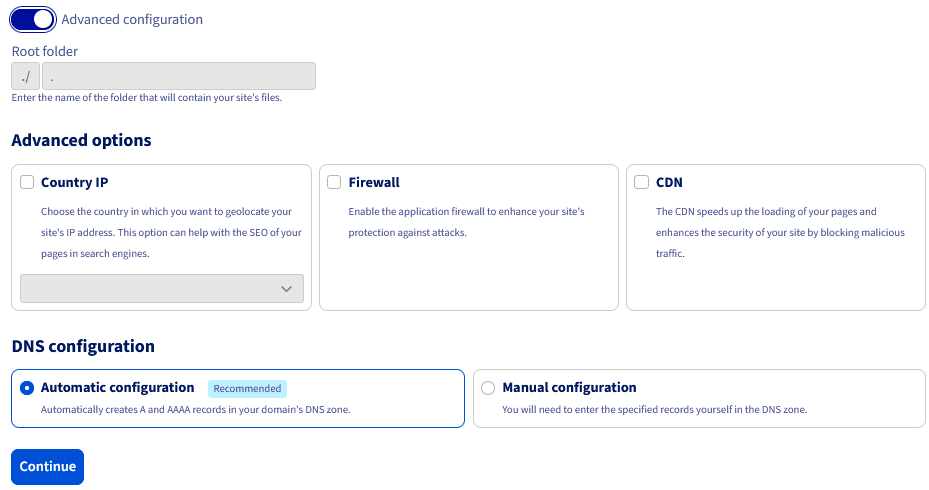| Option | Description |
| ----------------- | ------------------------------------------------------------------------------------------------------------------------------------------------------------------------------------------------------------------------------------------------------------------------------------------------------------------------------------------------------------------------------------- |
| IP of the country | Allows you to benefit from a geolocated IP address (from a list of countries) for the selected domain name.
Learn more from [this page](https://www.ovhcloud.com/en-gb/web-hosting/options/). |
| Firewall | Allows you to activate a firewall (filtering and analysis of requests) on the selected domain name.
Learn more from [this page](https://www.ovhcloud.com/en-gb/web-hosting/options/). |
| CDN | Allows you to activate the CDN (caching of static elements of your website, such as images) on the selected domain name.
Learn more from [our CDN page](https://www.ovhcloud.com/en-gb/web-hosting/options/cdn/).
By activating SSL and the CDN, you will also benefit from the **HTTP/2** protocol (this protocol is activated by default in our Gravelines datacentre). |
Once the Advanced configuration button is activated, you can also choose the DNS configuration mode for your domain name:
- **For automatic DNS configuration**, leave the Automatic configuration (recommended) box ticked.
- **For manual DNS configuration**, tick the Manual configuration box. To carry out the configuration, refer to the following guides:
- [Web hosting - List of IP addresses by cluster](https://docs.ovhcloud.com/en/guides/web-cloud/web-hosting/clusters-and-shared-hosting-ip.md)
- [Edit an OVHcloud DNS zone](https://docs.ovhcloud.com/en/guides/web-cloud/domains/dns-zone-edit.md)
Once your choices have been made, click on the Continue button to finalise the addition of your domain name or subdomain to your website. This addition may take up to an hour.
However, the modification of the DNS configuration of your domain name requires a propagation delay that can take up to 24 hours before it is fully effective.
Add an external domain name
This section applies only if your domain name is not present in your OVHcloud account.
Click on the tabs below to view each of the **6** steps.
**Step 1**
Go to the Hosting plans page, then select the web hosting plan concerned.

**Step 2**
On the page that opens, click on the My sites tab.

**Step 3**
In the table that appears, click on the ⁝ button to the right of the relevant website, then on Add a domain.

**Step 4**
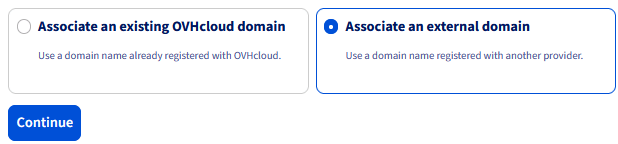
Tick the option Associate an external domain and click on Continue.
**Step 5**
Enter the domain name (e.g., domain.tld) or subdomain (e.g., **sub**.domain.tld) to associate in the **Domain name - required** field that appears below.
:::tip
**Special case**: Subdomains in `www` (e.g., **www**.domain.tld) are automatically added in addition to the domain name. Therefore, it is unnecessary to specify this particular subdomain in the input field.
:::
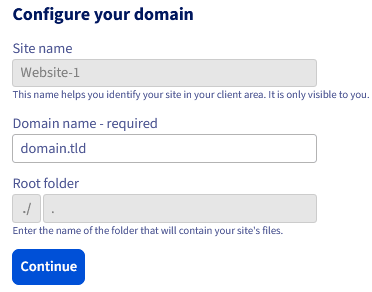Once the information has been completed, click on the Continue button.
:::info
Unlike domain names directly managed from your OVHcloud Control Panel, the **advanced options** are not directly available when adding an external domain name or subdomain to your website.
However, **all these features can be activated later once the external domain name or subdomain has been added to your website.** For this, please consult directly [this guide](https://docs.ovhcloud.com/en/guides/web-cloud/web-hosting/multisites-modify-domain.md).
:::
**Step 6**
Any addition of an external domain name to OVHcloud requires an additional mandatory validation. This allows us to ensure that the addition of the external domain name is legitimate. A message will therefore ask you to modify the DNS configuration of the domain name.
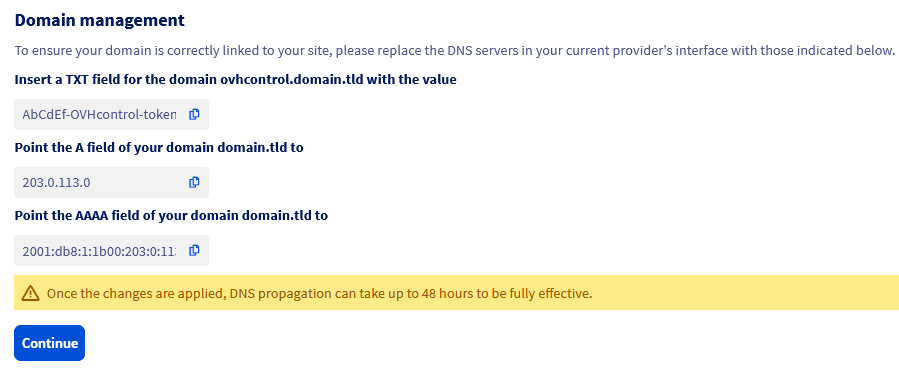Note the elements that appear, then click on the Continue button. From then on, the domain name is temporarily added, giving you time to modify its DNS configuration.
:::warning
You must make these changes **quickly** for your domain name to be correctly added. Without this action, the addition of your domain name will be cancelled.
The DNS entries of type **A** and **TXT** must be placed in the active DNS zone of your domain name for it to be added to your website. Only the DNS entries of type **AAAA** are optional.
Note that if you wish to add `sub.domain.tld`, you will need to create the `ovhcontrol.domain.tld` TXT entry and not the `ovhcontrol.sub.domain.tld` entry.
To find the active DNS zone of your domain name, find the [DNS servers](https://docs.ovhcloud.com/en/guides/web-cloud/domains/dns-server-edit.md) to which it is linked. You will only need to validate the domain name using the **TXT** field, not all its subdomains.
:::
Add a new domain name that has not yet been registered
This section applies only if your domain name has not yet been registered, either with OVHcloud or with another registrar. In other words, it concerns domain names that have not yet been subscribed to.
Click on the tabs below to view each of the **5** steps.
**Step 1**
Go to the Hosting plans page, then select the web hosting plan concerned.

**Step 2**
On the page that opens, click on the My sites tab.

**Step 3**
In the table that appears, click on the ⁝ button to the right of the relevant website, then on Add a domain.

**Step 4**
Tick the option Order a new domain and click on Continue.

**Step 5**
You are then redirected to our commercial page for the subscription of a domain name. Choose your new domain name according to market availability. Then follow the instructions in the order process until the order confirmation is validated.
Once your order has been paid for and validated, wait a few moments for it to be processed.
:::info
If, after a few hours, you notice that your new domain name has not been correctly associated with your website, follow the section "[Add a domain name managed from your OVHcloud Control Panel](#add-domain-ovhcloud)" of this guide.
:::
### Email offer included with your web hosting
Most [OVHcloud web hosting](https://www.ovhcloud.com/en-gb/web-hosting/) plans have an included option for creating custom email addresses with your domain name.
This email option can be activated for **only one** domain name. This means that if you host multiple websites with different domain names on your web hosting, you can only activate this option for one of your domain names.
Do not hesitate to consult [our dedicated guide](https://docs.ovhcloud.com/en/guides/web-cloud/web-hosting/activate-email-hosting.md) for more details on activating this option.
## Go further
[Edit an OVHcloud DNS zone](https://docs.ovhcloud.com/en/guides/web-cloud/domains/dns-zone-edit.md)
[Put a website online on your web hosting](https://docs.ovhcloud.com/en/guides/web-cloud/web-hosting/hosting-how-to-get-my-website-online.md)
For specialised services (SEO, development, etc.), contact [OVHcloud partners](https://partner.ovhcloud.com/en-gb/directory/).
If you would like assistance using and configuring your OVHcloud solutions, please refer to our [support offers](https://www.ovhcloud.com/en-gb/support-levels/).
Join our [community of users](https://community.ovhcloud.com/).