---
title: "Installing Ghost on a Cloud Web hosting plan"
description: "Find out how to set up a blog with the Ghost platform on Cloud Web"
url: https://docs.ovhcloud.com/en/guides/web-cloud/web-hosting/install-ghost
lang: en
lastUpdated: 2022-05-04
---
# Installing Ghost on a Cloud Web hosting plan
## Objective
[Ghost](https://ghost.org/) is an open-source blogging platform. Aimed at bloggers and journalists, it is specially designed to simplify the process of publishing content online. This platform is coded in JavaScript, and uses [Node.js](https://nodejs.org/), a server-side JavaScript engine for websites and APIs.
With an [OVHcloud Cloud Web hosting plan](https://www.ovhcloud.com/en-gb/web-hosting/cloud-web-offer/), you can use Node.js as a runtime environment for websites, then install and host Ghost, or any other application designed for use with Node.js.
In this tutorial, we will set up a blog with Ghost on an OVHcloud Cloud Web platform, and publish it online via your domain name.
## Requirements
### What you need to have
- a [Cloud Web hosting plan](https://www.ovhcloud.com/en-gb/web-hosting/cloud-web-offer/)
- Node.js enabled as a runtime environment
- the domain name added as a multisite, and Node.js defined as its runtime environment
- What you need to know:
- how to use the Node.js runtime environment
- how to log in via SSH
- access to edit text files in the command line (e.g. via Vim, Emacs or Nano)
***
### OVHcloud Control Panel Access
- **Direct link:** Hosting plans
- **Navigation path:** Web Cloud > Hosting plans > Select your web hosting plan
***
## Instructions
### Step 1: Enable Node.js as a runtime environment.
To access your Cloud Web hosting plan’s runtime environments, log in to the OVHcloud Control Panel
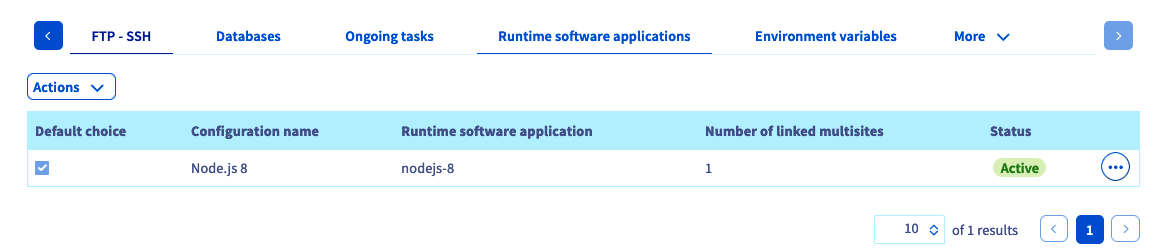
. Click Web hosting in the services bar on the left-hand side, then choose the name of the Cloud Web hosting plan concerned. Next, go to the `Runtime software applications
` tab.
The table that appears will list the runtime environments currently added. Check that Node.js has been enabled as the runtime environment. If it has been enabled, proceed to step 2: [Link Node.js to a multisite](#step-2-link-nodejs-to-a-multisite).
If it has not been enabled, add it as a new runtime environment (if possible with your solution) or modify the existing runtime environment.
- **If you want to add a runtime environment**, click Actions above the table, then Add a runtime environment.
- **If you want to modify a runtime environment**, click on the ...button to the right of the environment concerned, then `Modify`.
In the window that pops up, enter the information requested with the values shown in our example below, or adapt them to suit your own requirements.
| Information | Value to enter |
| ------------------------------- | -------------- |
| Custom name | NodeJS 8 |
| Runtime environment | nodejs-8 |
| Access path to public directory | public |
| Application environment | production |
| Application launch script | server.js |
Once you have entered this information, click `Confirm
`. If you would like further information on managing runtime environments, please refer to our guide on [Managing Cloud Web runtime software applications](/en/guides/web-cloud/web-hosting/manage-runtime-software-applications.md)
.

### Step 2: Link Node.js to a multisite.
Now that Node.js has been enabled as a runtime environment, you will need to link it to one of your multisites. To do this, go to the `Multisite
` tab. The table that opens will contain all of the domain names that have been added to your web hosting plan.
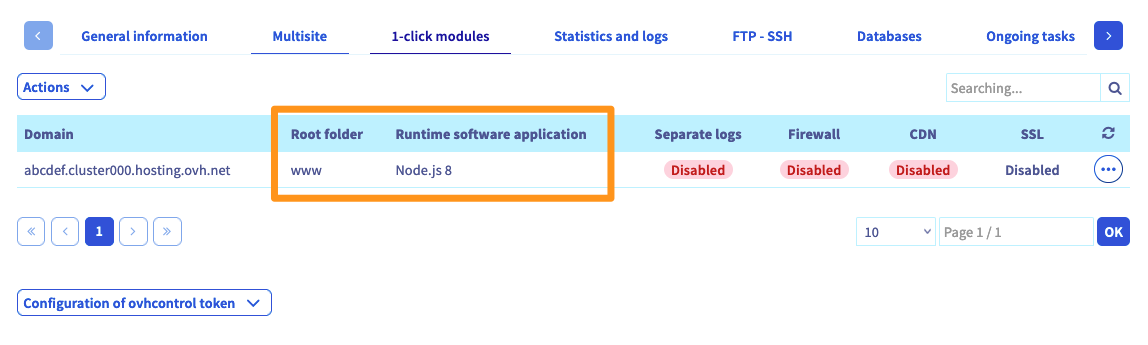
Two columns should stand out in the table below. Check that the Node.js runtime environment is correctly linked to the domain names concerned, and that the root file is correct. Use the information below if you need to. If it is correctly linked, go to step 3 - [Create a MySQL database](#step-3-create-a-mysql-database).
| Column | Description |
| ------------------- | ------------------------------------------------------------------------------------------------------------------------------------------------------------------------------------------- |
| Root folder | The source of the domain concerned (it corresponds to ‘DocumentRoot’). In our example, we will choose to specify ‘ghost’. This should contain our Node.js source code. |
| Runtime environment | The runtime environment for the domain concerned. The name shown will be the ‘Custom name’ you entered when you created the runtime environment. In our example, you should see ‘NodeJS 8’. |
If this is not the case, add a new multisite or modify the existing one.
- **If you want to add a multisite**, click on Add a domain or subdomain to the right of the table.
- **If you want to modify a multisite**, click the ... button. to the right of the domain name concerned, then click Modify.
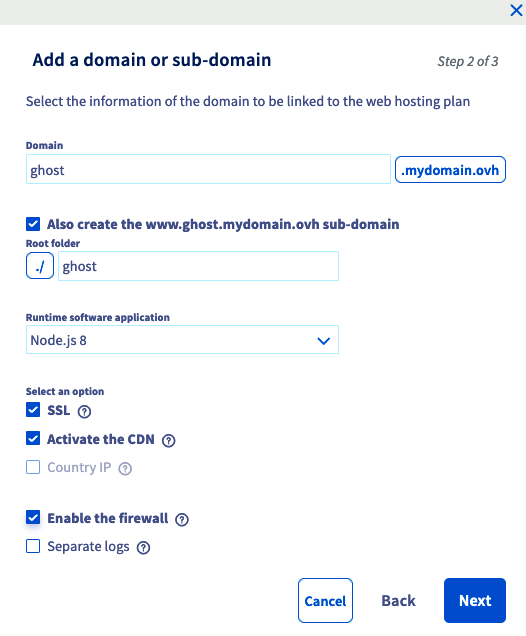
Enter the information requested in the pop-up window, and adapt the information to suit your own requirements. The table below shows the information used for this tutorial.
| Information | Value used as an example for this tutorial |
| ------------------- | ------------------------------------------ |
| Domain | ghost.demo-nodejs.ovh |
| Root folder | ghost |
| Runtime environment | NodeJS 8 |
From the additional options, select the ones you would like to enable. Once you have entered the information, click `Next
`, then finish the operation. This addition may take up to an hour. However, modifying the DNS configuration may require up to 24 hours to take full effect. If you would would like further information on managing multisites, read our guide to [Hosting multiple websites on your Web Hosting plan](/en/guides/web-cloud/web-hosting/multisites-configure-multisite.md)
.
### Step 3: Create a MySQL database.
Next, go to the 'Databases' tab. If this does not appear on the list, click on the three-bar button beforehand. The table displays all of the databases created on your web hosting plan. There are two ways of creating a new database:
- **If you have not created a database yet**, click on the Create a database button.
- **If you have already created a database**, click on the Actions button, then Create a database.
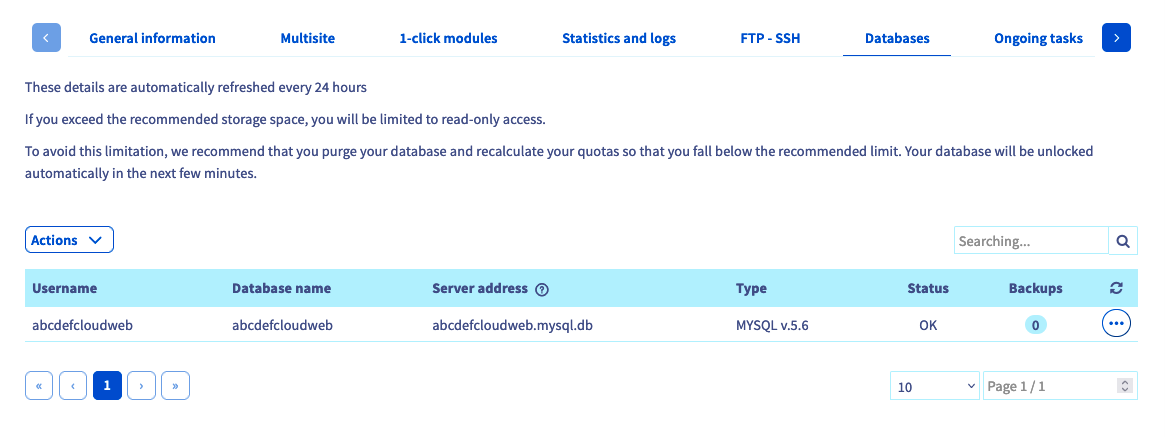
In the window that opens, Only `MySQL`
, in version `5.6`
is available.. Next, select “Stored in your Cloud Web instance”, and click `Next
`.
Then enter a custom username and password for the user. Once you have done so, click `Next
`, then click `Confirm
`. Wait a few moments for the process to finish.

### Step 4: Create environment variables.
This step is optional if you do not want to create environment variables. However, we strongly recommend doing so.
For this tutorial, we will create environment variables and enter the information required for connecting to our MySQL database. This means that if the password changes, for example, we can simply modify the variable in the OVHcloud Control Panel, rather than having to modify the source code.
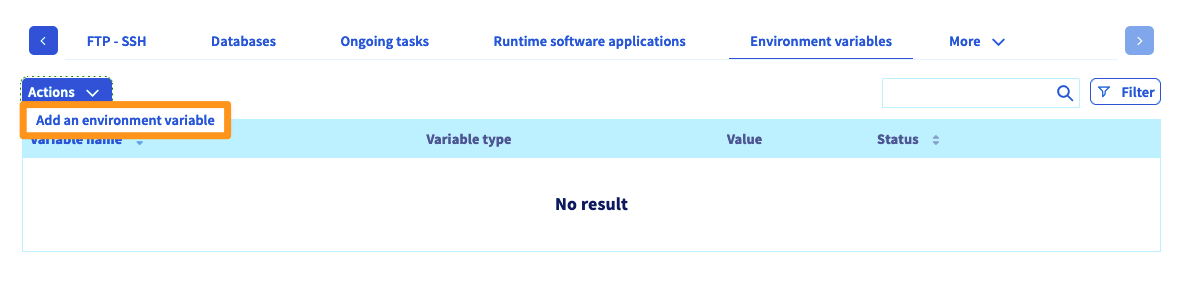
To do this, go to the `Environment variables
` tab. The table will list the variables that have already been created. To add a new one, click on the `Actions
` button below the table, then `Add an environment variable
`.
Enter the information requested in the pop-up window, adapting the information shown below to your own situation, then click `Confirm
` to create the variable. Here is what we created for this tutorial:
| Name | Variable type | Value |
| ---------------------------------- | ------------- | ------------------------------------------ |
| database\_\_connection\_\_host | string | The MySQL server address |
| database\_\_connection\_\_user | string | The MySQL username entered during creation |
| database\_\_connection\_\_database | string | The name of the MySQL database |
| database\_\_connection\_\_password | password | The MySQL password entered during creation |
| database\_\_client | string | mysql |
| server\_\_port | integer | 80 |
| server\_\_host | string | 0.0.0.0 |
### Step 5: Access your Cloud Web hosting plan via SSH.
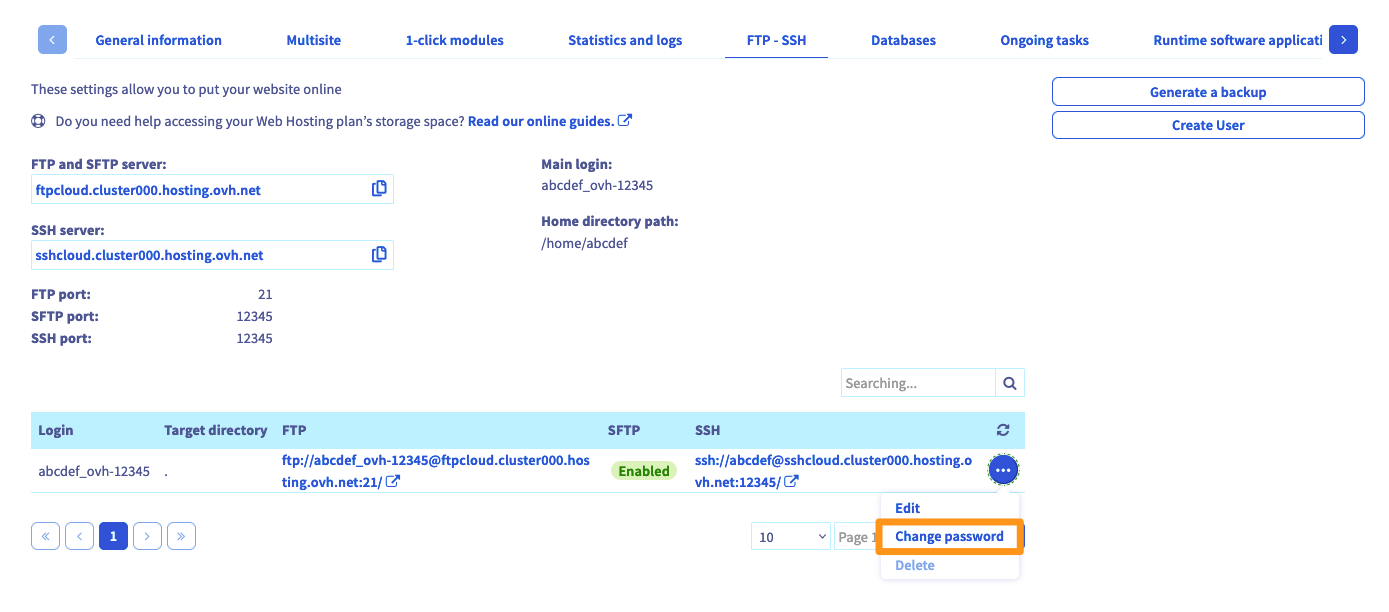
First of all, ensure that you have the information you need to connect. To do this, go to the FTP - SSH tab. If this does not appear on the list, click on the three-bar button beforehand. The information associated with your storage space will now appear. Gather the following information:
| Elements | Description |
| ------------------------- | ------------------------------------------------------------------------------------------------------------------------------------------------------------------------------------------------------------------------------------------------------------------------------------------------------------------------------------------------------------------------------------------------------ |
| SSH access to the cluster | You can retrieve two pieces of information with what appears:
**- the server address**: starts with ‘ssh://’ and ends before ‘:’
**- the connection port**: the number is included after ‘:’.
For example, you might see: ssh://`sshcloud.cluster024.hosting.ovh.net`:`12345`/, so ‘sshcloud.cluster024.hosting.ovh.net’ in the server address and ‘12345’ in connection port. |
| Primary SSH login | This is the primary SSH user created on your web hosting plan. |
If you have forgotten your SSH user password, click on the `...
` button to the right of the user concerned in the table, then `Change password
`.
Now, to connect via SSH, you need to use a terminal. This tool is installed by default on macOS or Linux. With a Windows environment, you will need to install a program like PuTTY, or add the ‘OpenSSH’ feature. Since this aspect will vary depending on which operating system you are using, we cannot provide any further details in this tutorial.
Here is an example of a command line you can use. You will need to replace "sshlogin", "sshserver" and "connectionport" with your own SSH login details. Once the command has been sent, you will be prompted to enter the SSH user password.
```sh
ssh sshlogin@sshserver -p connectionport
```
You can then check that the environment variables created [in step 4](#step-4-create-environment-variables) are present. For our tutorial, we see:
```sh
demonon@cloudweb-ssh:~ $ env | grep "database_"
database__client=mysql
database__connection__host=demononghost.mysql.db
database__connection__user=demononghost
database__connection__password=ZuperZecure123
database__connection__database=demononghost
```
### Step 6: Install Ghost.
Start by going to the root folder specified in [step 2](#step-2-link-nodejs-to-a-multisite). In our tutorial, the root folder is named ‘ghost’.
```sh
demonon@cloudweb-ssh:~ $ ls -l
drwxr-xr-x 3 demonon demonon 4 Mar 6 16:53 ghost
drwx---r-x 3 demonon demonon 5 Mar 6 16:48 www
demonon@cloudweb-ssh:~ $ cd ghost/
demonon@cloudweb-ssh:~/ghost $
```
Download the [latest version of Ghost](https://docs.ghost.org/), and unzip its contents.
```sh
demonon@cloudweb-ssh:~/ghost $ ls
public server.js
demonon@cloudweb-ssh:~/ghost $ curl -s -LO https://github.com/TryGhost/Ghost/releases/download/2.16.4/Ghost-2.16.4.zip
demonon@cloudweb-ssh:~/ghost $ unzip Ghost-2.16.4.zip
Archive: Ghost-2.16.4.zip
creating: content/
creating: content/adapters/
inflating: content/adapters/README.md
creating: content/apps/
inflating: content/apps/README.md
....
demonon@cloudweb-ssh:~/ghost $ rm Ghost-2.16.4.zip
demonon@cloudweb-ssh:~/ghost $ ls
Gruntfile.js LICENSE MigratorConfig.js PRIVACY.md README.md content core index.js package.json public server.js yarn.lock
```
Ghost uses [Yarn](https://yarnpkg.com/), an alternative to **npm**, as a manager for Node.js dependencies. Install Yarn via **npm**, and add these binaries in your ‘PATH’:
```sh
demonon@cloudweb-ssh:~/ghost $ npm-node8 install yarn
npm notice created a lockfile as package-lock.json. You should commit this file.
+ yarn@1.13.0
added 1 package and audited 1 package in 2.893s
found 0 vulnerabilities
demonon@cloudweb-ssh:~/ghost $ export PATH=$PATH:/usr/local/nodejs8/bin/:~/ghost/node_modules/.bin/
demonon@cloudweb-ssh:~/ghost $ node --version
v8.15.0
demonon@cloudweb-ssh:~/ghost $ yarn --version
1.13.0
```
You can continue making changes to the ’PATH’ by adding the export into the ’\~/.profile’ file:
```sh
demonon@cloudweb-ssh:~ $ echo "export PATH=$PATH:/usr/local/nodejs8/bin/:~/ghost/node_modules/.bin/" >> ~/.profile
```
Then install the Ghost dependencies using Yarn:
```sh
demonon@cloudweb-ssh:~/ghost $ yarn install
yarn install v1.13.0
[1/5] Validating package.json...
[2/5] Resolving packages...
[3/5] Fetching packages...
[4/5] Linking dependencies...
[5/5] Building fresh packages...
success Saved lockfile.
Done in 269.89s.
```
Stay in the ’\~/ghost’ folder, and create a `config.production.json` file containing the Ghost configuration:
```json
{
"url": "http://ghost.demo-nodejs.ovh",
"paths": {
"contentPath": "content/"
}
}
```
Then point the `server.js` file (defined [in step 1](#step-1-ebable-nodejs-as-a-runtime-environment)) to the Ghost `index.js` file:
```sh
demonon@cloudweb-ssh:~/ghost $ unlink server.js
demonon@cloudweb-ssh:~/ghost $ ln -s index.js server.js
```
You have now finished installing and configuring Ghost. You now just need to restart the Node.js daemon, so it takes into account the changes you have made in the ’\~/ghost’ file.
### Step 7: Restart the Node.js daemon.
To restart the Node.js daemon, go back to the OVHcloud Control Panel
. Go to the `Multisite
` tab, click on `...
` button to the right of the domain name concerned, then click `Restart
`.
Once you have done this, your application will be accessible via the domain name you have selected in your multisite’s configuration.

### Step 8: Use HTTPS.
To enhance your website's security, you can set up a redirection from HTTP to HTTPS. To do this, stay in the `ghost` folder, and create an `.htaccess` file containing the following content:
```
RewriteCond %{ENV:HTTPS} !on
RewriteRule (.*) https://%{HTTP_HOST}%{REQUEST_URI} [L,R=301]
```
## Conclusion
Step by step, we have covered how to install a Node.js application on a Cloud Web hosting plan. You’re now ready to get started using Ghost, and publish your first pieces of content!
## Go further
[Migrating your website and emails to OVHcloud](/en/guides/web-cloud/web-hosting/hosting-migrating-to-ovh.md)
[Publishing a website on your Web Hosting space](/en/guides/web-cloud/web-hosting/hosting-how-to-get-my-website-online.md)
[Setting up your website with 1-click modules](/en/guides/web-cloud/web-hosting/cms-install-1-click-modules.md)
[Hosting multiple websites on your Web Hosting plan](/en/guides/web-cloud/web-hosting/multisites-configure-multisite.md)
For specialised services (SEO, development, etc.), contact [OVHcloud partners](https://partner.ovhcloud.com/en-gb/directory/).
If you would like assistance using and configuring your OVHcloud solutions, please refer to our [support offers](https://www.ovhcloud.com/en-gb/support-levels/).
Join our [community of users](https://community.ovhcloud.com/).