---
title: "Installing Etherpad on your Cloud Web hosting plan"
url: https://docs.ovhcloud.com/en/guides/web-cloud/web-hosting/install-etherpad
lang: en
lastUpdated: 2022-05-04
---
# Installing Etherpad on your Cloud Web hosting plan
## Objective
[Etherpad](https://etherpad.org/) is a collaborative online text editor that works in real time. It allows several people to write text files simultaneously through a web interface. Etherpad is written in JavaScript and uses Node.js, a software platform for building your websites and APIs in server-side JavaScript.
[OVHcloud Cloud Web hosting](https://www.ovhcloud.com/en-gb/web-hosting/cloud-web-offer/) allows you to use Node.js as a runtime engine for your websites, and therefore to install Etherpad or any other application designed for Node.js.
**In this tutorial, we will install an Etherpad server on an OVHcloud Cloud Web hosting plan and make it available through your domain name.**
## Requirements
- A [OVHcloud Cloud Web hosting plan](https://www.ovhcloud.com/en-gb/web-hosting/cloud-web-offer/).
- Node.js enabled as a runtime engine.
- The relevant domain name added as a multisite, with Node.js set as its runtime engine.
- Access to your OVHcloud Control Panel, in the `Web Cloud` section.
- What you should know:
- The basics of the Node.js ecosystem.
- How to connect via SSH.
## Instructions
### Step 1: enabling Node.js as a runtime engine
To access the runtime engines of your Cloud Web hosting plan, log in to your OVHcloud Control Panel
. Click `Hosting`
in the services bar on the left, then choose the name of the relevant Cloud Web hosting plan. Finally, go to the `Runtime engines`
tab.
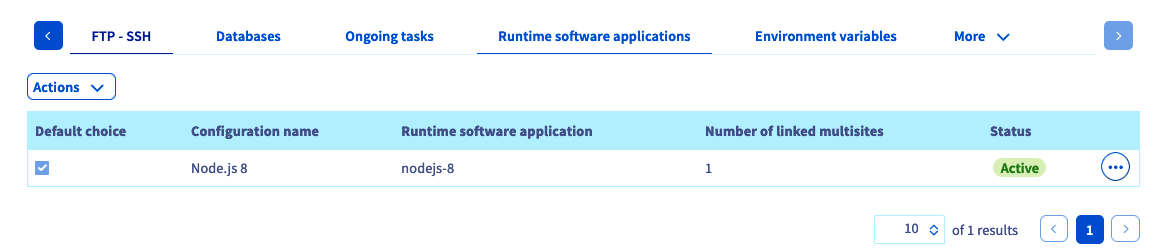
The table that appears displays the runtime engines currently added. Make sure that the Node.js runtime engine is enabled. If it is, proceed to Step 2 "[Associating Node.js with a multisite](#step-2-associating-nodejs-with-a-multisite)".
If it is not, add a new one (if your plan allows it) or modify the existing runtime engine.
- **If you want to add an engine**: click `Actions` above the table, then `Add a runtime engine`.
- **If you want to modify an engine**: click the `...` button to the right of the relevant engine, then `Edit`.
In the window that appears, fill in the requested information with the following values from our example, or adapt them to your own situation:
| Information | Value to enter |
| ---------------------------- | -------------- |
| Custom name | NodeJS 8 |
| Runtime engine | nodejs-8 |
| Path to the public directory | public |
| Application environment | production |
| Application launch script | server.js |
Once the information is filled in, click `Confirm`. If you would like more information about managing runtime engines, refer to our guide "[Managing the runtime engines of Cloud Web](/en/guides/web-cloud/web-hosting/manage-runtime-software-applications.md)".

### Step 2: associating Node.js with a multisite
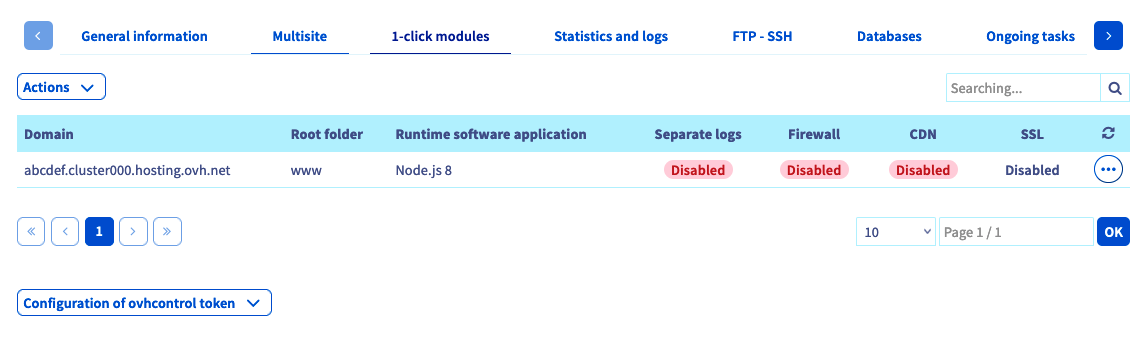
Now that Node.js is enabled as a runtime engine, you must associate it with one of your multisites. To do this, go to the `Multisite` tab. The table that appears contains all the domain names that have been added as a multisite. Two columns should draw your attention.
| Column | Description |
| -------------- | --------------------------------------------------------------------------------------------------------------------------------------------------------------------------------------------------------------------------- |
| Root folder | This is the root folder that must contain the source code of the relevant domain; it corresponds to the "DocumentRoot". In our example, we choose to specify "etherpad". It must therefore contain our Node.js source code. |
| Runtime engine | This is the runtime engine associated with the relevant domain name. The name displayed corresponds to the "Custom name" you defined when creating the runtime engine. In our example, you should find "NodeJS 8". |
In the table, check that the Node.js runtime engine is properly linked to the relevant domains and that the root folder is correct. If it is, proceed to Step 3 "[Connecting to your Cloud Web via SSH](#step-3-connecting-to-your-cloud-web-via-ssh)".
If it is not, add a new multisite or modify the existing one.
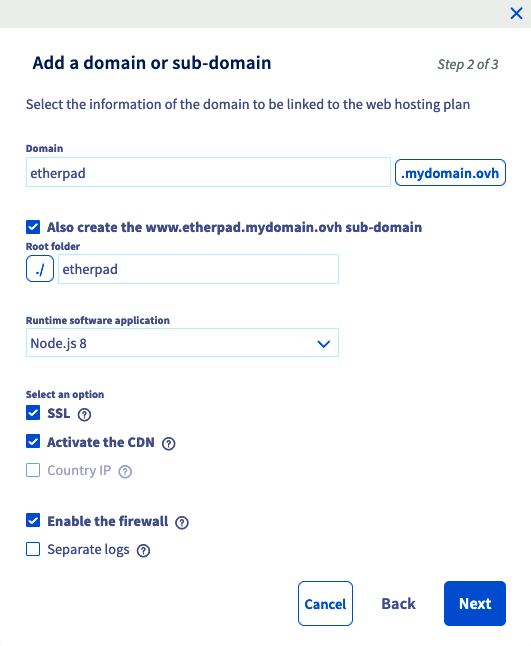
- **If you want to add a multisite**: click `Add a domain or subdomain` to the right of the table.
- **If you want to modify a multisite**: click the `...` button to the right of the relevant domain, then `Edit`.
In the window that appears, fill in the requested information according to your own situation. Here are the values we used for this tutorial:
| Information | Example value used for this tutorial |
| -------------- | ------------------------------------ |
| Domain name | etherpad.demo-nodejs.ovh |
| Root folder | etherpad |
| Runtime engine | NodeJS 8 |
As for the additional options, choose the ones you want to enable. Once the information is filled in, click `Next`, then finalise the operation. This addition can take up to one hour. However, the change to the DNS configuration can take up to 24 hours to become fully effective. If you would like more information about managing multisites, refer to our guide "[Sharing your hosting plan between several websites](/en/guides/web-cloud/web-hosting/multisites-configure-multisite.md)".
### Step 3: connecting to your Cloud Web via SSH
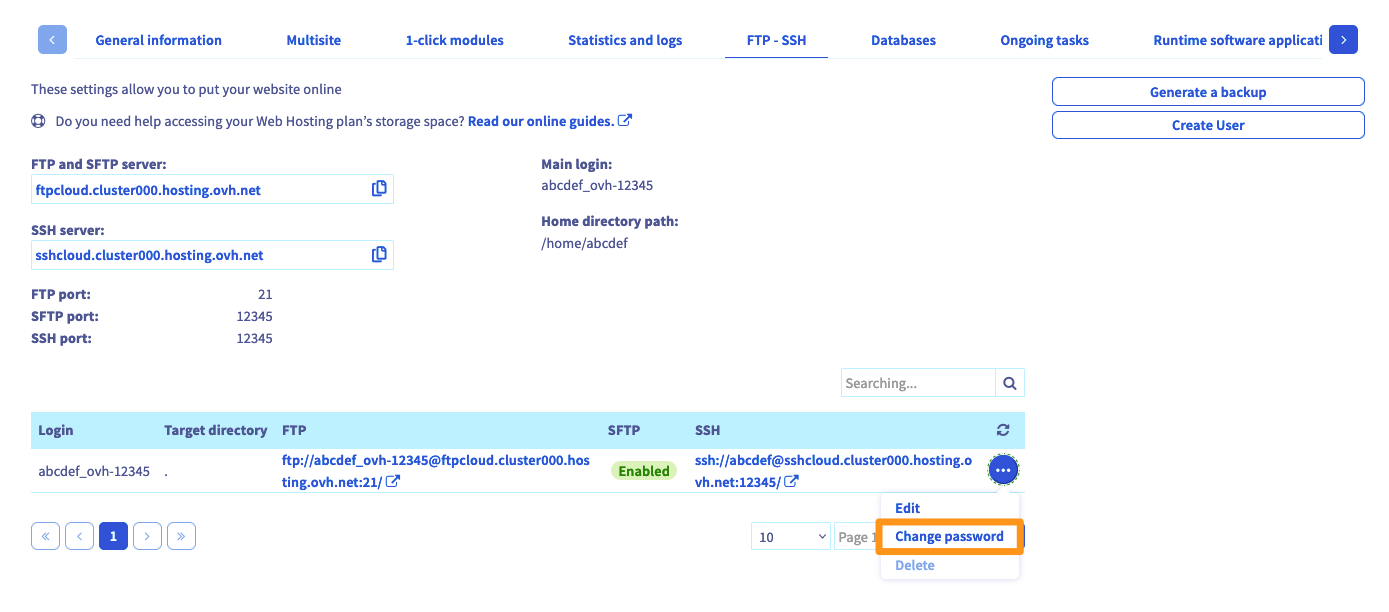
Start by retrieving the information you need to connect. To do this, go to the `FTP - SSH` tab. If it does not appear in the list, first click the button with three bars. The information related to your storage space then appears. Locate the details listed next to the following items:
| Items | Description |
| ------------------------- | ----------------------------------------------------------------------------------------------------------------------------------------------------------------------------------------------------------------------------------------------------------------------------------------------------------------------------------------------------------------------------------------------------------------------------- |
| SSH access to the cluster | The element that appears lets you retrieve two pieces of information:
**- the server address**: it starts after "ssh://" and ends before the ":";
**- the connection port**: the number is shown after the ":".
For example, you might find: ssh://`sshcloud.cluster024.hosting.ovh.net`:`12345`/, so "sshcloud.cluster024.hosting.ovh.net" as the server address and "12345" as the connection port. |
| Main SSH login | This is the main SSH username created on your hosting plan. |
If you no longer know the password of the SSH user, click the `...` button to the right of the relevant user in the table, then `Change password`.
Now, to connect via SSH, you need to use a terminal. This tool is installed by default on macOS and Linux. A Windows environment will require the installation of software such as PuTTY or the addition of the "OpenSSH" feature. As this procedure is specific to the operating system you use, we cannot detail it in this documentation.
Here is an example of a command line you can use. Replace the "sshlogin", "sshserver" and "connectionport" elements with the ones matching your own situation. Once the command is sent, you will be prompted to enter the password of the SSH user.
```sh
ssh sshlogin@sshserver -p connectionport
```
### Step 4: installing Etherpad
Start by moving into the root folder you specified [in Step 2](#step-2-associating-nodejs-with-a-multisite). In our tutorial, this is the "etherpad" directory. You can then retrieve the application code there.
```sh
demonon@cloudweb-ssh:~ $ cd etherpad/
demonon@cloudweb-ssh:~/etherpad $ git init
demonon@cloudweb-ssh:~/etherpad $ git remote add origin https://github.com/ether/etherpad-lite.git
demonon@cloudweb-ssh:~/etherpad $ git pull origin master
remote: Enumerating objects: 29763, done.
remote: Total 29763 (delta 0), reused 0 (delta 0), pack-reused 29763
Receiving objects: 100% (29763/29763), 9.80 MiB | 6.34 MiB/s, done.
Resolving deltas: 100% (21100/21100), done.
From https://github.com/ether/etherpad-lite
* branch master -> FETCH_HEAD
* [new branch] master -> origin/master
```
Now install Etherpad's dependencies:
```sh
demonon@cloudweb-ssh:~/etherpad [master]$ export PATH=$PATH:/usr/local/nodejs8/bin
demonon@cloudweb-ssh:~/etherpad [master]$ bash bin/installDeps.sh
Copy the settings template to settings.json...
Ensure that all dependencies are up to date... If this is the first time you have run Etherpad please be patient.
...
> wd@1.10.3 install /home/demonon/etherpad/src/node_modules/wd
> node scripts/build-browser-scripts
added 1094 packages in 34.97s
Ensure jQuery is downloaded and up to date...
Clearing minified cache...
Ensure custom css/js files are created...
```
For Etherpad, the dependencies are installed by a Bash script. In general, for Node.js applications, these dependencies are installed using the "npm-node8 install" command.
The configuration set up in Node.js expects to find a "server.js" file in the root folder of your multisite (which you configured [in Step 1](#step-1-enabling-nodejs-as-a-runtime-engine)). We will therefore create a symbolic link to point "server.js" to Etherpad's file of the same name.
```sh
demonon@cloudweb-ssh:~/etherpad [master]$ ln -fs node_modules/ep_etherpad-lite/node/server.js server.js
```
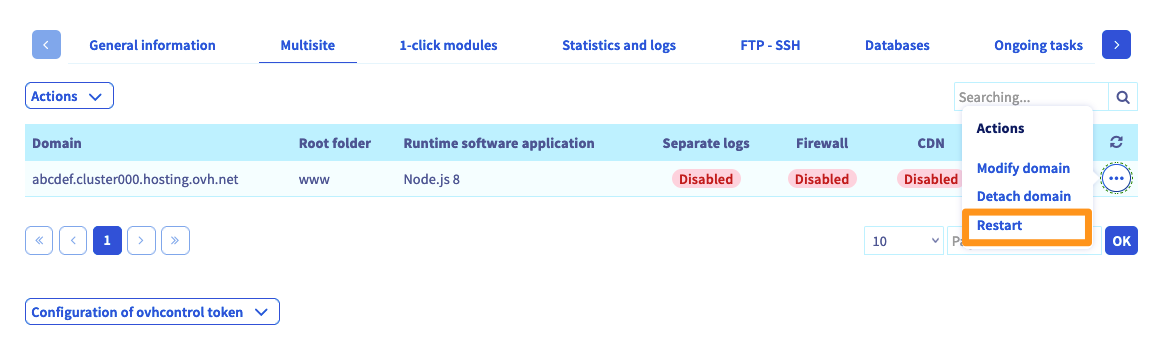
### Step 5: restarting the Node.js _daemon_
To restart the Node.js _daemon_
, go back to your OVHcloud Control Panel
. Go to the `Multisite`
tab, click the `...`
button to the right of the relevant domain name, then click `Restart`
.
Once this is done, the application will be accessible through the domain name chosen in your multisite configuration.
## Conclusion
We have seen how to install a Node.js application on a Cloud Web hosting plan by following the various steps. All that is left is to use Etherpad and collaborate together!
## Go further
[Migrating my website to OVHcloud](/en/guides/web-cloud/web-hosting/hosting-migrating-to-ovh.md)
[Putting my website online](/en/guides/web-cloud/web-hosting/hosting-how-to-get-my-website-online.md)
[Installing your website with 1-click modules](/en/guides/web-cloud/web-hosting/cms-install-1-click-modules.md)
[Sharing your hosting plan between several websites](/en/guides/web-cloud/web-hosting/multisites-configure-multisite.md)
For specialised services (SEO, development, etc.), contact the [OVHcloud partners](https://partner.ovhcloud.com/en-gb/directory/).
If you would like assistance using and configuring your OVHcloud solutions, we invite you to consult our various [support offers](https://www.ovhcloud.com/en-gb/support-levels/).
Join our [community of users](https://community.ovhcloud.com/).