---
title: "Speeding up your website with CDN"
description: "Find out how to improve your website by reducing loading times on a Web Hosting plan using the CDN"
url: https://docs.ovhcloud.com/en/guides/web-cloud/web-hosting/cdn-how-to-use-cdn
lang: en
lastUpdated: 2026-06-08
---
# Speeding up your website with CDN
## Objective
If you want to improve user experience by speeding up your website, the most effective technique is to enable the CDN (Content Delivery Network) option. This allows you to cache static files, such as images, CSS and JavaScript, on the closest servers to your visitors.
**Find out how to manage the CDN option on your Web Hosting plan.**
## Definition
**How does a CDN work?**
The CDN (Content Delivery Network) is literally a network dedicated to delivering content. It uses several servers around the world to display your website. The closer these servers are to your users, the faster your website performs for them.
In order for this to work, each server stores a part of your website in its cached memory. It is generally advised that you include so-called "static" files: images, JavaScript files and CSS, that help your website to run but are rarely modified.
## Requirements
- An [OVHcloud Web Hosting plan](https://www.ovhcloud.com/en-gb/web-hosting/)
***
### OVHcloud Control Panel Access
- **Direct link:** Web hosting
- **Navigation path:** Web Cloud > Hosting plans > Select your web hosting plan
***
## Instructions
### Enabling the CDN option
:::info
The CDN option is already included in the "Performance", "Agency", "Agency Plus" and "Agency Max" Web Hosting plans.
:::
#### If the CDN option is not ordered or enabled on your Web Hosting plan
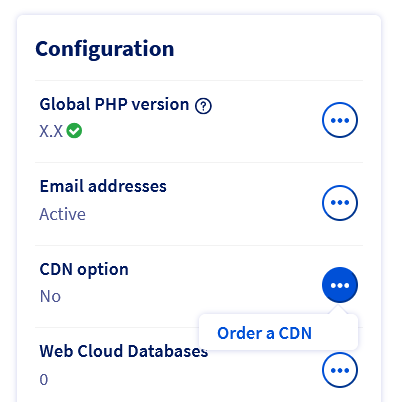
Log in to your OVHcloud Control Panel
and select `Web Cloud
` in the top navigation bar. Click `Hosting plans
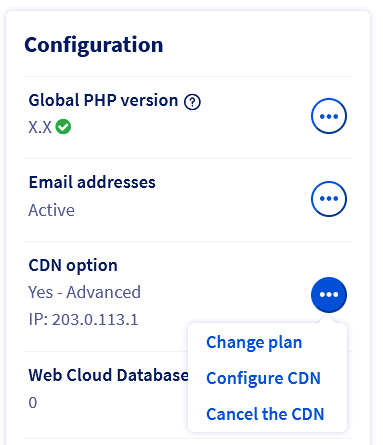
`, then choose the relevant Web Hosting plan. Click on `...
` to the right of "CDN option", then on `Order a CDN
` or `Activate option
` if the CDN option is already included in your hosting.
:::info
If you have a CDN option from before 11/19/2020, you can order the new Shared CDN offer by clicking `Upgrade CDN to a later version
`.
:::
You will be redirected to a page where you can generate a purchase order. Once the order is paid, the service will be available within a few minutes.
#### If the CDN option is already enabled on your Web Hosting plan
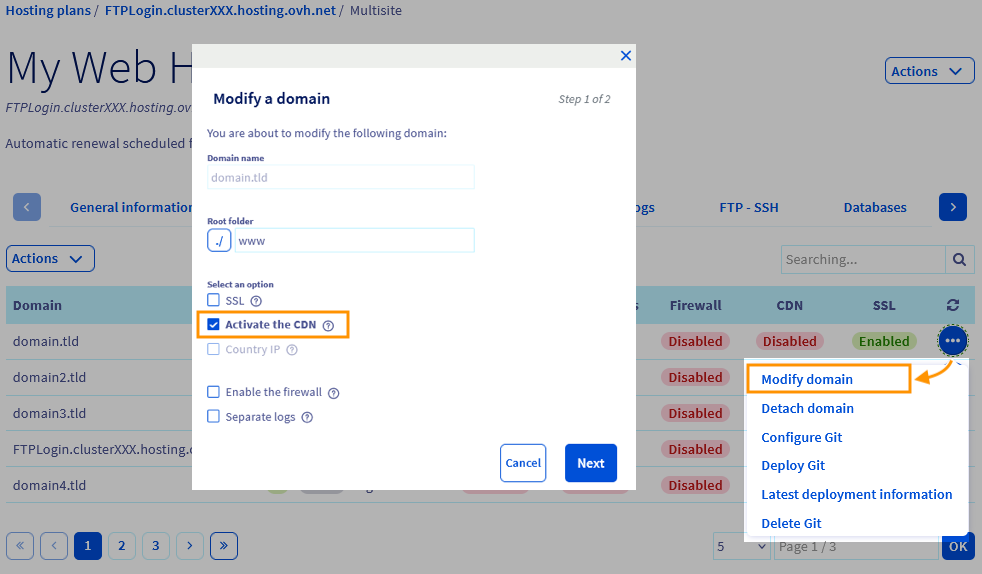
Log in to your OVHcloud Control Panel
and select `Web Cloud
` in the top navigation bar. Click `Hosting plans
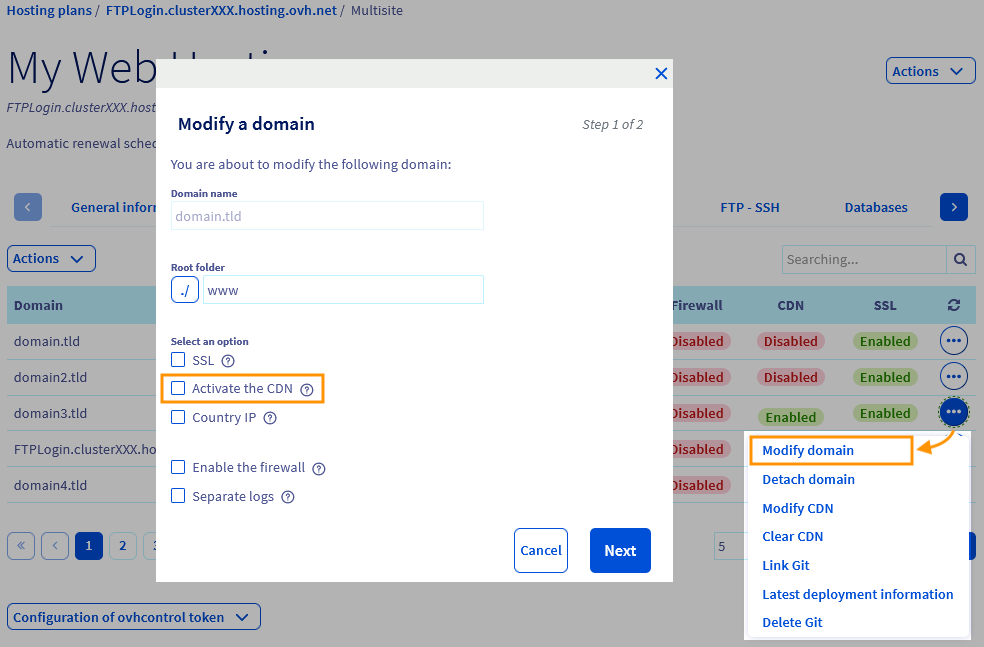
`, then choose the relevant Web Hosting plan. On the `Multisite
` tab, click on the `...
` button to the right of the domain name or subdomain concerned, then click on `Modify domain
`.
Select the “Activate the CDN” option, click `Next
` and then `Confirm
`.
:::warning
If an external domain name is added to one of the websites on your web hosting, you must include the CDN IP address of your hosting in the DNS zone of the domain name.
Check the [IP address list for Web Hosting clusters](/en/guides/web-cloud/web-hosting/clusters-and-shared-hosting-ip.md) to find the specific IP address for your cluster’s CDN.
:::
**Why is it not possible to use a geolocated IP with the CDN option?**
The CDN uses the principle of "IP Anycast". You do not request the same server depending on your geolocation, which is very efficient for reducing the loading time of your static files. Therefore, a geolocated IP address is not needed.
In terms of SEO (search engine optimisation), the website loading speed is more important that the geolocation of the IP addresses.
### Managing your Shared CDN
#### Clearing the Shared CDN cache
It can sometimes be useful to clear the CDN cache, especially when you modify your static files. For example, when deploying a new version of your website. You can clear the cache for each of your domain names and subdomains.
Go to the `Multisite
` tab for your Web Hosting plan, click on `...
` to the right of the domain name or subdomain concerned, then click on `Clear CDN
`.
#### Configuring Shared CDN options
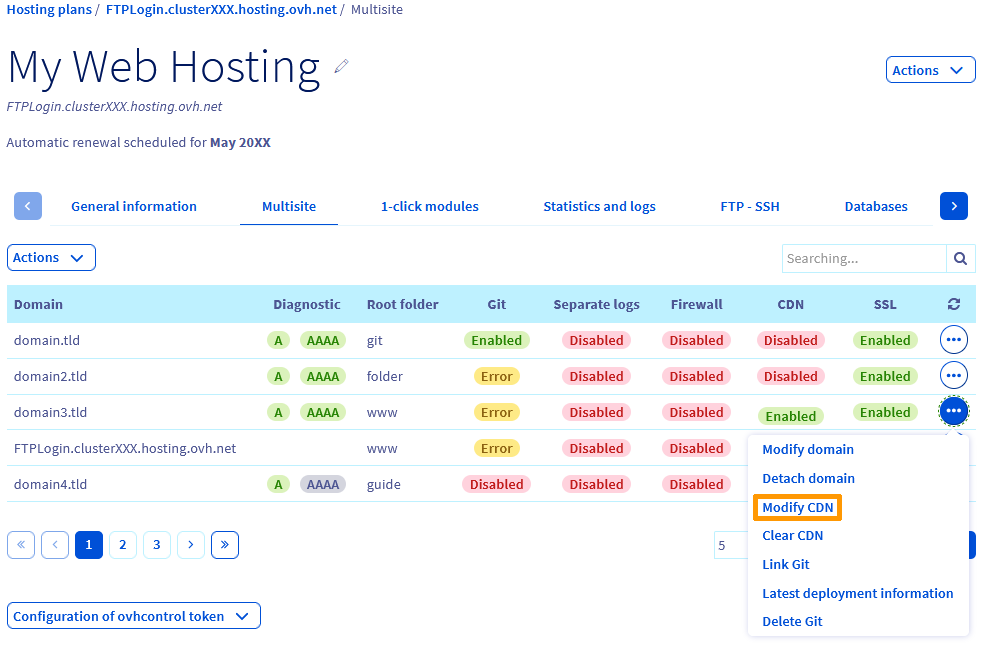
Go to the `Multisite
` tab for your Web Hosting plan, click on `...
` to the right of the domain name or subdomain concerned, then click `Modify the CDN
`.
:::warning
Some options are locked on CDN Basic and require you to sign up to [CDN Security](https://www.ovhcloud.com/en-gb/web-hosting/options/cdn/) or [CDN Advanced](https://www.ovhcloud.com/en-gb/web-hosting/options/cdn/).
:::

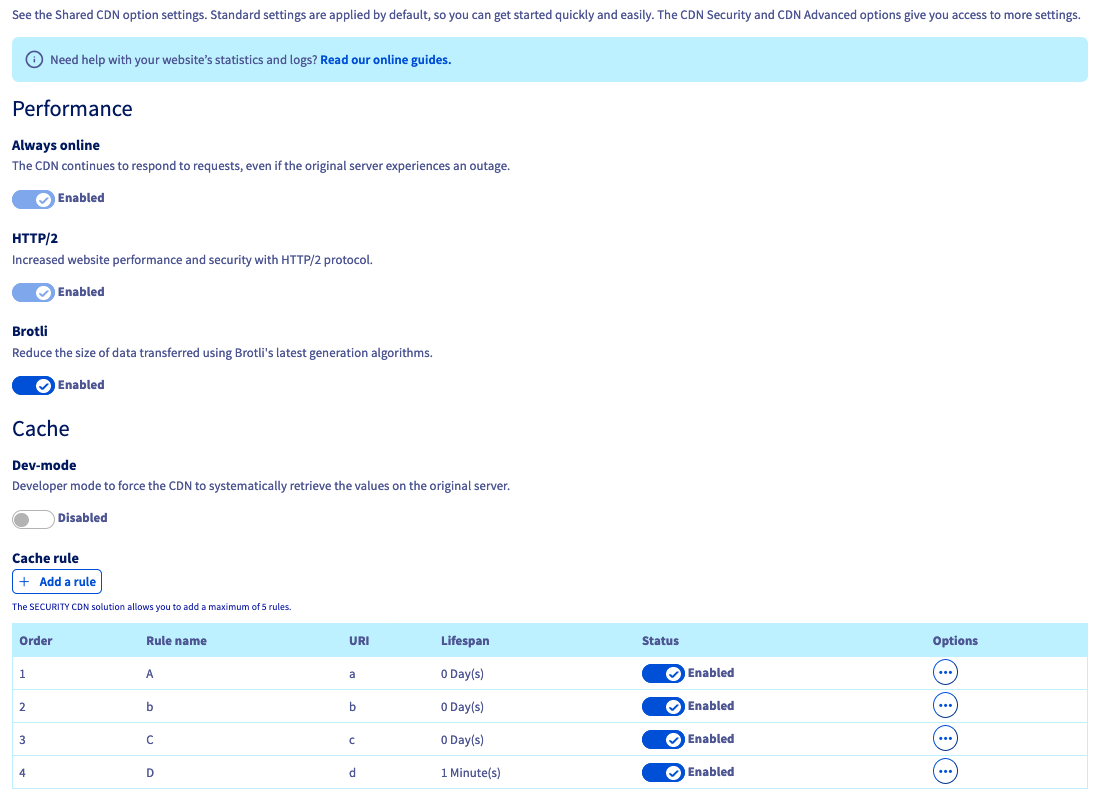
- **Always online**: Allows CDN data to be kept online in the event of a server failure.
- **HTTP/2**: Protocol that enables your website to perform better in terms of security and latency.
- **Dev-mode**: Allows you to disable the cache during your website development.
- **Brotli**: Compression type that optimises the size of your cached files.
- **Cache rule**: Create up to 5 rules. They will set the cache refresh rate for specific resources on your site ([see section below](#cacherules)).
Once you have chosen your options, click `Apply configuration
`, then `Confirm configuration
` in the next window.
##### **Creating a cache rule**
[](#)
To add a cache rule on one of your website’s elements, go to the `Multisite
` tab for your Web Hosting plan, click on `...
` to the right of the domain name or subdomain concerned, then click on `Modify CDN
`.
Under **Cache rule**
, click the `Add a rule
` button.
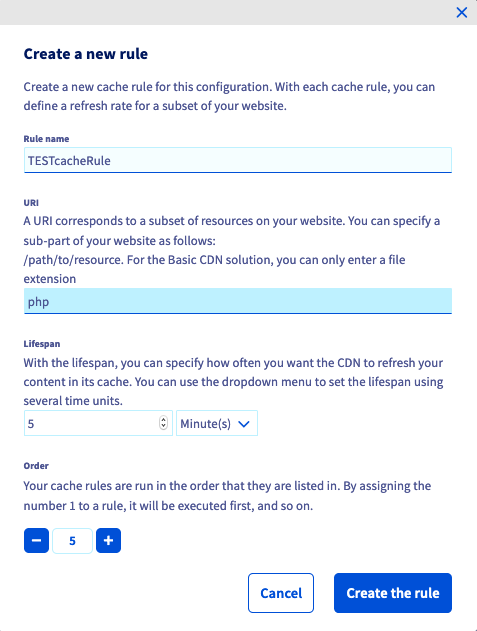
- **Rule name**: Give your rule a name.
- **URI**: Enter the subset of resources for your website via its path in your website’s directory. For the CDN Basic and CDN Security offers, you can only enter a file extension.
- **Lifespan**: specify the caching time for the chosen resource.
- **Order**: Order your rules by execution order (lowest to highest).
Once you have made your choices, click the `Create the rule
` button.
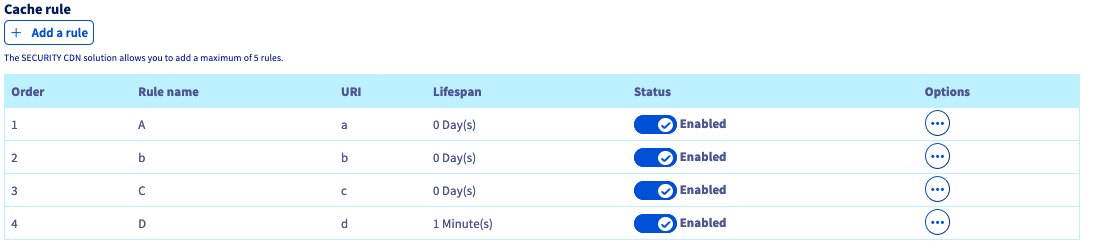
Rules will appear in the list. You can modify a rule by clicking on `...
`, then on `Modify rule
` or delete it by clicking `Delete the rule
`.
Once you have configured your rules and chosen your options, click `Apply configuration
`, then click `Confirm configuration
` in the next window.
:::warning
To have a higher quota of rules and more settings available than creating cache rules, you can choose the [Advanced CDN option](https://www.ovhcloud.com/en-gb/web-hosting/options/cdn/).
:::
#### Configuring CDN Security options
Go to the `Multisite
` tab for your Web Hosting plan, click on `...
` to the right of the domain name or subdomain concerned, then click on `Modify the CDN
`.
:::info
The options explained below require a subscription to [CDN Security](https://www.ovhcloud.com/en-gb/web-hosting/options/cdn/) or [CDN Advanced](https://www.ovhcloud.com/en-gb/web-hosting/options/cdn/).
:::
- **Cross-Origin Resource Sharing (CORS)**: In the list, enter the external domain names that will be authorised to access your website’s resources for the purpose of sharing them.
Once you have enabled this feature, click Edit list of external resources to add the domain names that are authorised to share your resources.
 Once you have completed your list, click `Confirm
`.
:::info
When you enable the CORS option without specifying any domain names in the list, all domain names will be allowed to use your website's resources.
:::
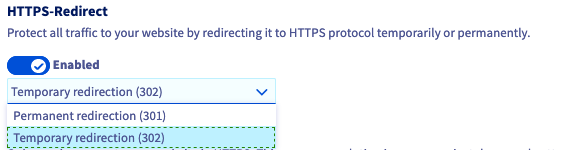
- **HTTPS-Redirect**: Protect all traffic to your website by redirecting it to the HTTPS protocol temporarily or permanently.
Once you have enabled the feature, click the drop-down menu to choose between `Permanent redirection (301)` or `Temporary redirection (302)`.
Once you have completed your list, click `Confirm
`.
:::info
When you enable the CORS option without specifying any domain names in the list, all domain names will be allowed to use your website's resources.
:::
- **HTTPS-Redirect**: Protect all traffic to your website by redirecting it to the HTTPS protocol temporarily or permanently.
Once you have enabled the feature, click the drop-down menu to choose between `Permanent redirection (301)` or `Temporary redirection (302)`.
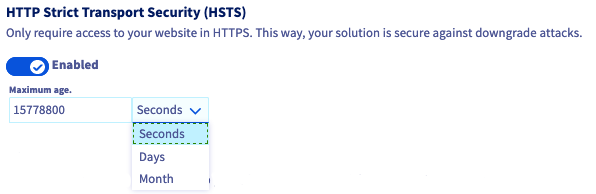
 - **HTTP Strict Transport Security (HSTS)**: Force HTTPS access to your website. This way, your hosting is secure against downgrade (or rollback) attacks.
Once the feature is enabled, determine the lifetime for which the browser will apply HSTS on your website.
- **HTTP Strict Transport Security (HSTS)**: Force HTTPS access to your website. This way, your hosting is secure against downgrade (or rollback) attacks.
Once the feature is enabled, determine the lifetime for which the browser will apply HSTS on your website.
 :::info
When you enable the HSTS feature on your website, it will enforce the use of the HTTPS protocol on your browser until the end of the period known as `maximum age`, even after disabling the feature in your Control Panel. However, when the cache is cleared on the browser that has already visited your site, the browser will apply the new HSTS status.
:::
- **Mixed content**: Enforce the integrity of all your web pages's content. Pages will be loaded securely, contributing to an optimal user experience. All of your website’s internal and external resources must be available in HTTPS, to avoid a browser error.
- **Application firewall**: The **W**eb **A**pplication **F**irewall (WAF) protects your website from fraudulent attacks such as code injections, illegitimate requests or data theft. It covers the main known vulnerabilities on the web by filtering requests and packets transmitted (the list of vulnerabilities is managed by OVHcloud and regularly updated).
:::warning
For the installation of an [OVHcloud 1-click module](/en/guides/web-cloud/web-hosting/cms-install-1-click-modules.md), the WAF must be disabled in order to prevent the installation of the module from being blocked.
:::
:::info
WAF is fully managed by OVHcloud, and the list of vulnerabilities is regularly updated.
:::
#### Configuring CDN Advanced options
Go to the `Multisite
` tab for your Web Hosting plan, click on `...
` to the right of the domain name or subdomain concerned, then click `Modify the CDN
`.
:::info
The options presented below require a subscription to [CDN Advanced](https://www.ovhcloud.com/en-gb/web-hosting/options/cdn/).
:::
- **Geolocation HTTP Header**: Determine the country of the visitor to customise the proposed experience. The country code is automatically added in the header of each request to be handled by your original server. The identification elements in the header are called `Geo-Country-Code`, `Geo-Country-Name`, `Geo-Region`, `Geo-City`.
- **Prefetch**: Anticipate the next resource being loaded. Preload it automatically in the CDN cache using your website’s _header link_. This mechanism is mainly used to load CSS, JavaScript, images, favicons or web fonts that are required by the website theme.
In the example below, when the current page is displaying 'Hi', a subquery triggers the preloading of the resource `/cache/style.css`.
```
; rel=prefetch");
print 'Hi'
?>
```
- **Mobile redirect**: Automatically redirect "Mobile" visitors to an optimised website. Choice: redirect systematically to the root of another website, or keep the URL by replacing only the domain (or subdomain).
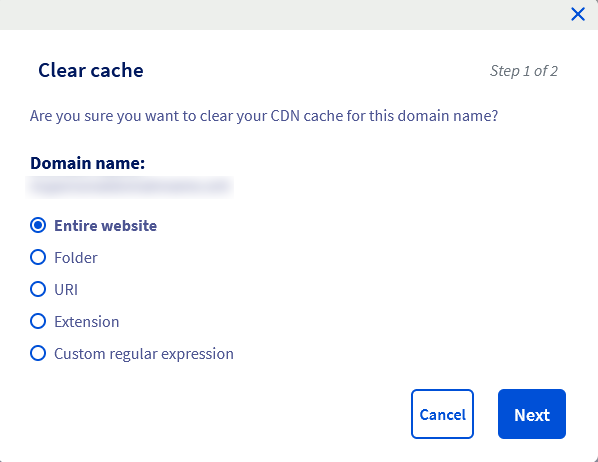
- **Advanced Purge**: Customise your purge by choosing which elements of the cache to clear: the entire site, a folder, a URI, a file extension, or using a custom regular expression.
In the
:::info
When you enable the HSTS feature on your website, it will enforce the use of the HTTPS protocol on your browser until the end of the period known as `maximum age`, even after disabling the feature in your Control Panel. However, when the cache is cleared on the browser that has already visited your site, the browser will apply the new HSTS status.
:::
- **Mixed content**: Enforce the integrity of all your web pages's content. Pages will be loaded securely, contributing to an optimal user experience. All of your website’s internal and external resources must be available in HTTPS, to avoid a browser error.
- **Application firewall**: The **W**eb **A**pplication **F**irewall (WAF) protects your website from fraudulent attacks such as code injections, illegitimate requests or data theft. It covers the main known vulnerabilities on the web by filtering requests and packets transmitted (the list of vulnerabilities is managed by OVHcloud and regularly updated).
:::warning
For the installation of an [OVHcloud 1-click module](/en/guides/web-cloud/web-hosting/cms-install-1-click-modules.md), the WAF must be disabled in order to prevent the installation of the module from being blocked.
:::
:::info
WAF is fully managed by OVHcloud, and the list of vulnerabilities is regularly updated.
:::
#### Configuring CDN Advanced options
Go to the `Multisite
` tab for your Web Hosting plan, click on `...
` to the right of the domain name or subdomain concerned, then click `Modify the CDN
`.
:::info
The options presented below require a subscription to [CDN Advanced](https://www.ovhcloud.com/en-gb/web-hosting/options/cdn/).
:::
- **Geolocation HTTP Header**: Determine the country of the visitor to customise the proposed experience. The country code is automatically added in the header of each request to be handled by your original server. The identification elements in the header are called `Geo-Country-Code`, `Geo-Country-Name`, `Geo-Region`, `Geo-City`.
- **Prefetch**: Anticipate the next resource being loaded. Preload it automatically in the CDN cache using your website’s _header link_. This mechanism is mainly used to load CSS, JavaScript, images, favicons or web fonts that are required by the website theme.
In the example below, when the current page is displaying 'Hi', a subquery triggers the preloading of the resource `/cache/style.css`.
```
; rel=prefetch");
print 'Hi'
?>
```
- **Mobile redirect**: Automatically redirect "Mobile" visitors to an optimised website. Choice: redirect systematically to the root of another website, or keep the URL by replacing only the domain (or subdomain).
- **Advanced Purge**: Customise your purge by choosing which elements of the cache to clear: the entire site, a folder, a URI, a file extension, or using a custom regular expression.
In the Multisite tab, click on the ... button to the right of the domain name or subdomain concerned, then click on Purge CDN.
 - **Query String**: Content caching management, based on the parameters (also called _Query String_) of the URL query. Depending on your configuration, choose the behaviour of the CDN cache:
- _Disabled_: The resource is cached with its unsorted parameters. This will create, for example, 2 iterations in the CDN cache for 2 URLs with the same parameters in a different order.
- _Enabled - Sort Settings_: The resource is cached by sorting its parameters. You will need to sort it before storing the URL in the CDN cache. For example, only one iteration will be kept for 2 URLs with the same settings in a different order.
- _Enabled - Ignore settings_: The resource is cached without any parameters. The CDN cache will not take into account the parameters entered in the URL, so it will store the URL without the parameters in the cache.
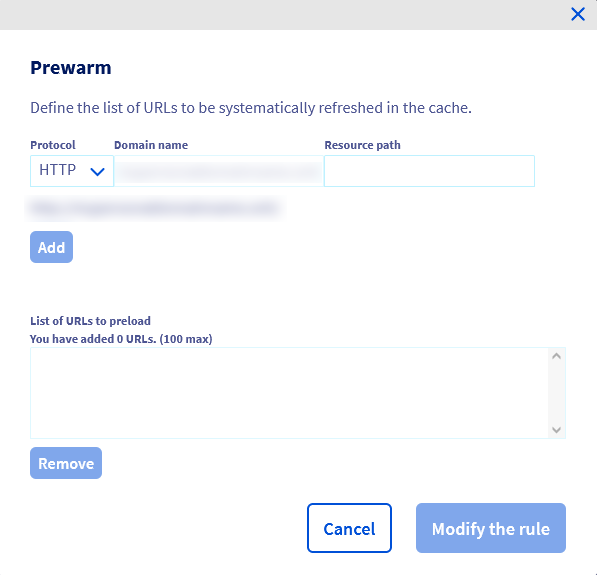
- **Prewarm**: Force permanent caching of your critical resources. The CDN automatically anticipates and refreshes the cache, without waiting for a user request. This function applies only to static content, with a TTL greater than 0, and the resource must not exceed 1 GB. A gauge tells you the level of resource consumption in _Prewarm_, depending on your URL list. The total resources called by these URLs must not exceed 1 GB.
To define the list of URLs that should be in _Prewarm_, click
- **Query String**: Content caching management, based on the parameters (also called _Query String_) of the URL query. Depending on your configuration, choose the behaviour of the CDN cache:
- _Disabled_: The resource is cached with its unsorted parameters. This will create, for example, 2 iterations in the CDN cache for 2 URLs with the same parameters in a different order.
- _Enabled - Sort Settings_: The resource is cached by sorting its parameters. You will need to sort it before storing the URL in the CDN cache. For example, only one iteration will be kept for 2 URLs with the same settings in a different order.
- _Enabled - Ignore settings_: The resource is cached without any parameters. The CDN cache will not take into account the parameters entered in the URL, so it will store the URL without the parameters in the cache.
- **Prewarm**: Force permanent caching of your critical resources. The CDN automatically anticipates and refreshes the cache, without waiting for a user request. This function applies only to static content, with a TTL greater than 0, and the resource must not exceed 1 GB. A gauge tells you the level of resource consumption in _Prewarm_, depending on your URL list. The total resources called by these URLs must not exceed 1 GB.
To define the list of URLs that should be in _Prewarm_, click Edit URL List.
Using the `Protocol`, `Domain Name`, and `Resource Path` fields, type one of the links to a resource that you want to add to the **Prewarm** function, and then click Add.
A list is created in the lower frame, with all the links you have listed, you can delete the link of your choice by selecting it, then clicking Remove.
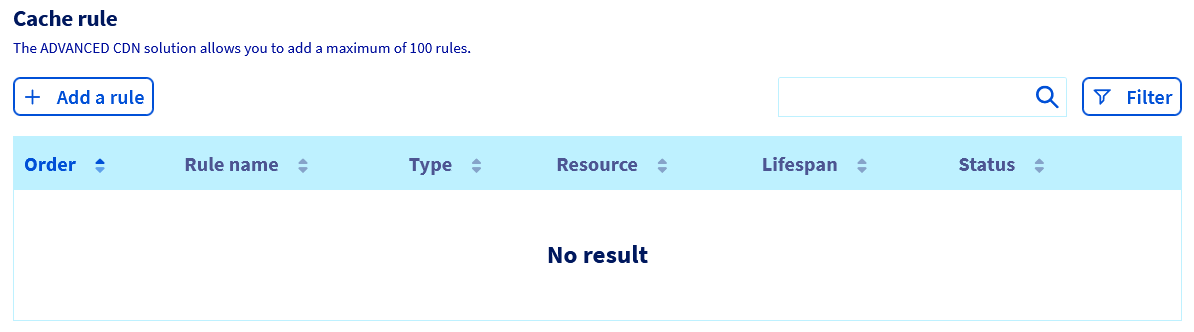
 - **Cache rule**: Create up to 100 rules. They set the cache refresh rate for specific resources on your site. Continue reading the guide in [the next step](#cacherulesadv) for more information.
Once you have chosen your options, click `Apply configuration
`, then `Confirm configuration
` in the next window.
##### **Create an advanced caching rule**
[](#)
To add a cache rule on one of your website’s elements, go to the `Multisite
` tab for your Web Hosting plan, click on `...
` to the right of the domain name or subdomain concerned, then click `Modify the CDN
`.
Under **Cache**
rules, click the `Add a rule
` button.
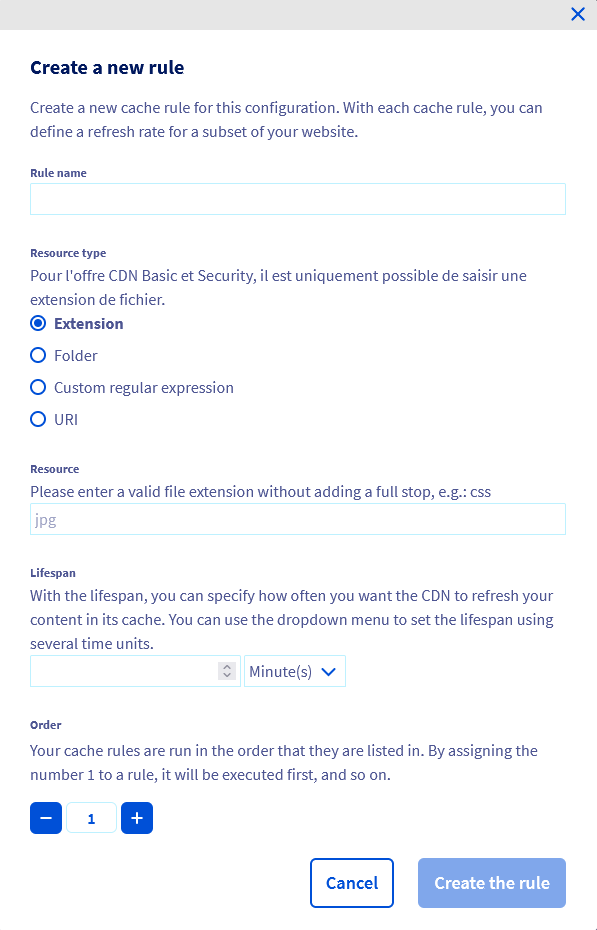
- **Rule name**: Give your rule a name.
- **Resource type**: Choose from the options below:
- **Extension**: Please enter a valid file extension without putting a period, for example: CSS.
- **File**: Please enter a valid path for one of the folders in the root directory of your website.
- **Custom regular expression**: It applies to all URIs on your website.
- **URI**: Enter the subset of your website’s resources via their URL path.
- **Resource**: set attributes based on the type of resource you choose.
- **Lifespan**: Specify the cache duration for the chosen resource.
- **Order**: Order your rules by execution order (lowest to highest).
Once you have made your choices, click the `Create rule
` button.
Rules appear in a list. You can edit a rule by clicking `...
` to the right of the rule, then `Edit Rule
`. You can delete it by clicking `Delete Rule
`.
Once you have configured your rules and chosen your options, click `Apply configuration
`, then `Confirm configuration
` in the next window.
### View CDN statistics and logs
To view CDN statistics and/or logs, please refer to our dedicated guide: “[Web Hosting - View CDN statistics and logs](/en/guides/web-cloud/web-hosting/cdn-statistics-and-logs.md)”.
### How do I cache my files in the CDN?
**Using a CMS**
The main CMSs distribute several plugins that allow static files to be cached so that they are automatically included by the CDN. Others automatically configure static files by enabling an integrated caching to the CMS. For further information, please refer to the official documentation for the CMS or plugin that you use.
**Without using a CMS**
If you are not using a CMS, you can also use the CDN cache. To do this, you must add headers to the HTTP requests. There are several ways in which you can add these headers. One of the easiest ways is to define rules within a .htaccess file according to the file extensions.
```apache
1. # Cache images for 1 week
2.
3. Header set Cache-Control "max-age=604800, public"
4.
5.
6. # Cache JavaScript and CSS for 1 month
7.
8. Header set Cache-Control "max-age=2592000"
9.
```
:::warning
Caching by using HTTP headers results in caching within the CDN but also within your users’ browsers. Therefore, to prevent your visitors from seeing an older cached version, it is recommended that you rename the files with every new version.
:::
### Disabling the CDN option for a website
This action allows you to disable the CDN for one or more of your domain names or subdomains, without removing the CDN option from your web hosting.
:::warning
Disabling the CDN option for a website requires changing the IP address to use to redirect your domain name to your Web Hosting plan.
This change is done automatically if your domain name’s active DNS zone is also managed from the OVHcloud account
containing your Web Hosting plan.
Otherwise, you will need to do two things:
- Retrieve the **default** IP address of the cluster where your Web Hosting plan is located using our guide “[Web Hosting: The IP addresses of our clusters](/en/guides/web-cloud/web-hosting/clusters-and-shared-hosting-ip.md)”.
- Manually change the IP address in your domain name’s active DNS zone, or contact your DNS zone provider to update it for you.
Modifying an entry in a domain name’s active DNS zone will take between **4** and **24** hours to propagate fully. By the time this propagation finishes, a page containing the code **520** may appear randomly. This occurs because some parts of the DNS network still redirect requests to the CDN IP address linked to your Web Hosting plan.
:::
Log in to your OVHcloud Control Panel
and select `Web Cloud
` in the top navigation bar. Click `Hosting plans
`, then choose the relevant the Web Hosting plan. On the `Multisite
` tab, click on the `...
` button to the right of the domain name or subdomain concerned, then click on `Modify domain
`.
Untick "Activate the CDN", click `Next
` and then `Confirm
`.
### Cancelling the CDN option
This action will remove the CDN option from your entire Web Hosting solution.
Log in to your OVHcloud Control Panel
and select `Web Cloud
` in the top navigation bar. Click `Hosting plans
`, then choose the relevant the Web Hosting plan. Click `...
` to the right of “CDN option”, then on `Cancel the CDN
`.
Click `Confirm
` to continue with the cancellation.
:::warning
You will receive an email containing the CDN closure procedure. Please follow the instructions in the email in order to confirm or cancel the request.
:::
### Checking that your CDN is working
You can confirm that the CDN is active on your domain name via a terminal with the following command:
```bash
curl -i http://yourpersonaldomain.ovh/
```
If your domain name is being processed by the CDN, you will receive a result like the one below:
```console
HTTP/1.1 200 OK
Date: Mon, 01 Jan 2020 00:00:00 GMT
Content-Type: text/html; charset=UTF-8
Set-Cookie: SERVERID12345=123456; path=/; max-age=900
Vary: Accept-Encoding
X-Request-ID: 123456789
X-CDN-Pop: rbx1
X-CDN-Pop-IP: 00.111.22.333/44
X-Cacheable: Cacheable
Accept-Ranges: bytes
Transfer-Encoding: chunked
X-IPLB-Instance: 12345
```
The “_X-CDN_” headers confirm that the domain is running through the CDN.
If the domain name is not running through the CDN, you will receive a result similar to the following:
```console
HTTP/1.1 200 OK
Date: Mon, 01 Jan 2020 00:00:00 GMT
Content-Type: text/html; charset=UTF-8
Set-Cookie: SERVERID12345=123456; path=/; max-age=900
Server: Apache
X-Powered-By: PHP/7.1
Vary: Accept-Encoding
X-IPLB-Instance: 12345
```
The absence of the “_X-CDN_” header shows that you are not using a CDN.
## Go further
For specialised services (SEO, development, etc.), contact [OVHcloud partners](https://partner.ovhcloud.com/en-gb/directory/).
If you would like assistance using and configuring your OVHcloud solutions, please refer to our [support offers](https://www.ovhcloud.com/en-gb/support-levels/).
Join our [community of users](https://community.ovhcloud.com/).
- **Cache rule**: Create up to 100 rules. They set the cache refresh rate for specific resources on your site. Continue reading the guide in [the next step](#cacherulesadv) for more information.
Once you have chosen your options, click `Apply configuration
`, then `Confirm configuration
` in the next window.
##### **Create an advanced caching rule**
[](#)
To add a cache rule on one of your website’s elements, go to the `Multisite
` tab for your Web Hosting plan, click on `...
` to the right of the domain name or subdomain concerned, then click `Modify the CDN
`.
Under **Cache**
rules, click the `Add a rule
` button.

- **Rule name**: Give your rule a name.
- **Resource type**: Choose from the options below:
- **Extension**: Please enter a valid file extension without putting a period, for example: CSS.
- **File**: Please enter a valid path for one of the folders in the root directory of your website.
- **Custom regular expression**: It applies to all URIs on your website.
- **URI**: Enter the subset of your website’s resources via their URL path.
- **Resource**: set attributes based on the type of resource you choose.
- **Lifespan**: Specify the cache duration for the chosen resource.
- **Order**: Order your rules by execution order (lowest to highest).
Once you have made your choices, click the `Create rule
` button.
Rules appear in a list. You can edit a rule by clicking `...
` to the right of the rule, then `Edit Rule
`. You can delete it by clicking `Delete Rule
`.

Once you have configured your rules and chosen your options, click `Apply configuration
`, then `Confirm configuration
` in the next window.
### View CDN statistics and logs
To view CDN statistics and/or logs, please refer to our dedicated guide: “[Web Hosting - View CDN statistics and logs](/en/guides/web-cloud/web-hosting/cdn-statistics-and-logs.md)”.
### How do I cache my files in the CDN?
**Using a CMS**
The main CMSs distribute several plugins that allow static files to be cached so that they are automatically included by the CDN. Others automatically configure static files by enabling an integrated caching to the CMS. For further information, please refer to the official documentation for the CMS or plugin that you use.
**Without using a CMS**
If you are not using a CMS, you can also use the CDN cache. To do this, you must add headers to the HTTP requests. There are several ways in which you can add these headers. One of the easiest ways is to define rules within a .htaccess file according to the file extensions.
```apache
1. # Cache images for 1 week
2.
3. Header set Cache-Control "max-age=604800, public"
4.
5.
6. # Cache JavaScript and CSS for 1 month
7.
8. Header set Cache-Control "max-age=2592000"
9.
```
:::warning
Caching by using HTTP headers results in caching within the CDN but also within your users’ browsers. Therefore, to prevent your visitors from seeing an older cached version, it is recommended that you rename the files with every new version.
:::
### Disabling the CDN option for a website
This action allows you to disable the CDN for one or more of your domain names or subdomains, without removing the CDN option from your web hosting.
:::warning
Disabling the CDN option for a website requires changing the IP address to use to redirect your domain name to your Web Hosting plan.
This change is done automatically if your domain name’s active DNS zone is also managed from the OVHcloud account
containing your Web Hosting plan.
Otherwise, you will need to do two things:
- Retrieve the **default** IP address of the cluster where your Web Hosting plan is located using our guide “[Web Hosting: The IP addresses of our clusters](/en/guides/web-cloud/web-hosting/clusters-and-shared-hosting-ip.md)”.
- Manually change the IP address in your domain name’s active DNS zone, or contact your DNS zone provider to update it for you.
Modifying an entry in a domain name’s active DNS zone will take between **4** and **24** hours to propagate fully. By the time this propagation finishes, a page containing the code **520** may appear randomly. This occurs because some parts of the DNS network still redirect requests to the CDN IP address linked to your Web Hosting plan.
:::
Log in to your OVHcloud Control Panel
and select `Web Cloud
` in the top navigation bar. Click `Hosting plans
`, then choose the relevant the Web Hosting plan. On the `Multisite
` tab, click on the `...
` button to the right of the domain name or subdomain concerned, then click on `Modify domain
`.
Untick "Activate the CDN", click `Next
` and then `Confirm
`.

### Cancelling the CDN option
This action will remove the CDN option from your entire Web Hosting solution.
Log in to your OVHcloud Control Panel
and select `Web Cloud
` in the top navigation bar. Click `Hosting plans
`, then choose the relevant the Web Hosting plan. Click `...
` to the right of “CDN option”, then on `Cancel the CDN
`.

Click `Confirm
` to continue with the cancellation.
:::warning
You will receive an email containing the CDN closure procedure. Please follow the instructions in the email in order to confirm or cancel the request.
:::
### Checking that your CDN is working
You can confirm that the CDN is active on your domain name via a terminal with the following command:
```bash
curl -i http://yourpersonaldomain.ovh/
```
If your domain name is being processed by the CDN, you will receive a result like the one below:
```console
HTTP/1.1 200 OK
Date: Mon, 01 Jan 2020 00:00:00 GMT
Content-Type: text/html; charset=UTF-8
Set-Cookie: SERVERID12345=123456; path=/; max-age=900
Vary: Accept-Encoding
X-Request-ID: 123456789
X-CDN-Pop: rbx1
X-CDN-Pop-IP: 00.111.22.333/44
X-Cacheable: Cacheable
Accept-Ranges: bytes
Transfer-Encoding: chunked
X-IPLB-Instance: 12345
```
The “_X-CDN_” headers confirm that the domain is running through the CDN.
If the domain name is not running through the CDN, you will receive a result similar to the following:
```console
HTTP/1.1 200 OK
Date: Mon, 01 Jan 2020 00:00:00 GMT
Content-Type: text/html; charset=UTF-8
Set-Cookie: SERVERID12345=123456; path=/; max-age=900
Server: Apache
X-Powered-By: PHP/7.1
Vary: Accept-Encoding
X-IPLB-Instance: 12345
```
The absence of the “_X-CDN_” header shows that you are not using a CDN.
## Go further
For specialised services (SEO, development, etc.), contact [OVHcloud partners](https://partner.ovhcloud.com/en-gb/directory/).
If you would like assistance using and configuring your OVHcloud solutions, please refer to our [support offers](https://www.ovhcloud.com/en-gb/support-levels/).
Join our [community of users](https://community.ovhcloud.com/).