---
title: "How to migrate an MX Plan email address to an OVHcloud Zimbra account"
description: "Find out how to migrate an MX Plan email address to an OVHcloud Zimbra account"
url: https://docs.ovhcloud.com/en/guides/web-cloud/email-and-collaborative-solutions/zimbra/migrate-mxplan-to-zimbra
lang: en
lastUpdated: 2026-06-01
---
# How to migrate an MX Plan email address to an OVHcloud Zimbra account
## Objective
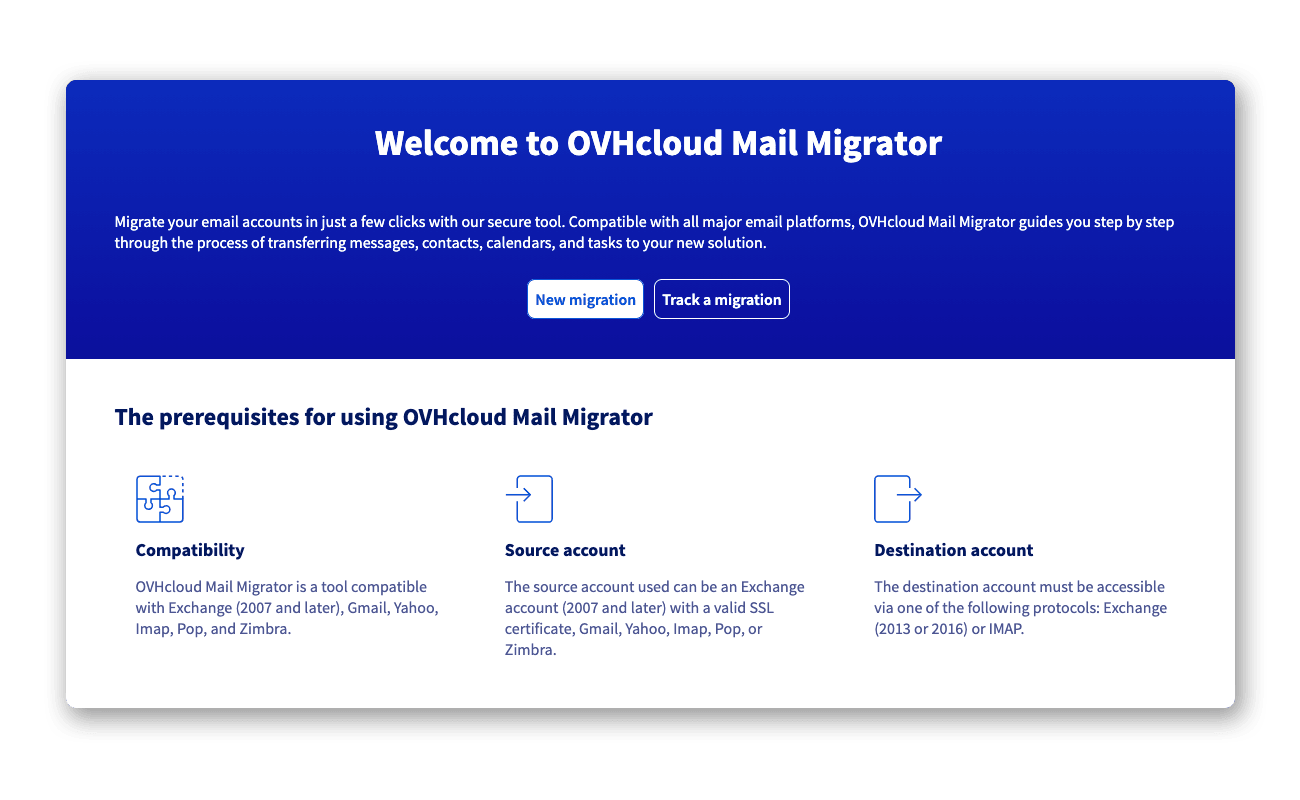
If you want to upgrade your MX Plan email solution to an [OVHcloud Zimbra](https://www.ovhcloud.com/en-gb/emails/zimbra-emails/) solution, you can use the [**O**VH **M**ail **M**igrator](https://omm.ovhcloud.com/) tool to perform your migration.
**Find out how to migrate an MX Plan email address to an OVHcloud Zimbra account.**
## Requirements
- You have an MX Plan email address (via the MX Plan solution, or included in an [OVHcloud web hosting](https://www.ovhcloud.com/en-gb/web-hosting/) plan).
- You have an OVHcloud Zimbra email account.
- **No redirection is set up on the MX Plan email address you want to migrate**.
***
### OVHcloud Control Panel Access
- **Direct link:** Zimbra
- **Navigation path:** Web Cloud > Zimbra Mail
***
## Instructions
:::warning
If your email account manages sensitive information, or if you encounter any issues during the migration, we recommend waiting for the automation tool to be set up in the OVHcloud Control Panel.
:::
Migrating an MX Plan email account to a Zimbra email account is done in 2 stages. To avoid interrupting email reception on the original address, you must follow the process below:
1. **[Transfer the contents of the MX Plan account to a Zimbra account](#step1)**
- [1.1 - Creating a Zimbra email address](#step11)
- [1.2 - Migrating emails with OVHcloud Mail Migrator](#step12)
- [1.3 - Source account email backup (optional)](#step13)
2. **[Delete the original MX Plan account and reassign its address to the Zimbra account](#step2)**
- [2.1 - Deletion of the old MX Plan email address](#step21)
- [2.2 - Rename the Zimbra email address](#step22)
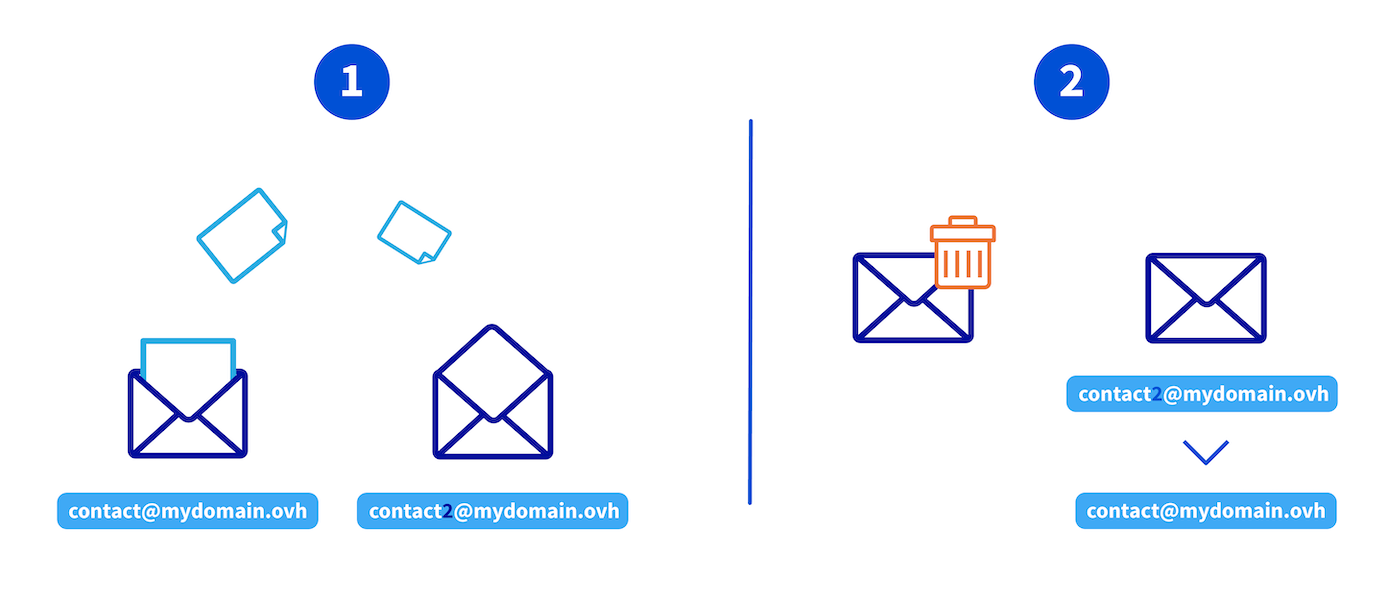
In the example below, we are migrating the address `contact@mydomain.ovh`. To do this, we will create the Zimbra account under the name `contact2@mydomain.ovh`.
### 1 - Transfer the contents of the MX Plan account to a Zimbra account [](#)
#### 1.1 - Creating a Zimbra email address [](#)
:::info
If you already have a Zimbra email address, go to [Migrating emails with OVHcloud Mail Migrator](#step12).
:::
First, create an email address with a temporary name. For example, you can create the address `contact2@mydomain.ovh` if you need to migrate the address `contact@mydomain.ovh`.
To create a Zimbra email address, please read the "Create an email account" section of our guide [Getting started with the Zimbra solution](/en/guides/web-cloud/email-and-collaborative-solutions/zimbra/getting-started-zimbra.md).
#### 1.2 - Migrating emails with OVHcloud Mail Migrator [](#)
Use the migration tool [**O**VH **M**ail **M**igrator](https://omm.ovhcloud.com/) (**OMM**) to transfer the contents of the original MX Plan account to the new Zimbra destination account, using the example shown in the diagram above.
The migration with OMM is carried out in 3 steps: create a project, configure the migration, then track its progress. Click on each tab to display the corresponding instructions.
**Step 1**
**Create a migration project**
Go to [OVHcloud Mail Migrator](https://omm.ovhcloud.com/) and click New migration.
- **Project contact email address**: Enter an email address that will receive the login credentials and tracking notifications. Do not use an address that will be migrated in this project.
- **Project password**: Set a password (minimum 10 characters, with at least 1 special character, 1 number, 1 uppercase and 1 lowercase letter).
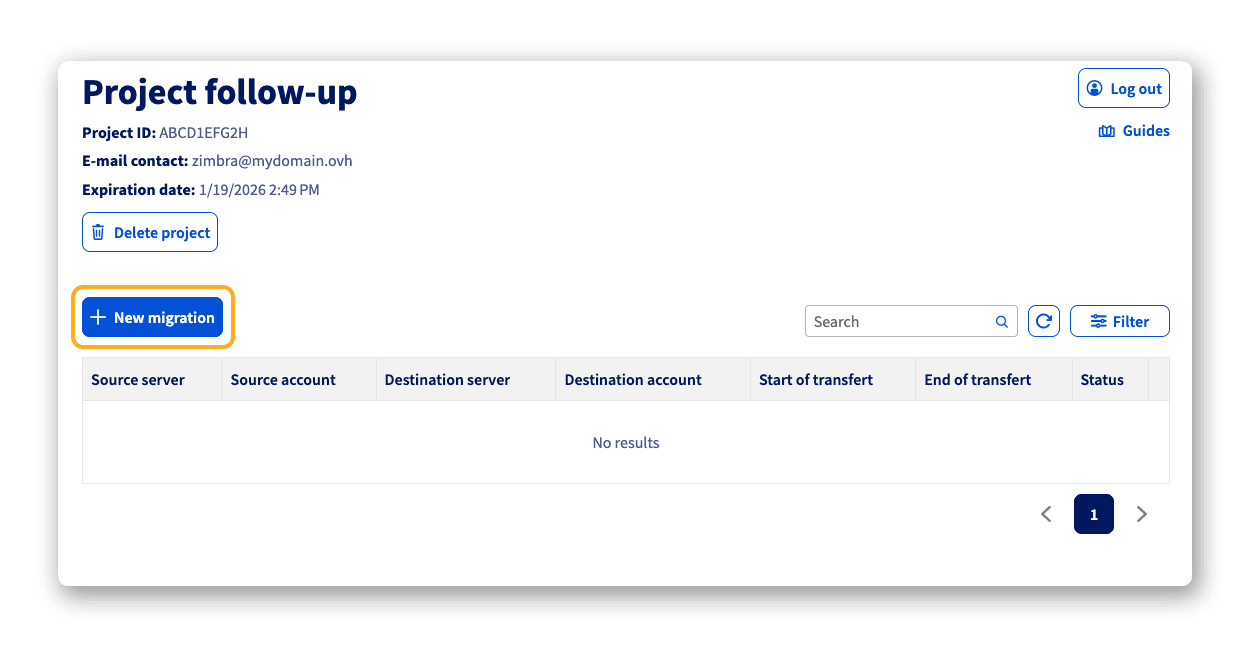
Click Create my project. You will receive a confirmation email containing the unique project identifier.
**Step 2**
**Log in to the project and create the migration**
From the [OMM](https://omm.ovhcloud.com/) homepage, click Track a migration, enter the `Project identifier` and `Project password`, then click Log in to the project.
Then click New migration to configure your migration:
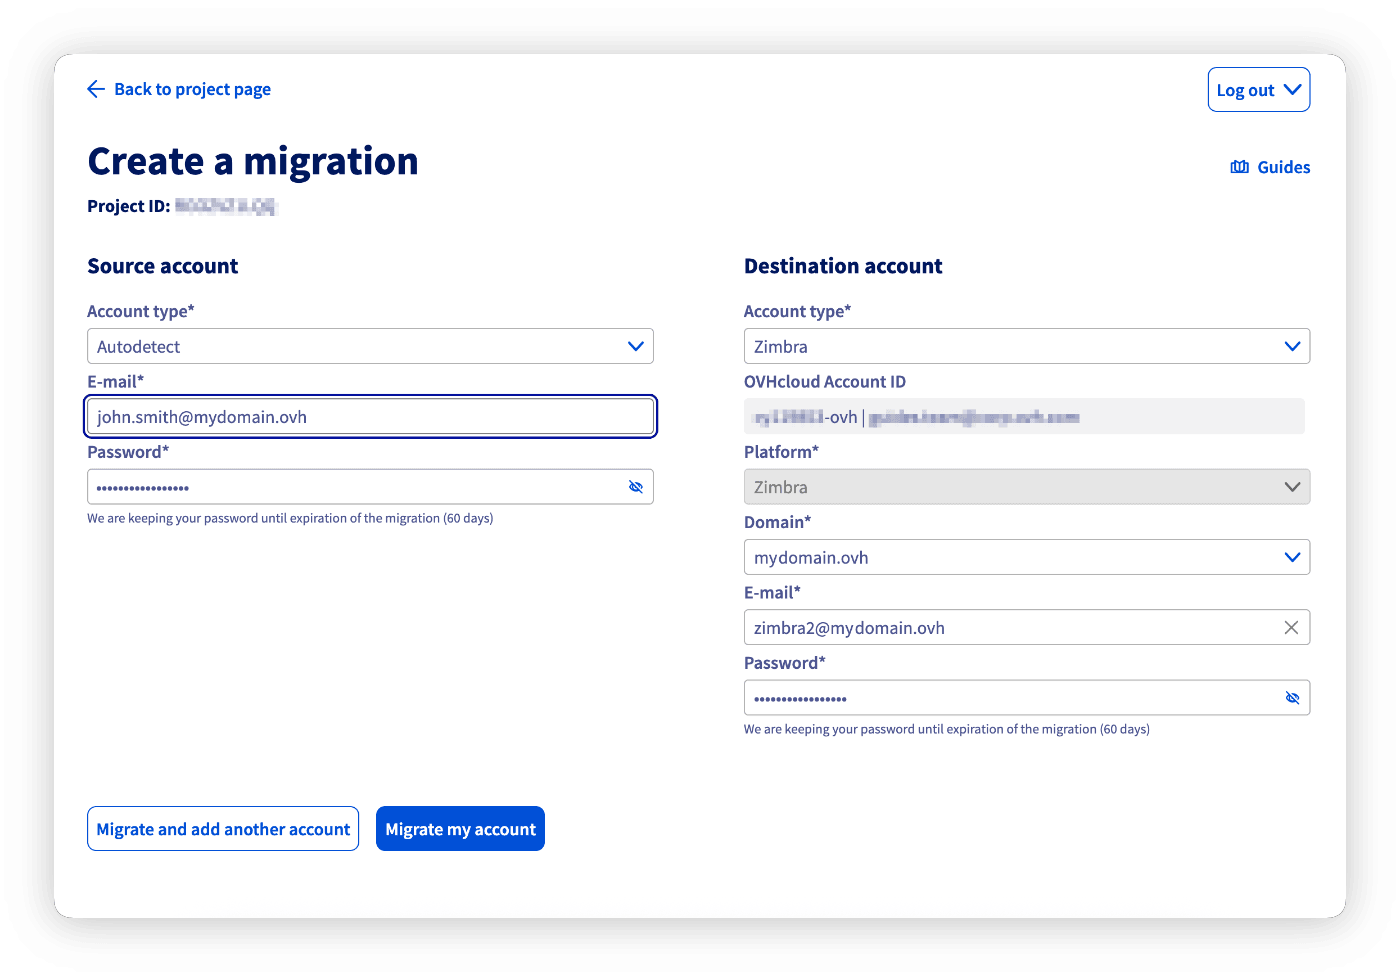
- **Source account**:
- **Account type**: Select `OVHcloud`, then choose `MX Plan` or `Auto-detection`. Click Log in to authenticate with your OVHcloud account and automatically select the service and address to migrate (e.g. `john.smith@mydomain.ovh`). Then enter the password for this email account.
- **Destination account**:
- **Account type**: Select `OVHcloud`, then choose `Zimbra`. Click Log in to authenticate with your OVHcloud account and select the Zimbra service and destination address (e.g. `zimbra2@mydomain.ovh`). Then enter the password for this email account.
- **Data to transfer**: Check the supported data types and uncheck any that you do not want to migrate.
- **Transfer start**: Choose `Immediately` or tick `Later` to schedule the migration at a defined date and time.
Click Migrate my account to start the migration.
**Step 3**
**Track the migration**
Two methods allow you to track your migration project:
- Via the email received when the project was created, using the link provided (the project identifier is pre-filled).
- From the [OMM](https://omm.ovhcloud.com/) homepage: click Track a migration, enter your `Project identifier` and `Project password`, then click Log in to the project.
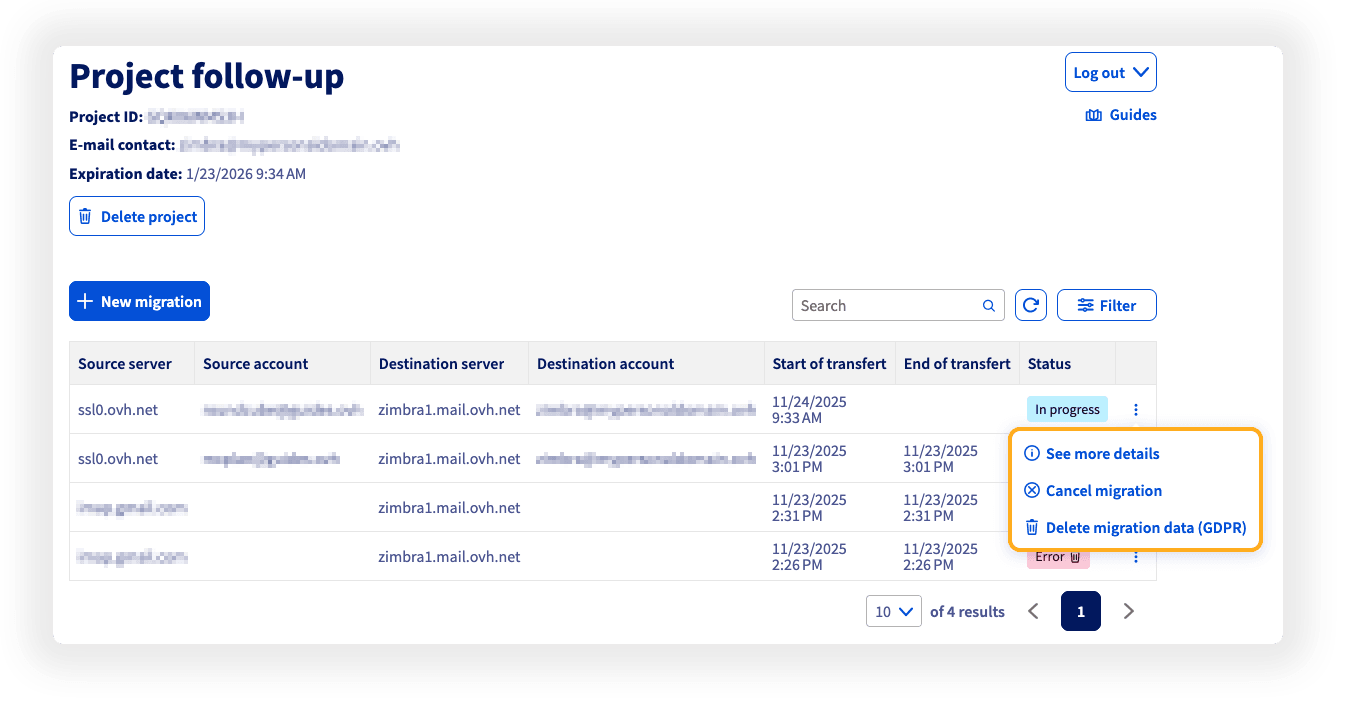
From the project page, click the ⋮ button to the right of your migration line to display the options:
- View more details: Track the progress of the migration and view the report once it is complete.
- Cancel migration: Cancels the ongoing migration. Items already migrated are kept in the destination account.
- Delete my migration data (GDPR): Triggers the deletion of all migration-related data. Information on migration events is retained.
For more details on using OMM, please read our guide "[Migrating email accounts via OVHcloud Mail Migrator](/en/guides/web-cloud/email-and-collaborative-solutions/migrating/omm-migrate-email-account-to-ovhcloud.md)".
:::info
The migration time varies depending on the volume of data, and can range from a few minutes to several hours. Once the migration is complete, check that all emails have been migrated.
:::
#### 1.3 - Source account email backup (optional) [](#)
:::warning
Before deleting your MX Plan account, **back up your emails** to avoid any data loss.
:::
Use the export options of your email client. In our guide "[Migrating your email address manually](/en/guides/web-cloud/email-and-collaborative-solutions/migrating/manual-email-migration.md)", you can find the details for manually exporting an email address from an email client.
### 2 - Delete the original MX Plan account and reassign its address to the Zimbra account [](#)
#### 2.1 - Deletion of the old MX Plan email address [](#)
To delete the MX Plan email address (e.g. `contact@mydomain.ovh`), follow our guide "[Delete an email account](/en/guides/web-cloud/email-and-collaborative-solutions/common-email-features/delete-email-account.md)".
:::warning
If you are migrating from an MX Plan account using Zimbra webmail, wait 5 minutes for the deletion to take effect before renaming the second email account.
:::
#### 2.2 - Rename the Zimbra email address [](#)
In your OVHcloud Control Panel, access your Zimbra service and rename the temporary Zimbra email address to the migrated MX Plan address. Using the example from step 2 of chapter 1.2 above, the temporary address `zimbra2@mydomain.ovh` will be renamed to `john.smith@mydomain.ovh`, which is the address in use.
### Conclusion [](#)
Your email account is now migrated to Zimbra. To finalise the configuration, please read the guides below:
- [Getting started with the Zimbra solution](/en/guides/web-cloud/email-and-collaborative-solutions/zimbra/getting-started-zimbra.md)
- [Configuring your Zimbra email address on an email client](/en/guides/web-cloud/email-and-collaborative-solutions/zimbra/mail-apps.md)
## Go further [](#)
[OVHcloud Zimbra FAQ](/en/guides/web-cloud/email-and-collaborative-solutions/mx-plan/faq-zimbra.md)
For specialised services (SEO, development, etc.), contact the [OVHcloud partners](https://partner.ovhcloud.com/en-gb/directory/).
If you would like assistance with using and configuring your OVHcloud solutions, we recommend referring to our range of [support solutions](https://www.ovhcloud.com/en-gb/support-levels/).
Join our [community of users](https://community.ovhcloud.com/).