---
title: "MX Plan - Setting up your email account on Thunderbird for Windows"
description: "Find out how to set up your MX Plan email address on Thunderbird for Windows"
url: https://docs.ovhcloud.com/en/guides/web-cloud/email-and-collaborative-solutions/mx-plan/how-to-configure-thunderbird-windows
lang: en
lastUpdated: 2026-06-08
---
# MX Plan - Setting up your email account on Thunderbird for Windows
## Objective
MX Plan email accounts can be configured on compatible email clients. This allows you to use your email address from your preferred device. Thunderbird is a free and open-source email client.
**This guide explains how to set up your MX Plan email address on Thunderbird for Windows.**
## Requirements
- You are using an MX Plan email account. This applies to the following services:
- [Web hosting](https://www.ovhcloud.com/en-gb/web-hosting/) (included in all offers)
- [Free hosting](https://www.ovhcloud.com/en-gb/domains/free-web-hosting/) (included with a domain name subscription)
- A separately ordered MX Plan service
- A [Zimbra Starter email account](https://www.ovhcloud.com/en-gb/emails/zimbra-emails/)
- [Web hosting](https://www.ovhcloud.com/en-gb/web-hosting/) (included in all offers)
- A separately ordered MX Plan service
- You have the Thunderbird software installed on your Windows device.
- You have the credentials for the email account you want to configure.
Information regarding the administration and configuration of OVHcloud services
This guide will show you how to use OVHcloud solutions with external tools, and the changes you need to make in specific contexts. You may need to adapt the instructions according to your situation.
If you experience any difficulties carrying out these operations, we recommend that you contact a specialist service provider or discuss the issue with our [community](https://community.ovhcloud.com/community/en). OVHcloud cannot provide you with technical support in this regard. You can find more information in the [Go further](#go-further) section of this guide.
## Instructions
### Add the account
- **On the first launch of the application**: a configuration wizard appears and prompts you to enter your email address.
- **If an account is already configured on the application**:
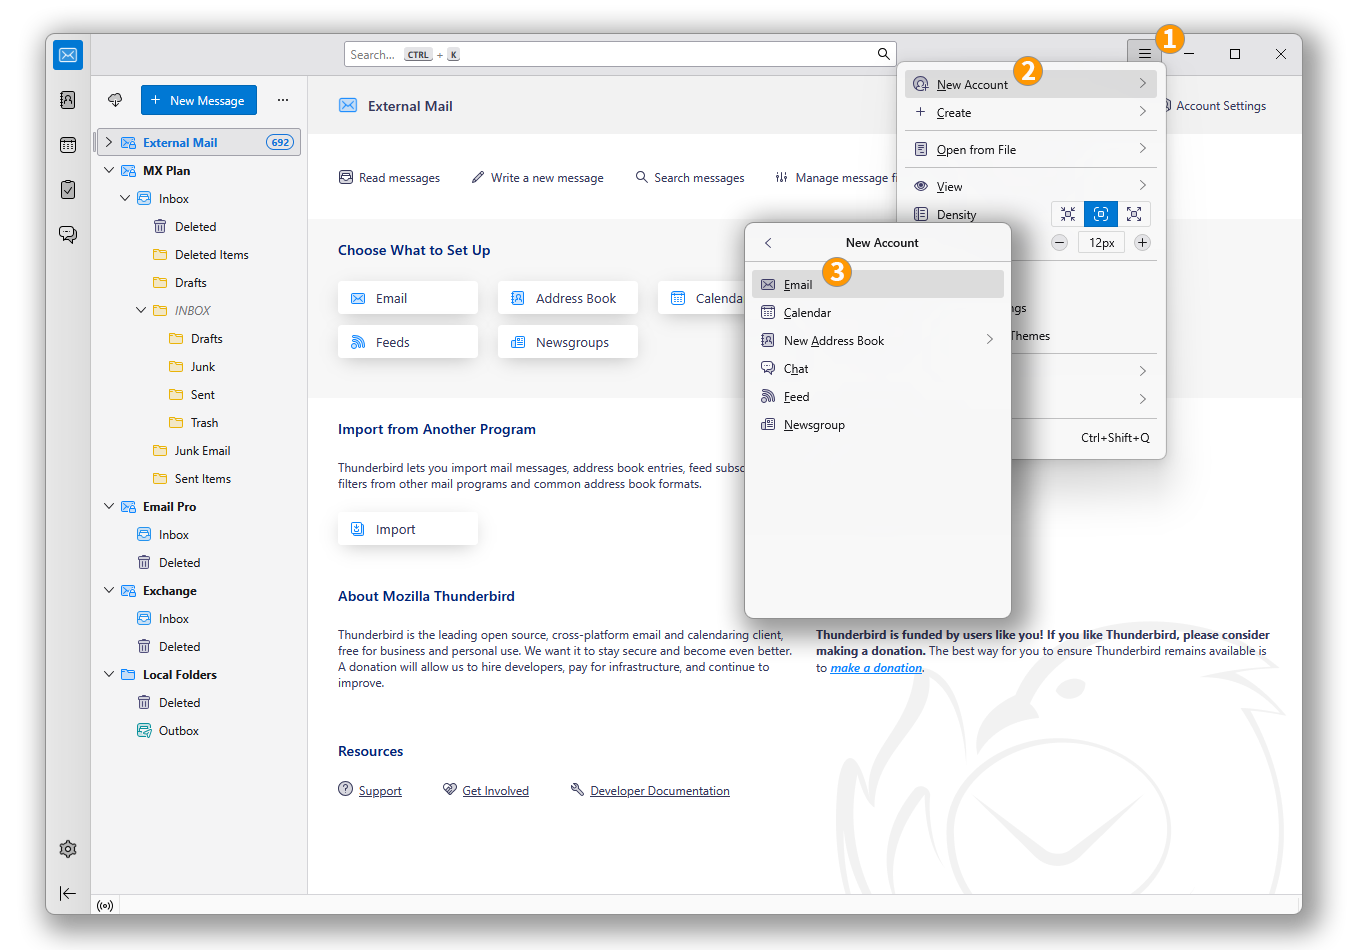
1. Click on the ☰ menu in the top horizontal bar.
2. Click on New Account.
3. Click on Email Address.
Follow the configuration steps by clicking successively on the **5** tabs below:
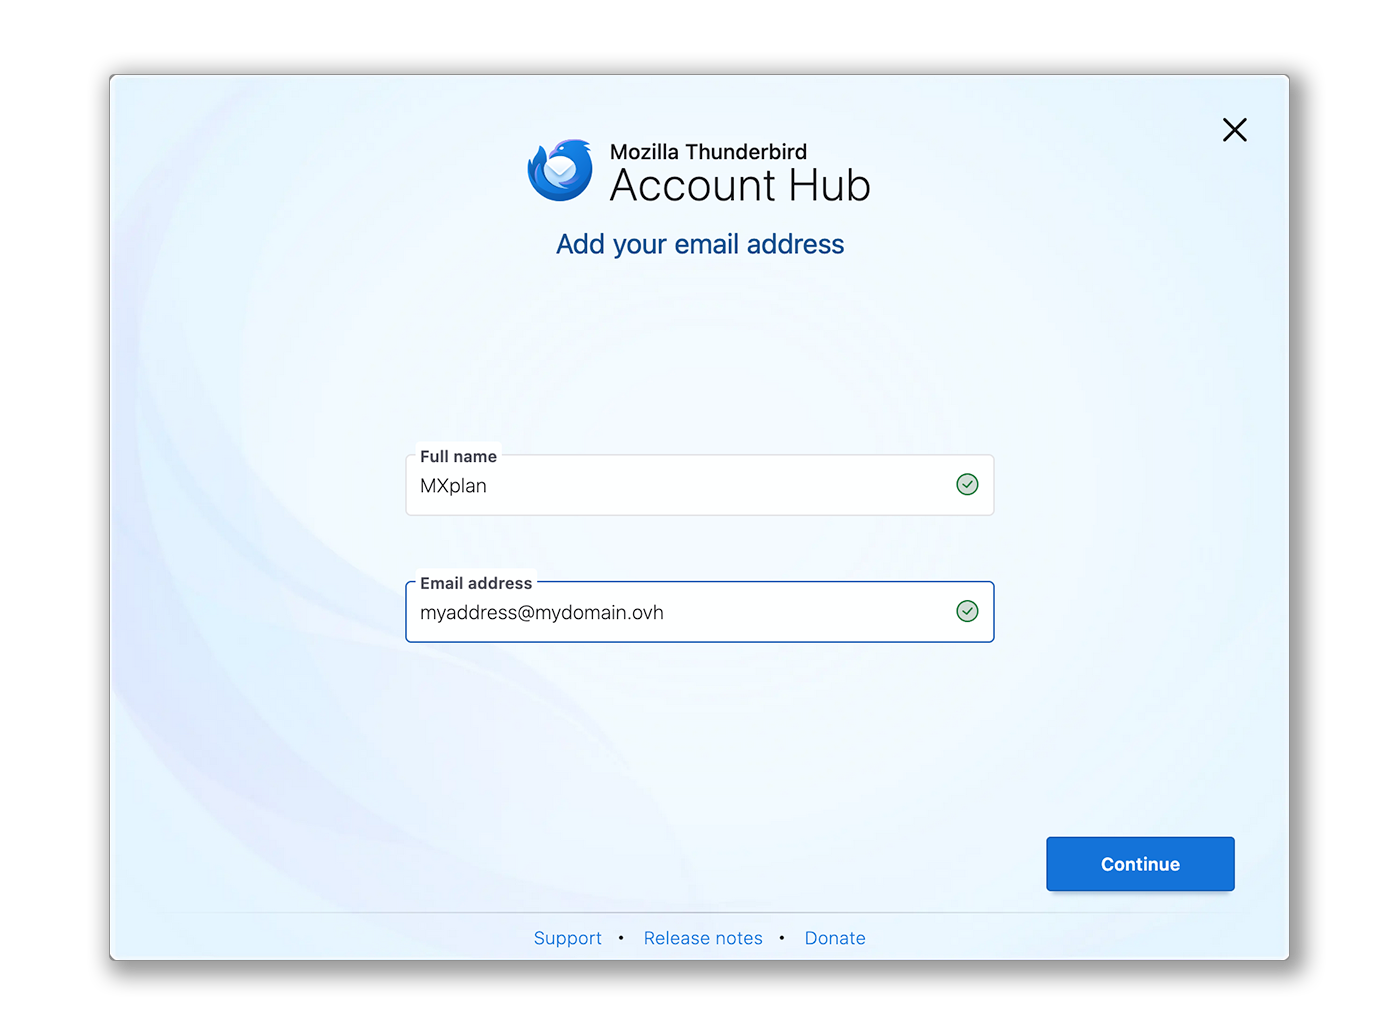
**Step 1**
In the window that appears, enter the following 2 pieces of information:
- Your full name (display name).
- The email address to configure.
Click on Continue to complete the settings.
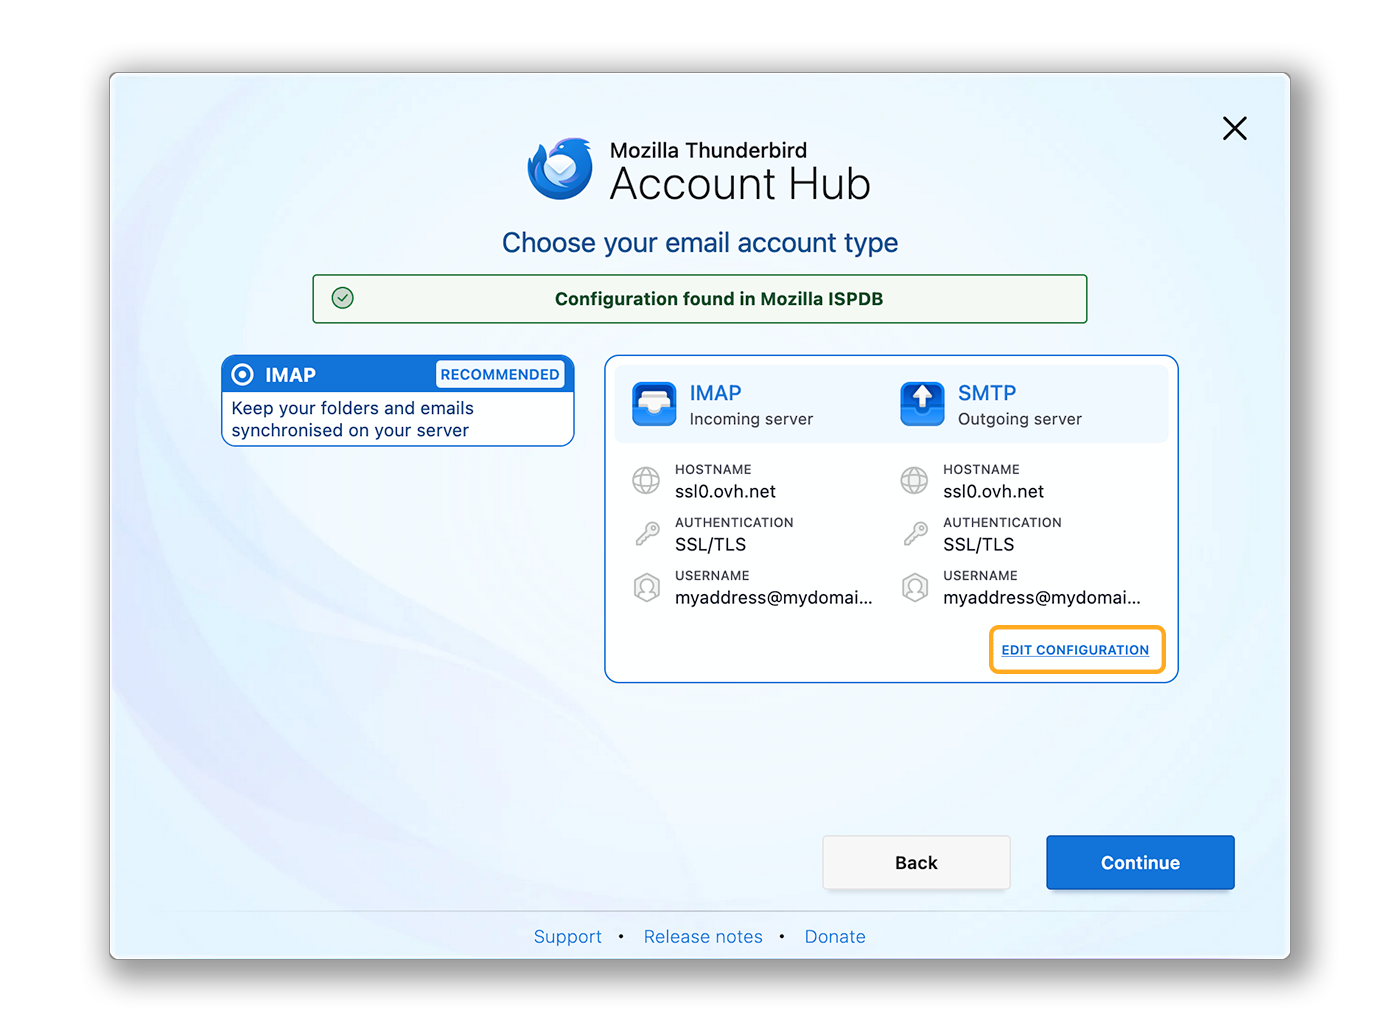
**Step 2**
When Thunderbird detects an OVHcloud domain name, an automatic configuration related to the MX Plan offer is proposed:
- If the information is correct, click on Continue and proceed to step 5.
- Otherwise, click on MODIFY THE CONFIGURATION to perform a manual configuration.
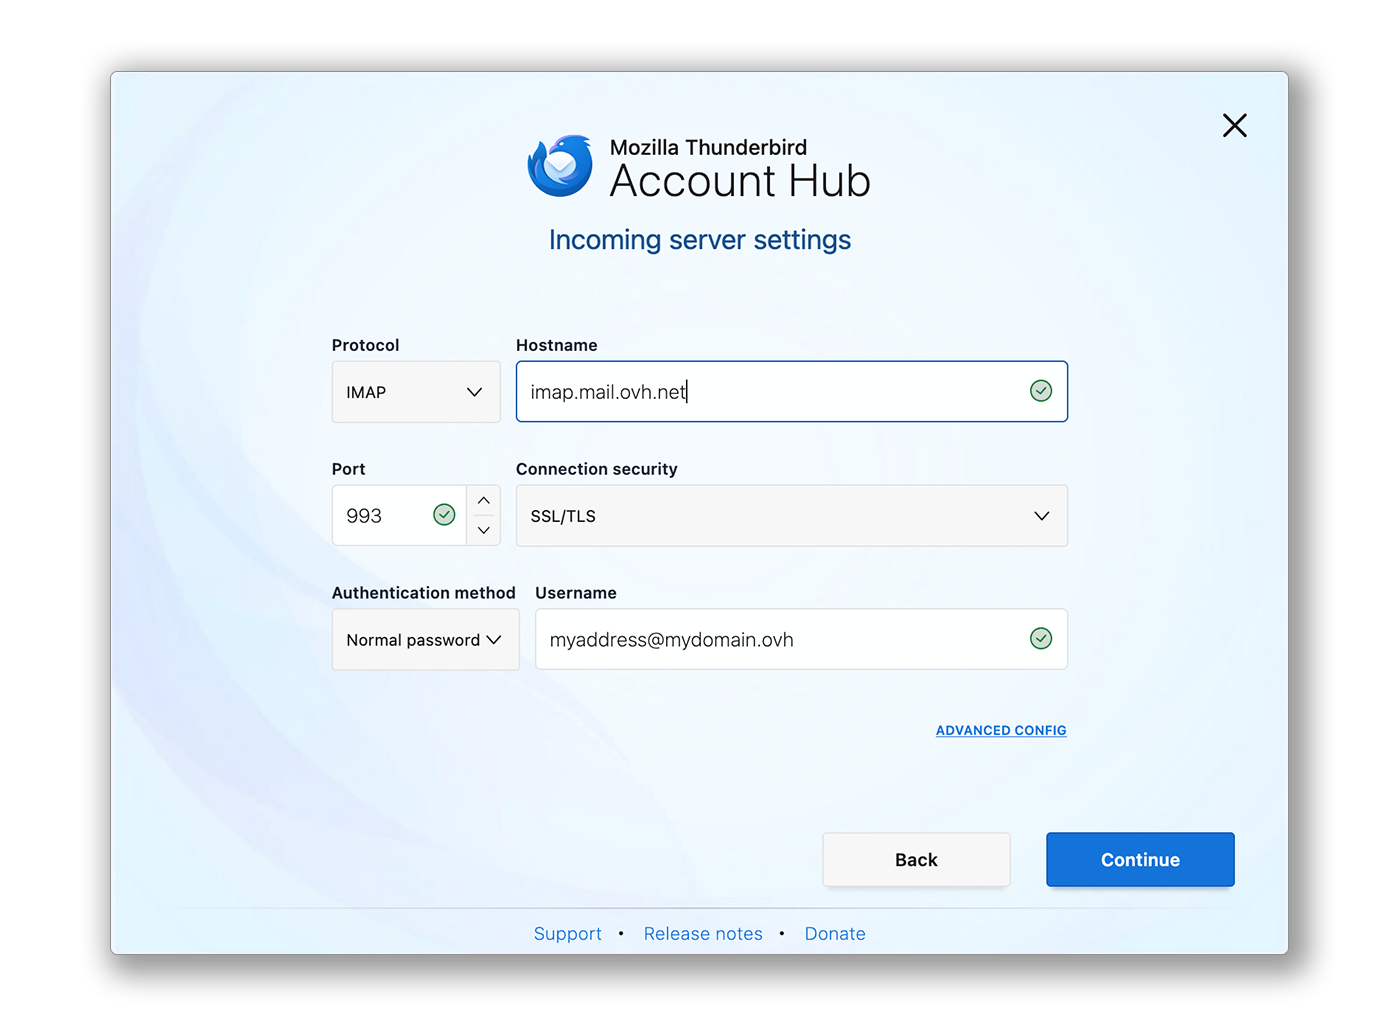
**Step 3**
Incoming server settings:
- **Protocol**: IMAP
- **Hostname**: imap.mail.ovh.net **or** ssl0.ovh.net
- **Port**: 993
- **Connection security**: SSL/TLS
- **Authentication method**: Normal password
- **Username**: Your full email address
**Step 4**
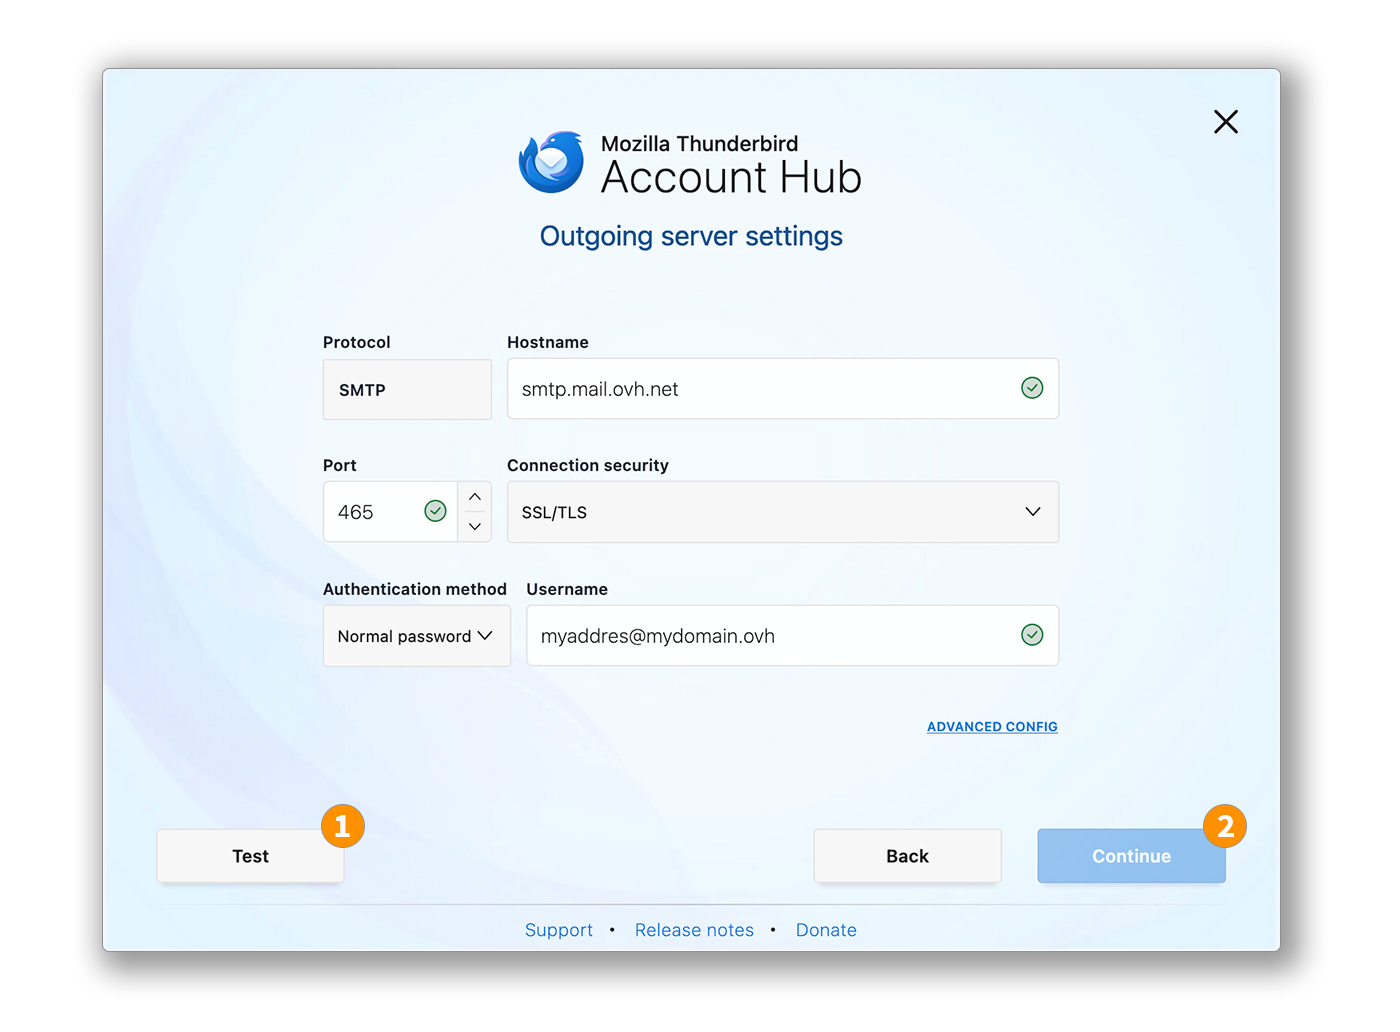
Outgoing server settings:
- **Protocol**: SMTP
- **Server**: smtp.mail.ovh.net **or** ssl0.ovh.net
- **Port**: 587
- **Connection security**: STARTTLS
- **Authentication method**: Normal password
- **Username**: Your full email address
1\. Click on Test to verify the entered settings.
2\. Click on Continue to validate these settings.
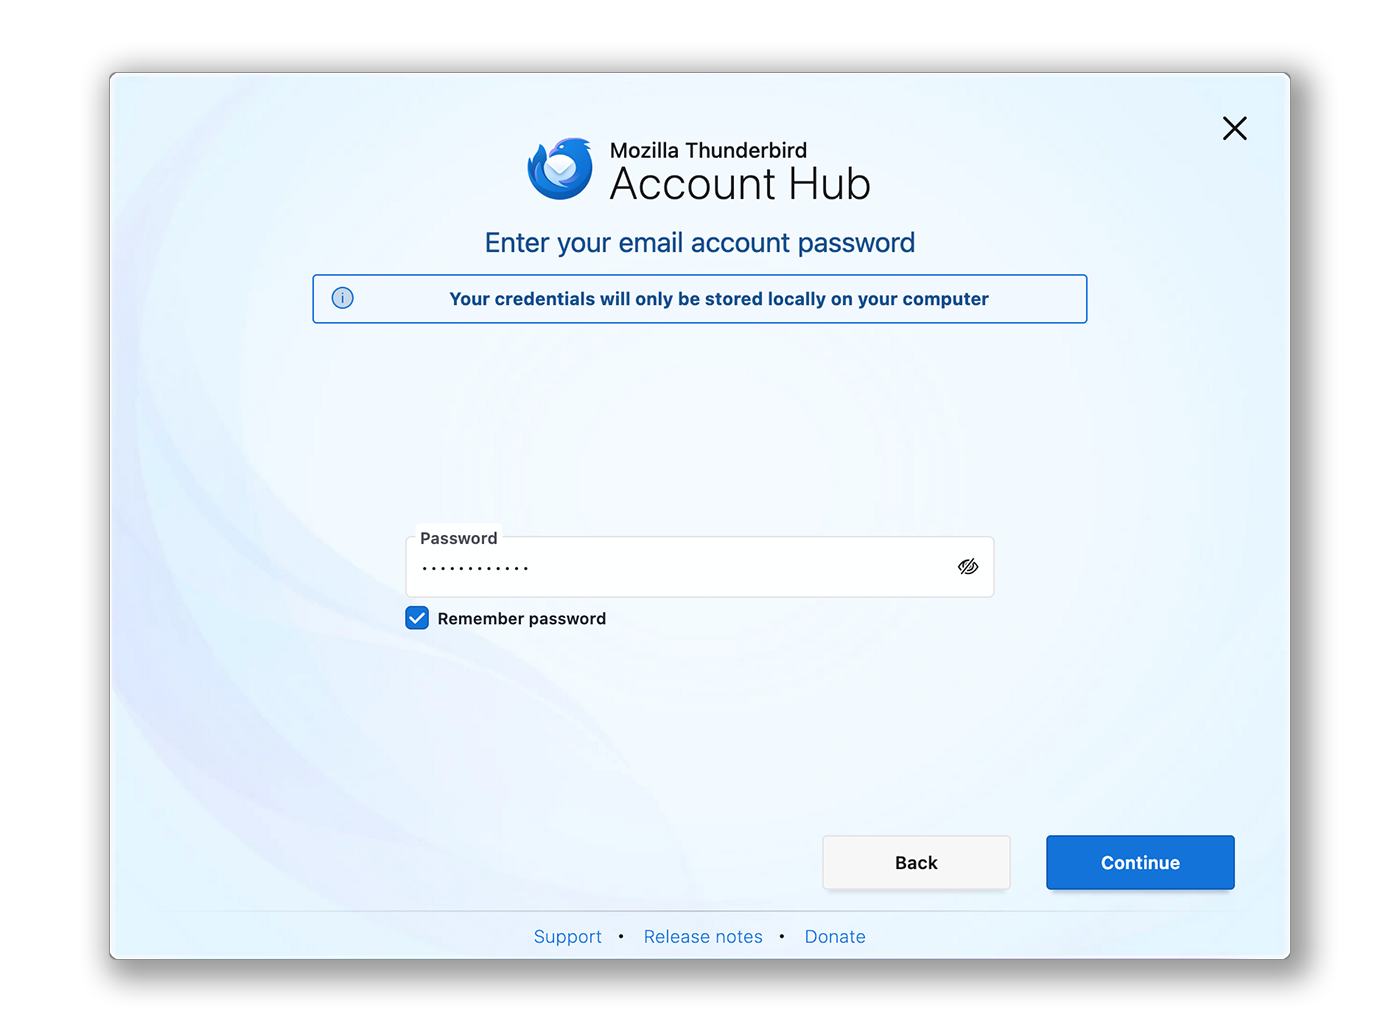
**Step 5**
Enter the password associated with the email account, then click on Continue to finalize the configuration.
:::info
**POP configuration**
If you want a POP configuration for your email address, replace the settings in **Step 3** with the following:
Incoming server settings:
- **Protocol**: POP3
- **Hostname**: pop.mail.ovh.net **or** ssl0.ovh.net
- **Port**: 995
- **Connection security**: SSL/TLS
- **Authentication method**: Normal password
- **Username**: Your full email address
:::
### Use the email address
Once your email address is configured, you can start using it! You can now send and receive emails.
OVHcloud also offers a web application to access your email account from a browser. To access the OVHcloud Webmail, click on [this link](https://www.ovhcloud.com/en-gb/mail/). You can log in using your email account credentials.
### Retrieve a backup of your email account
If you need to perform an operation that could result in the loss of your email account data, we recommend making a backup beforehand. To do this, refer to the "**Export**" section in the "**Thunderbird**" part of our guide "[Manually Migrate Your Email Address](/en/guides/web-cloud/email-and-collaborative-solutions/migrating/manual-email-migration.md)".
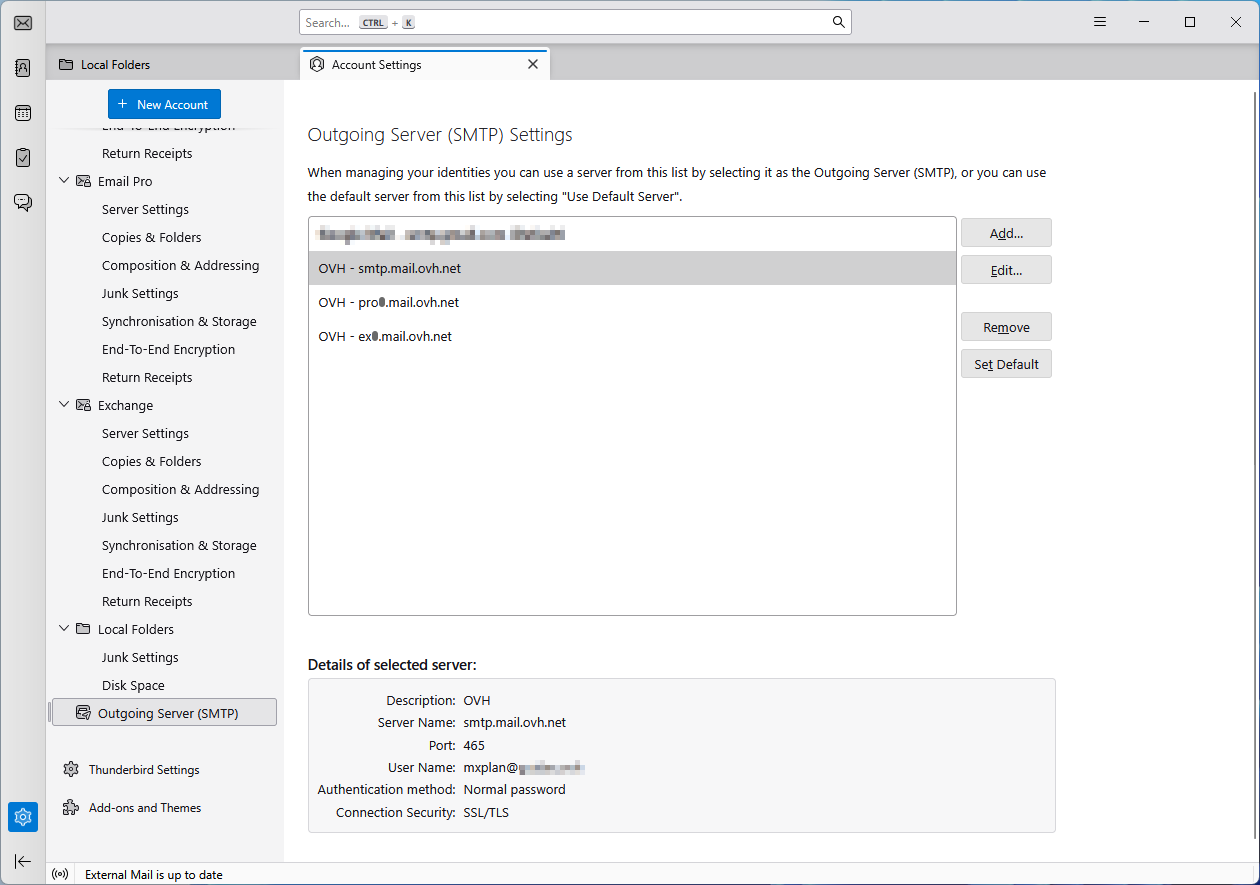
### Modify existing settings
If your email account is already configured and you need to access the account settings to modify them:
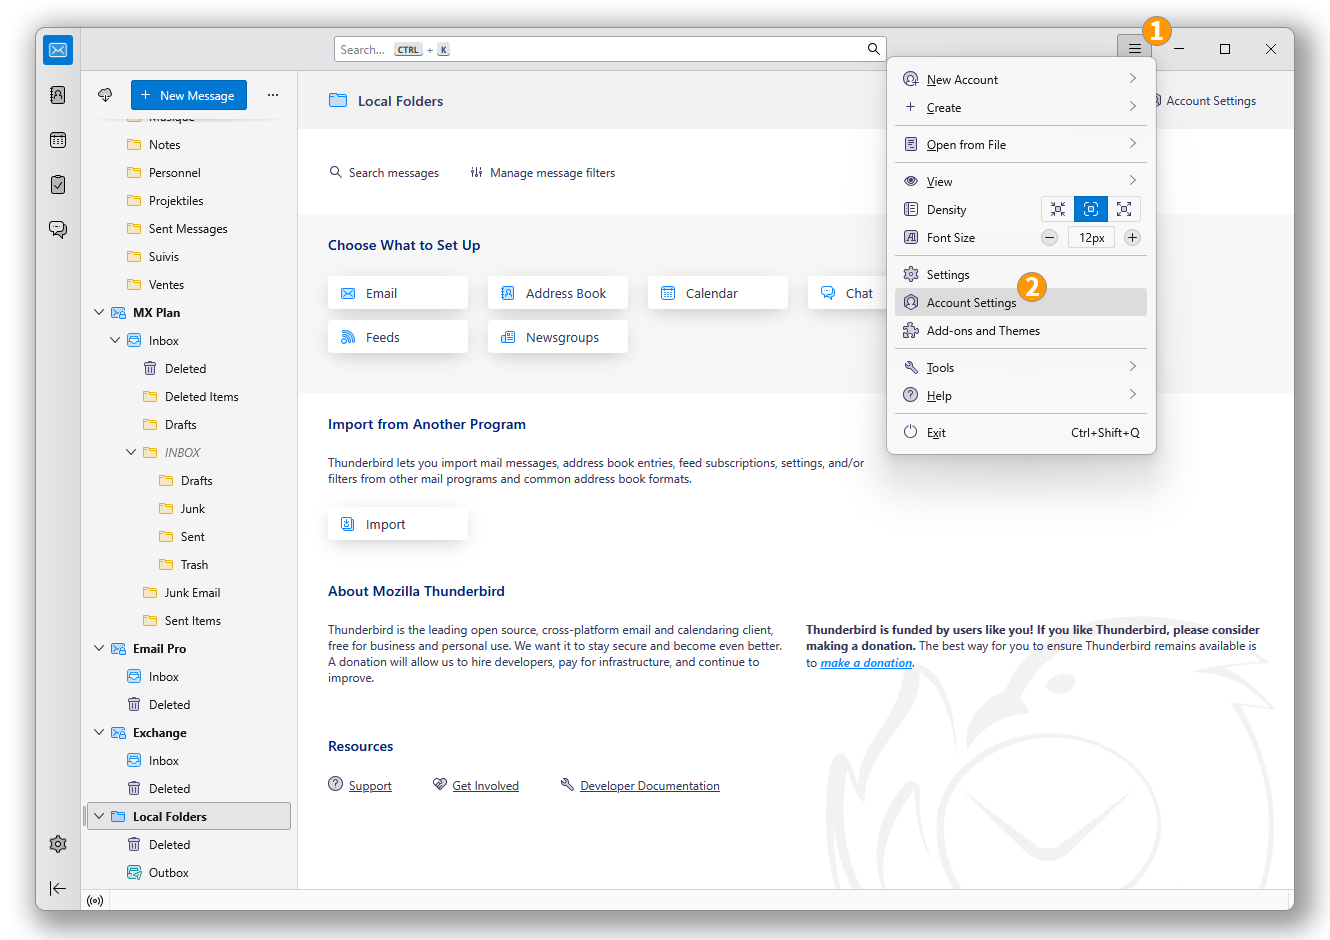
1. Click on the ☰ menu in the top horizontal bar.
2. Click on Account Settings.
- To modify settings related to the **reception** of your emails, click on Server Settings in the left column under your email address.
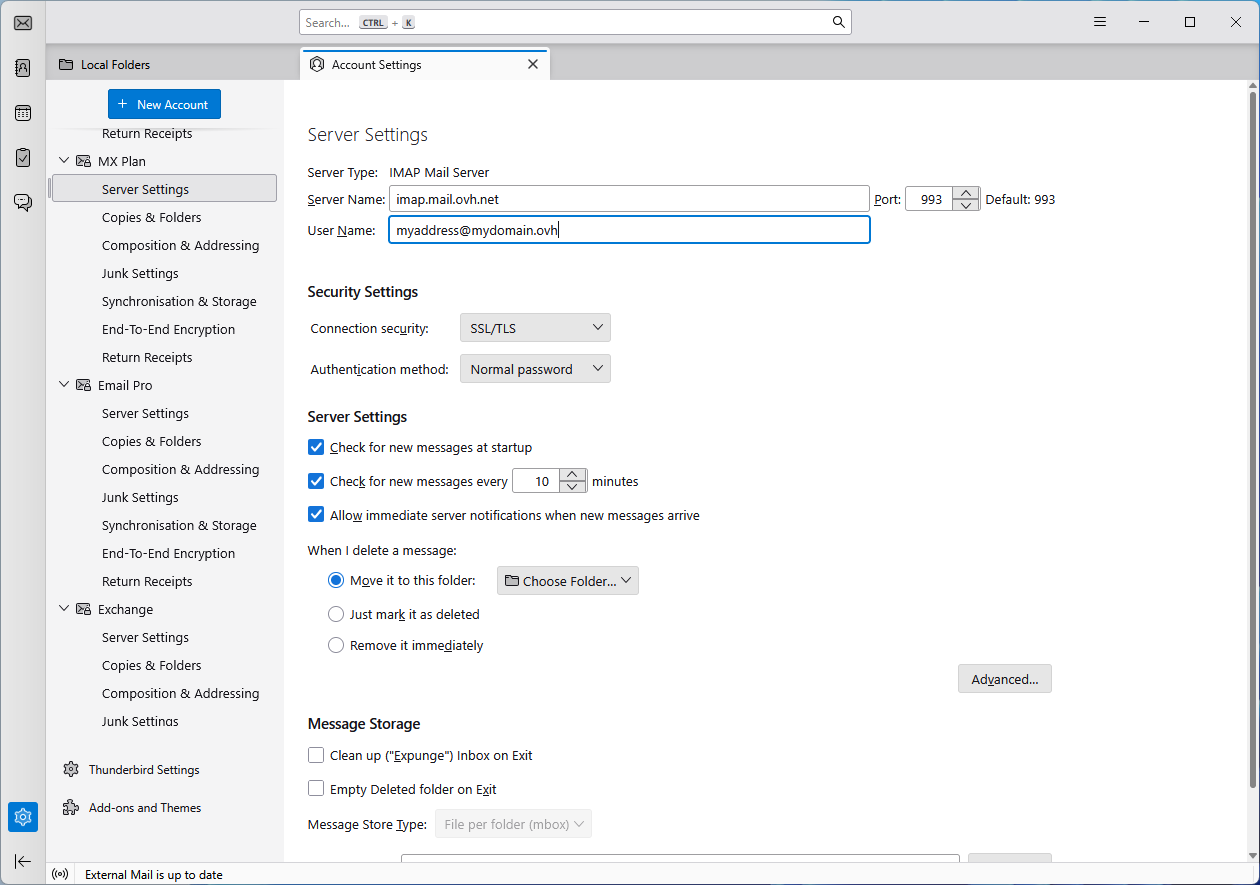
- To modify settings related to the **sending** of your emails, click on Outgoing Server (SMTP) at the bottom of the left column.
- Click on the relevant email address in the list, then click on Edit.
## Go further [](#)
:::info
For more information on configuring an email address from the Thunderbird email client, consult [Mozilla's help center](https://support.mozilla.org/products/thunderbird).
:::
[Getting started with MX Plan](/en/guides/web-cloud/email-and-collaborative-solutions/mx-plan/email-generalities.md)
For specialised services (SEO, development, etc.), contact [OVHcloud partners](https://partner.ovhcloud.com/en-gb/directory/).
If you would like assistance using and configuring your OVHcloud solutions, please refer to our [support offers](https://www.ovhcloud.com/en-gb/support-levels/).
Join our [community of users](https://community.ovhcloud.com/community/en).