---
title: "MX Plan - Configuring your email address in Outlook for macOS"
description: "Find out how to configure your MX Plan email address in Outlook for macOS"
url: https://docs.ovhcloud.com/en/guides/web-cloud/email-and-collaborative-solutions/mx-plan/how-to-configure-outlook-2016-mac
lang: en
lastUpdated: 2024-10-01
---
# MX Plan - Configuring your email address in Outlook for macOS
## Objective
You can configure MX Plan email addresses on email clients, if they are compatible. This means that you can send and receive messages from the application of your choice.
## Requirements
- You need to have an MX Plan email address (included in the MX Plan solution, and in [OVHcloud Web Hosting plans](https://www.ovhcloud.com/en-gb/web-hosting/)).
- You must have Microsoft Outlook installed on your Mac.
- You must have the login details for the email address you want to set up.
:::info
Are you using Outlook for Windows? Read our guide: [Configuring your email address in Outlook for Windows](/en/guides/web-cloud/email-and-collaborative-solutions/mx-plan/how-to-configure-outlook-2016.md).
:::
## Instructions
### Step 1: Add the account
Once you have launched Outlook on your device, you can add an account in two different ways:
- **When you start the application for the first time**: A setup wizard will appear and prompt you to enter your email address.
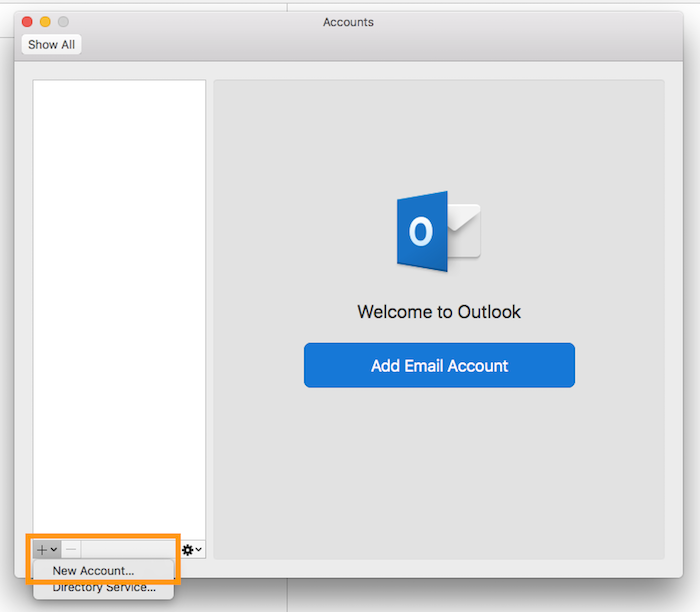
- **If you have already added an account:** Click Tools in the menu bar at the top of your screen, then Accounts. In the window that pops up, click on + then on New account.
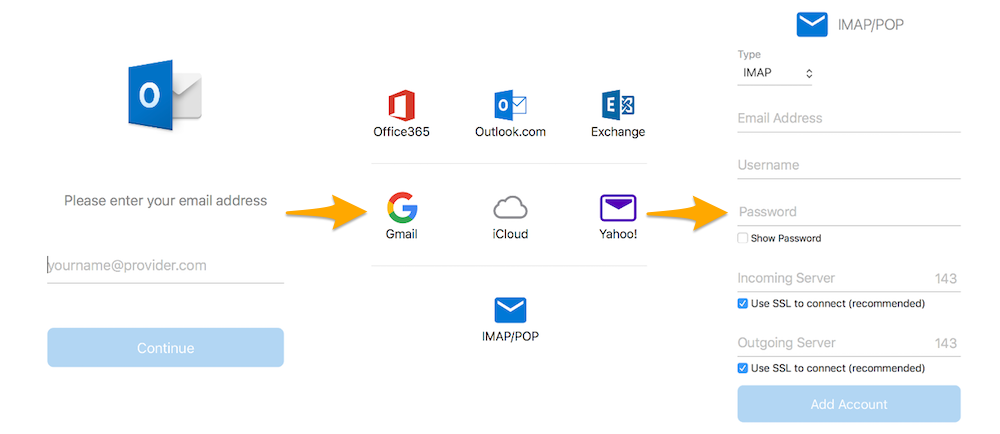
Enter your email address, then click `Continue
`. For the provider, click on `IMAP/POP
`, then enter the information requested.
| Information | Description |
| --------------- | ---------------------------------------------------------------------------------------------------------------------------------------------- |
| Account type | We recommend using **IMAP** (selected by default). You can also select **POP** (emails stored locally on your Mail app) in the drop-down menu. |
| Mail address | Enter a name that will distinguish this account from any other accounts added in your Outlook app. |
| Username | Enter your full email address. |
| Password | Enter the password for your email address. |
| Incoming server | Enter the server name (see the technical settings below). Leave the **Use SSL to connect** box ticked. |
| Incoming port | Enter port 993. |
| Outgoing server | Enter the server name (see the technical settings below). Leave the **Use SSL to connect** box ticked. |
| Outgoing port | Enter port 465. |
Once you have entered this information, click `Next
`. If the information is correct, Outlook will successfully connect to the account.
To check that the account has been correctly configured, you can send a test email.
If you need to enter any settings manually in your account preferences, the technical settings you will need to use with our MX Plan solution are listed below:
- **IMAP configuration**
| Server type | Server name | SSL | Port |
| ----------- | ------------ | --- | ---- |
| Incoming | ssl0.ovh.net | Yes | 993 |
| Outgoing | ssl0.ovh.net | Yes | 465 |
- **POP configuration**
| Server type | Server name | SSL | Port |
| ----------- | ------------ | --- | ---- |
| Incoming | ssl0.ovh.net | Yes | 995 |
| Outgoing | ssl0.ovh.net | Yes | 465 |
### Step 2: Use the email address
Once you have configured your email address, you can start using it! You can now send and receive messages.
OVHcloud also offers a web application that you can use to consult your email from a web browser. You can access this application at [Webmail](https://www.ovhcloud.com/en-gb/mail/). Just log in using your email login details.
## Go further
:::info
For more information on configuring an email address from the Outlook app on macOS, see [the Microsoft Help Center](https://support.microsoft.com/en-gb/office/add-an-email-account-to-outlook-for-mac-6aeec61b-86af-40af-8ffe-985d0fc82ddb).
:::
[Configuring your Email Pro account in Outlook for Mac](/en/guides/web-cloud/email-and-collaborative-solutions/email-pro/outlook-macos-configuration.md).
[Configuring your Exchange account in Outlook for Mac](/en/guides/web-cloud/email-and-collaborative-solutions/microsoft-exchange/how-to-configure-outlook-2016-mac.md).
Join our [community of users](https://community.ovhcloud.com/community/en).