---
title: "How to use Zimbra webmail"
description: "Discover the Zimbra webmail interface for your OVHcloud MX Plan email accounts"
url: https://docs.ovhcloud.com/en/guides/web-cloud/email-and-collaborative-solutions/mx-plan/email-zimbra
lang: en
lastUpdated: 2026-06-08
---
# How to use Zimbra webmail
## Objective
With the OVHcloud MX Plan, you can send and receive emails from an email client (Thunderbird, Outlook, Mac Mail) or via webmail in your device's web browser.
OVHcloud provides a webmail service called Zimbra to access MX Plan email accounts. On this page, we will cover the essential features for using this webmail.
**Find out how to use Zimbra webmail for your OVHcloud MX Plan email accounts.**
## Requirements
- You have an OVHcloud **MX Plan** email solution, included in our [web hosting plans](https://www.ovhcloud.com/en-gb/web-hosting/), included in a [free hosting](https://www.ovhcloud.com/en-gb/domains/free-web-hosting/) hosting plan, or ordered separately as a standalone solution.
- You have the login details for the MX Plan email account you would like to use. For more information, please read our guide on [Getting started with the MX Plan solution](/en/guides/web-cloud/email-and-collaborative-solutions/mx-plan/email-generalities.md).
## Instructions
**Content overview**
- [Log in to Zimbra webmail](#login)
- [General interface of Zimbra webmail](#general-interface)
- [Manage your email account folders](#folders-management)
- [Special folders](#folders-specials)
- [Create folders](#folders-creation)
- [Email processing](#email-management)
- [Action on a selected email](#email-action)
- [Searching emails](#email-search)
- [Restore deleted emails](#restore)
- [Write an email](#email-writing)
- [Configure Zimbra interface preferences](#settings)
- [Contacts](#contacts)
- [Folder management](#contacts-folders)
- [Managing lists](#contacts-lists)
- [Import/Export contacts](#import-export)
- [Calendar](#calendar)
- [Calendar management](#calendar-management)
- [Tasks](#tasks)
- [Storage](#storage)
- [Add a file](#storage-add)
- [Share a file/folder](#storage-share)
- [Edit a document](#storage-onlyoffice)
- [Filters](#filters)
- [How to set filters](#filters-howto)
- [Create a filter](#filters-creation)
- [Create a redirection](#filters-redirection)
- [Delegations](#delegations)
- [Signature](#signatures)
- [Automatic Replies](#auto-reply)
### Log in to Zimbra webmail [](#)
Go to the page [Webmail](https://www.ovhcloud.com/en-gb/mail/)
. Enter your email address and password, then click `Login
`.
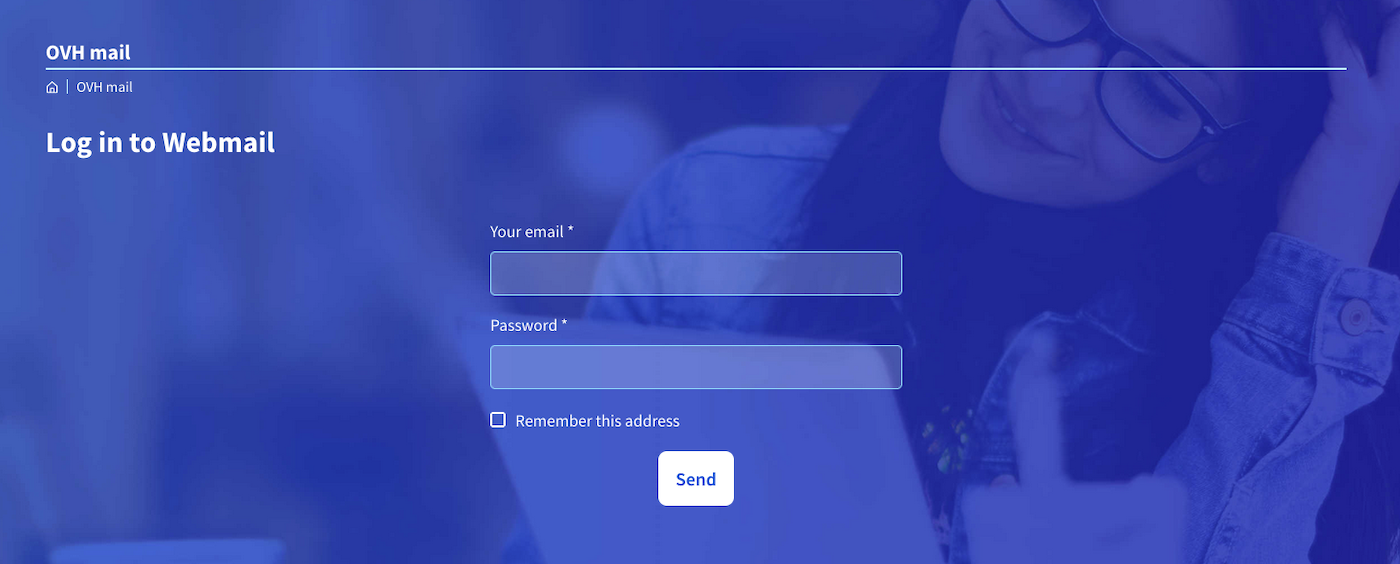
You will then be redirected to the Zimbra interface.
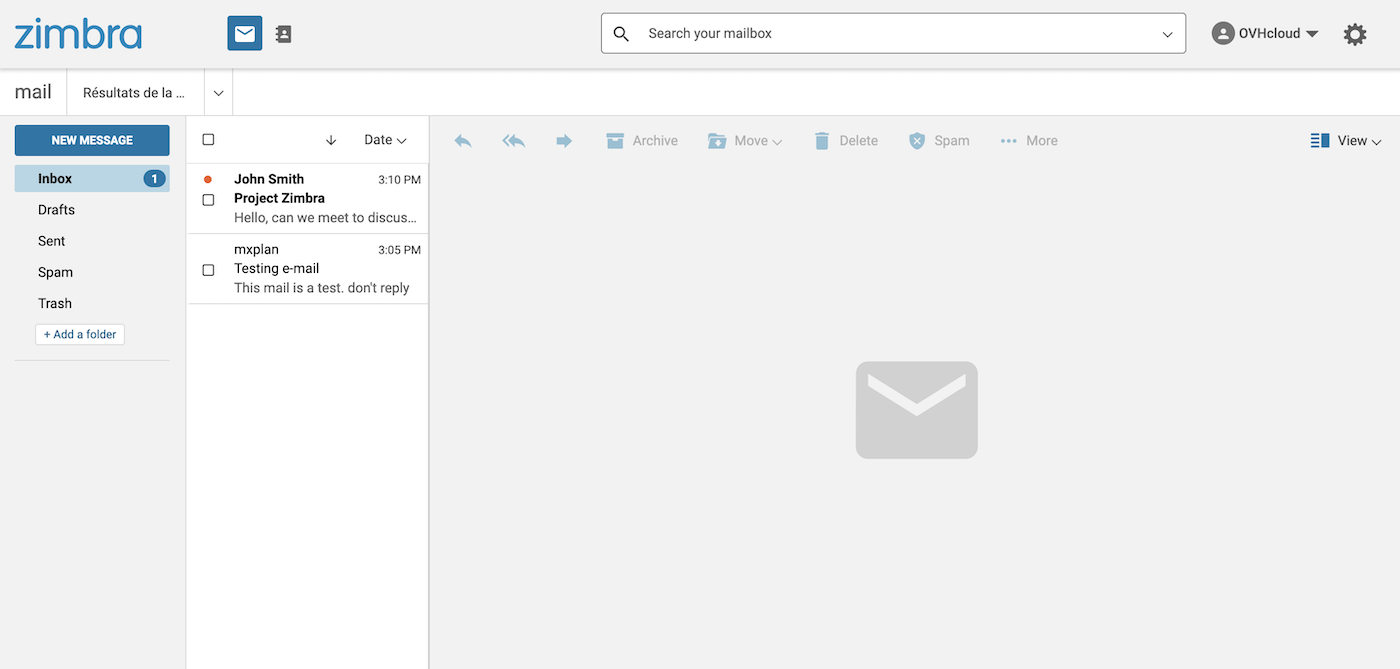
### General interface of Zimbra webmail [](#)
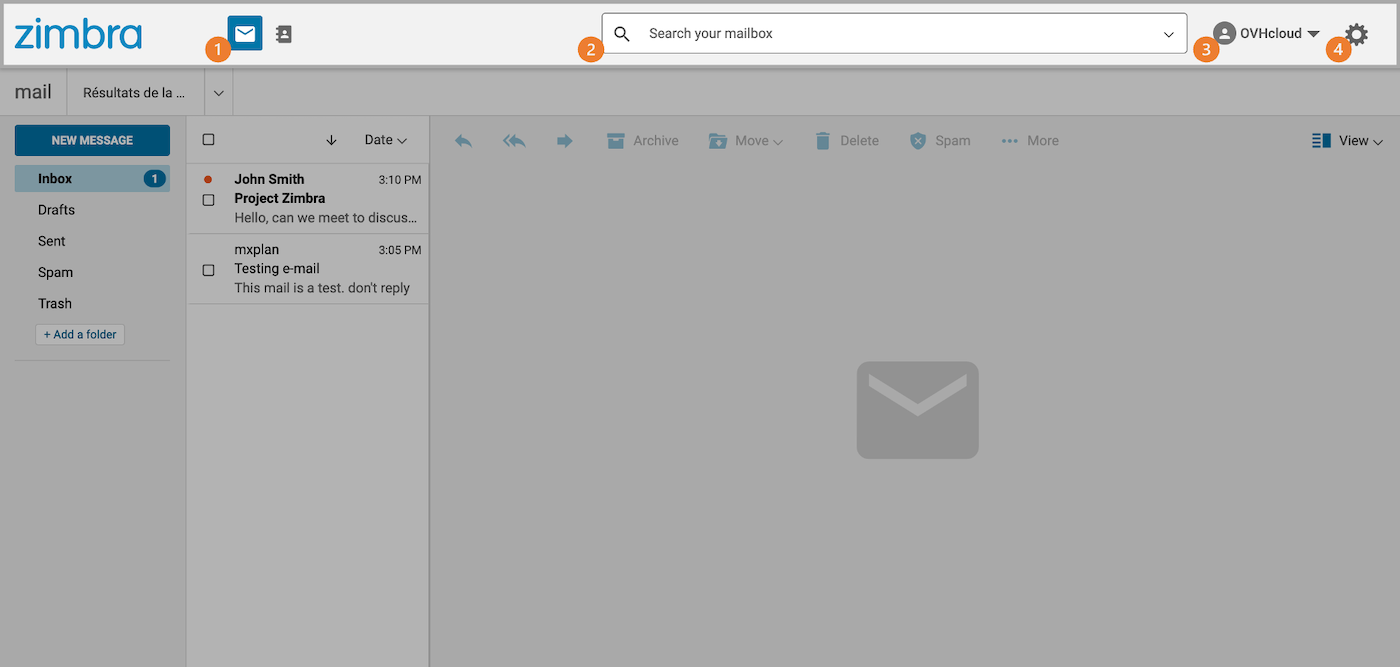
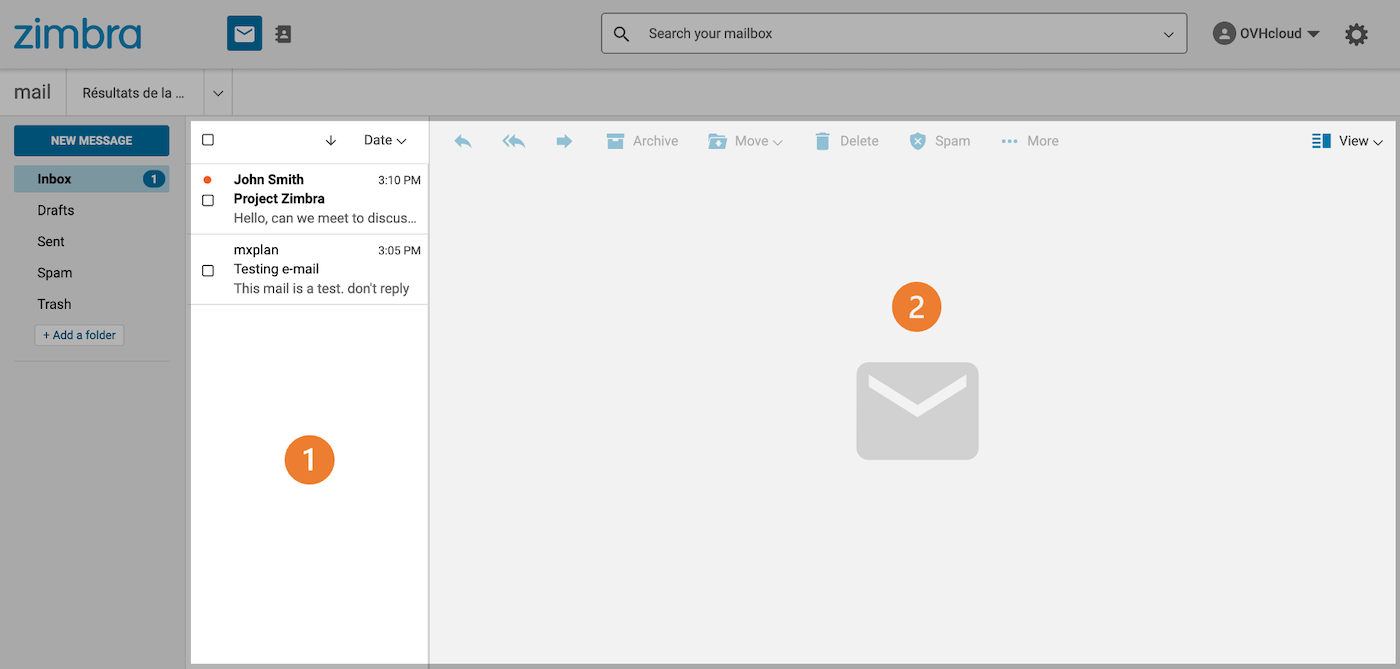
Once you have logged in to your email account, you will have access to the main Zimbra window, which consists of 3 areas:
**Top menu**
- **(1)** This area allows you to switch between the interfaces for `mail` and `contacts`. By default, you are on the `mail` tab.
- **(2)** A search bar allows you to find messages or contacts.
- **(3)** The menu for managing your email account profile and the button to access the settings **(4)**.
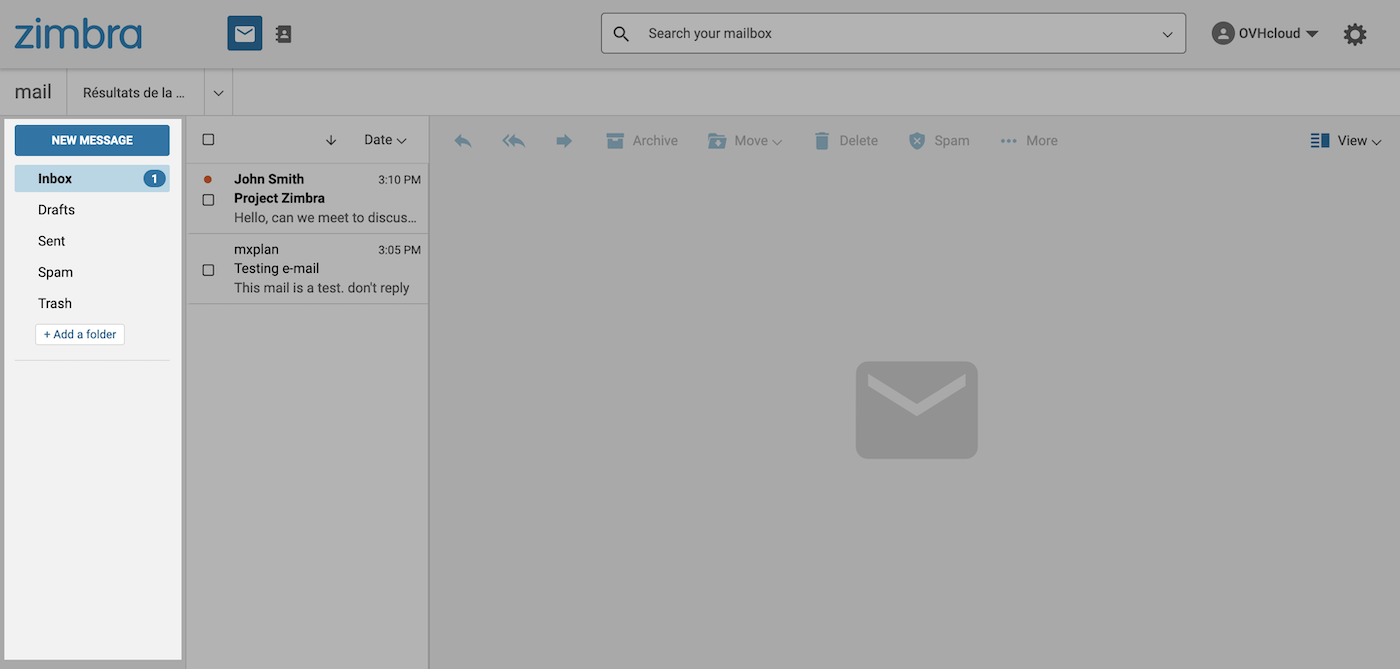
**Left Column**
By default, this is the tree-view of your email account, made up of folders and subfolders. The main folder is `Inbox`.
**Center Window**
By default, your emails are displayed in this zone, which contains two parts:
- **(1)** The list of elements
- **(2)** The contents of the selected item
### Manage your email account folders (left-hand column) [](#)
In this area, you will see the folders stored on your email account. You will find the **special** folders already there (in orange) and the folders you have **created** (in green).
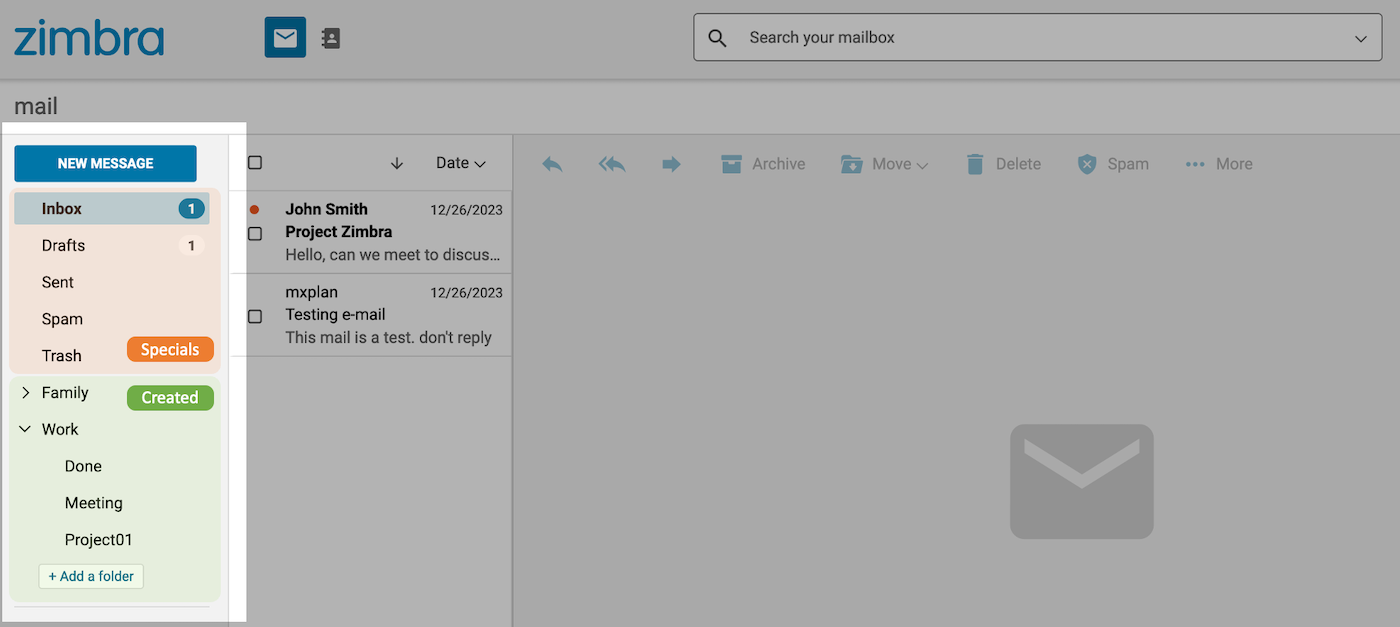
#### Special folders [](#)
Special folders are created automatically by the email server, and they make up the main part of an email account.
- **Inbox**: Emails are delivered to this folder by default (excluding filters applied).
- **Drafts**: Emails that are written but not sent are saved in this folder.
- **Sent**: Sent emails are automatically stored in this folder.
- **Archive**: The default folder for classifying processed emails.
- **SPAM**: A folder where emails considered unwanted are stored.
- **Trash**: Deleted emails are stored in this folder before they are permanently deleted.
:::info
Special folders cannot be deleted.
:::
#### Create folders [](#)
To organize your emails according to your needs, you can create your own folders.
To create a folder, click the `\+ Add a folder
` button at the bottom of the column.
You can also create a subfolder by right-clicking the folder you want, and then clicking `Create subfolder
`.
:::info
The "Drafts", "SPAM" and "Trash" folders cannot contain subfolders.
:::
### Email processing [](#)
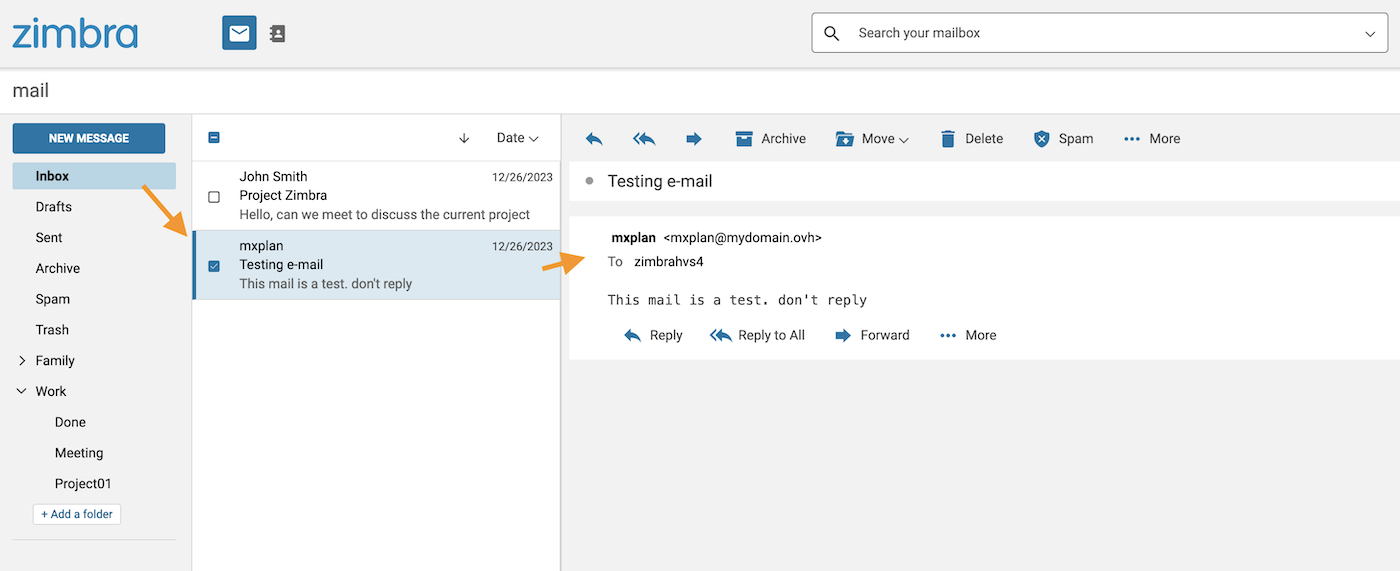
When you select a folder or subfolder in the left-hand column, the list of emails contained in it appears in the middle column. Then click on the email of your choice to display its contents in the window on the right.
:::info
**Display type**
The display of your emails is in a form that can be modified. To do this, click the `View
` button in the top right-hand corner of this window.
:::
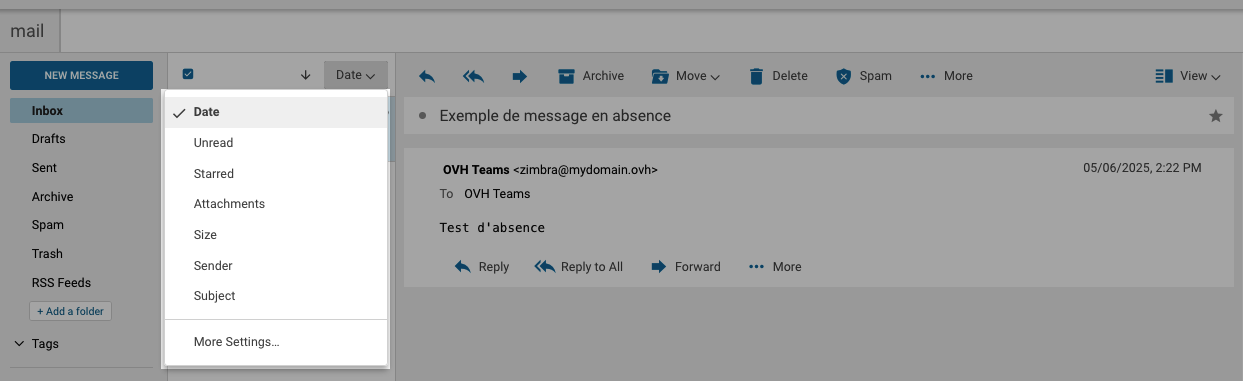
It is possible to sort and display emails based on certain criteria by clicking on the existing filter (by default, `Date
`) at the top of the email list.
#### Action on a selected email [](#)
When you select an email is selected, many actions are available:
- 1.**Reply**: Reply directly to the sender.
- 2.**Reply all**: Reply directly to all recipients in the “To” and “Cc” fields.
- 3.**Forward**: Forward the selected email to one or more recipients.
- 4.**Archive**: Move the email to the "Archive" folder of your email account.
- 5.**Move**: Move the email to one of the folders in the email account.
- 6.**Delete**: Place the selected email in the "Trash".
- 7.**SPAM**: Place the selected email in the spam folder.
- 8.**More**
- **Mark as Read**
- **Mark as Unread**
- **Star**: Assign a "star" to your email to highlight and identify it more easily.
- **Clear Star**: Remove the "star" assigned to this email.
- **Show Original**: Display the raw email with the header.
- **New Filter**: Create a filter based on the sender and subject of the selected message.
- **Print**: Print the selected conversation or email.
- 9.**View**: Select one of the 3 layouts to view your folders and emails.
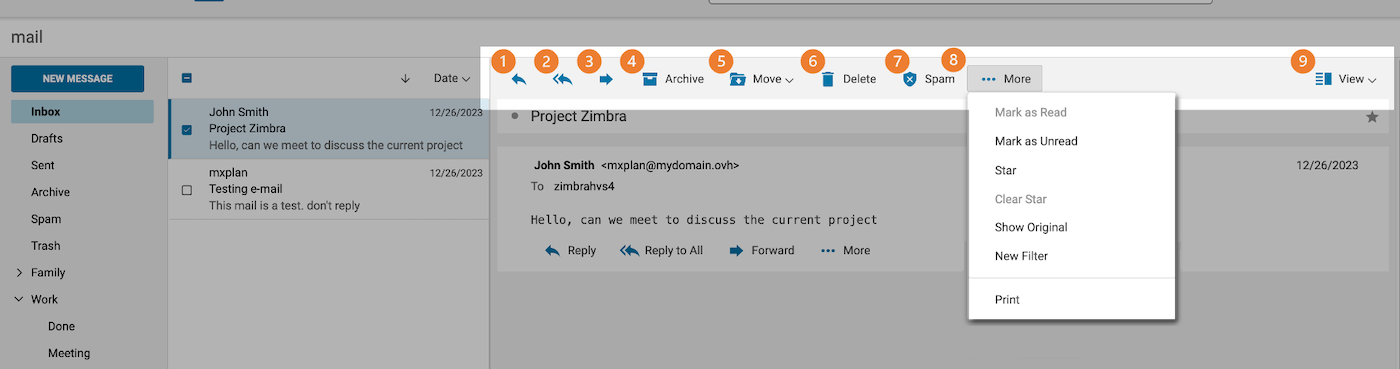
You can access these options by right-clicking on each email in the middle column.
:::info
If one of your contacts asks for a read receipt of an email, you will get the following standard message: `John has requested a read receipt for this email. Send a read receipt`.
:::
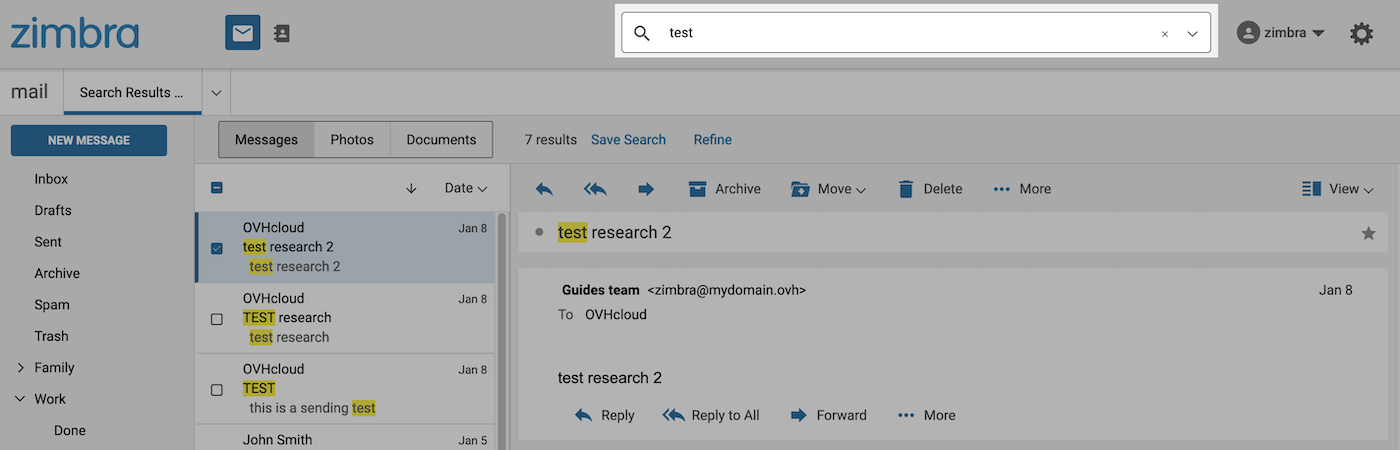
#### Searching emails [](#)
If you would like to find an email, use the search bar at the top of your interface. You can then do a **simple search** or an **advanced search**, as described in the tabs below:
**Simple search**
Enter the keyword(s) you would like to find in the search bar, and press `Enter` to confirm your search. The word or words will be highlighted in your results.
> If you know where to search for your item, you can enter keywords ( **from**, **to**, **cc**, **subject**, etc.) followed by a colon (`:`) and search for the item in the search text box. For example, if you want to quickly find a sender, you can type "from:" and the email address you are looking for. Example: "from: [address@example.com](mailto:address@example.com)".
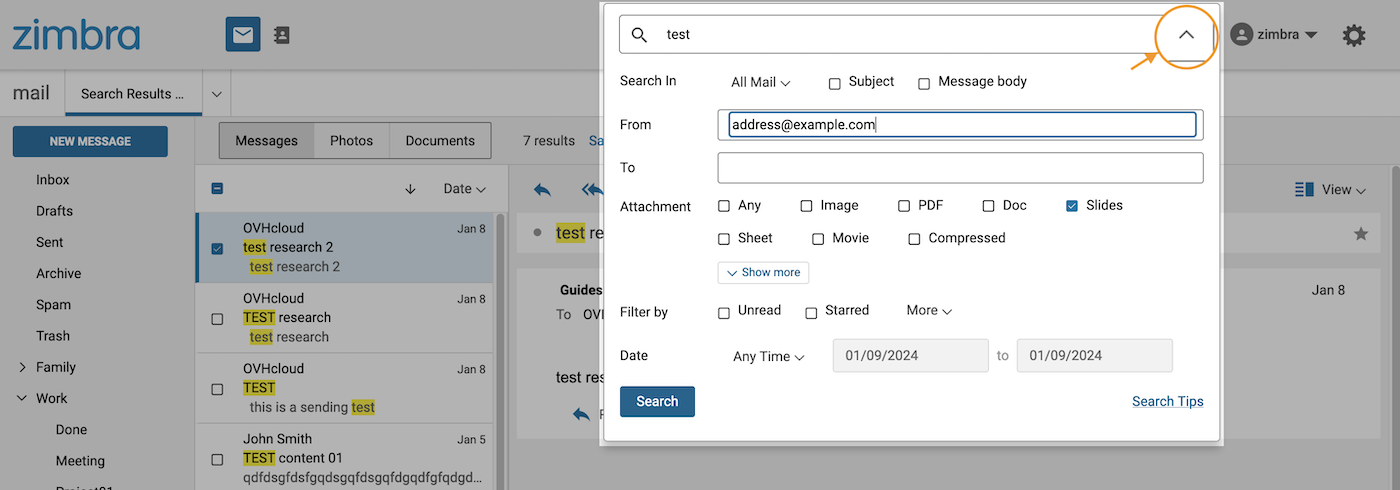
**Advanced search**
For a more precise search, click the arrow symbol on the right-hand side of your search bar. You can then restrict your search to a folder, a time condition, the subject or body of the message, and much more.
#### Recover deleted emails [](#)
When you delete emails, they are placed by default in the trash.
If you delete emails from your trash or empty it, they are placed in retention. They can still be recovered for 30 days.
We will review the steps to recover an email in retention by going through its deletion and restoration process:
1. **Deleting an email**: When you view an email in the inbox or one of the folders and click delete, it will go by default to the trash.
2. **Empty the Trash**: When you Empty the Trash or delete an email from it, the email no longer appears in the trash and enters its 30-day retention period.
3. **Access restoration**: To recover an email deleted from the trash within 30 days, right-click on Trash, then click Recover deleted mail.
4. **Choose emails to restore**: From this window, you can view emails that have been emptied from the trash. Select the email(s) you want to restore. Click Next, choose the folder where you want to restore the emails, then click Save.

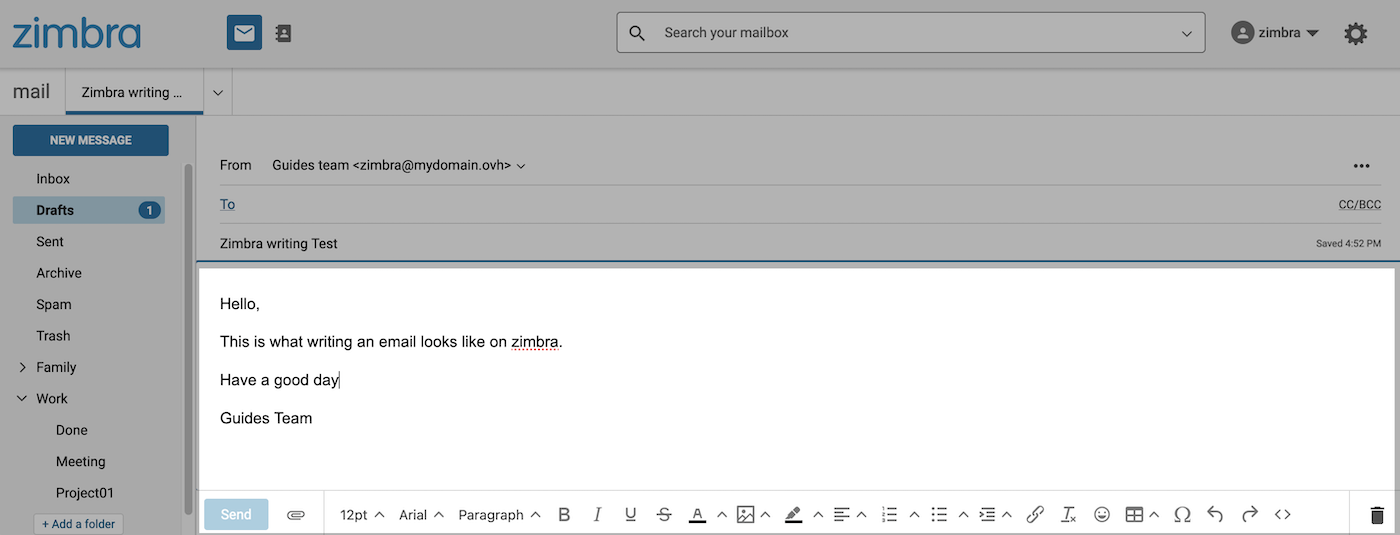
### Write an email [](#)
To create a new email, click the `New Message
` (1) button in the top left of your Zimbra window.
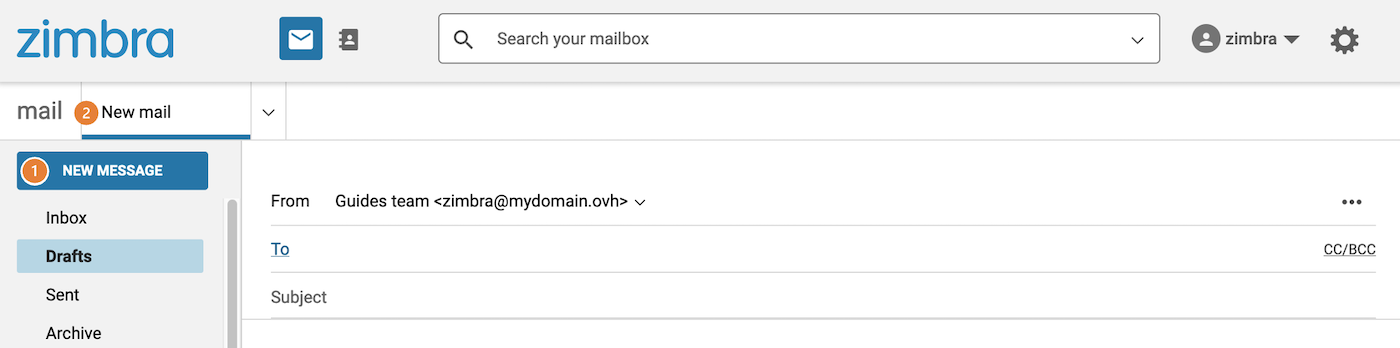
**Header**
The header allows you to fill in the following fields:
- **From**: The address from which you send your email. By default, this is your account email address. You can change your sender address by clicking on the arrow to the right of your email address.
- **To**: The recipients of your email. Click To to access your contacts.
- **CC**: Click CC/BCC to the right of To to display this field. Carbon copy is a recipient field that allows you to send your email in copy to people you want to integrate into a loop, without them being considered as direct recipients of the email (unlike the recipients in the **To** field).
- **BCC**: Click CC/BCC to the right of To to display this field. Blind carbon copy is a recipient field that allows an email to be sent without other recipients seeing the person or people in **BCC**.
- **Subject**: Email title, the first item visible on reception before opening the email.
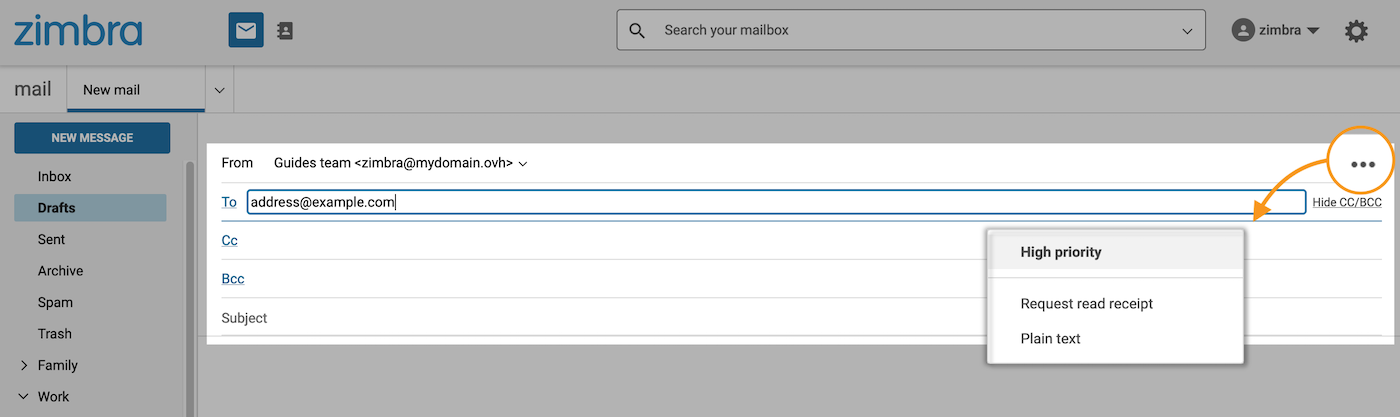
- ...: Located to the right of the From field, it gives you access to 3 options:
- You can make your email a priority by ticking `High priority`.
- Click `Request Read Receipt` to request a read receipt from the recipient.
- The `Plain Text` feature will disable the HTML layout features of your email.
**Email body**
To compose the body of your email, there is an HTML toolbar at the bottom of your window. This will allow you to edit your emails with layout, directly via your browser. In addition, the \< > button (on the far right of your toolbar) opens a window where you can paste an email that has been prewritten using an external tool.
After you have written your email, before you click `Send
`, you can attach an attachment to it by clicking the paperclip icon next to the `Send
` button.

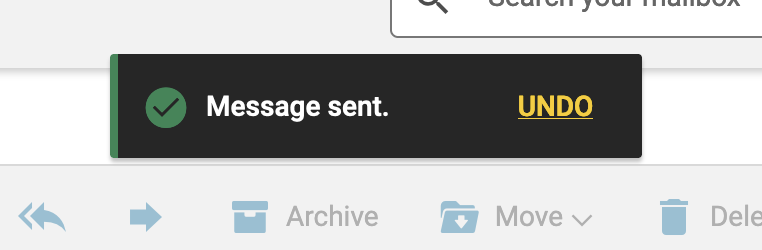
:::tip
**Cancel a sending**
If you have enabled the `Undo send`
option in the "**Write an email**
" section of Zimbra preferences, you can click `UNDO
` to cancel sending.
This button will remain available for approximately 5 seconds.
:::
### Configure Zimbra interface preferences [](#)
Your Zimbra interface has 2 configuration menus:
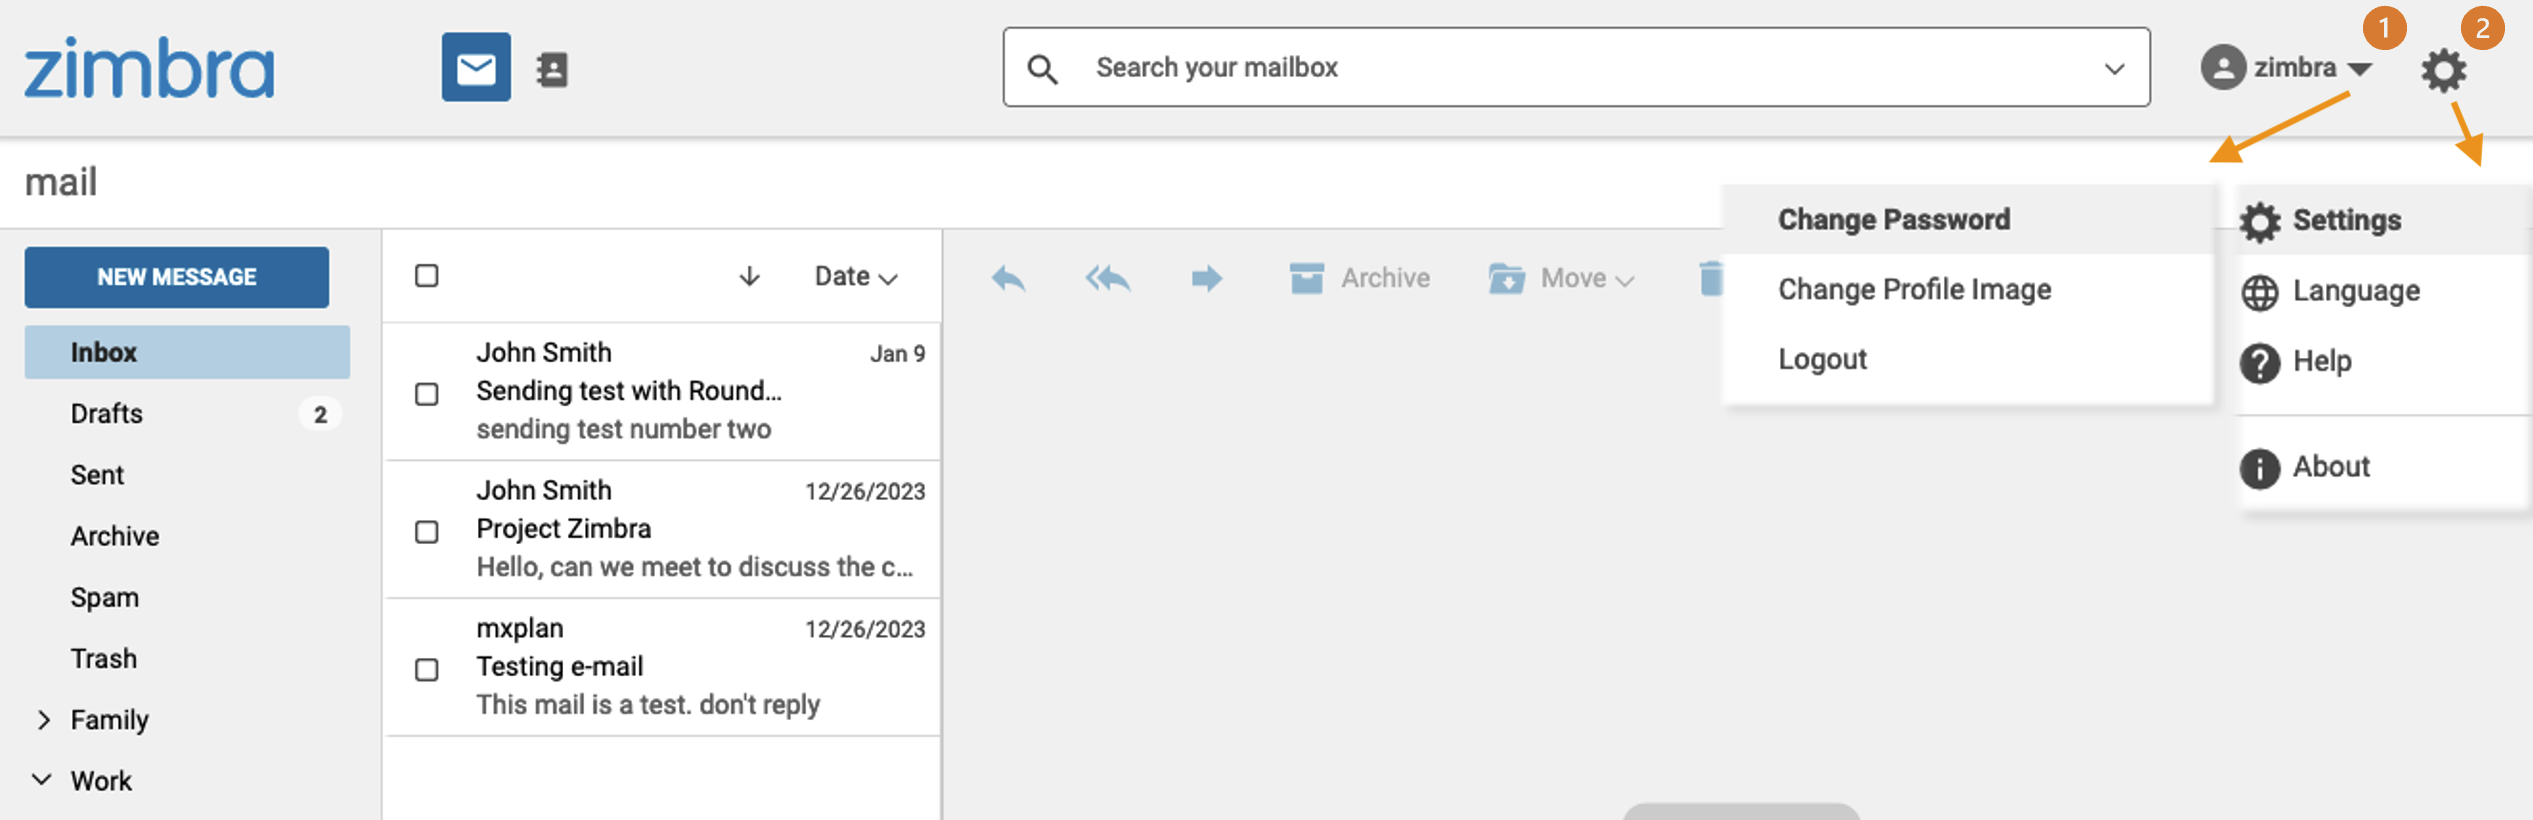
- **(1) Profile**: Click on the name of your email account in the top right-hand corner of your interface. From this menu, you have the options "**Change password**", **Change Profile Image** and you can log out of the account by clicking on **Logout**.
- **(2) Settings**: Click on the cogwheel icon in the top right-hand corner of your interface to change the **Language** of your interface. In the **Help** section, you can read the official Zimbra documentation. In **Settings**, you will find all of the configuration elements described in the following tabs:
**General**
From this tab, you can find:
- a progress bar indicating the space used on your email account.
- the ability to set the date and time display format for your emails.
**Viewing Email**
Here you can find information on how to display the items of your email account.
- **When viewing message lists**: These options allow you to organize the list of your emails by conversation groups and display more details in preview.
- **Preview Pane**: Select one of the 3 layouts to view your folders and emails. This option includes the choices found on the View button when you view your emails.
- **Message list density**
- **Mark as read**: You can delay the status change of your email to "read" when you click on it, or leave it "unread" without any action on your part.
- **Check for new mail**: Define how often emails received from your Zimbra interface are synchronized.
- **Read receipts**: Set Zimbra's behavior when you open a delivery receipt email.
- **New mail notifications**: Enable notifications when a message is received.
- **Show images in emails**: Whether to automatically show images when you open an email or not.
- **View emails as plain text**: This option displays the email in a plain format, with no layout.
- **Show images by default in mail from these trusted addresses or domains**: Set the trusted email addresses for which the images can be automatically displayed.
**Writing Email**
- **Undo send**: This option allows you to display a banner, for 5 seconds, allowing you to cancel sending an email.
- **Request read receipts**: This option sends a request for a read receipt to your recipients when you send them an email.
- **Save a copy to Sent folder**: By default, this option saves sent emails in the "Sent" folder of your email account.
- **Delegates**: Refer to the [Delegations](#delegations) section of this guide to learn how to use it.
- **Delegate send settings**: See the [Delegations](#delegations) section of this guide to learn how to use it.
- **Composer**: You can set your default format when you start writing an email.
**Signatures**
This space allows you to create your signatures.
- **Standard signature**: Enter the signature that will appear when you write a new email.
- **Reply or forward signature**: Allows you to add a different signature when you reply to or relay an email.
**Out of Office**
This tab refers to the “auto-reply” feature. To configure your automatic replies, please refer to the section "[Automatic Replies](#auto-reply)" of this documentation.
**Filters**
To configure your filters, see the "[Filters](#filters)" section of this documentation.
**Calendar and reminders**
Here, you can find the settings linked to your [calendars](#calendar).
**General Calendar Settings**
- **Default schedule**: Set the default calendar used when you create an event in your calendars.
- **Start of week**: The day that appears first in your calendar grid.
- **Start of day**: The time that appears at the top of the displayed time range.
- **End of day**: The time that appears at the bottom of the displayed time range.
- **Workday Time Zone** used for your calendars.
- **When creating or editing events**: Display time zones for start and end times.
- **Sharing**: `Enable delegation for CALDav clients`. This option allows you to manage your calendars through software that supports the CALdav protocol.
- **Declined Events**: Display an event in the calendar, even if it has been denied.
**Event reminders**
- **Send reminders via email to**: Send reminders of events to an email address.
- **Show browser notifications**: Receive notifications from your web browser regarding your events.
- **Default callback time**: Default callback time applied when you enable it on an event.
- **Show reminders for overdue events**: Continue sending reminders after an event.
**Free Busy Permission**
- **Permission for**: This setting only applies to the availability status linked to your email address calendars. This means that you can share your "Busy" or "Available" status with other email addresses.
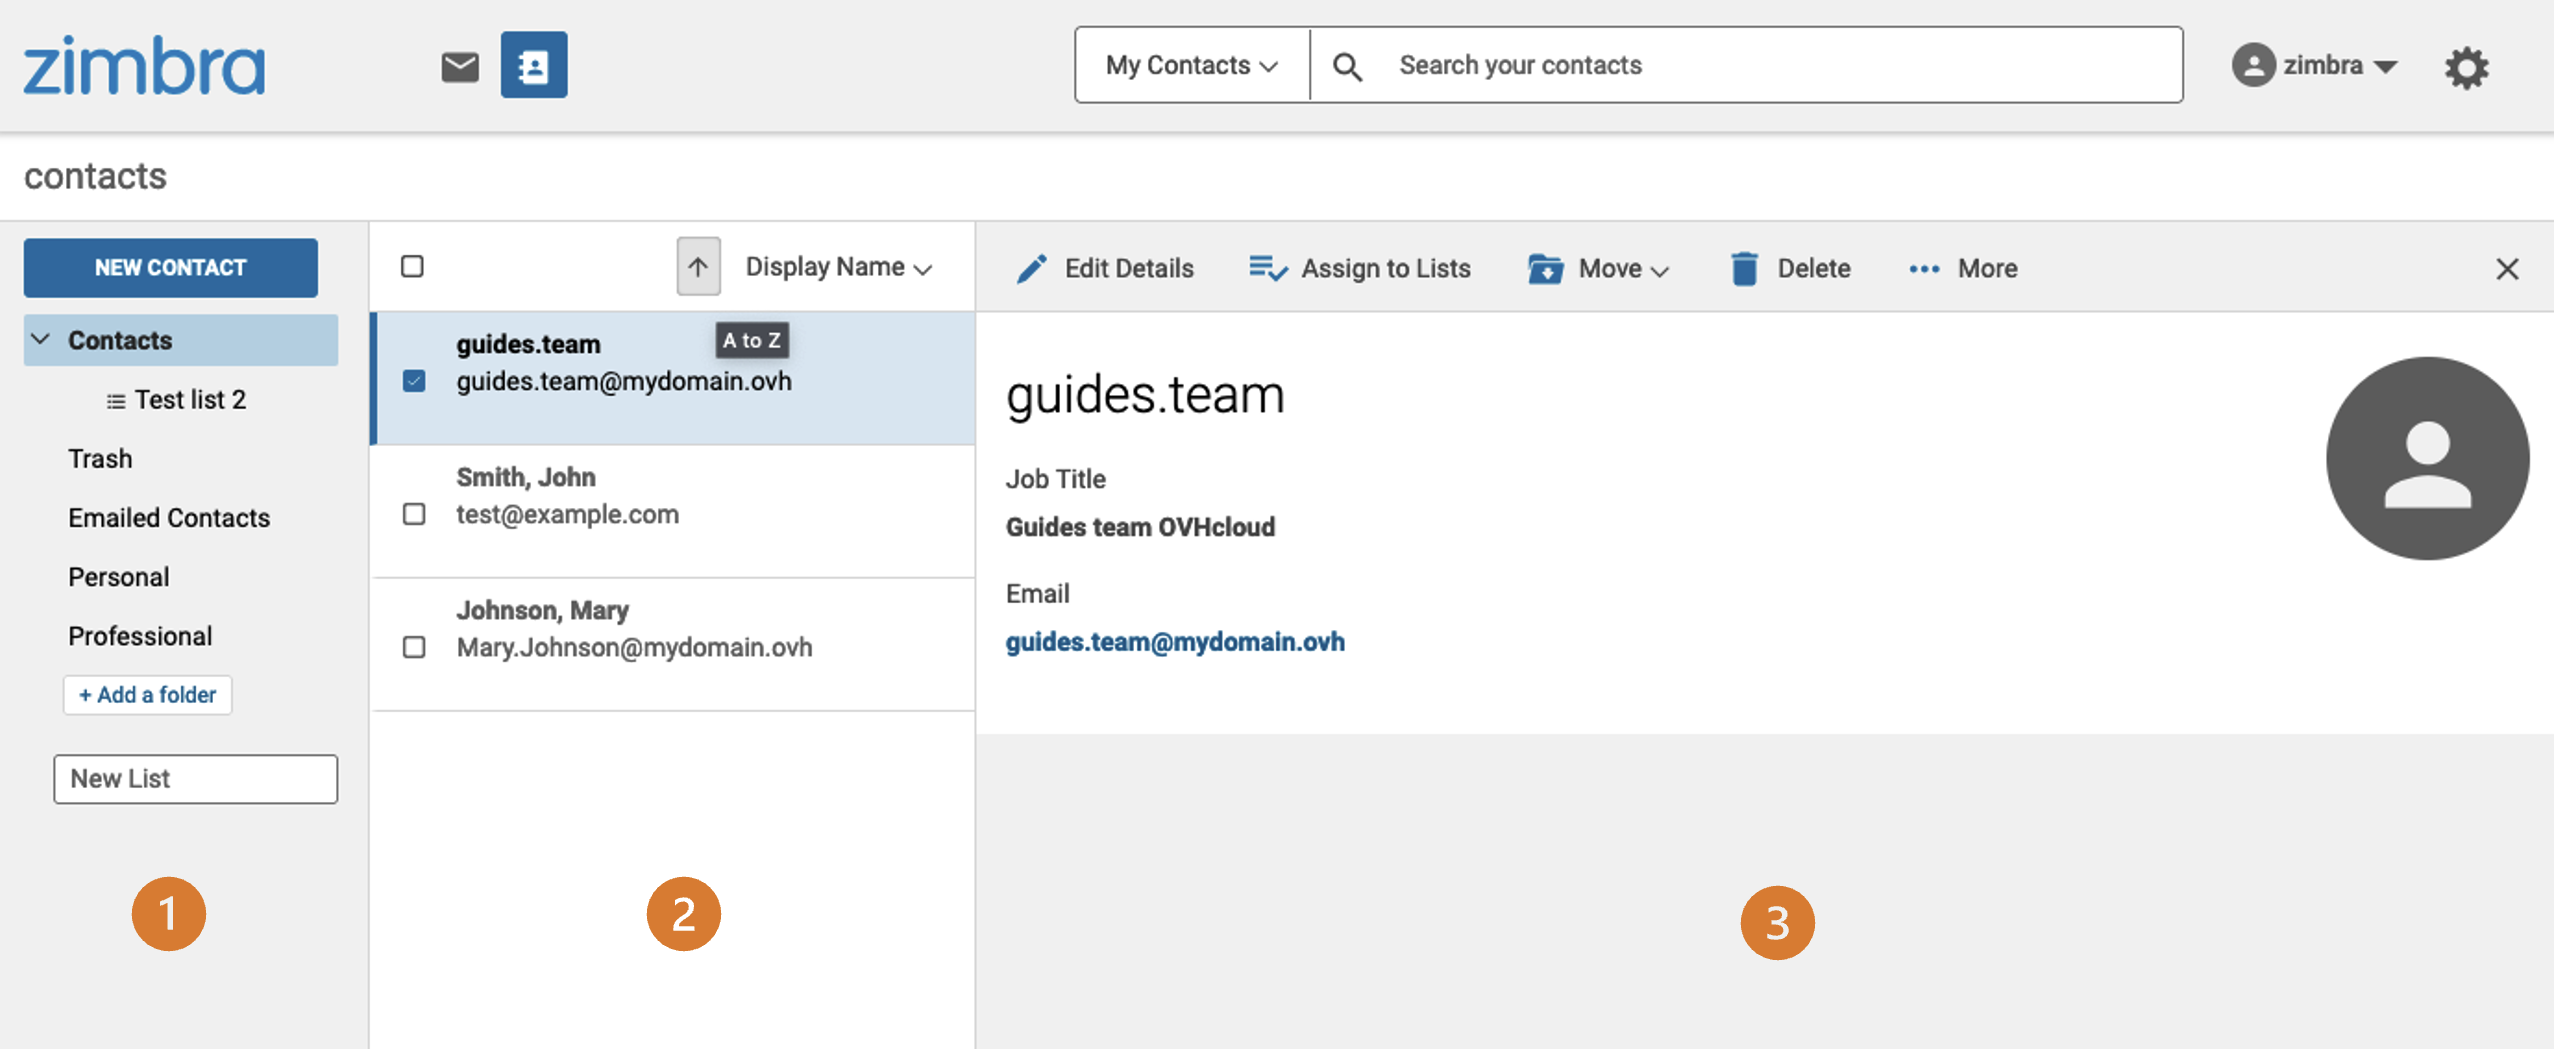
### Contacts [](#)
Click `Contacts` in the top bar to access the address book. It is divided into **3 parts**:
- **(1) Folders** (left): In the address book, you can create folders to organize and group contacts.
- **(2) Contact list** (center): View the contacts in the selected address book or folder.
- **(3) Contact Properties** or **New Contact** (right): This window appears when a contact is selected or is being created. You can read or modify a contact's information there.
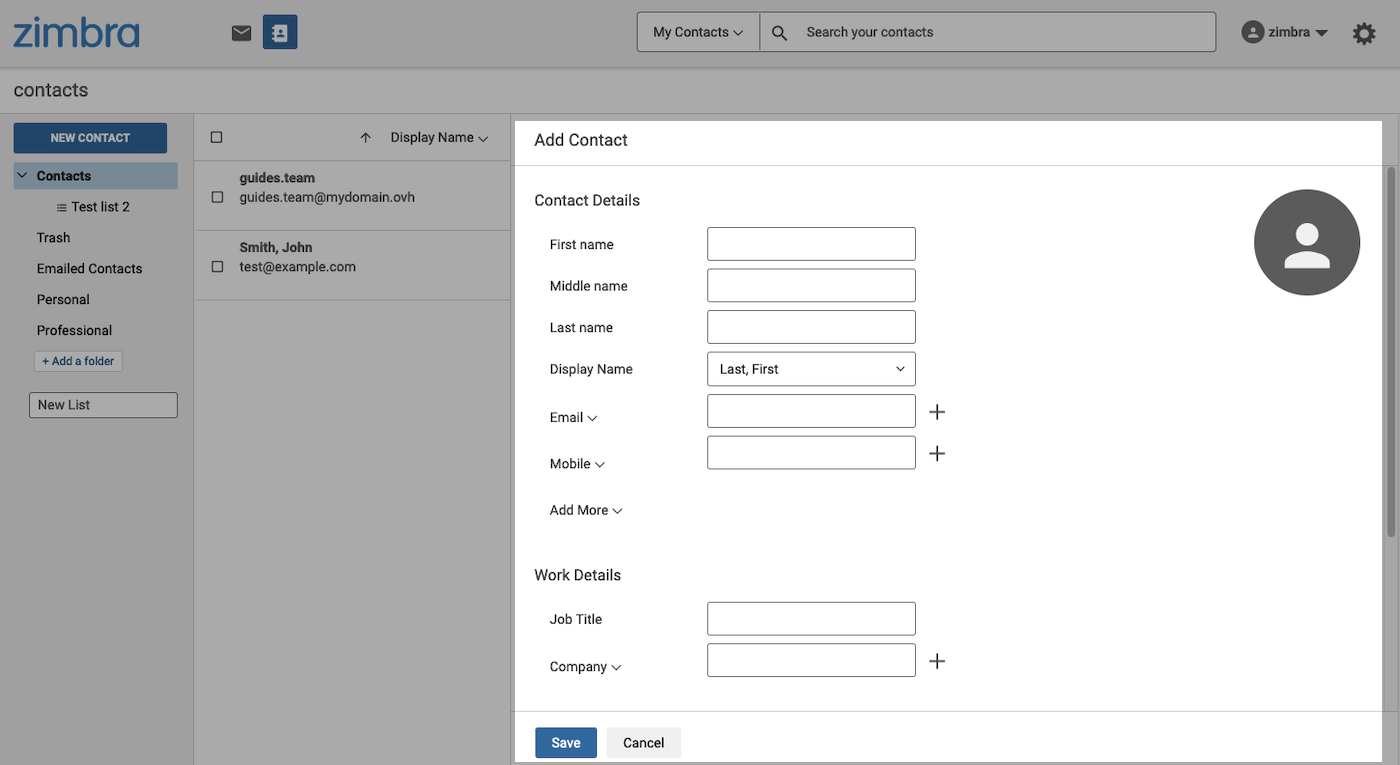
To create a new contact, click the `New Contact
` button at the top of the left-hand column.
Fill the fields with the information of your contact. You can add an image to it by clicking the profile icon in the upper right of the form.
Then click `Save
`.
#### Manage contact folders [](#)
As with emails, special contact folders are automatically created by the email server.
- **Contacts**: Contacts are stored in this folder by default.
- **Trash**: Deleted contacts are stored in this folder before they are permanently deleted.
- **Emailed Contacts**: The contacts you have exchanged with are saved in this folder.
You can create folders and subfolders. They can be used to organize contacts into subsets. This makes it easier to find a contact in a folder you have created, rather than in your entire address book.
To create a folder, click the `\+ Add a folder
` button at the bottom of the left-hand column.
You can also create a subfolder by right-clicking the folder you want, and then clicking `Create Subfolder
`. The "Emailed Contacts" and "Trash" folders cannot contain subfolders.
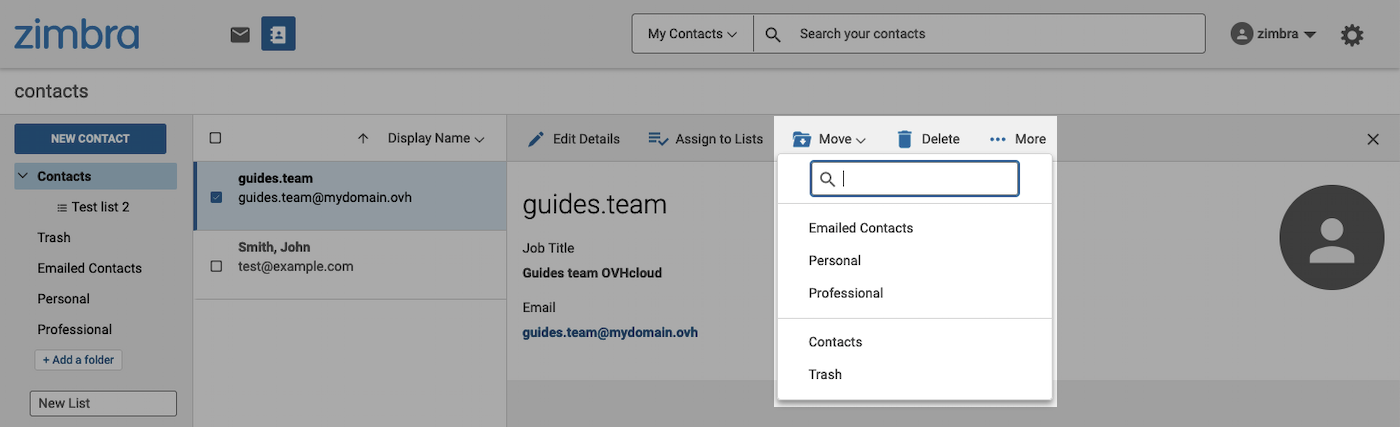
To move a contact to one of the folders, select the contact in the middle column and then, in the contact window that appears on the right, click the `Move
` button. Then select the folder you want to assign to the contact.
:::info
When you create a contact from a selected folder, the contact will be automatically added to that folder.
:::
#### List management [](#)
You can associate a contact with one or more lists. Lists are used to group contacts, so emails can be sent to all of the list members. For example, to send an email to a large number of regular recipients, simply add the name of your list as a recipient, instead of adding the contacts in a list one by one.
To create a list, click in the box labeled `New List` at the bottom of the left-hand column and type a name for your list.
To assign a contact to one of your lists, select the contact in the middle column, and then in the window that appears on the right, click `Assign to Lists
`. Select the list(s) you want to assign to the contact. Alternatively, enter a new list name and click `Add
`.

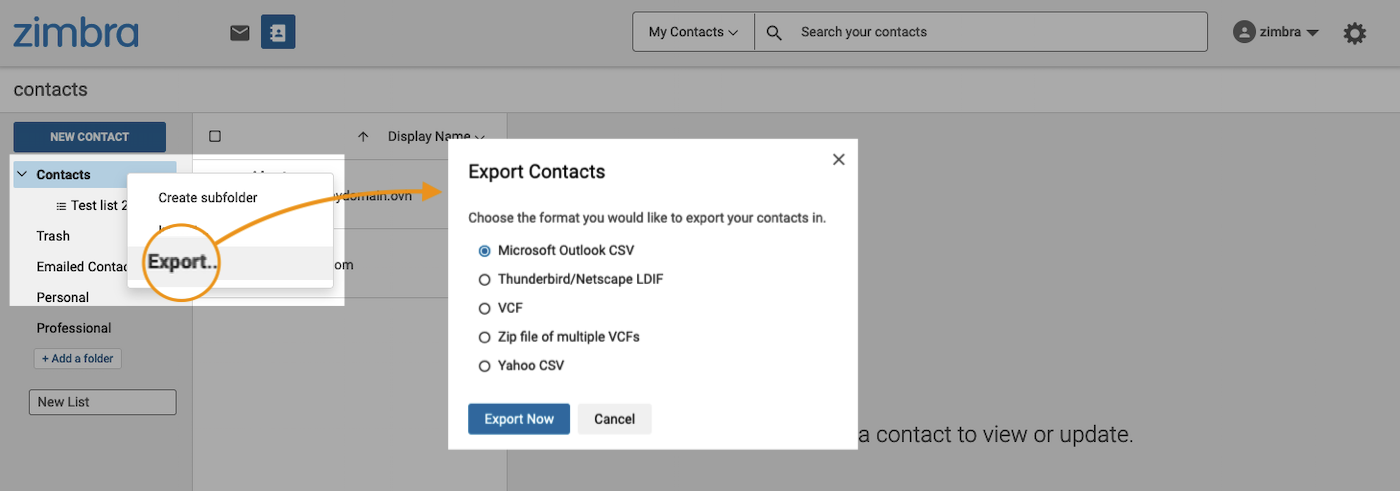
#### Import Contacts / Export Contacts [](#)
Select one of the following two tabs:
**Import Contacts**
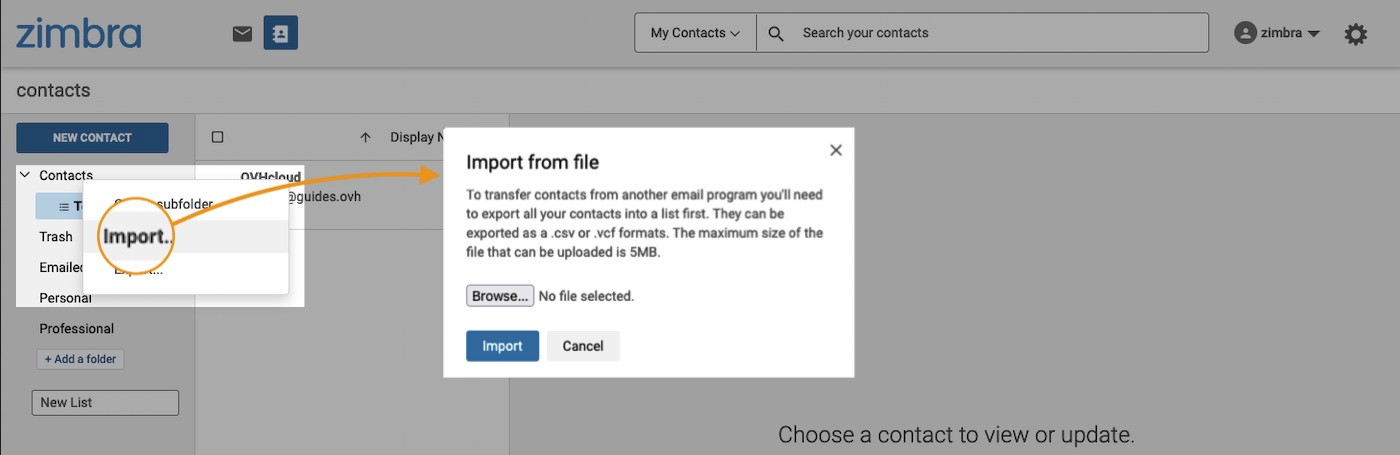
In the `Contacts` window, right-click on the contacts folder of your choice, with the exception of the "Email contacts" and "Trash" folders, which do not allow contacts to be imported and exported.
Then click Import to open the import window. With the `Browse...` button, you can retrieve the file containing your contacts in the formats .csv or .vcf.
**Export Contacts**
In the `Contacts` window, right-click on the contacts folder of your choice, with the exception of the "Email contacts" and "Trash" folders, which do not allow contacts to be imported and exported.
Then click Export to open the export window. Select the file type you want to export, and then click Export.
### Calendar [](#)
Click on the `Calendar` icon in the top bar to access the address book. It is divided into **3 parts**:
- **(1) List of calendars** (left): Manage your different calendars and sub-calendars.
- **(2) Calendar Content** (center): View the content of selected calendars and sub-calendars.
- **(3) Task List** (right): Manage your tasks and task lists.

#### Calendar management [](#)
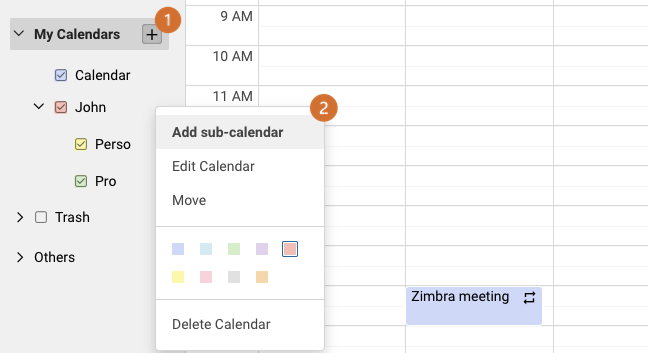
By default, in the `My Calendars` list, you have a `Calendar` created by default. This default calendar cannot be deleted, but you will see that you can create your own calendars in the next paragraph.
##### 1 - Create a calendar [](#)
- **(1)**: To create a calendar, move your cursor over `My Calendars` in the left-hand column and click the `+` button. Enter a name and colour, then click Save.
You can also create sub-calendars.
- **(2)**: To create a sub-calendar, move your cursor over the calendar for which you want to create one, then right-click to display the drop-down menu. Click `Add sub-calendar`. Enter a name and colour, then click Save.
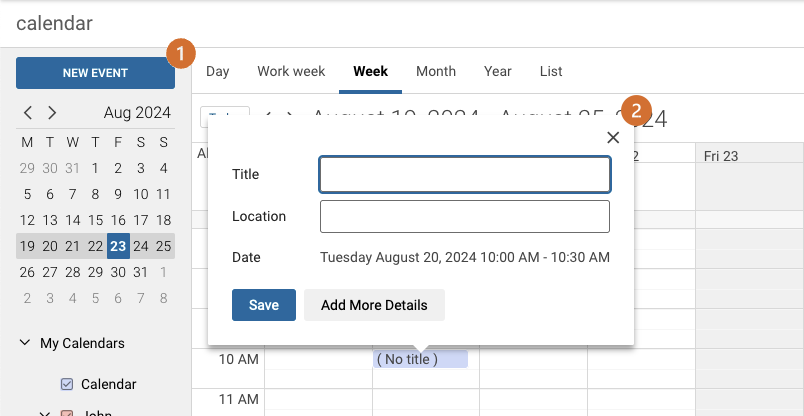
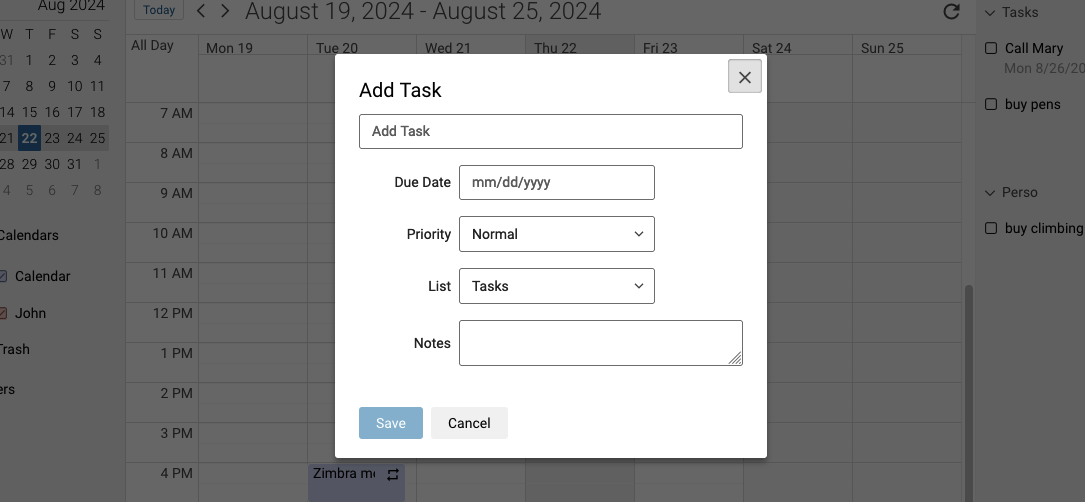
##### 2 - Add an event [](#)
- **(1)**: Click on New event in the top left-hand corner.
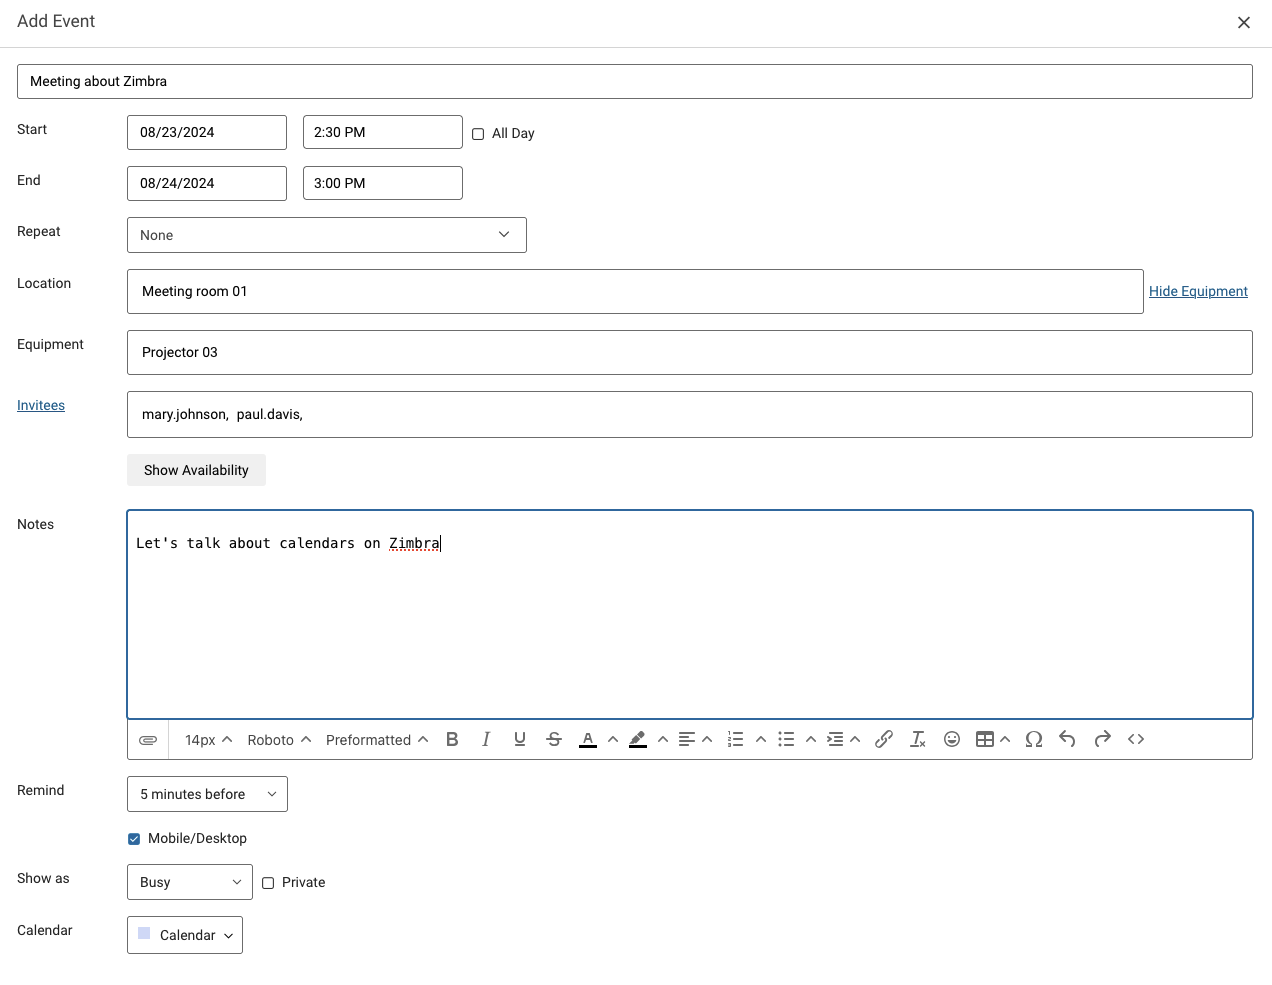
- **(2)**: Click on the time condition of your calendar in which you want to add an event. For a simple addition, simply define a title for the event and a location then click Save. To add more details about your event, click Add more details.
- **Start**: The date and time your event starts. If you tick `All day`, you will not have to enter a start and end time because the whole day will be taken into account.
- **End**: The end date and time of your event.
- **Repeat**: If this is a recurring event, define the frequency.
- **Location**: The location where the event will take place, such as the name of a meeting room.
- **Equipment**: By clicking Show equipment, you can display this line to define a shared equipment that you will use for your event.
- **Guests**: The email addresses of the event participants.
- **Notes**: Message that will be sent to the event guests.
- **Remind**: Be notified before the event begins.
- **Show as**: Define if the event makes its guests available or unavailable during its progress.
- **Calendar**: Define the calendar associated with the event.
Once you have defined your event, click `Save
`.
##### 3 - Edit an event [](#)
#### Tasks [](#)
Tasks are items that are detached from your calendars. Their purpose is to list the tasks to be performed without attaching an execution date or a temporality to them. These tasks are complementary to calendars.
The "Tasks" list exists by default, it cannot be deleted, but you can create your own task lists.
- **(1)**: To create a task, click the ... button, then New task or simply click the + button next to your task list.
- **(2)**: To create a new task list, click the ... button, then click Create List....
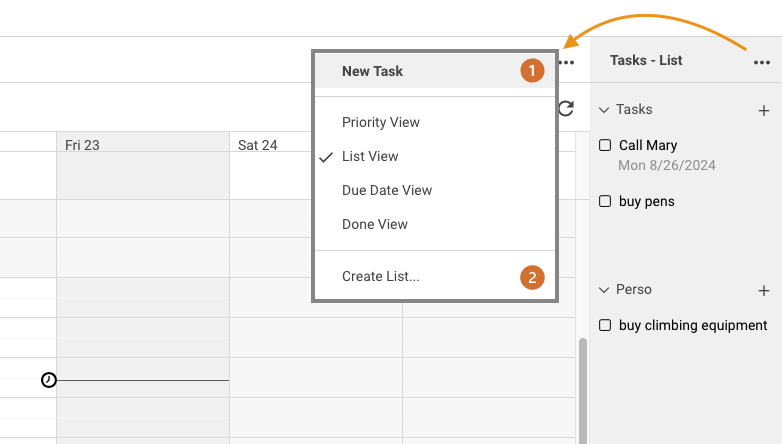
When you create a task, you can set a due date and priority so that you can rank them according to their importance, as well as a drop-down menu to select the corresponding task list.
Then click `Save
` to finish creating your task.
### Storage [](#)
:::tip
The storage feature called "Briefcase" is only available with the Zimbra Pro solution.
:::
Click the `Briefcase
` icon in the top bar to access your storage space. You can upload your files and share them there.
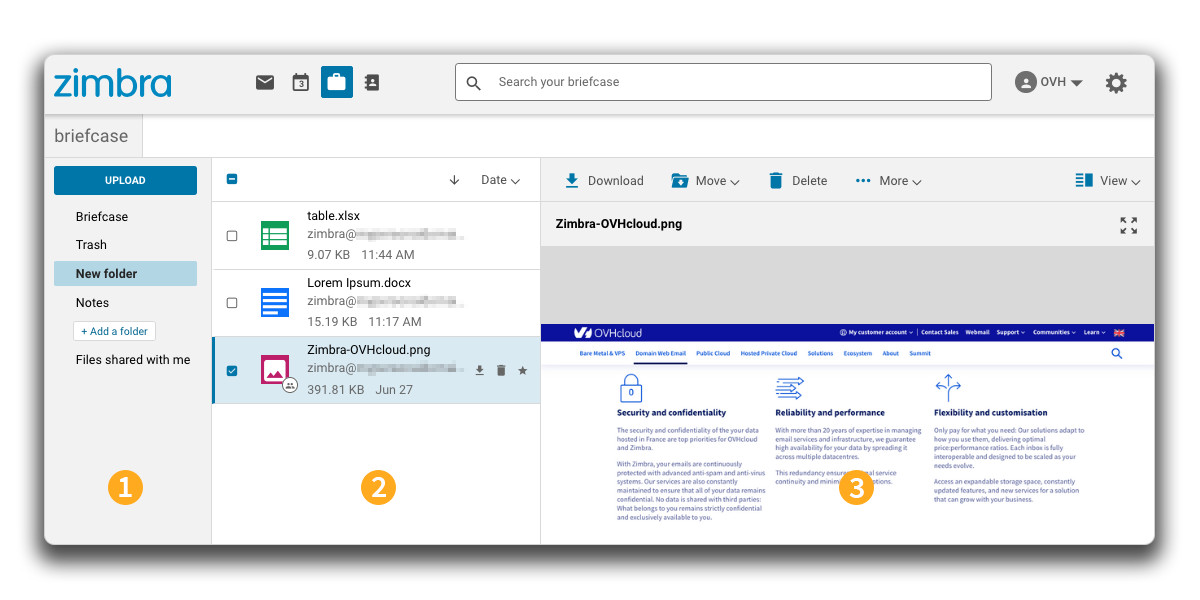
1. In the left-hand column, you will see the folders for your storage space.
- To create a new folder, click + Add a folder at the bottom of the column. Enter the name you want, then confirm by pressing the Enter key.
- To create a subfolder, right-click on one of the folders, then click Create subfolder. Enter the name you want, then confirm by pressing the Enter key.
2. In the center column, you will see a list of the files in the selected folder.
3. In the right window, depending on the file type selected in the center column, a preview of the content is displayed. The top bar of the preview displays the possible actions on the file or files you selected.
#### Add a file [](#)
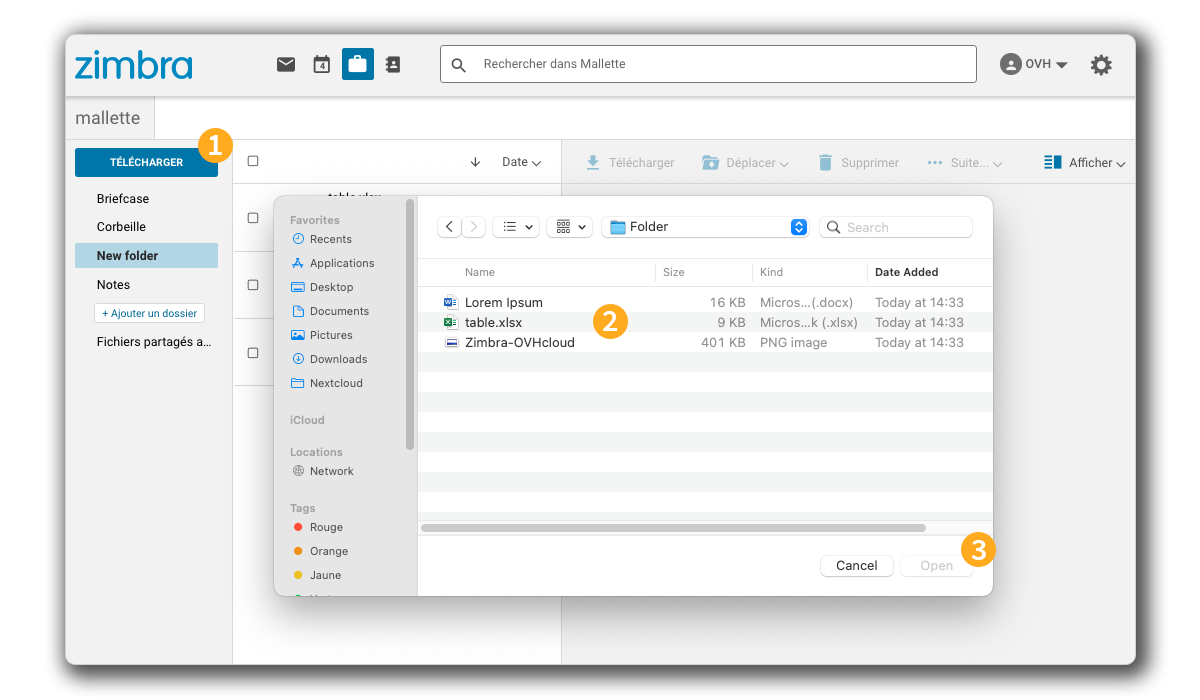
To add a file to your storage space, follow the steps below:
1. Click Upload in the left column.
2. From the File Browse window, select the file(s) to upload to your storage space.
3. Click Open to upload the item(s) to your storage space.
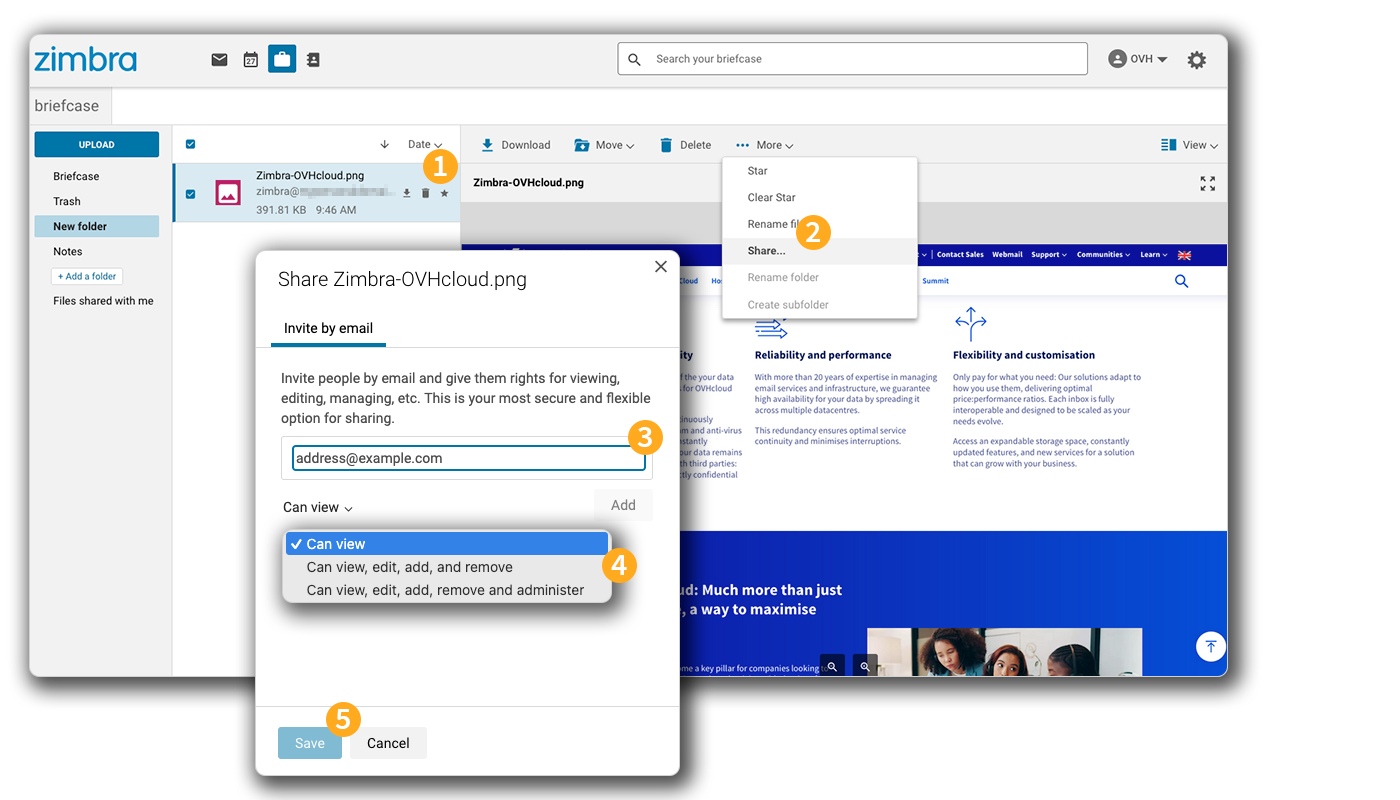
#### Share a file/folder [](#)
Sharing allows you to give access to a folder or file on your storage to a third party, outside your Zimbra account.
:::warning
Sharing for folder and file administration is only possible with another Zimbra Pro account.
:::
**Share a file**
1. Select the file to share and click More....
2. Click Share....
3. Enter the guest email address, then click Add. You can add multiple email addresses.
4. Choose the permissions you want to assign to the guest.
5. Click Save to finalize the sharing.
**Share a folder**
1. Right-click on the folder you want to share, then click Share....
2. Enter the guest email address, then click Add. You can add multiple email addresses.
3. Choose the permissions you want to assign to the guest.
4. Click Save to finalize the sharing.
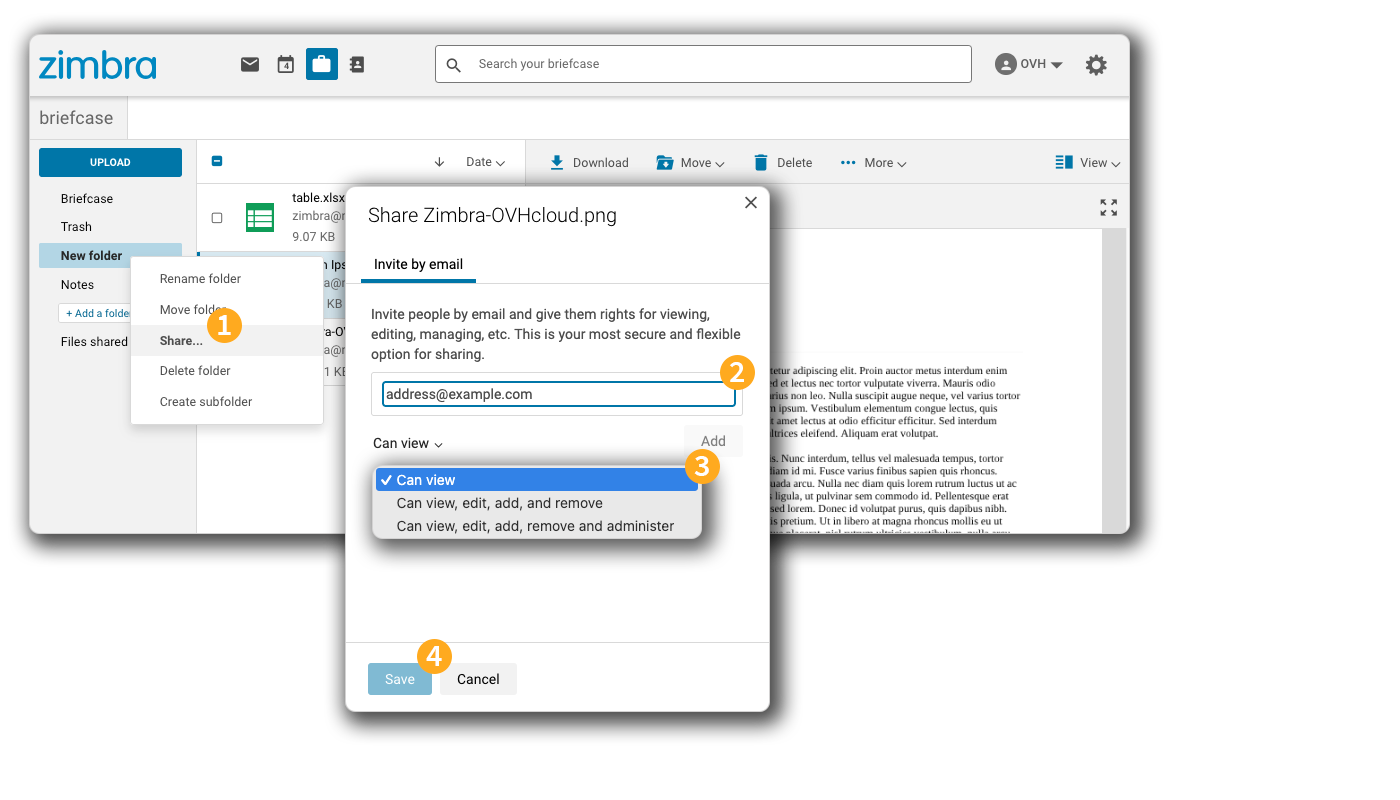
The guest receives an email inviting them to create a Zimbra account with a username and password. This account provides access to a Zimbra interface limited to the shared content only.
#### Edit a document [](#)
:::tip
The document editing feature from the "Briefcase" space is only available with the Zimbra Pro solution.
:::
From your Zimbra account's Briefcase, you can edit your text files, spreadsheets or presentations with the integrated ONLYOFFICE suite. To edit a document:
- Click the Briefcase icon in the top bar to access your storage space.
- Select the file you want to edit.
- In the top bar, click Edit.
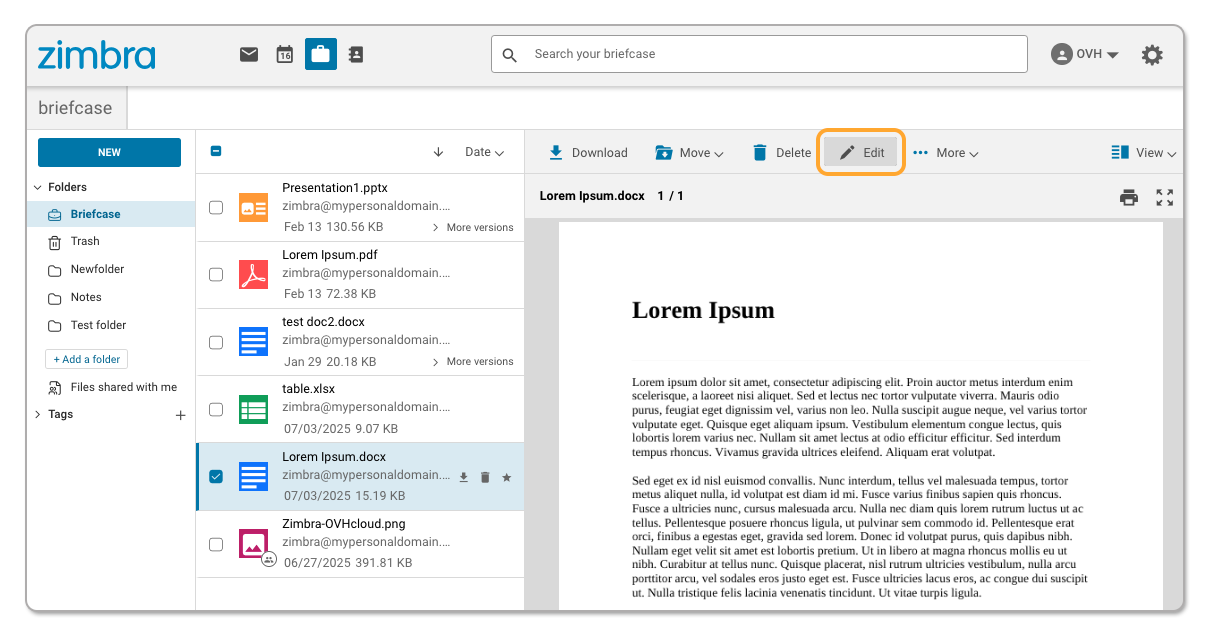
- The ONLYOFFICE editor opens in a new tab.
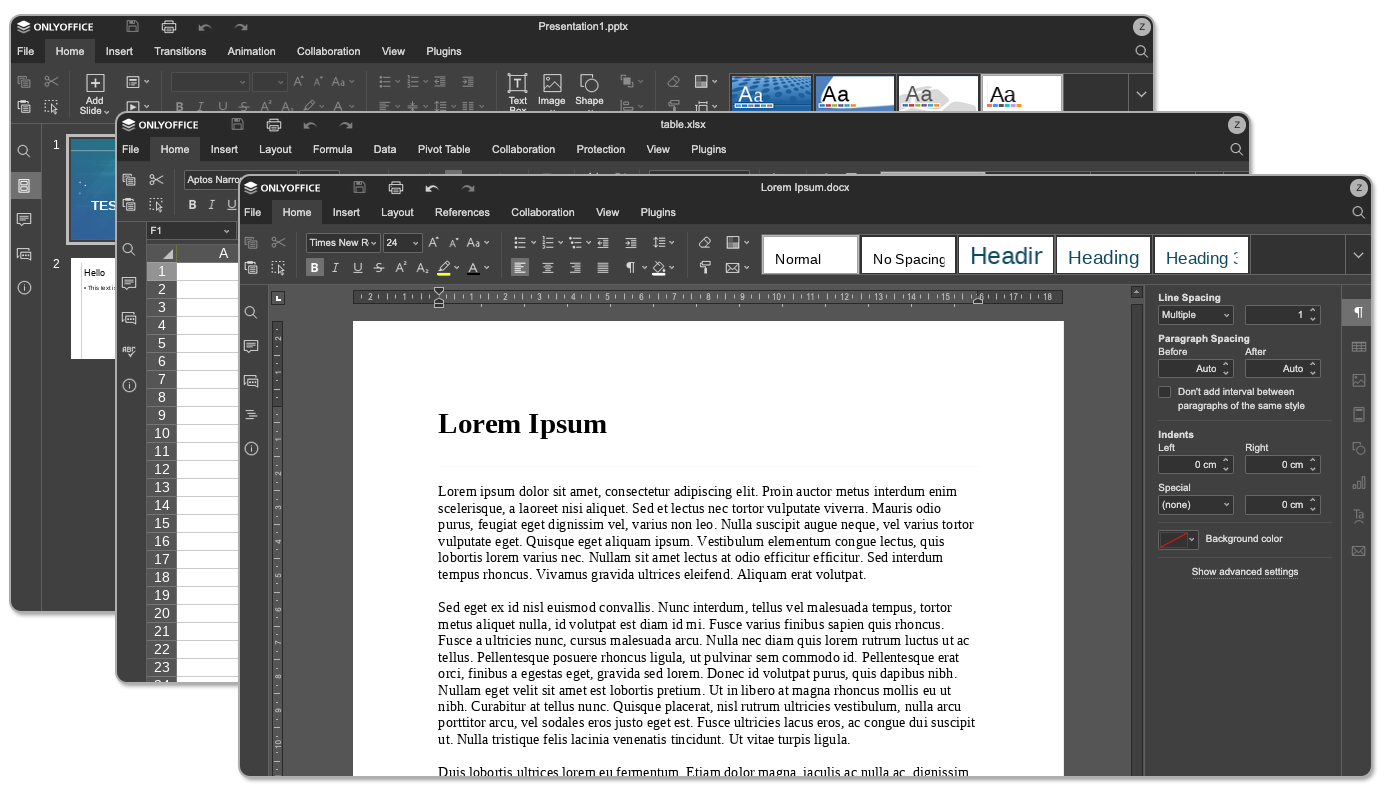
Changes you make in the editor are automatically saved during editing or when you close the tab.
:::tip
For more information on editing documents in ONLYOFFICE, [see the official documentation](https://helpcenter.onlyoffice.com/docs).
:::
### Filters [](#)
#### How to set filters [](#)
Setting up filters on your email account is an important parameter that allows you to set up an automatic sorting system when your emails are received.
A filtering rule in Zimbra is made up of 4 elements:
1 - [Comparison field](#filters-comp-field)
: On which part of the email the filter will apply.
2 - [Comparison operator](#filters-comp-operator)
: How precisely should the filter be applied.
3 - [Value](#filters-value)
: Which words/elements of the email will be targeted by the filter.
4 - [Filter Actions](#filters-action)
: What will the filter do on the email.
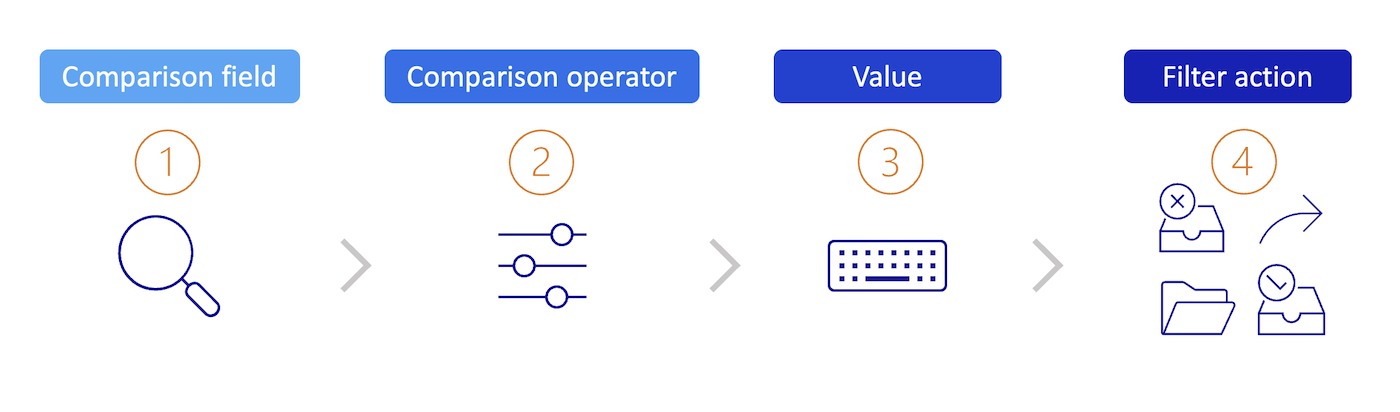
> Example: If the **Subject (1)** field of the email **contains (2)** the word `invoice` **(3)**, then **Forward to (4)** `billing@example.com`.
In the following paragraphs, you will find the details of each of the elements of a filtering rule.
##### 1 - Comparison field [](#)
The comparison field is the section of the email to check for the comparison operator. Comparison fields can include the following fields:
- **From**: Specify a sender in the “From” field of the email.
- **To**: Search for recipient names in the "To" field.
- **CC**: Search for copied recipient names in the “CC” field.
- **Subject**: Specify items in the subject of the email.
- **Header named**: When selected, an additional input field appears before the comparison operator. Use this field to enter any element of an email header. You can specify the standard fields "From", "To", "Subject", or other fields that may be present in the email header. For example, some email servers might add specific fields to the header that you can include in your filter rule, using this comparison field.
- **Body**: Refers to the words contained or not in the body of the email.
##### 2 - Comparison operator [](#)
Depending on the comparison field designated above, the comparison operator will determine the level of correspondence to be applied to the value.
:::info
The available comparison operators vary depending on the comparison field you have selected.
:::
- **Matches exactly / Does not match exactly**: What you enter must match exactly.
_For example_, by indicating that the subject of the email corresponds exactly to “house”, the filter will only match with “house” and not with “houses” or “a blue house”.
- **Contains / Does not contain**: What you enter must be present in the field(s).
_For example_, by specifying that the subject of the email must contain “house”, the filter will match with “house”, “houses” and also “a blue house”.
- **Matches wildcard condition / Does not match wildcard condition**: Specifies that the subject must match the specified string, which includes wildcards.
- **Exists / Does not exist**: Specifies that the specified comparison field must exist or must not exist in the message. This comparison operator is used with the comparison fields named header.
> **Using wildcards in filters**
>
> Wildcards can be used in the input field for comparison using the comparison operator “**Matches wildcard condition / Does not match wildcard condition**”. The available wildcards are `*` and `?`.
>
> - The wildcard `*` is a placeholder for any number of characters of any type, including spaces.
For example, the search string “blue\*house” would return the matches “blue house”, “houses” or “blue wooden house”. However, it would not return "lightning blue house".
Another example: The search string "w\*house" would return the matches "white house" and "watch TV in your house". However, it would not return “watch TV in your house with a friend”.
>
> - The wildcard `?` is a placeholder for exactly one character.
For example, the search string “blue?house” would return the matches “blue house”, “blue-house” and “blue\_house”.
##### 3 - Value [](#)
Once you have selected your field and comparison operator, you will need to enter the value they should match in the corresponding box.
##### 4 - Filter Actions [](#)
The `Then` field defines the action to be taken on the email that meets the filter conditions. Filter actions can include deleting, sorting, and even marking incoming mail.
- **Keep in the Inbox**: Saves emails to your inbox. If none of the filtering rules match an email, this action takes place by default.
- **Move to folder**: Moves the email to a specified folder.
- **Permanently delete**: Deletes the email message, not storing it in any of your folders including "Trash".
- **Forward To**: Forwards the email to the address you specify.
- **Mark as read**
- **Star**: Marks your email with a star.
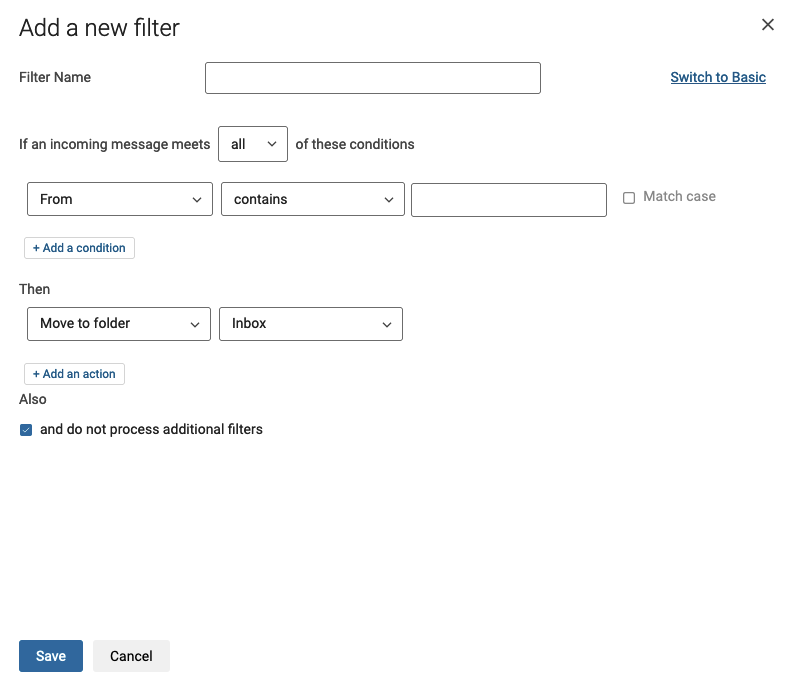
#### Create a filter [](#)
To create filters, click on the cogwheel icon in the top right-hand corner of your Zimbra interface, then click on `Settings
`. Next, click on `Filters
` in the left-hand column.
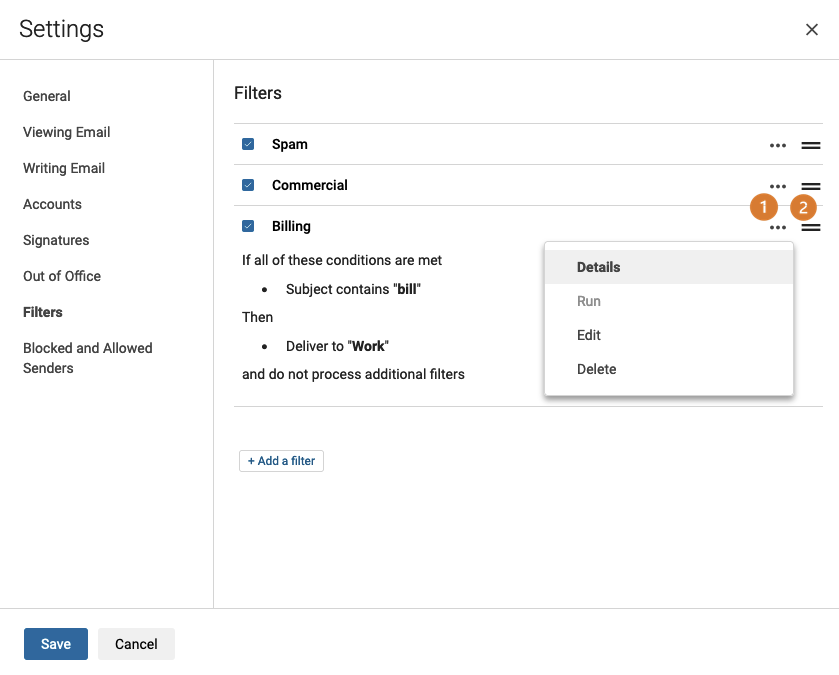
If filters exist, you will see the list in the order in which they are applied:
- **(1)** You can preview each filter by clicking the ... button to the right of the filter and then clicking Details. The Run button launches the action set for this filter.
- **(2)** This button is used as a handle, allowing you to move the filter in the list to assign an order of application. Each filter is applied in the order that is defined in the list.
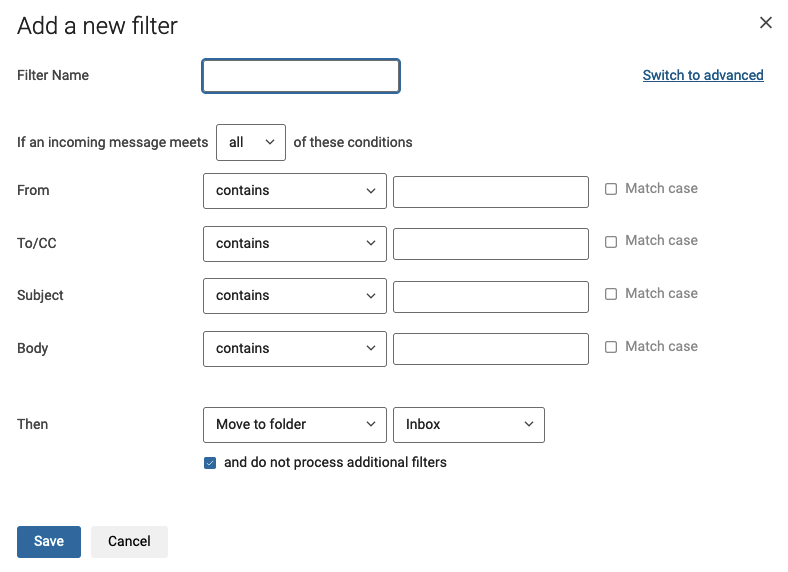
Click the `\+ Add a filter
` button to start creating it. The basic mode window appears by default. You can switch to advanced mode by clicking `Switch to advanced
` to have all comparison operators. Find the details in the section “[How to set filters](#filters-howto)
”.
**Basic mode**
**Advanced mode**
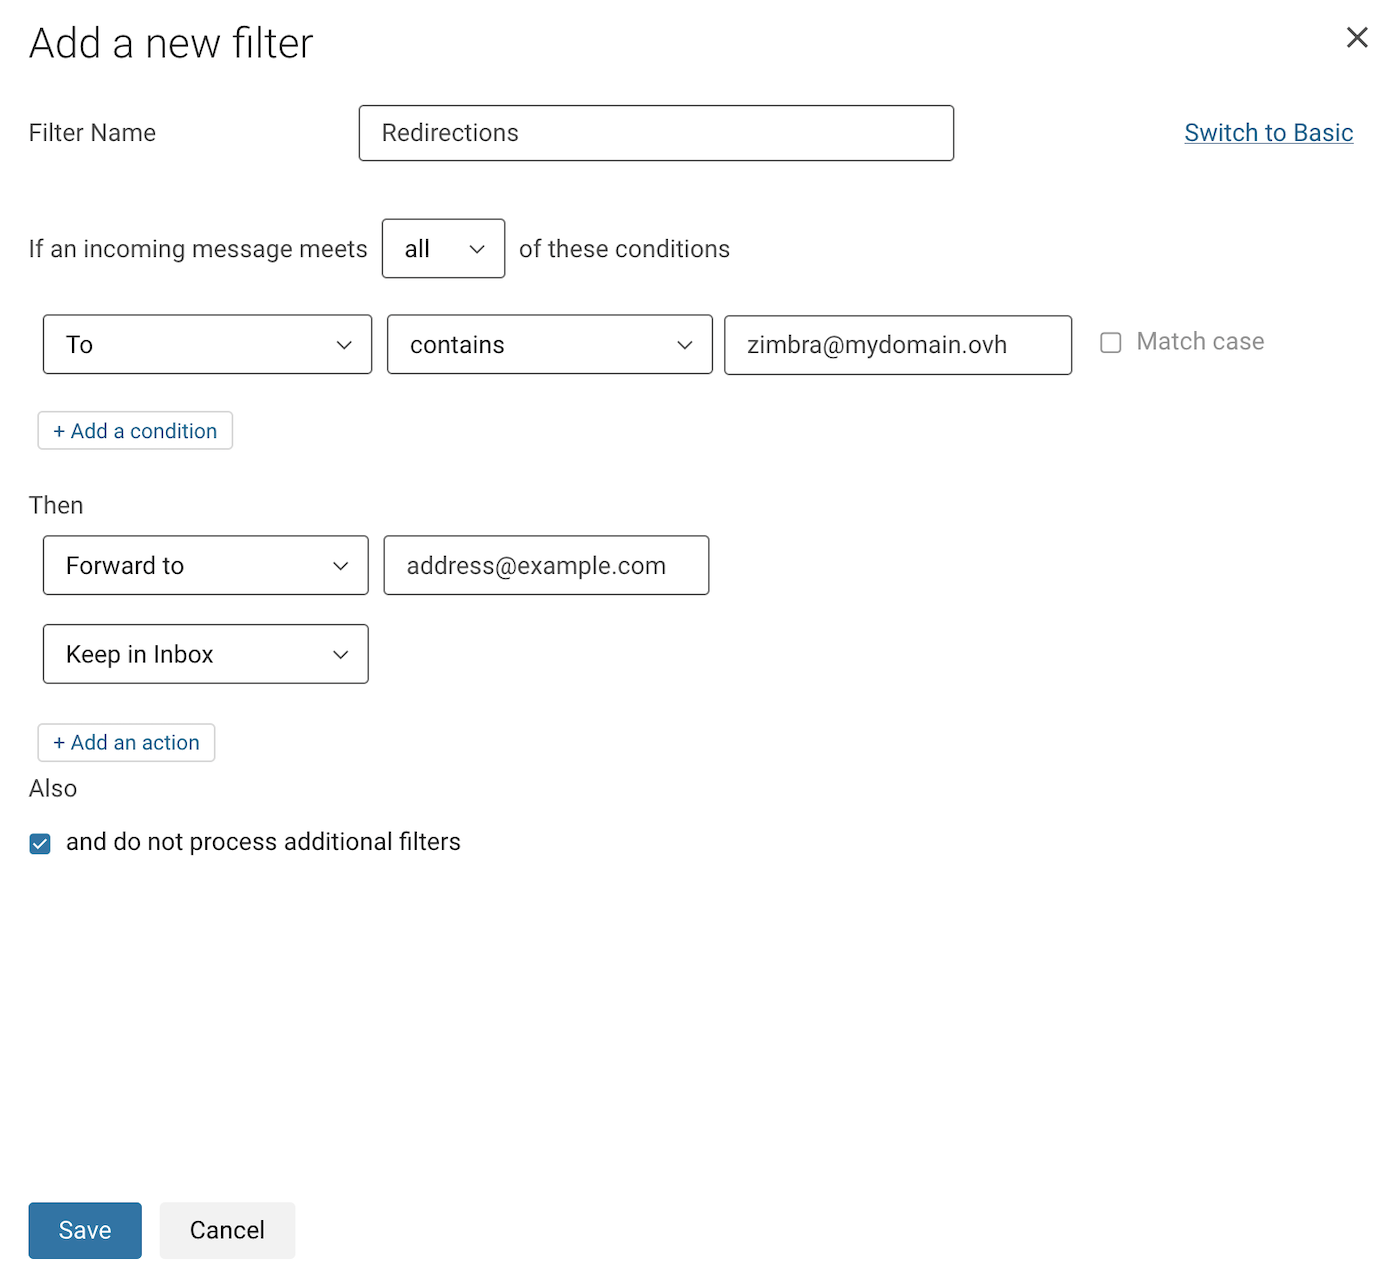
#### Create a redirection [](#)
It is possible to use a filter to redirect incoming emails to another address via a forwarding rule.
:::info
In our example below, we have chosen to redirect all incoming emails to another email address. To understand the example in the screenshots, we are logged in to the address **[zimbra@mydomain.ovh](mailto:zimbra@mydomain.ovh)** and want to redirect the emails from this account to the address **[address@example.com](mailto:address@example.com)**.
:::
To access the filters and create your redirection, follow these instructions:
- Click the ⚙ button in the top-right corner of your webmail window.
- Click Settings.
- Click the Filters section in the settings window.
- Click the Add a filter button.
- First, click Advanced mode in the top-right corner to set up this rule.
- Give your filter a name in the `Filter name` field.
- Leave the dropdown menu on `all` in the phrase "If an incoming message meets ... of these conditions".
- On the next line, select To (To), leave contains, and enter the email address you are logged in to in the field just to the right.
- Under the "Then" section, select `Forward to` from the dropdown menu and enter the destination email address.
- Click + Add an action further down, then select `Keep in Inbox`.
- Click Save in your filter window and also in the settings window.
### Delegations [](#)
To access the delegation setting, click on the cogwheel icon in the top right-hand corner of your Zimbra interface. Next, click on `Settings
` and `Writing email
` in the left-hand column.
You can delegate your email account to another email account. This requires both belonging to the same email service.
:::info
An email account with the same domain name but on another email solution cannot be delegated.
:::
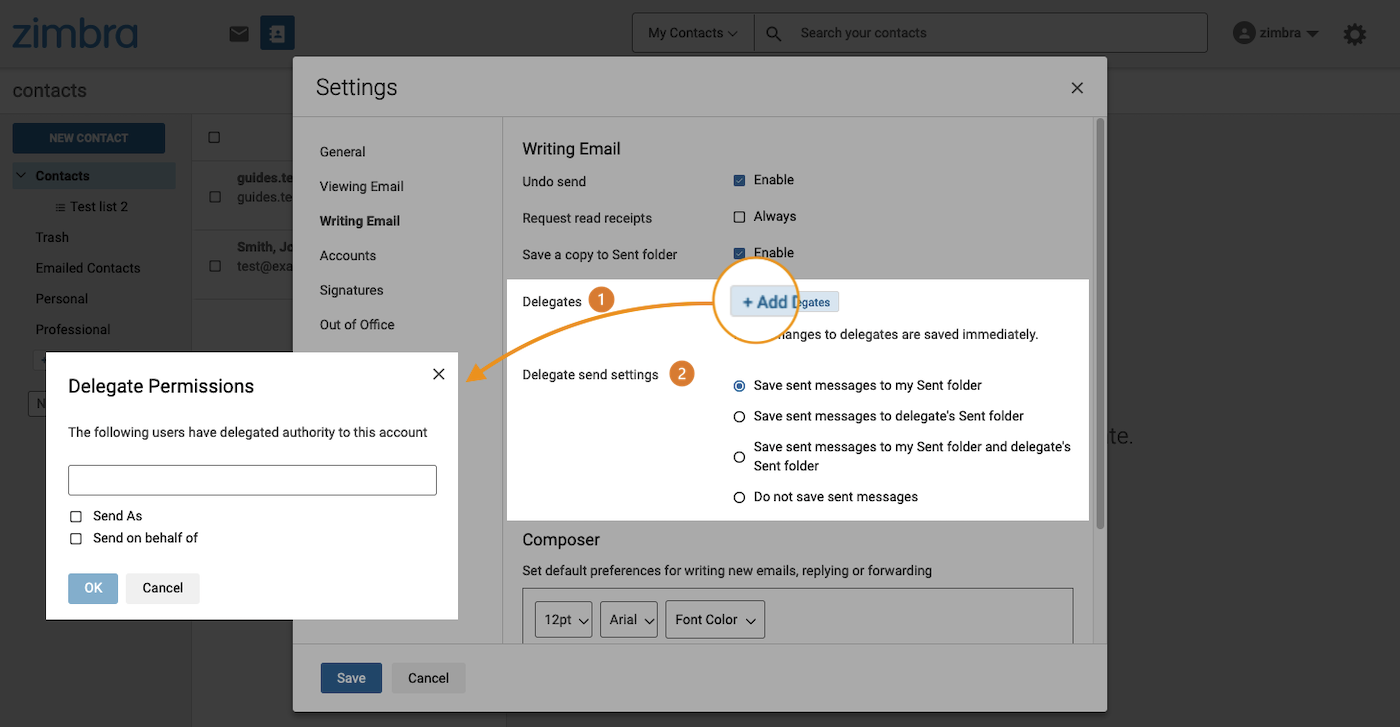
**(1) Delegates**
: To delegate your email account to another account, click `Add Delegates
`.
- **Send as**: The delegate can send an email with your email address, it will apear as if you had sent it yourself. The recipient will not see the delegate's email address.
- **Send on behalf of**: The delegate can send an email from their email address with your email address included as “on behalf of”. The recipient will then have a record of the two email addresses involved in the exchange.
**(2) Delegate send settings**: You have the following options when you delegate your email address to another email address.
- **Save sent messages to my Sent folder**: If the delegated account sends an email from your email address, this email will appear in your "Sent" folder.
- **Save sent messages to delegate's Sent folder**: If the delegated account sends an email from your email address, this email will appear in the delegate's "Sent" folder.
- **Save sent messages to my Sent folder and delegate's Sent folder**: If the delegated account sends an email from your email address, this email will appear in the "Sent" folders of both accounts.
- **Do not save sent messages**: If the delegated account sends an email from your email address, no copy will be saved.
### Signature [](#)
Click on the cogwheel icon in the top right-hand corner of your Zimbra interface, then click on `Settings
`. Next, click on `Signatures
` in the left-hand column.
You can find the configuration details in the “[Configure Zimbra interface preferences](#settings)” section of this guide (click on the tab **Signatures**).
### Automatic Replies [](#)
When you are absent without access to your email account, you can set up a message that will be used to automatically reply to emails. In Zimbra webmail, this feature is called “Out of Office”.
To manage your responder, click on the cogwheel icon in the top right-hand corner of your interface, then click on `Settings
` and then on `Out of Office
`.
By default, the `Enable automatic response during these dates (inclusive)` option is disabled. Tick this box to enable automatic replies. You can now enter the content of your absence message into the field.
- If you are not sure when you want to stop the automatic reply, select the `No end date` check box.
- The Send sample copy to me button will send you a preview of this automatic reply in your inbox.
- `External Senders`: You can define a different message when the sender is external to your domain name and/or address book. By default, all senders receive the same message.
## Go further
[Getting started with MX Plan](/en/guides/web-cloud/email-and-collaborative-solutions/mx-plan/email-generalities.md)
[Changing an MX Plan email password](/en/guides/web-cloud/email-and-collaborative-solutions/mx-plan/email-change-password.md)
[Creating filters for your email addresses](/en/guides/web-cloud/email-and-collaborative-solutions/mx-plan/feature-filters.md)
[Using email aliases and redirections](/en/guides/web-cloud/email-and-collaborative-solutions/common-email-features/feature-redirections.md)
Join our [community of users](https://community.ovhcloud.com/community/en).