---
title: "Signing and encrypting Exchange emails with S/MIME"
description: "Find out how to publish your S/MIME certificate and sign and encrypt your Exchange emails in Outlook, the OWA webmail, iOS and Android"
url: https://docs.ovhcloud.com/en/guides/web-cloud/email-and-collaborative-solutions/microsoft-exchange/feature-smime
lang: en
lastUpdated: 2026-09-15
---
> For AI agents: the complete documentation index is available at https://docs.ovhcloud.com/en/llms.txt, the full documentation bundle is available at https://docs.ovhcloud.com/en/llms-full.txt.
# Signing and encrypting Exchange emails with S/MIME
## Objective
S/MIME
adds two guarantees to your Exchange emails, using a personal certificate:
- **Encryption** ensures that only the intended recipient can read the message. If the email is intercepted in transit, or if an unauthorised person gains access to it, its content stays unreadable.
- **Digital signature** guarantees the sender's identity and the message's integrity. It proves that the email was sent by the expected sender, and that its content has not been altered in transit.
The two are independent: an email can be signed, encrypted, or both.
S/MIME relies on a **certificate specific to each user**, containing a public key and a private key. OVHcloud does not issue S/MIME certificates: you order yours for the primary email address of your Exchange account from a certificate authority (CA) such as Sectigo.
**This guide explains how to publish your S/MIME certificate and how to sign and encrypt your emails in Outlook, in the OWA webmail, and on mobile devices.**
## Requirements
- A [Hosted Exchange](https://www.ovhcloud.com/en-gb/emails/hosted-exchange/), [Private Exchange](https://www.ovhcloud.com/en-gb/emails/private-exchange/) or [Trusted Exchange](https://www.ovhcloud.com/en-gb/enterprise/products/trusted-exchange/) service
- An S/MIME certificate issued for the **primary email address** of your Exchange account
- Outlook for Windows installed and [configured with your Exchange account](https://docs.ovhcloud.com/en/guides/web-cloud/email-and-collaborative-solutions/microsoft-exchange/how-to-configure-outlook-2016.md)
- To encrypt an email: each recipient's certificate, which your email client retrieves from the Global Address List (GAL) — see the [How encryption works](#how-encryption-works) section below
:::warning
**Start with Outlook, whichever client you plan to use.** Publishing your certificate to the Exchange organisation can only be done from Outlook for Windows. Until that is done, the other users of your organisation cannot encrypt emails addressed to you or verify your signatures — and the other clients (OWA, iOS, Android) cannot be used for S/MIME.
:::
## How it works
### How encryption works [](#)
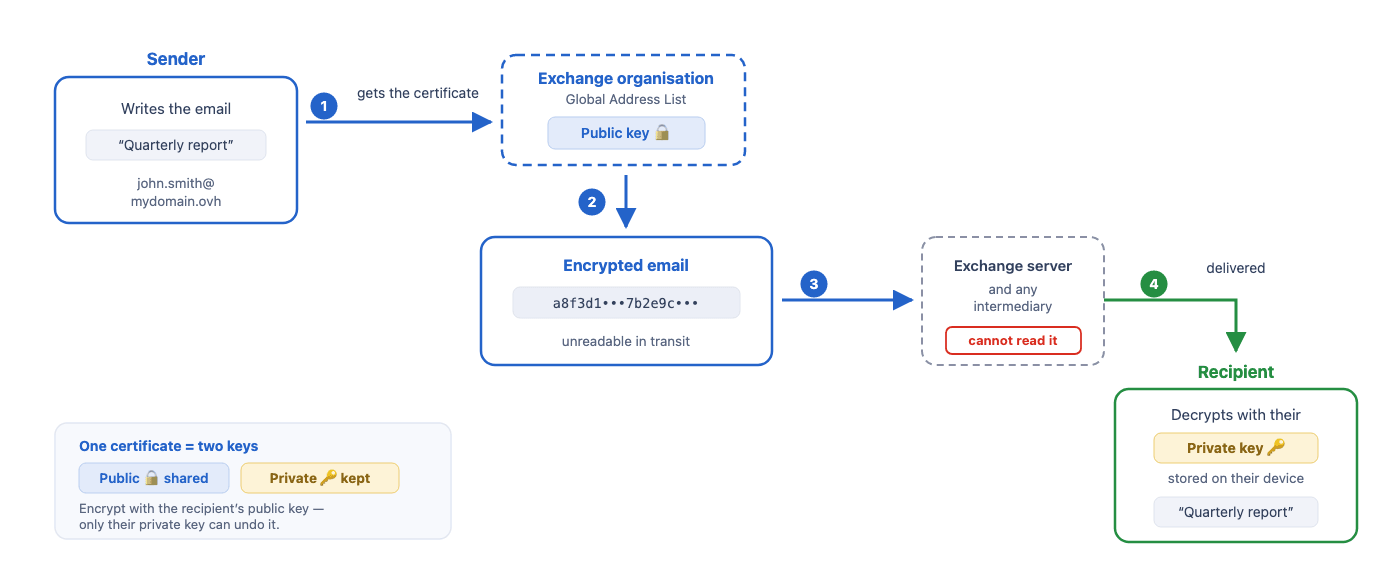
Each user has a certificate containing a public key and a private key. When an encrypted email is sent:
1. The email client retrieves the recipient's certificate, and therefore their public key.
2. The message is encrypted with this public key.
3. Once encrypted, the message is unreadable to any intermediary, including the Exchange server.
4. Only the recipient can decrypt it, with their private key stored on their device.
This is why you must already have the recipient's certificate to encrypt an email to them.
### How the signature works
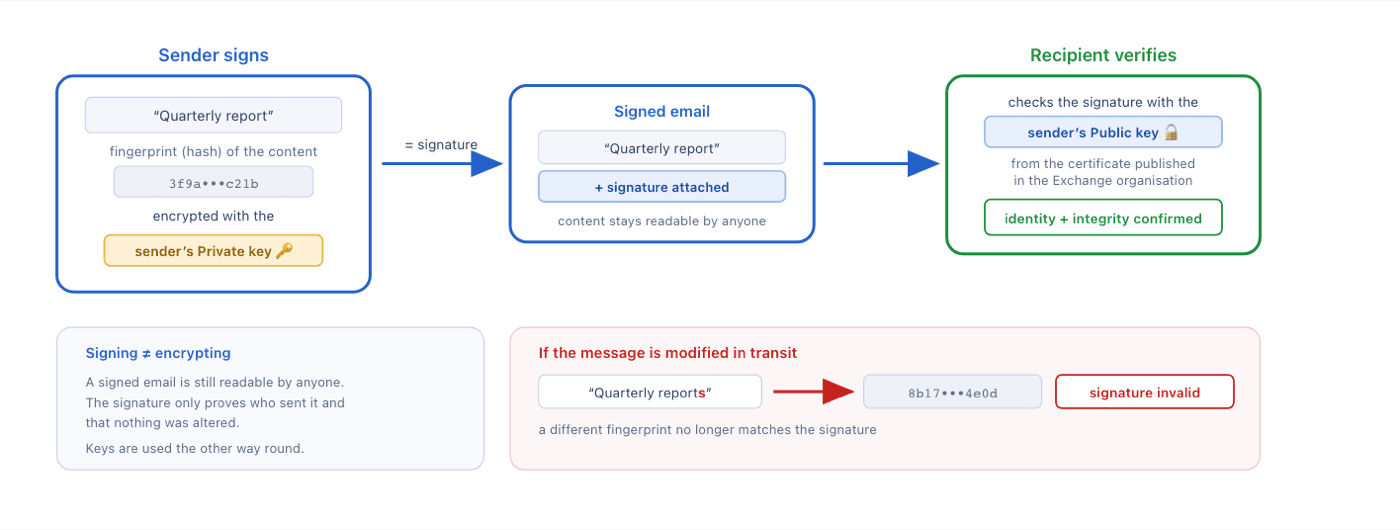
1. The email client computes a fingerprint (hash) of the email content.
2. This fingerprint is encrypted with the sender's private key: this forms the signature.
3. The recipient's email client verifies the signature with the sender's public key, retrieved from their certificate published in the Exchange organisation.
Any modification of the message invalidates the signature.
## Instructions
### Step 1: publishing your certificate from Outlook [](#)
Publishing your certificate makes it accessible within your Exchange organisation. The other users then retrieve it automatically to encrypt the emails they send you, and to verify the digital signature of the messages you send them. You can then use the other email clients.
**Follow the 4 tabs below in order:**
**1. Trust Center**
#### Opening the Trust Center
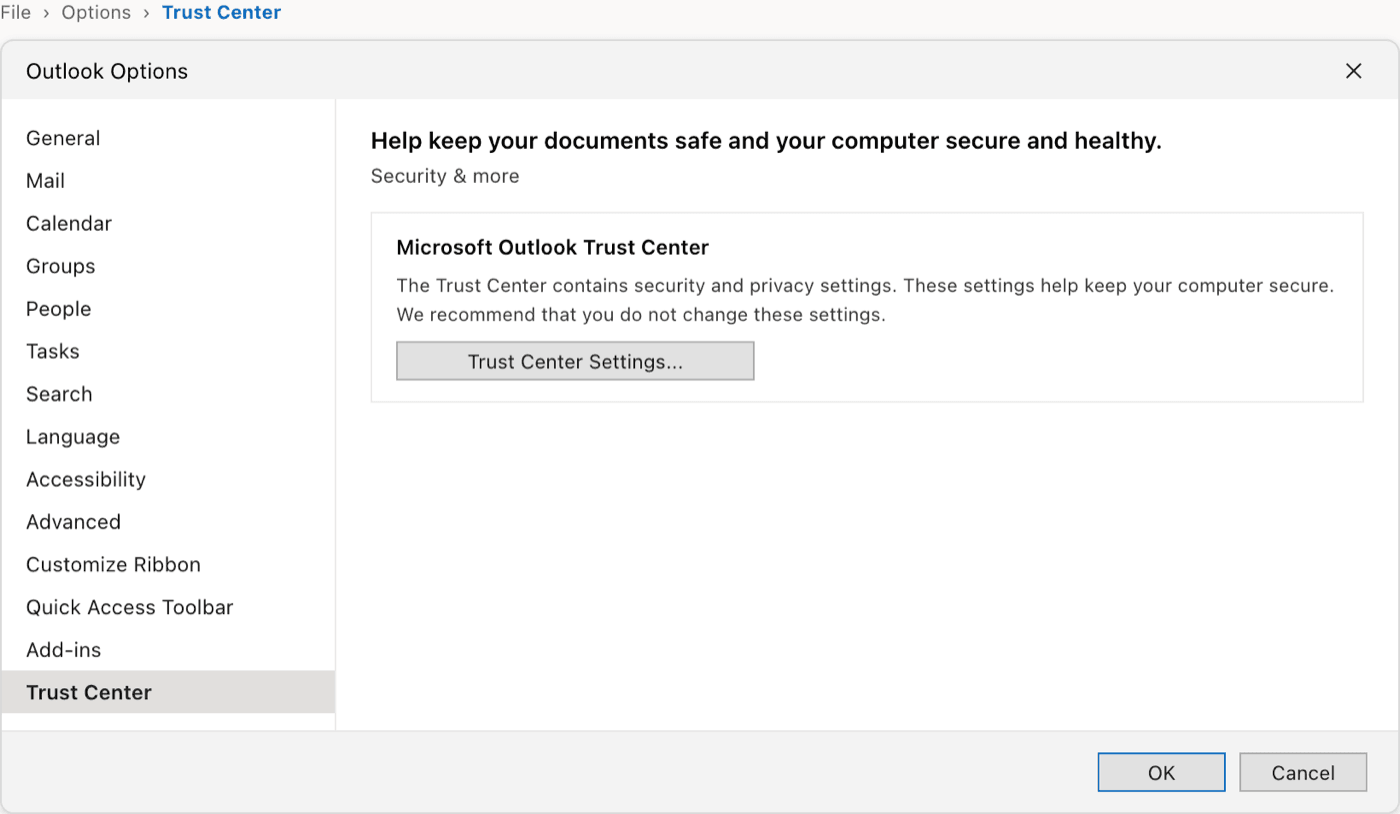
1. In Outlook, click File, then Options.
2. In the left-hand list, select Trust Center, then click Trust Center Settings....
3. Open the Email Security section.
**2. Import the certificate**
#### Importing your certificate
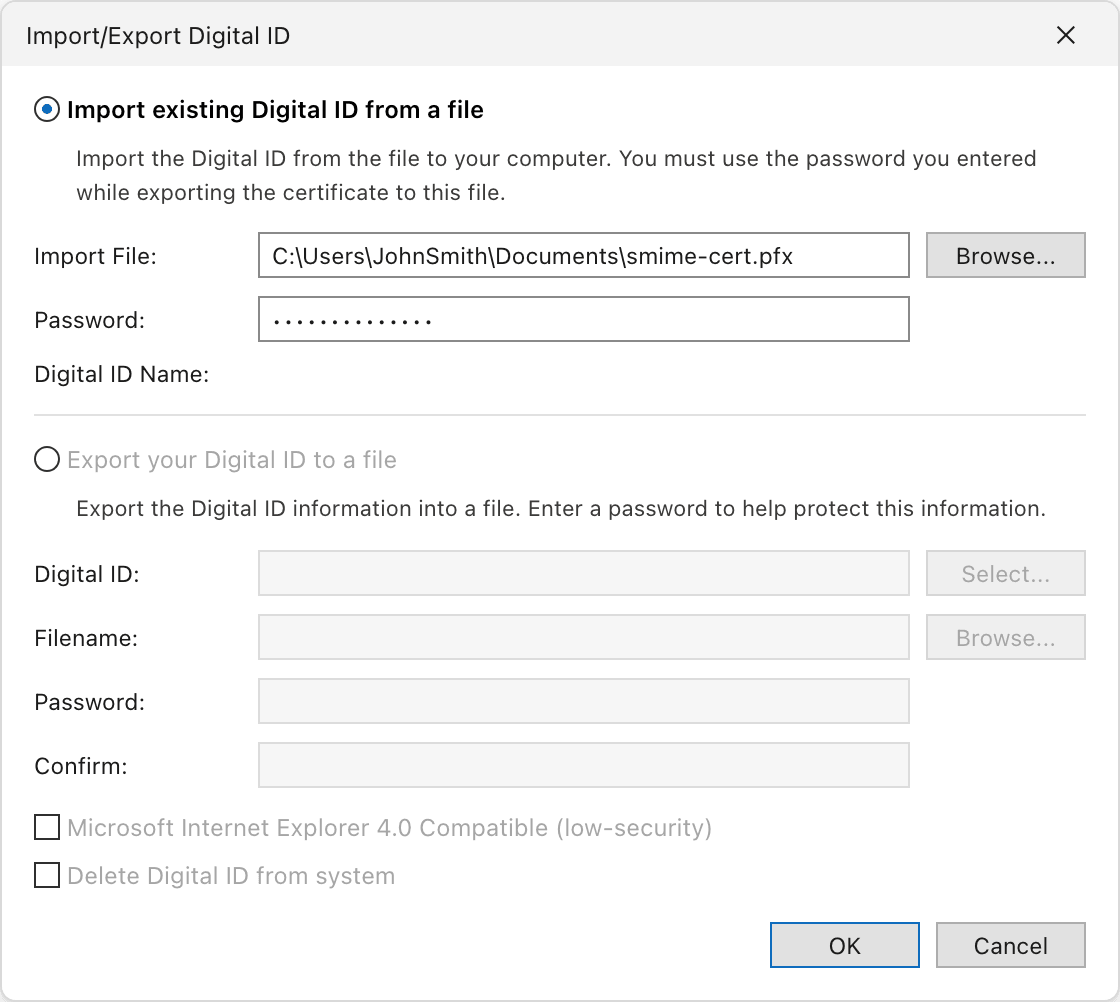
1. In the **Digital IDs (Certificates)** area, click Import/Export....
2. Select Import existing Digital ID from a file, then browse to your certificate file.
3. Enter the password protecting the file, then confirm with OK.
**3. Security settings**
#### Selecting the certificate and algorithm
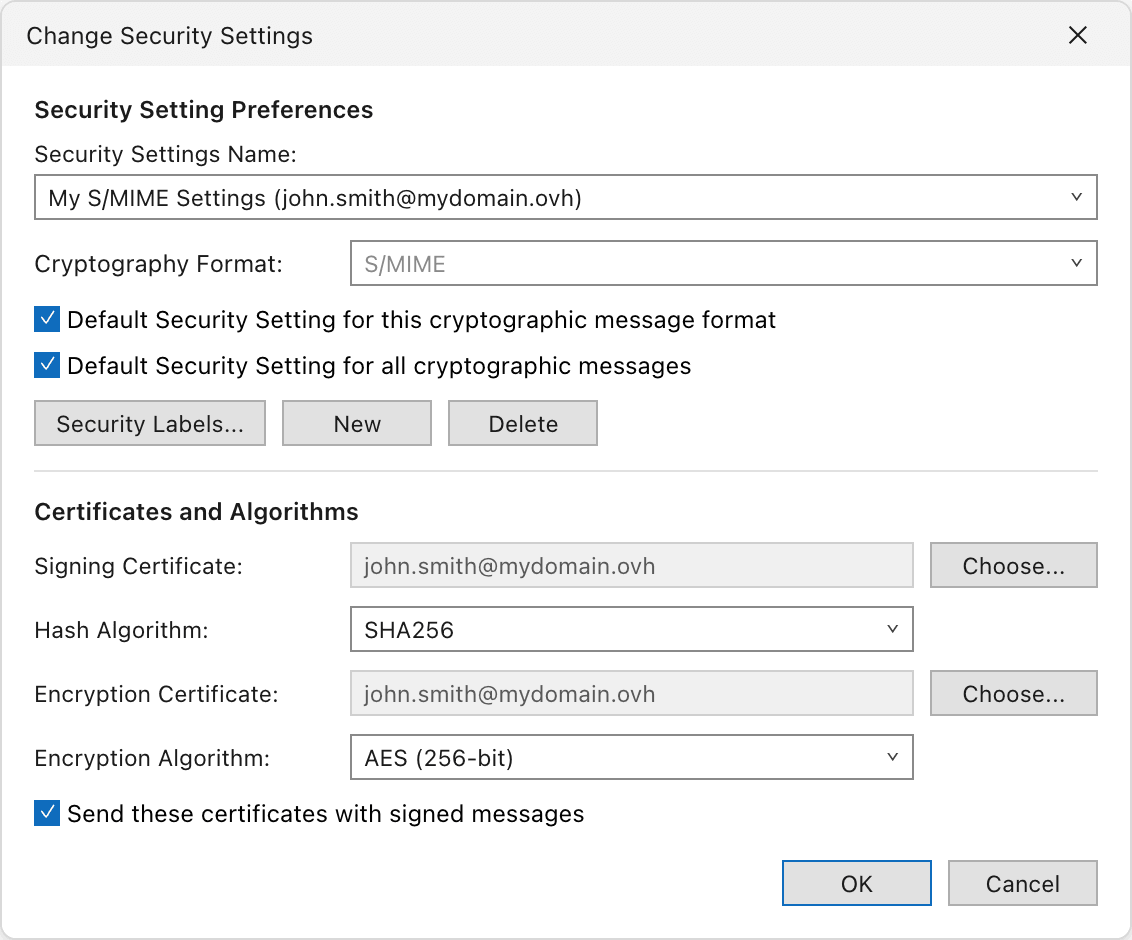
1. Back in the Email Security section, click Settings... under **Encrypted email**.
2. Check that the imported certificate is selected as both **Signing Certificate** and **Encryption Certificate**.
3. Set **Hash Algorithm** to SHA256.
4. Confirm with OK.
:::warning
**Do not keep SHA1 as the hash algorithm.** SHA1 is deprecated for digital signatures: collisions have been demonstrated against it, so a signature computed with SHA1 no longer guarantees the integrity of the message. Choose SHA256 or a stronger algorithm.
:::
**4. Publish to the GAL**
#### Publishing the certificate to your organisation
1. In the **Digital IDs (Certificates)** area, click Publish to GAL....
2. Confirm when prompted.

Your certificate is now published. In Outlook, you can sign and encrypt a message from the `Options
` tab of the compose window, with `Sign
` and `Encrypt
`.
A signed and/or encrypted email indicates this in its header: a padlock icon (encryption) and a rosette icon (signature) on the right, and a **Signed By** line with the signing address.
### Step 2: configuring your other clients [](#)
**OWA webmail**
#### Finding the S/MIME options
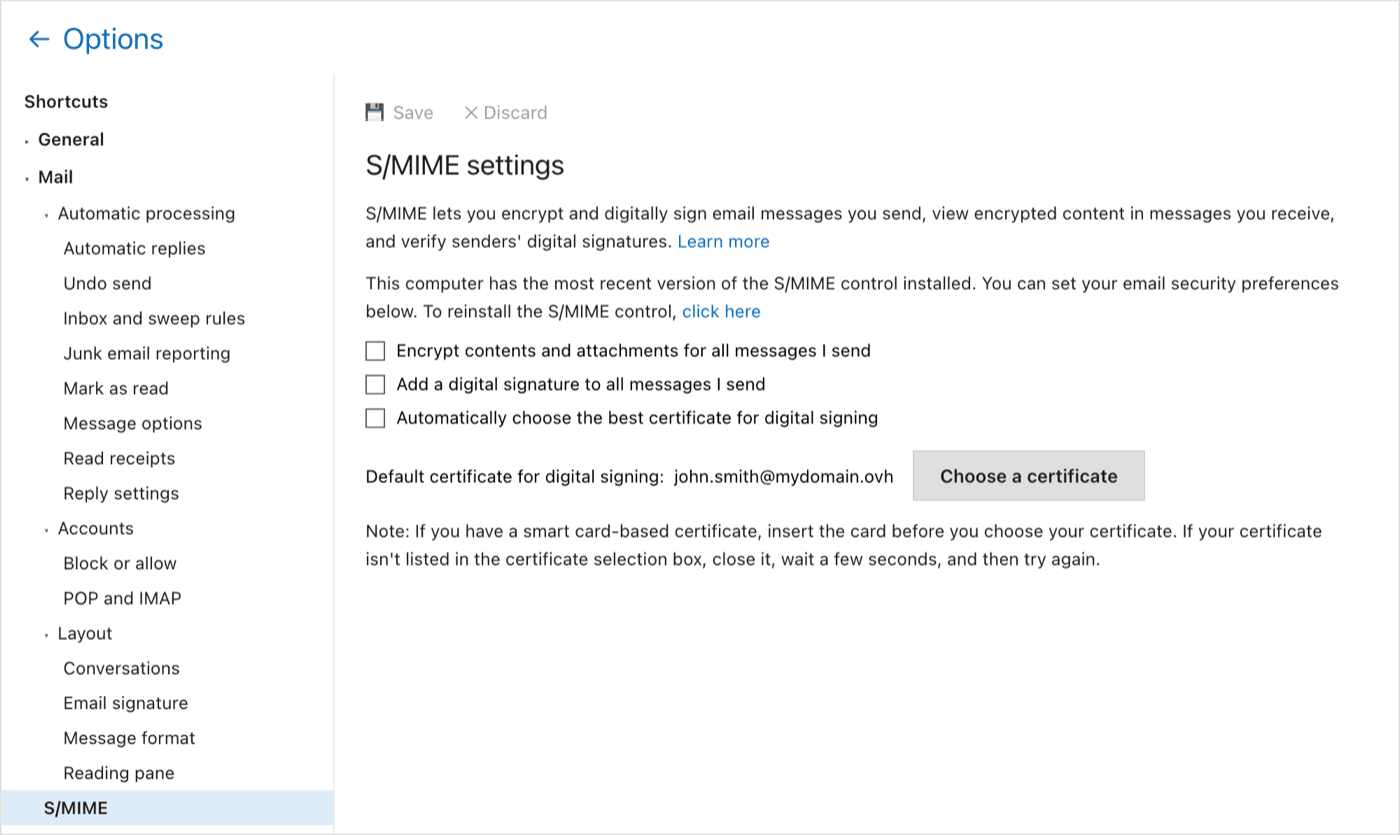
From the OWA webmail, you can decrypt received emails and verify their signature, as well as sign and encrypt the messages you send. The S/MIME settings are in the OWA options, under Mail > S/MIME. That page lets you encrypt and digitally sign every message you send by default, and choose the certificate used for signing.
#### Installing the S/MIME control
To read an encrypted email or verify a signature, you need a compatible browser with the **S/MIME control** installed and configured. The control ships as a browser extension.
If the control is missing, OWA displays a message with a direct download link for the control.
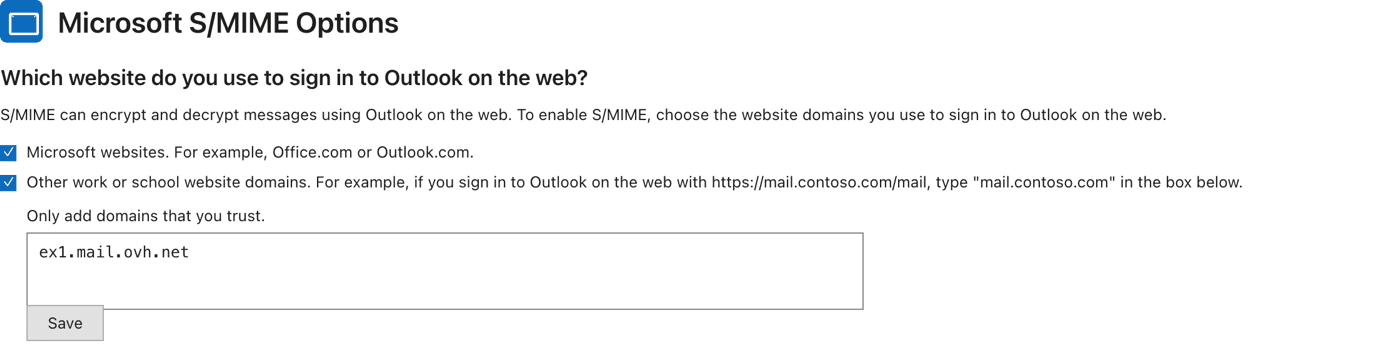
#### Declaring the webmail domain
Once the control is installed, open its settings and add your Exchange webmail domain to the trusted domains, then save.
:::warning
**The control does not work in the reading pane.** Open the email in a dedicated window to use the S/MIME functions.
:::
**iOS**
#### Installing the certificate
The certificate is installed at system level, in the PKCS #12 format (a `.p12` or `.pfx` file holding both the certificate and its private key, protected by a password).
The simplest method is to **email the certificate to the user**: they tap the attachment and follow the system prompts. Export the certificate from Outlook beforehand (the Import/Export... button used in [Step 1](#step-1)) and **protect the export with a strong password**: an unprotected `.p12` file exposes the private key, and therefore every email encrypted for you.
Opening the attachment installs a configuration profile. Finish the installation in Settings, then check the certificate in Settings > General > VPN & Device Management.
#### Enabling S/MIME in the Mail app
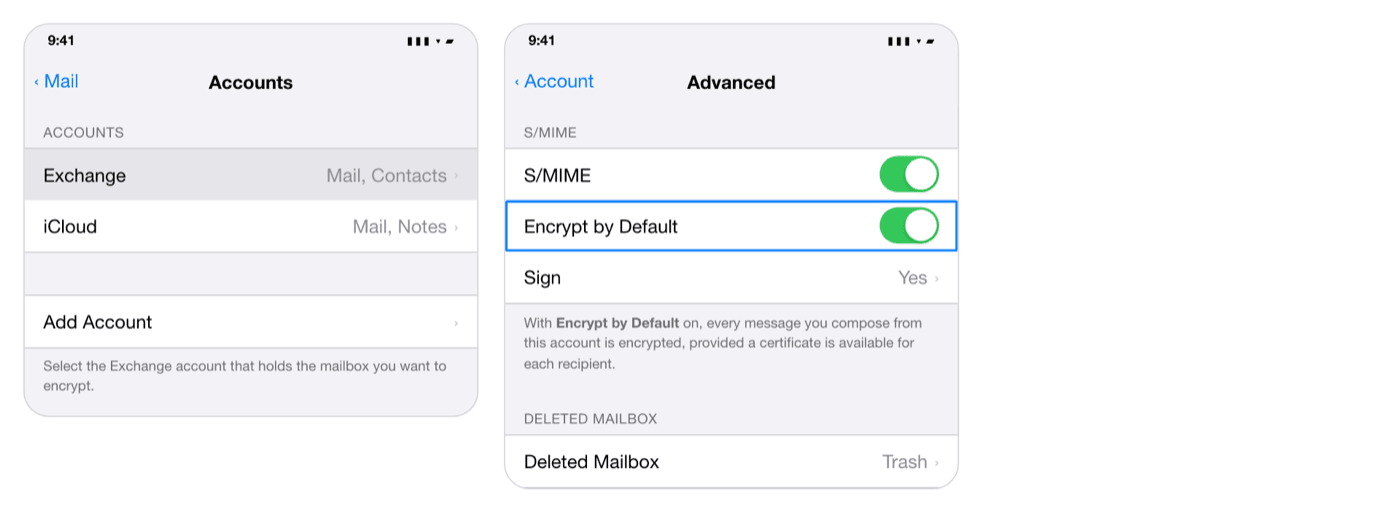
The native Mail app supports S/MIME. Once the certificate is installed, open Settings > Mail > Accounts, select your Exchange account, then Account > Advanced. Enable S/MIME, then turn on Encrypt by Default to encrypt your outgoing messages; the signing option sits in the same section.
When composing a message, the lock icon in the address field shows the encryption state and lets you change it for that message. As in Outlook, iOS looks up the recipients' certificates in your organisation's Global Address List — which is why publishing your own certificate matters.
For details on the Mail app's behaviour, see the Apple page "[Use S/MIME to send and receive encrypted messages in the Mail app in iOS](https://support.apple.com/en-gb/102245)".
**Android**
On Android, S/MIME requires an email client that supports it for Exchange. The OWA webmail opens in the device browser, but cannot sign, encrypt or decrypt there: those functions rely on the S/MIME control, which only installs on a desktop browser.
#### Using a compatible email client
The certificate is installed at system level, from Settings > Security > Encryption & credentials (menu names vary by manufacturer and Android version).
The certificate is then available system-wide; whether you can sign and encrypt depends on the email app, so pick one that explicitly advertises S/MIME support for Exchange.
:::info
The **Gmail** app supports S/MIME only within a managed Google Workspace organisation. With an OVHcloud Exchange mailbox, use a compatible third-party client instead.
:::
#### Outlook for Android
Microsoft's S/MIME documentation for Outlook mobile covers **Exchange Online only**: the feature relies on a virtual certificate collection configured in Exchange Online, and automated certificate delivery requires Microsoft Intune as the enrolment provider. These prerequisites do not apply to mailboxes hosted on the OVHcloud Exchange platform.
See the Microsoft page "[S/MIME for Outlook for iOS and Android in Exchange Online](https://learn.microsoft.com/en-gb/exchange/clients-and-mobile-in-exchange-online/outlook-for-ios-and-android/smime-outlook-for-ios-and-android)" for the full prerequisites.
## Limitations
- To encrypt an email, you must already have the recipient's certificate.
- Without a backup, losing the device or the certificates means **losing access to encrypted emails**. Keep a backup copy of your certificate in a safe place.
- S/MIME is configured on each client separately. On mobile, the iOS Mail app supports it natively; on Android, use an email client that supports S/MIME for Exchange (see [Step 2](#step-2)).
- If a transport rule modifies the body of the email, the signed email is shown as an attachment in the recipient's Outlook.
## Go further [](#)
[Exchange - Configure your email account on Outlook for Windows](https://docs.ovhcloud.com/en/guides/web-cloud/email-and-collaborative-solutions/microsoft-exchange/how-to-configure-outlook-2016.md)
[Using your email address from the Outlook Web App (OWA) webmail](https://docs.ovhcloud.com/en/guides/web-cloud/email-and-collaborative-solutions/using-the-outlook-web-app-webmail/email-owa.md)
[Configuring two-factor authentication on an Exchange account](https://docs.ovhcloud.com/en/guides/web-cloud/email-and-collaborative-solutions/microsoft-exchange/manage-2fa-exchange.md)
Join our [community of users](https://community.ovhcloud.com/).