---
title: "How to add a domain name to your Exchange service"
description: "Find out how to add a domain name to your Exchange service"
url: https://docs.ovhcloud.com/en/guides/web-cloud/email-and-collaborative-solutions/microsoft-exchange/exchange-adding-domain
lang: en
lastUpdated: 2025-04-28
---
# How to add a domain name to your Exchange service
## Objective
To use the accounts included with an Exchange service, you will need to add a domain name to it.
You can also add multiple domain names to an Exchange or Email Pro service.
**Find out how to add a domain name to your Exchange or Email Pro service.**
## Requirements
- An [Exchange](https://www.ovhcloud.com/en-gb/emails-exchange/) or [Email Pro](https://www.ovhcloud.com/en-gb/emails/email-pro/) solution
- One or more domain names
- Administrative access to your domain name’s configuration (in order to [modify the DNS zone](/en/guides/web-cloud/domains/dns-zone-edit.md))
***
### OVHcloud Control Panel Access
**Exchange:**
- **Direct link:** Exchange
- **Navigation path:** Web Cloud > Exchange > Select your platform
**Email Pro:**
- **Direct link:** Email Pro
- **Navigation path:** Web Cloud > Email Pro > Select your platform
***
## Instructions
### Add a domain name
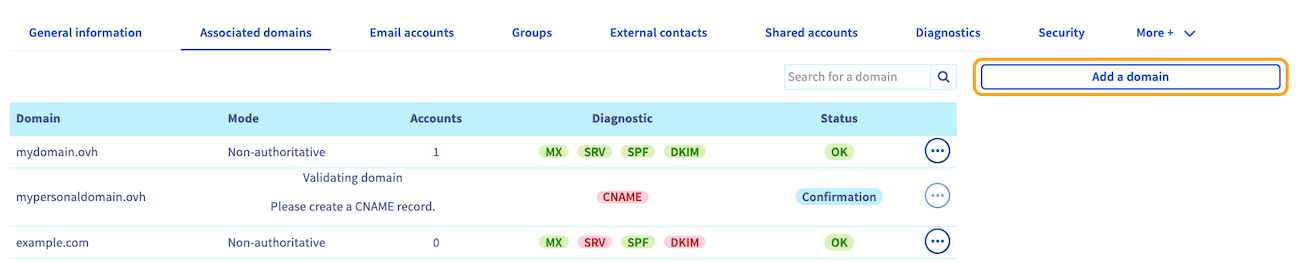
1. Click on the Associated domains tab of your Exchange or Email Pro service.
2. The table will show you the domain names currently associated with your service.
3. Click the Add a domain button.
:::warning
By default, all email accounts on a service are interconnected. All of the addresses created on your email service will be able to view all of the service’s addresses in the directory, including those with a different domain name.
To unlink the display of domains, you need to order another [Exchange or Email Pro](https://www.ovhcloud.com/en-gb/emails/) service for the domain name(s) concerned.
:::
In the window for adding a domain:
- **Select a domain from the list**: In the list, you will find the domain names that you fully manage (or at least manage the DNS zone) in your OVHcloud Control Panel.
- **Enter a domain name that is not managed by your OVHcloud account**: You will need to be able to modify the domain name’s configuration, and more precisely its DNS zone, so that the service can be configured.
Once you have made your choice, click the `Next
` button.

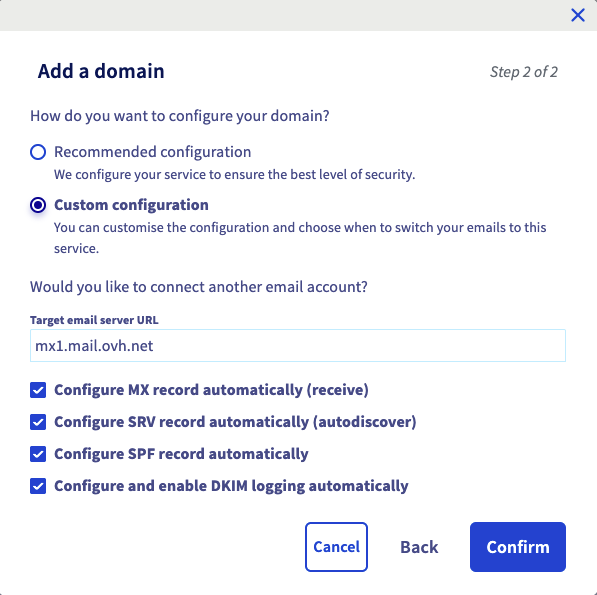
The window now displays information about configuring modes.
- **If you have selected an OVHcloud domain name** from the list: You can choose between two modes.
- **Recommended configuration**: Your DNS zone will be configured automatically, if you do not need a specific configuration in your DNS zone for MX, SPF, DKIM and SRV records.
- **Custom configuration**: This is appropriate if you have already configured an email solution on your domain name. You can choose the elements that interest you.
- If you would like to use a private email service or one external to OVHcloud in addition to this email service, enter the host name of the email server in the `URL of the target email server` box.
- _Configure MX record automatically_: adds the OVHcloud receiving servers (applies to all OVHcloud email solutions).
- _Configure the SPF record automatically_: creates the SPF record in order to authorize OVHcloud email sending servers to transmit your emails. This registration is valid for all OVHcloud email solutions.
- _Configure DKIM record automatically_: allows automatic entry of the records required to authenticate your email sending.
- _Configure SRV record automatically_: enables email software to automatically configure Exchange accounts on your domain name.
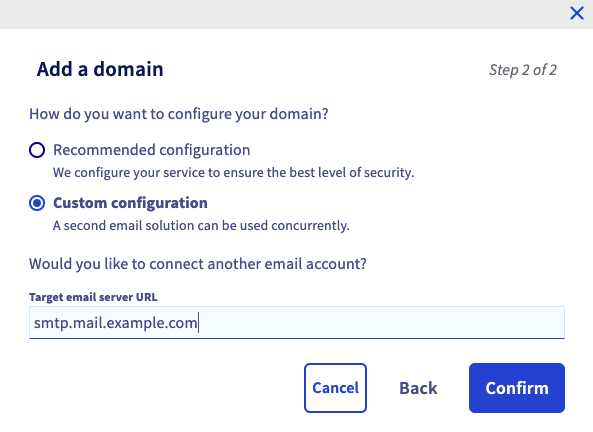
- **If you have entered a domain name that is not managed by your OVHcloud account**: This means that the domain name, and more specifically its DNS zone, is not managed from the OVHcloud Control Panel. It can also be registered at another registrar. It will then be necessary to proceed with the configuration directly in its management interface, whatever the following choice made.
- **Recommended configuration**: This is suitable if you only use OVHcloud email solutions.
- **Custom configuration**: If you would like to use a private email service or one external to OVHcloud in addition to this email service, enter the host name of the email server in the `URL of the target email server` box.
At the end of the configuration process, please check the information displayed, then click the `Confirm
` button to confirm the domain addition.
### Configure the domain name (DNS zone)
Once you have added the domain name as an associated domain, check that its configuration is correct using the table that appears. A green box indicates that the domain name is correctly configured.
If the box is red:
- **If you chose automatic configuration when you added your domain**: It may take a few moments for the display in the OVHcloud Control Panel to refresh.
- **If you have entered a domain name that is not managed by your OVHcloud account**:
- Click on the red box `MX`, `SRV`, `SPF` and `DKIM` to see the changes you need to make. If this domain name does not use the OVHcloud configuration (its DNS servers), you will need to carry out the modifications from your domain name’s management interface.
- In case of a red `CNAME` box, please refer to our guide explaining how to [create a CNAME record when adding an associated domain](/en/guides/web-cloud/email-and-collaborative-solutions/microsoft-exchange/exchange-dns-cname.md).

:::info
Modifying a domain name’s configuration can take between 4 and 24 hours to propagate fully.
:::
To check that a domain name is correctly configured, go to the `Associated domains
` table on your service. If the box is now green, the domain name is correctly configured. Otherwise, the propagation may not be complete yet.
### Modify the mode of an associated domain
You can change the mode of an associated domain on your service. First, it is necessary to understand the difference in operation between authoritative and non-authoritative modes.
:::info
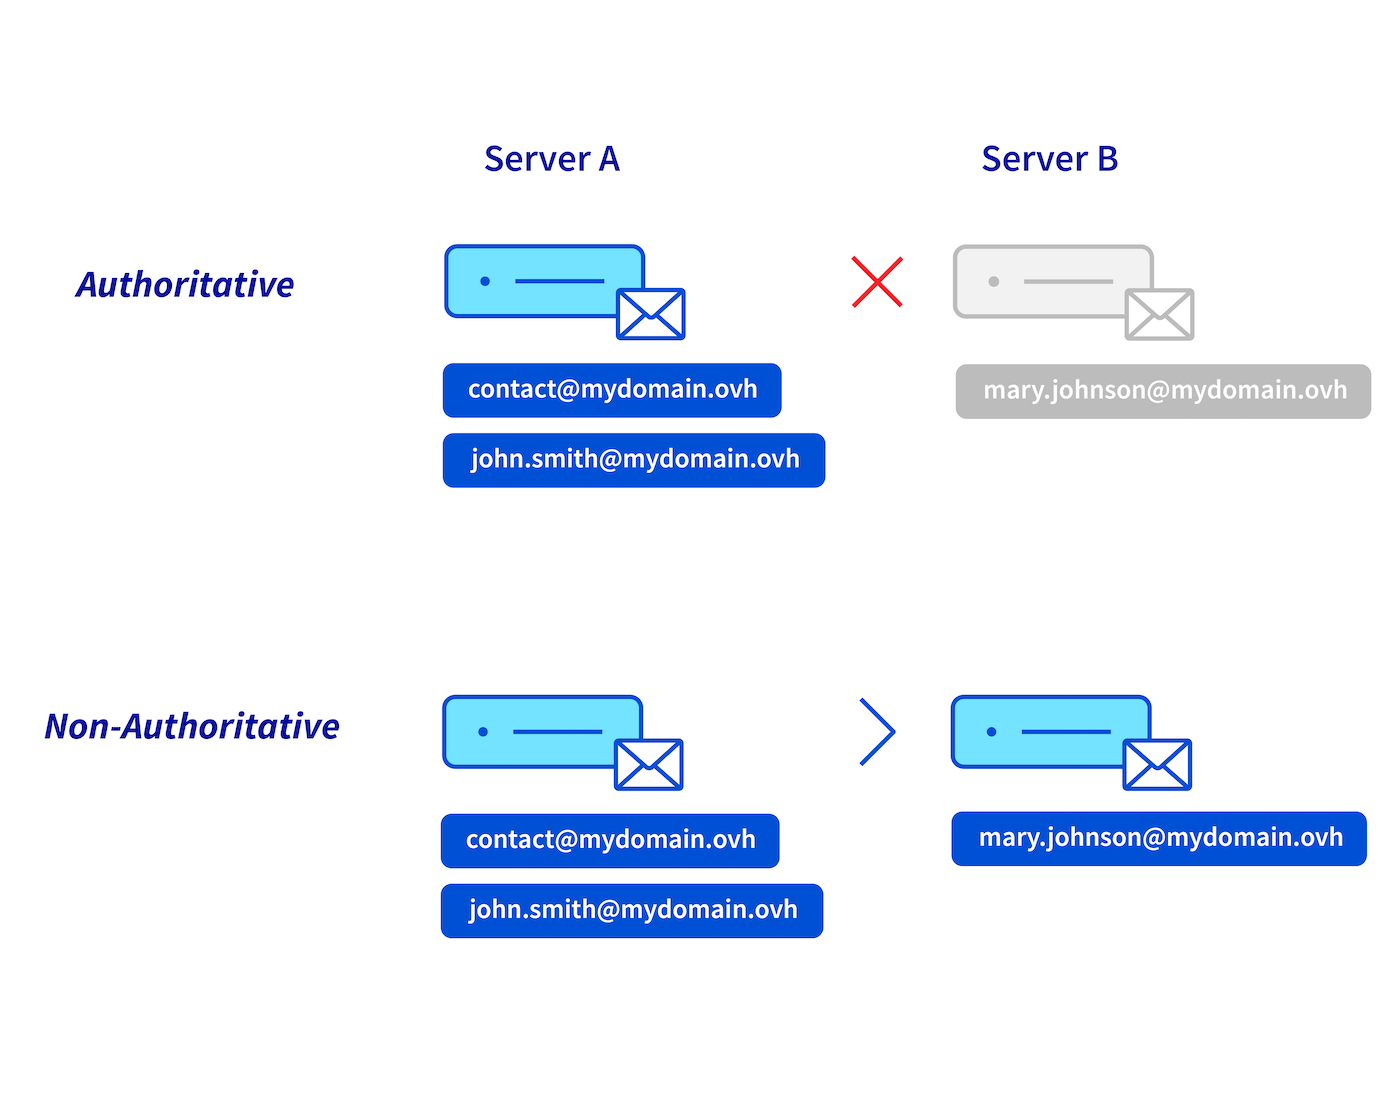
**Authoritative / non-authoritative**
- Choosing the **authoritative** mode on your email service (_Server A_) involves hosting all of your domain name’s email addresses on this service.
For example, if you send an email to the address _[mary.johnson@mydomain.ovh](mailto:mary.johnson@mydomain.ovh)_, the _Server A_ will return a failure message to the sender because this address does not exist on the _Server A_.
- The **non-authoritative** mode on your email service (_Server A_) allows distribution of your domain name’s email addresses between your primary email service (_Server A_) and another email service (_Server B_).
For example, if you send an email to the address _[mary.johnson@mydomain.ovh](mailto:mary.johnson@mydomain.ovh)_, _Server A_ will send the email to _Server B_ so that it can deliver it.
:::
1. Click on the Associated domains tab.
2. Click the ... button on the line for the domain name concerned.
3. Click Configuration.
4. Select the mode you want.
:::warning
If you get the message "**authoritative domain detected**" when adding your domain name to your email service, this means that this domain name is declared in **authoritative** mode on another email service. You will need to switch it to **non-authoritative** mode on both services in order for them to coexist.
:::
### Configure and use accounts
Now that you have added the domain names to your service, you can configure your email accounts. You can do this in the `Email accounts
` tab. If required, you can order additional accounts using the `Action
`/`Order accounts
` or `Add account
`.
As a reminder, all of the addresses created on your service will be able to view all of the addresses for that service in the directory, including those with a different domain name.
Once the accounts are fully configured, you can start using them. To do this, OVHcloud offers **webmail**, accessible [here](https://www.ovhcloud.com/en-gb/mail/). To optimize the use of your email accounts on a software application, ensure that it is compatible with the service.
If you would like to configure your email accounts on an email client or device such as a smartphone or tablet, or if you would like assistance with the features of your email service, please refer to our documentation, which is accessible from the [Exchange](https://www.ovhcloud.com/en-gb/emails-exchange/) and [Email Pro](https://www.ovhcloud.com/en-gb/emails/email-pro/) pages.
You can purchase Outlook licenses in the OVHcloud Control Panel
and Office 365 licenses on the [Microsoft 365](https://www.ovhcloud.com/en-gb/collaborative-tools/microsoft-365/)
page. We recommend using one of these solutions if you would like to use Outlook email software, or more software from the Office suite, depending on your needs.
### Delete a domain name from a service
If you would like to remove a domain name from your Exchange or Email Pro service, you will need to ensure that it is not linked to any email accounts, aliases, resources, shared accounts (only on Exchange), groups, external contacts or footers that are still configured. In this case, you will need to **attach these accounts to another domain name** on your service, or **delete them**.
:::warning
Before deleting email accounts, make sure they are not being used. You may need to back up these accounts. If necessary, please refer to our guide on [Migrating your email address manually](/en/guides/web-cloud/email-and-collaborative-solutions/migrating/manual-email-migration.md), which will describe how you can export account data via the OVHcloud Control Panel or email client.
:::
Go to the `Associated domains
` tab of your service. In the table, the `Accounts`
column shows the number of accounts associated with the domain names in your list.
If you have email accounts attached to the domain name you want to detach, you have two options:
**Attach accounts to another domain name**:
1. Go to the Email accounts tab.
2. To the right of the accounts you want to modify, click the ... button.
3. Click Modify.
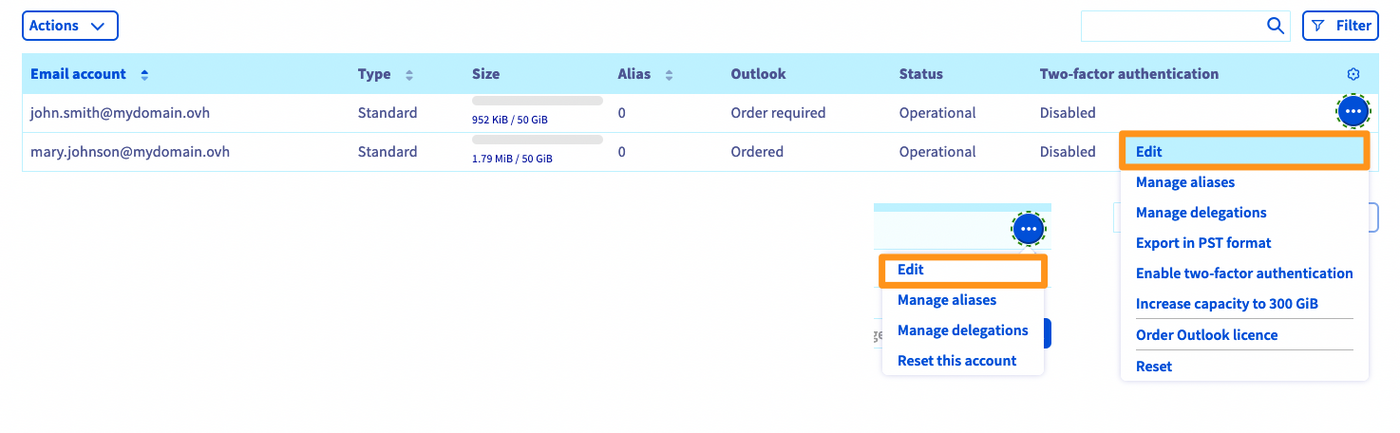
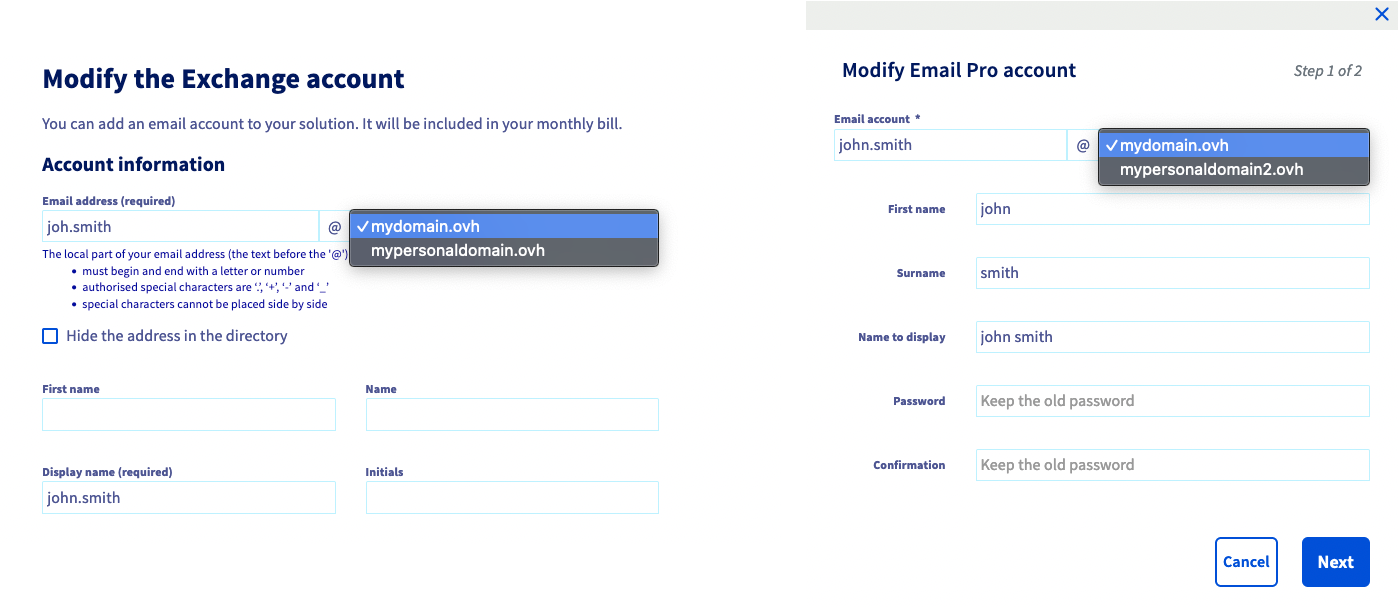
4\. From the Edit window, you can modify the domain name attached to the account via the dropdown menu.
**Delete accounts from your service**:
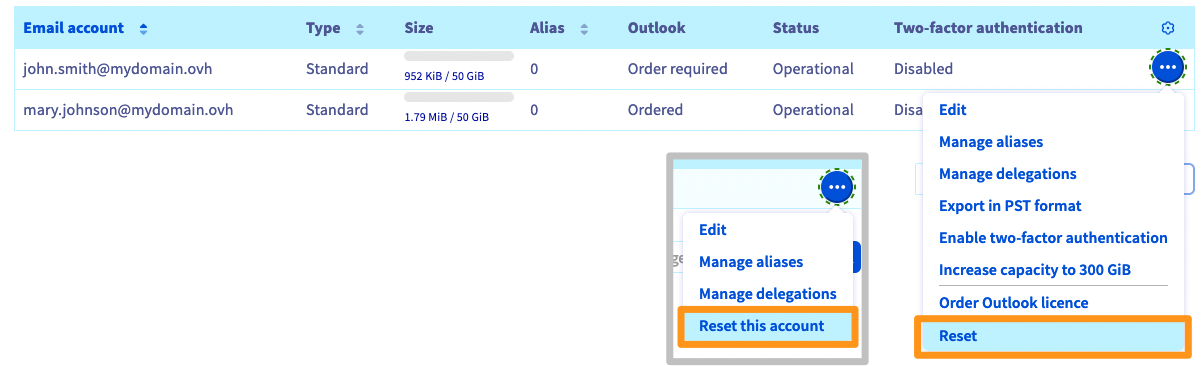
1. Go to the Email accounts tab.
2. To the right of the account you want to delete, click the ... button.
3. Click Reset this account or Reset.
Once the accounts have been reassigned to another domain name, or after their reset, the domain name can be deleted.
In the `Associated domains
` tab of your service, click the `...
` button to the right of the domain name concerned, then `Delete this domain
`.

## Go further
[Creating a CNAME record to add an associated domain](/en/guides/web-cloud/email-and-collaborative-solutions/microsoft-exchange/exchange-dns-cname.md)
[Editing an OVHcloud DNS zone](/en/guides/web-cloud/domains/dns-zone-edit.md)
For specialized services (SEO, development, etc.), contact [OVHcloud partners](https://partner.ovhcloud.com/en-gb/directory/).
If you would like assistance using and configuring your OVHcloud solutions, please refer to our [support offers](https://www.ovhcloud.com/en-gb/support-levels/).
Join our [community of users](https://community.ovhcloud.com/community/en).