---
title: "Redirecting a domain name managed by OVHcloud"
description: "Find out about the various redirection types, and how to create one for a domain name managed by OVHcloud"
url: https://docs.ovhcloud.com/en/guides/web-cloud/domains/redirect-domain-name
lang: en
lastUpdated: 2026-03-27
---
# Redirecting a domain name managed by OVHcloud
## Objective
Redirecting a domain name means redirecting it to a new target. Different types of redirections exist, each responding to a specific need.
**Find out about the different ways to redirect your domain name.**
## Requirements
- A [domain name](https://www.ovhcloud.com/en-gb/domains/)
- Access to your web hosting plan (for a redirection via a [.htaccess](#htaccess_rewrite) file).
***
### OVHcloud Control Panel Access
- **Direct link:** Domain names
- **Navigation path:** Web Cloud > Domain names > Select your domain name
***
## Instructions
### Understanding domain name redirection
This feature allows you to redirect a domain name/subdomain to:
- Another existing domain name/subdomain:
- **Example**: `domain.tld`
- A website URL (Uniform Resource Locator):
- **Examples**: `http://www.domain.tld/welcome/` or `https://www.domain.tld/welcome/` (if the target domain name has a compatible SSL certificate).
There are several ways of doing this:
- **From the OVHcloud Control Panel**, where a configuration wizard can be used to set up your redirection.
- **Via a method that requires programming**. You will need to create the redirection yourself in a file (usually a [.htaccess](#htaccess_rewrite)).
:::warning
Setting up a redirection can affect your website's SEO ranking.
Be careful about the changes you make, or contact a [specialist provider](https://partner.ovhcloud.com/en-gb/directory/) for SEO if necessary.
Please note: a redirection created from the OVHcloud Control Panel
does not allow you to redirect a `https://`
URL to another domain name or URL.
To create this type of redirection, you must use [a URL rewrite](/en/guides/web-cloud/web-hosting/htaccess-url-rewriting-using-mod-rewrite.md)
, for example via a ".htaccess" file.
:::
### Redirecting a domain name from the Control Panel
Apart from "pointing" redirections to DNS A, AAAA and CNAME records, 3 redirection options are available from the OVHcloud Control Panel
.
If needed, refer to our documentation on [DNS records](/en/guides/web-cloud/domains/dns-zone-records.md).
:::warning
To use one of the 3 options below, the active DNS zone for your domain name must be managed in your OVHcloud Control Panel. These redirection options will modify your DNS zone configuration in order to work.
Otherwise, the redirections will not work.
:::
:::info
Whichever redirection option you choose, the change requires a propagation time of 4 to 24 hours maximum before it is fully effective.
:::
**Click on the options below to view the content.**
Option 1 - Permanent visible redirection to a web address
This option allows you, after entering the redirected domain name, to display the target domain name in your browser's address bar instead of the redirected domain name.
- **Example**: if you redirect `domain1.tld` to `domain2.tld`, `domain2.tld` will be displayed in the address bar of your browser.
> This "standard" redirection will return an HTTP 301 code.
Click on the tabs below to view each of the **7** steps.
**Step 1**
Go to the Domain names page, then choose the domain name concerned.
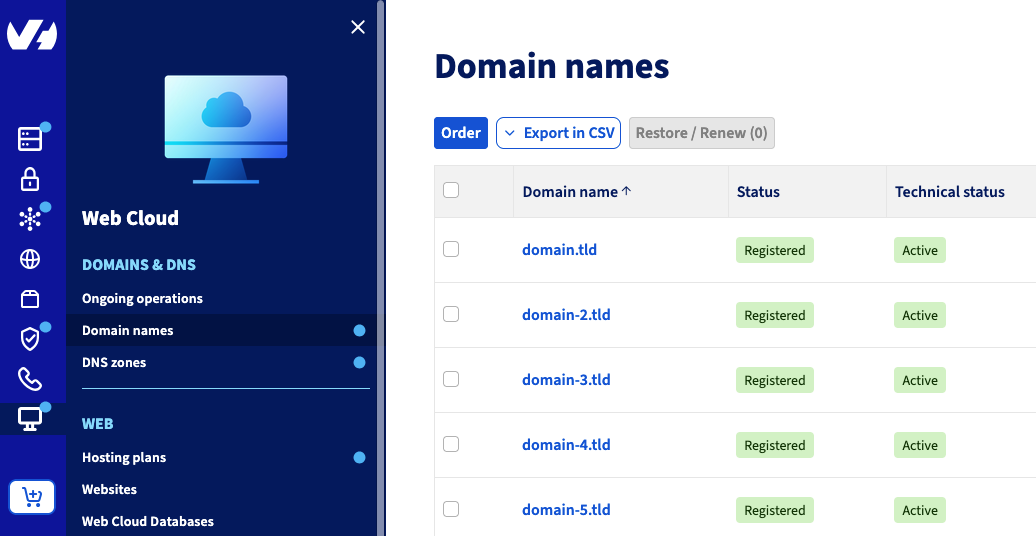
**Step 2**
Click on the Redirection tab: the table displays the active redirections for your domain name. Then click Add a redirection.

**Step 3**
In the window, your domain name to redirect already appears. Fill in the form **only** if you wish to redirect a _subdomain_.
The Also redirect box can be ticked to also redirect the `www` subdomain to the same target you choose for your domain name/subdomain.
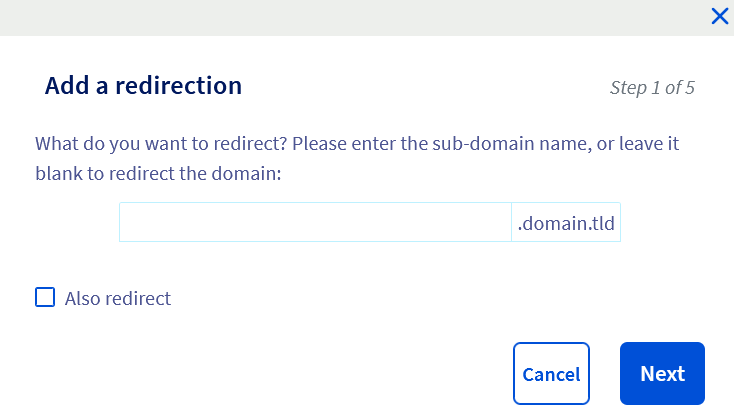Click Next.
**Step 4**
Select To a web address.
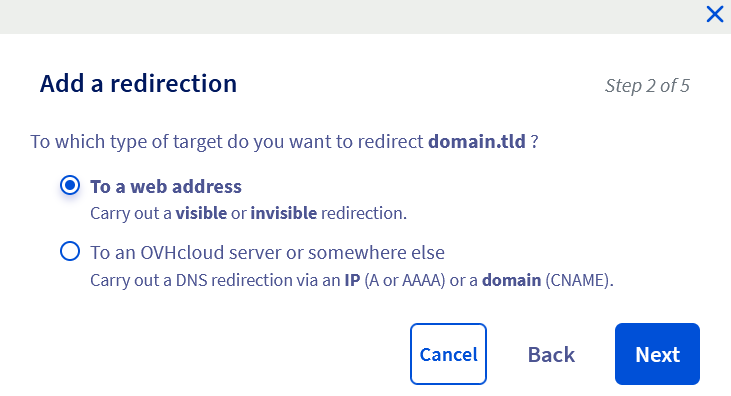Click Next.
**Step 5**
Select With a visible redirection from the two choices shown.
Click Next.
**Step 6**
Select Permanent (301) from the two choices shown, then enter the target domain name or URL for your redirection in the Web address form that appears.
Click Next.
**Step 7**
In this last step, make sure the information displayed is correct.
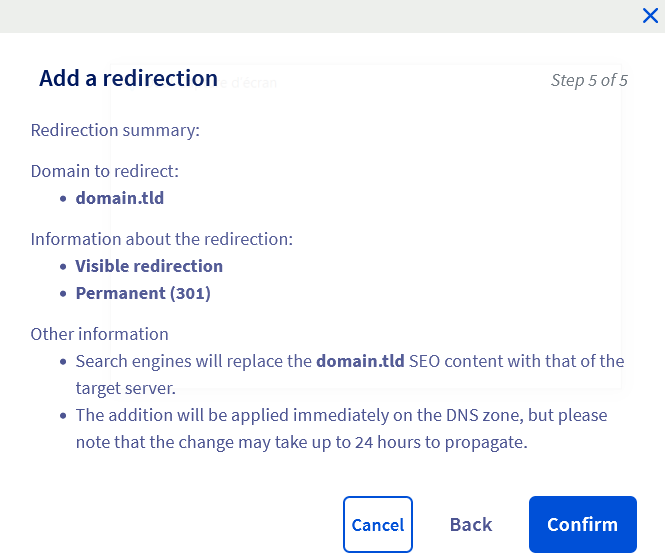Click Confirm to confirm your configuration.
:::info
If the message "_There are redirections from the domain names you wish to redirect that conflict with the redirections you wish to add_" appears, you can tick the Confirm the overwriting of the existing redirection box to force your redirection to be applied.
Please note, the old configuration will be disabled and deleted.
:::
Option 2 - Temporary visible redirection to a web address
As with option 1, this option displays the target domain name in your browser's address bar instead of the redirected domain name after you enter the redirected domain name.
However, this option should be used on a one-off basis, for example for temporary events.
Positioning on search engines is less efficient than with a **permanent visible** redirection of type 301 (HTTP code).
- **Example**: if you redirect `domain1.tld` to `domain2.tld`, `domain2.tld` will be displayed in the address bar of your browser.
> This redirection will return an HTTP 302 code.
Click on the tabs below to view each of the **7** steps.
**Step 1**
Go to the Domain names page, then choose the domain name concerned.

**Step 2**
Click on the Redirection tab: the table displays the active redirections for your domain name. Then click Add a redirection.

**Step 3**
In the window, your domain name to redirect already appears. Fill in the form **only** if you wish to redirect a _subdomain_.
The Also redirect box can be ticked to also redirect the `www` subdomain to the same target you choose for your domain name/subdomain.
Click Next.
**Step 4**
Select To a web address.
Click Next.
**Step 5**
Select With a visible redirection from the two choices shown.
Click Next.
**Step 6**
Select Temporary (302) from the two choices shown, then enter the target domain name or URL for your redirection in the Web address form that appears.
Click Next.
**Step 7**
In this last step, make sure the information displayed is correct.
Click Confirm to confirm your configuration.
:::info
If the message "_There are redirections from the domain names you wish to redirect that conflict with the redirections you wish to add_" appears, you can tick the Confirm the overwriting of the existing redirection box to force your redirection to be applied.
Please note, the old configuration will be disabled and deleted.
:::
Option 3 - Invisible redirection to a web address
This redirection allows you, after entering the redirected domain name, to keep it displayed in your browser's address bar instead of replacing it with the target domain name.
**Warning, this action is not compatible with all websites and affects your website's SEO.**
- **Example**: if you redirect `domain1.tld` to `domain2.tld`, `domain1.tld` will be displayed in the address bar of your browser.
Invisible redirection works with an _iFrame_ HTML tag. This allows your redirected domain name to integrate the content of the other page corresponding to the target domain name into its own HTML page.
This encapsulation prevents your website visitors from viewing the target domain name.
> This option will return an HTTP 200 code.
:::warning
Please note, pages embedded with an _iFrame_ tag may not be readable on smartphones. Their content is generally not taken into account by search engines for your website's SEO and indexing.
:::
Click on the tabs below to view each of the **7** steps.
**Step 1**
Go to the Domain names page, then choose the domain name concerned.

**Step 2**
Click on the Redirection tab: the table displays the active redirections for your domain name. Then click Add a redirection.

**Step 3**
In the window, your domain name to redirect already appears. Fill in the form **only** if you wish to redirect a _subdomain_.
The Also redirect box can be ticked to also redirect the `www` subdomain to the same target you choose for your domain name/subdomain.
Click Next.
**Step 4**
Select To a web address.
Click Next.
**Step 5**
Select With an invisible redirection from the two choices shown.
Click Next.
**Step 6**
Select Temporary (iframe) from the two choices shown, then enter the target domain name or URL for your redirection in the Web address form that appears.
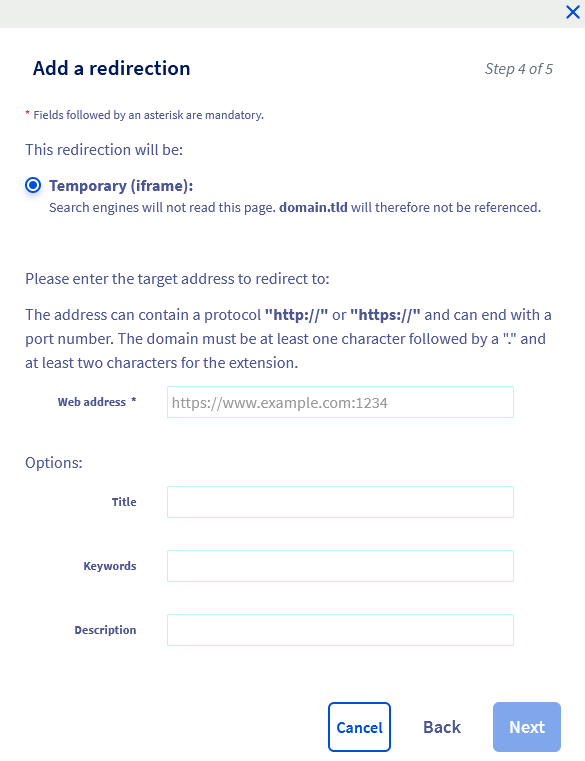Three optional settings are available at this step:
- **Title**: the title of your website. It will appear as a page title in the browser tab.
- **Keywords**: they can be used by search engines to partially index the page.
- **Description**: a description of your website. It will be used by search engines in their results.
Click Next.
**Step 7**
In this last step, make sure the information displayed is correct.
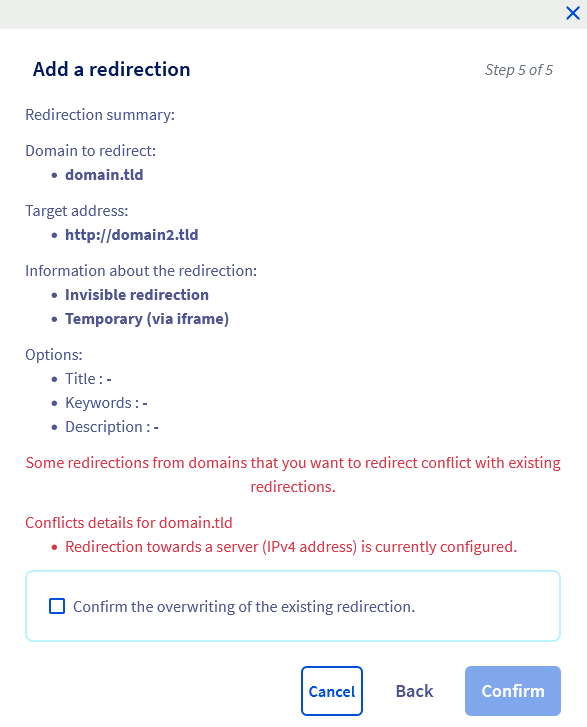Click Confirm to confirm your configuration.
:::info
If the message "_There are redirections from the domain names you wish to redirect that conflict with the redirections you wish to add_" appears, you can tick the Confirm the overwriting of the existing redirection box to force your redirection to be applied.
Please note, the old configuration will be disabled and deleted.
:::
### Redirecting a domain name via a ".htaccess" file
:::warning
OVHcloud provides services that you are responsible for with regard to their configuration and management. It is therefore your responsibility to ensure that they function properly.
This guide is designed to help you with common tasks. Nevertheless, we recommend contacting a [specialist provider](https://partner.ovhcloud.com/en-gb/directory/) if you experience any difficulties. We will not be able to assist you with the steps documented below. You can find more information in the [Go further](#go-further) section of this guide.
:::
".htaccess" files are configuration files in which commands can be specified. When the web server (Apache) runs your website's code, the commands are interpreted and executed.
You can use such commands to create redirections.
Editing a ".htaccess" file can make your website inaccessible. If in doubt, contact a [specialist provider](https://partner.ovhcloud.com/en-gb/directory/).
You can find all of our documentation on ".htaccess" in the [Go further](#go-further) section of this guide.
:::tip
We recommend that you **back up your .htaccess file** before making any changes. This way, you can restore the previous version of the file if you make a mistake.
:::
Below are 4 variables for creating redirections via the ".htaccess" file.
#### Variable 1 - "Redirect permanent"
This variable allows you to redirect a website as a whole, or only part of a website, to another website or another part of a website. Visitors are automatically redirected to the correct address/URL when they try to access your website via the historical address/URL.
**Code to place in the ".htaccess"**
To redirect an entire website:
```bash
Redirect permanent / http://domainTarget.tld/
```
To redirect one directory to another:
```bash
Redirect permanent /old_folder http://domain.tld/new_folder
```
To redirect a file to another:
```bash
Redirect permanent /old_file.php http://domain.tld/new_file.php
```
**HTTP code**
The script will return an HTTP 301 code. This will notify search engine bots to update their links to the new address/URL.
#### Variable 2 - "Redirect gone"
This variable is useful for deleted files. It replaces the _404 document not found_ message with a more explicit message such as _410 document no longer exists_. Your website visitor is informed that the file they are trying to access no longer exists.
**Code to place in the ".htaccess"**
```bash
Redirect gone /fileDeleted.html
```
**HTTP code**
The script will return an HTTP 410 code.
#### Variable 3 - "Redirect seeother"
If you change the extension of a file, the _seeother_ variable allows you to change the file type. The visitor who tries to access the old file will be automatically redirected to the one with the correct extension.
**Code to place in the ".htaccess"**
```bash
Redirect seeother /example.doc http://domain.tld/example.pdf
```
**HTTP code**
The script will return an HTTP 303 code.
#### Variable 4 - "Redirect Temp"
This variable can be used when you temporarily move files to another website. Visitors who try to access your website via the historical address/URL are automatically redirected to the new temporary address/URL.
**Code to place in the ".htaccess"**
```bash
Redirect temp / http://OtherWebsite.tld/site/
```
**HTTP code**
The script will return an HTTP 302 code.
## Go further [](#)
[Blocking access to my website for certain IP addresses via a ".htaccess" file](/en/guides/web-cloud/web-hosting/htaccess-how-to-block-a-specific-ip-address-from-accessing-your-website.md).
[Protecting your website's administration interface with a ".htaccess" file](/en/guides/web-cloud/web-hosting/htaccess-protect-directory-by-password.md).
[Rewriting URLs using mod\_rewrite](/en/guides/web-cloud/web-hosting/htaccess-url-rewriting-using-mod-rewrite.md).
[Performing other operations with ".htaccess" files](/en/guides/web-cloud/web-hosting/htaccess-what-else-can-you-do.md).
[How do I edit my DNS zone?](/en/guides/web-cloud/domains/dns-zone-records.md)
For specialised services (SEO, development, etc.), contact [OVHcloud partners](https://partner.ovhcloud.com/en-gb/directory/).
If you would like assistance using and configuring your OVHcloud solutions, please refer to our [support offers](https://www.ovhcloud.com/en-gb/support-levels/).
Join our [community of users](https://community.ovhcloud.com/).