---
title: "How to improve email security with a DKIM record"
description: "Find out how to configure a DKIM record on your OVHcloud domain name and email service"
url: https://docs.ovhcloud.com/en/guides/web-cloud/domains/dns-zone-dkim
lang: en
lastUpdated: 2026-06-08
---
# How to improve email security with a DKIM record
## Objective
The DKIM (**D**omain**K**eys **I**dentified **M**ail) record allows you to sign emails to prevent identity fraud. This signature works on the principle of hashing combined with asymmetric cryptography.
**This guide explains how DKIM works, and how to set it up for your email service.**
## Requirements
- You have signed up to one of these email offers:
- OVHcloud MX Plan Email, available with a [web hosting plan](https://www.ovhcloud.com/en-gb/web-hosting/), a [free hosting plan](https://www.ovhcloud.com/en-gb/domains/free-web-hosting/), or a separate MX Plan solution
- OVHcloud MX Plan Email, available with a [web hosting plan](https://www.ovhcloud.com/en-gb/web-hosting/) or a separate MX Plan solution
- [Exchange](https://www.ovhcloud.com/en-gb/emails/hosted-exchange/) or [Private Exchange](https://www.ovhcloud.com/en-gb/emails/hosted-exchange/)
- [Email Pro](https://www.ovhcloud.com/en-gb/emails/email-pro/)
- [Zimbra](https://www.ovhcloud.com/en-gb/emails/zimbra-emails/).
- An email solution outside of OVHcloud with DKIM support
***
### OVHcloud Control Panel Access
- **Direct link:** DNS zones
- **To access your services:** Web Cloud > DNS zones > Select your domain name
***
:::warning
If your domain name does not use OVHcloud DNS servers, you will need to modify the DKIM records in the interface of the service provider that manages your domain name configuration.
If your domain name is registered with OVHcloud, you can check if it is using the OVHcloud configuration in your Control Panel
. To do this, go to the `DNS zones
` tab, and select the domain concerned.
:::
## Instructions
**Overview**
- [How does DKIM work?](#how-dkim-work)
- [Hashing](#hash)
- [Asymmetric encryption](#encrypt)
- [How are hashing and asymmetric encryption used for DKIM?](#encrypt-and-hash)
- [Why do we need to configure DNS servers?](#dns-and-dkim)
- [Example of an email sent using DKIM](#example)
- [What is a DKIM selector?](#selector)
- [Automatically configure DKIM for an OVHcloud email offer](#auto-dkim)
- [Configure DKIM via API for an OVHcloud email offer](#internal-dkim)
- [API - Full DKIM configuration](#firststep)
- [For MX Plan and Zimbra](#confemail)
* [For Exchange](#confex)
- [For Email Pro](#confemp)
- [API - The different states of DKIM](#dkim-status)
- [API - Activate or change a DKIM selector](#enable-switch)
- [API - Disable and delete DKIM](#disable-switch)
- [Configuring DKIM for an email solution outside of your OVHcloud account](#external-dkim)
- [DKIM record](#dkim-record)
- [TXT record](#txt-record)
- [CNAME record](#cname-record)
- [Test your DKIM](#test-dkim)
- [Use cases](#usecases)
- [How do I change my DKIM key pair?](#2selectors)
- [Why does the DKIM icon appear in red in the Control Panel?](#reddkim)
- [From the OVHcloud API interface, how do I understand the state of the DKIM that is not working?](#api-error)
### How does DKIM work? [](#)
To understand why DKIM helps secure your email exchanges, it is necessary to understand how it works. DKIM uses **hashing** and **asymmetric encryption** to create a secure signature. The **email platform** and the **DNS zone** of your domain name will help transmit the DKIM information to your recipients.
Hashing
[](#)
The principle of a **hash function** is to generate a **signature** (also called a fingerprint) from input data. Its purpose is to create a fixed sequence of characters at the output, regardless of the amount of input data.
On the following diagram, you can see that the output will always be 32 characters using a MD5 (**M**essage **D**igest **5**) hash algorithm, while the input text may vary in size. The slightest character variation in input data completely changes the output hash, making the output signature unpredictable and tamper-proof. In the example below, the input value is passed into the MD5 hash algorithm and the output is its hash value.
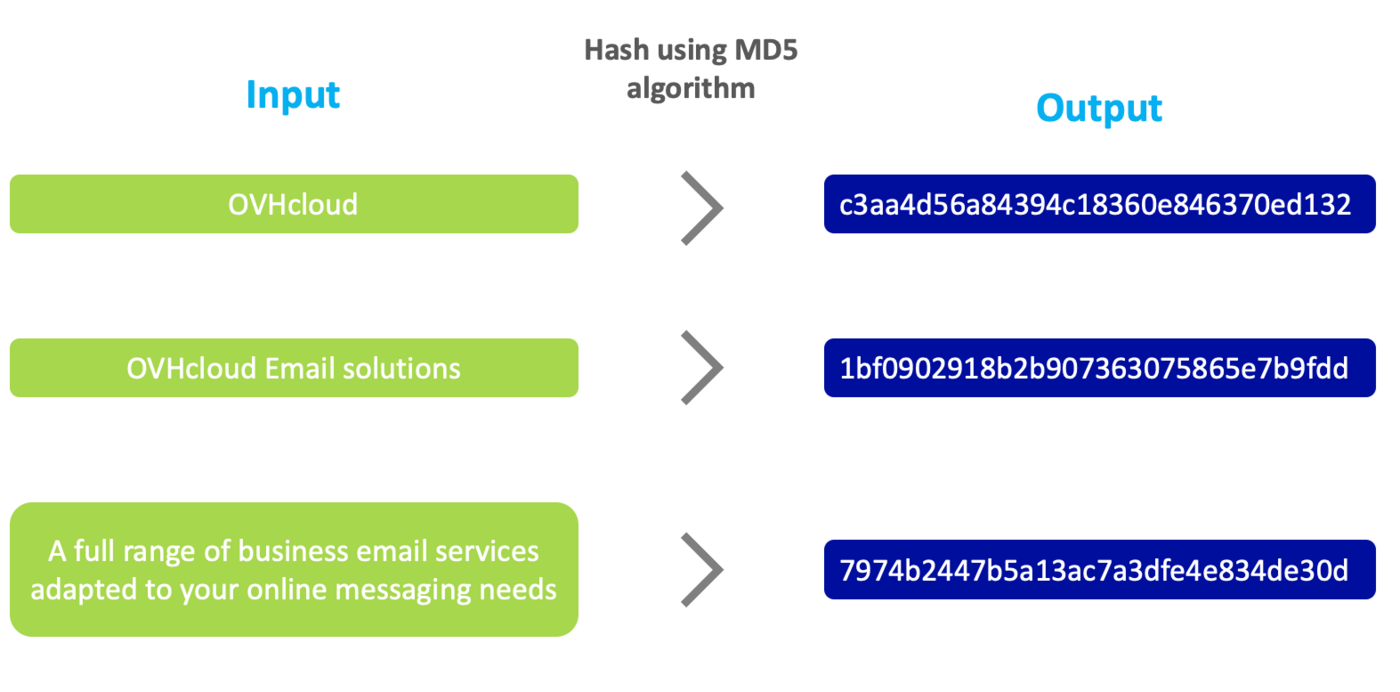The hash function is useful when you want to check the integrity of a message. Different but similar looking input data will produce a completely different hash value with an equal length of characters in output, regardless of the input length.
Asymmetric encryption
[](#)
The purpose of **encryption**, as its name suggests, is to encrypt the data it is given. It is **asymmetric** because the encryption key is not the same as the decryption, unlike symmetric encryption, which uses the same key to encrypt and decrypt.
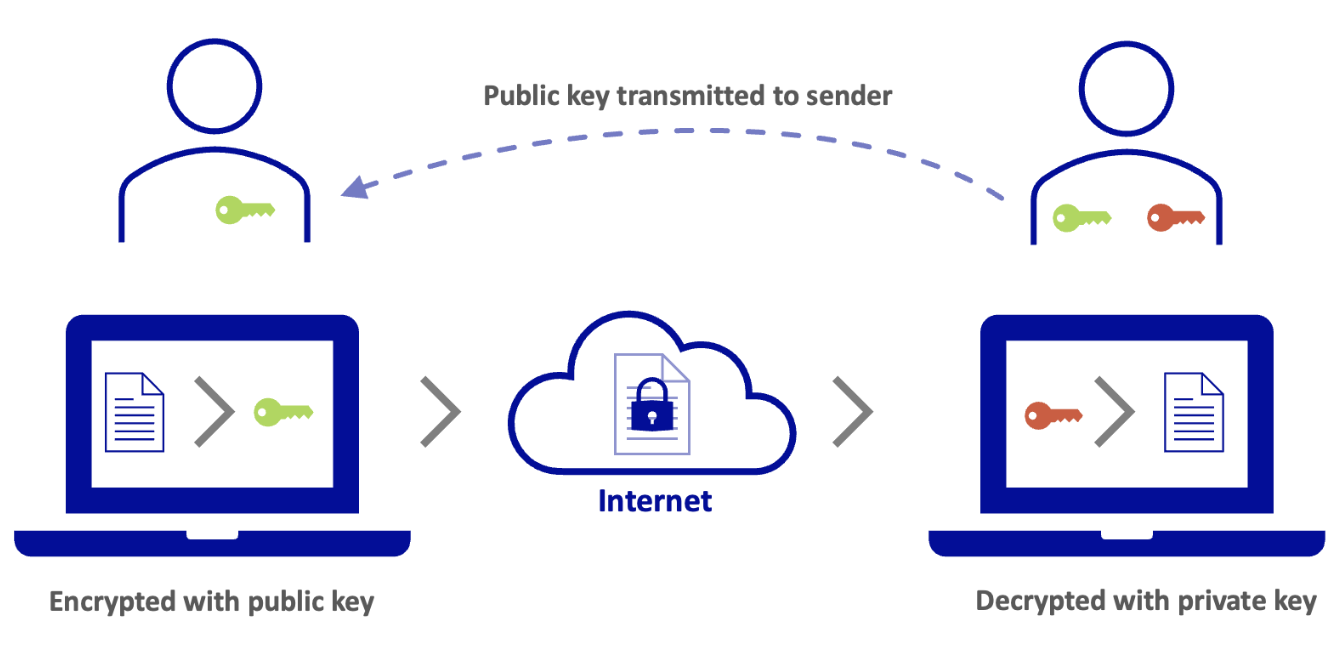
Asymmetric encryption uses a **public key** and a **private key**. The public key is visible and usable by everyone. The private key is only used by the holder and is not visible to all.
There are two uses for asymmetric encryption:
- **The input data is encrypted with the public key and decrypted by the holder of the private key**. For example, you want a third party to send you data securely. You transmit your public key without worrying about someone getting it. This third party will encrypt their data with your public key. Encrypted data can only be decrypted by the private key holder.
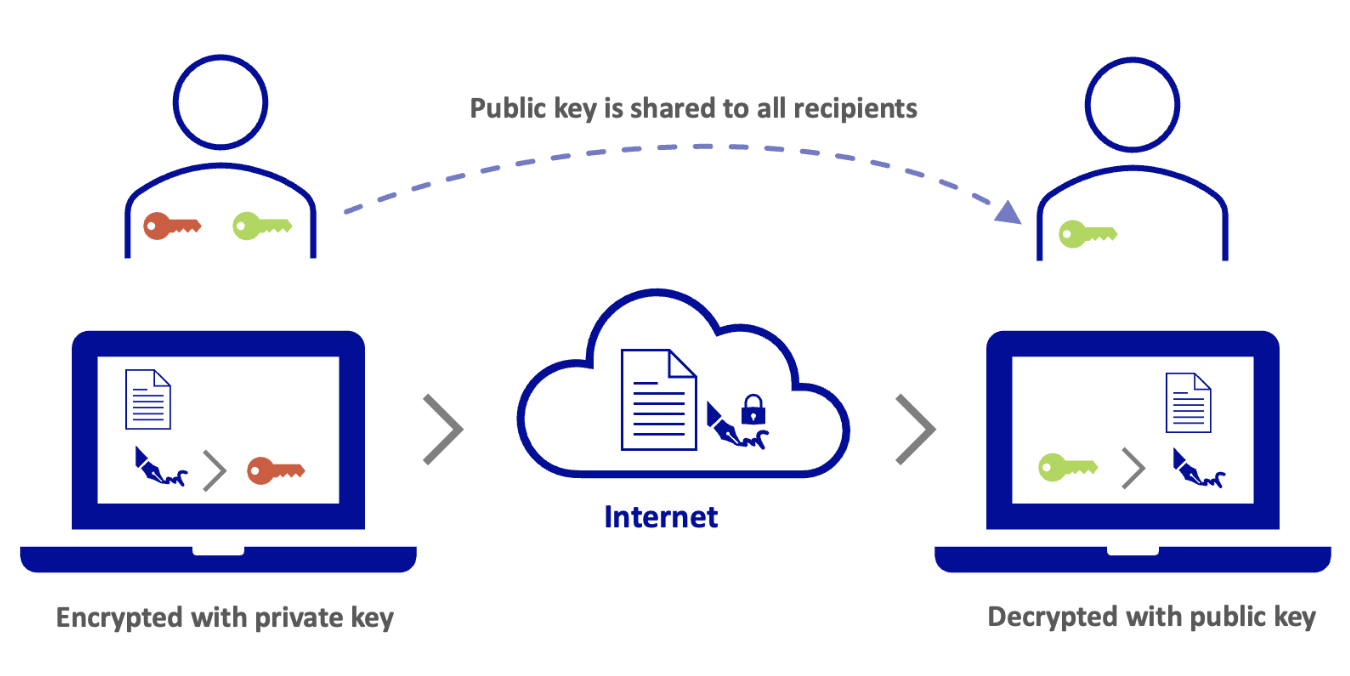
- **The input data is encrypted by the private key holder and decrypted by the public key**. This use applies to authenticate a data exchange. For example, your recipients want to ensure that you are the author of the message you send them. In this case, you will encrypt your message with your private key. This message can only be decrypted by the public key that you have transmitted to everyone, which guarantees your recipients the authenticity of your message. A message decrypted by the public key can only come from the holder of the private key.
How are hashing and asymmetric encryption used for DKIM?
[](#)
From the email platform, DKIM will use hashing to create a signature from certain elements of [the email header](/en/guides/web-cloud/email-and-collaborative-solutions/troubleshooting/diagnostic-headers.md) and email body (email content).
The signature is then encrypted with the private key using asymmetric encryption.
Why do we need to configure DNS servers?
[](#)
In order for a recipient to verify the sender's DKIM signature, they will need the DKIM parameters and especially the public key to decrypt it. A domain name’s [DNS zone](/en/guides/web-cloud/domains/dns-zone-general-information.md) is public, which is why a DNS record is added to transmit the public key and DKIM settings to the recipient.
What is a DKIM selector?
[](#)
When you enable DKIM, it works with a public/private key pair. You can assign several pairs of keys to your domain name, for example, as part of a rotation. Indeed, when you change the key pair, the old pair must remain active until all emails you sent with the old key fail to pass the DKIM check on the incoming server.
For this rotation principle to work, we're going to use something called **DKIM selectors**. A DKIM selector includes a private/public key pair. It is visible as a character string in the DKIM signature of an email after the argument `s=`. This signature is visible in [the email header](/en/guides/web-cloud/email-and-collaborative-solutions/troubleshooting/diagnostic-headers.md).
**Example of a DKIM signature part**
```
DKIM-Signature: v=1; a=rsa-sha256; d=mydomain.ovh; s=ovhex123456-selector1; c=relaxed/relaxed; t=1681877341;
```
The value of this selector is `s=ovhex123456-selector1`.
Example of an email sent using DKIM
[](#)
When you send an email from **[contact@mydomain.ovh](mailto:contact@mydomain.ovh)**, a signature encrypted with a private key is added to the email header.
The recipient **[recipient@otherdomain.ovh](mailto:recipient@otherdomain.ovh)** can decrypt this signature with the public key visible in the DNS zone of **mydomain.ovh**. The signature is created from the content of the email sent. This means that if the email is modified during transit, the signature will not match with the content and this will cause the DKIM check on the destination server to fail.
### Automatically configure DKIM for an OVHcloud email offer [](#)
Automatic DKIM configuration is available for all our email offers:
- MX Plan included with a [Web Hosting](https://www.ovhcloud.com/en-gb/web-hosting/), a [free hosting](https://www.ovhcloud.com/en-gb/domains/free-web-hosting/) or ordered separately
- [Exchange](https://www.ovhcloud.com/en-gb/emails-exchange/)
- [E-mail Pro](https://www.ovhcloud.com/en-gb/emails/email-pro/)
- [Zimbra](https://www.ovhcloud.com/en-gb/emails/zimbra-emails/)
When you configure your domain name on an OVHcloud email solution, automatic DKIM configuration is proposed and performed by default if you do not disable it.
If DKIM was not enabled when you added a domain name to your email platform, you will need to launch the automatic configuration process via the Control Panel.
Click on the tab below corresponding to your offer.
**MX Plan**
1. Log in to your OVHcloud Control Panel.
2. Open the Web Cloud section.
3. Click MX Plan.
4. Select the domain concerned.
5. Finally, go to the General information tab.
In the **General informations** box, `DKIM` is displayed in red in the column **Diagnostic**.
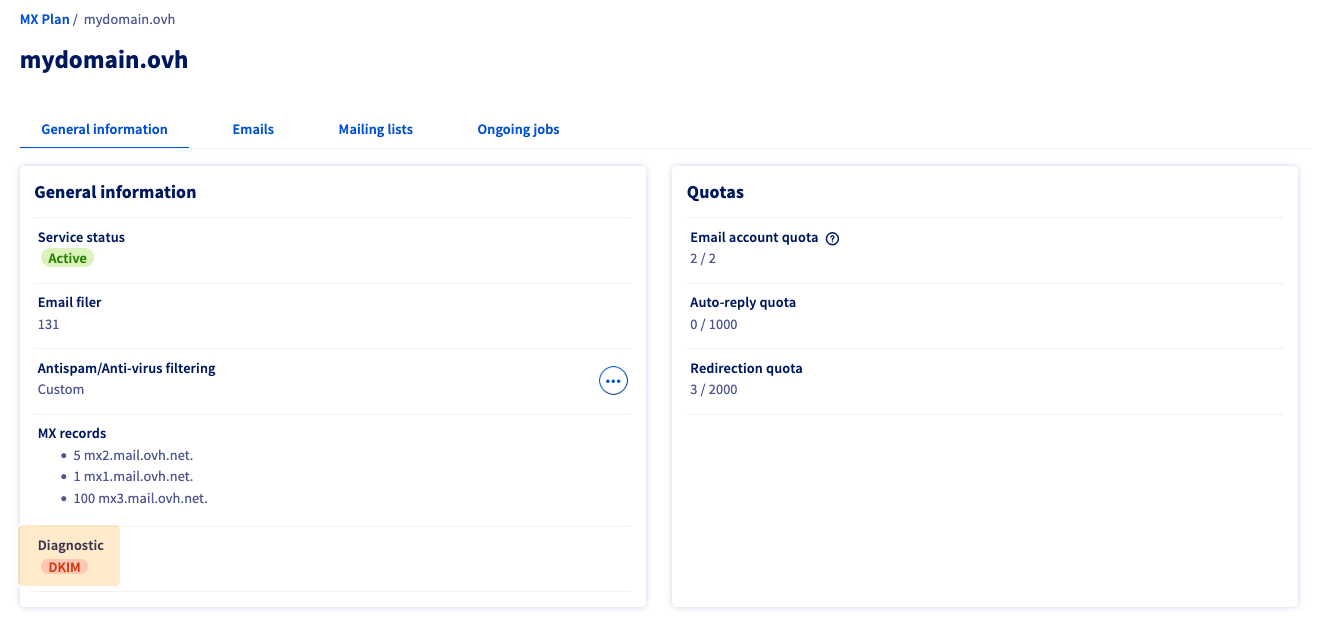To enable DKIM, simply click on the red `DKIM` badge and then click on Validate from the activation window that appears.
If your domain name is not managed in the same OVHcloud Control Panel as your email platform or is registered outside OVHcloud, you will see the window below:
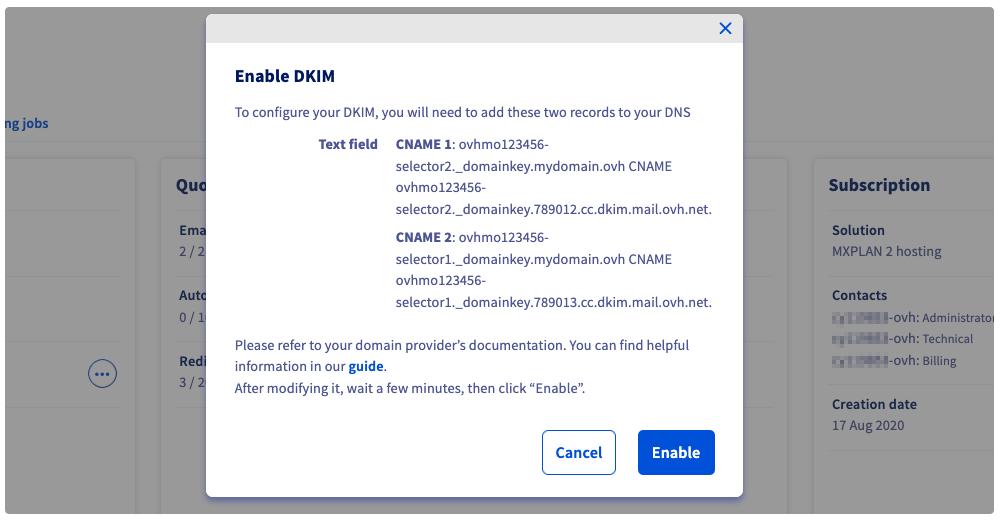This window asks you to enter two CNAME values in the DNS zone of the domain name, which links this domain name to the DKIM selectors of your email service. You need to enter these values and ensure they are propagated before clicking on Enable.
**Exchange**
1. Log in to your OVHcloud Control Panel.
2. Open the Web Cloud section.
3. In the `MICROSOFT` section, click Exchange.
4. Select the service concerned.
5. Finally, go to the Associated domains tab.
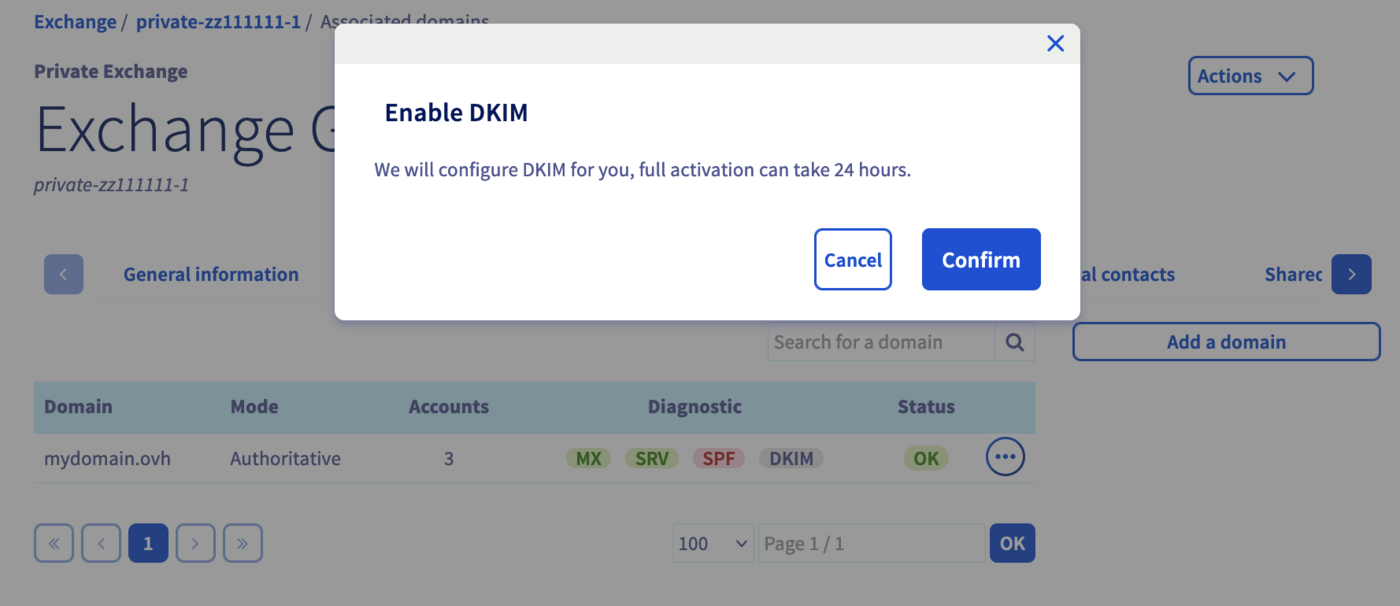
To the right of the domain name concerned, `DKIM` is displayed in red.
To enable DKIM, simply click on the red `DKIM` badge and then click on Validate from the activation window that appears.

**E-mail Pro**
1. Log in to your OVHcloud Control Panel.
2. Open the Web Cloud section.
3. Click Email Pro.
4. Select the service concerned.
5. Finally, go to the Associated domains tab.
To the right of the relevant domain name, you can see that the `DKIM` badge is red.
To enable DKIM, simply click on the red `DKIM` badge and then click on Validate from the activation window that appears.

**Zimbra**
1. Log in to your OVHcloud Control Panel.
2. Open the Web Cloud section.
3. Click Zimbra Mail.
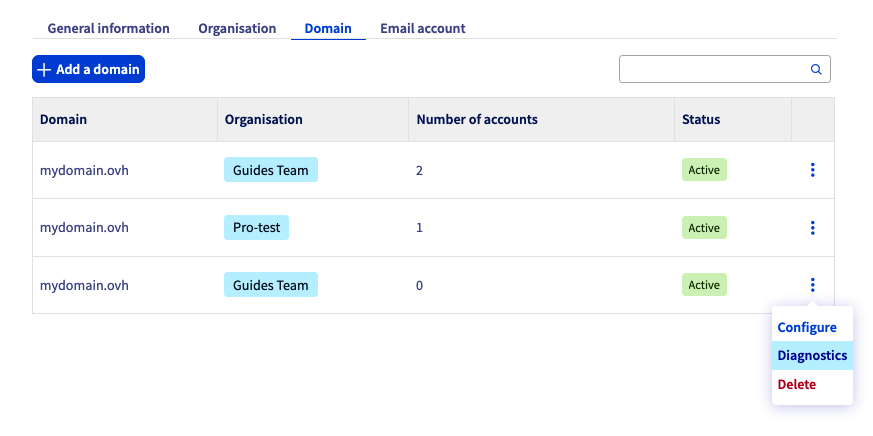
4. Finally, go to the Domain tab.
5. To the right of the relevant domain, click ⁝, then Diagnostics.
To the right of the `DKIM` label on the corresponding tab, you should see a warning indicating that DKIM is not working. Click on the DKIM tab to access the DKIM configuration status. To fix the error, you need to add or modify two DNS entries of type CNAME in the DNS zone of the associated domain name, according to the information visible from this tab.
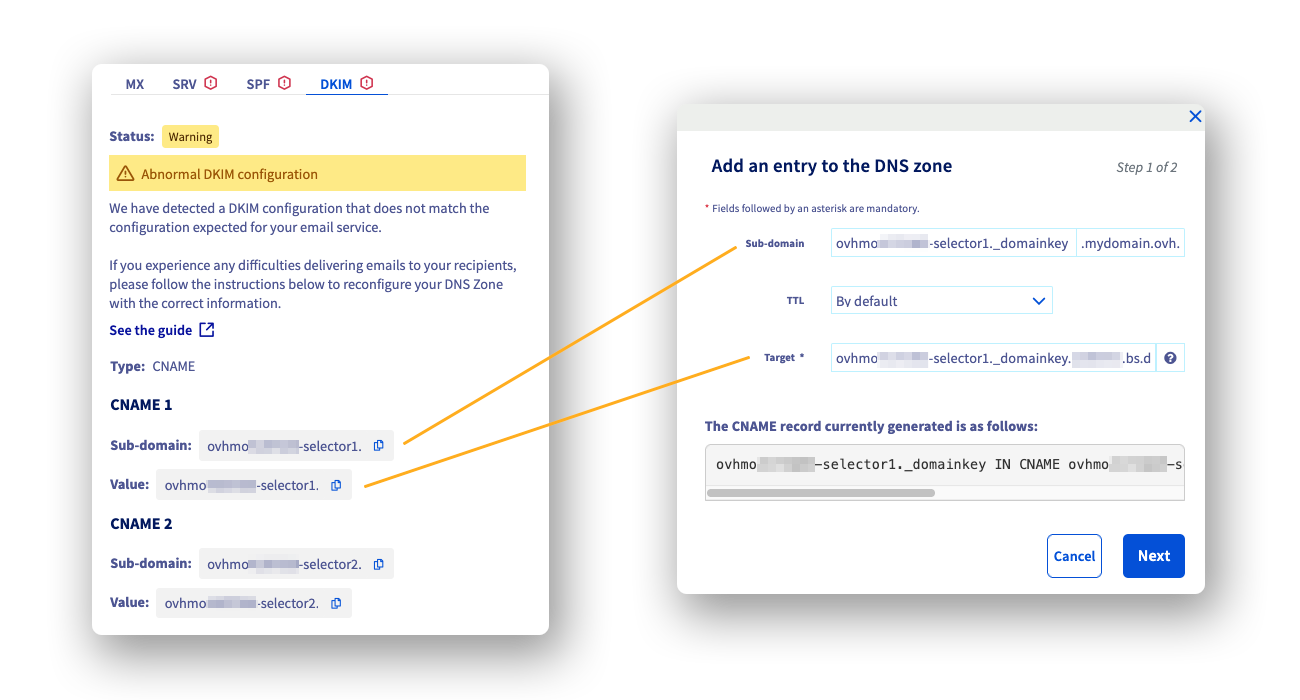:::info
**Tip for creating a CNAME record**
From the OVHcloud Control Panel where the domain name of your email service is hosted, in the Web Cloud section, click Domain names in the left-hand column and select the relevant domain name.
Select the DNS zone tab, then click Add an entry in the window that appears. Choose `CNAME` and complete the fields according to the values you have noted.
:::
Automatic DKIM activation takes between 30 minutes and a maximum of 24 hours. To check that your DKIM is working, simply return to the domain management section mentioned in the tabs above and check that the `DKIM` badge is green, or for a Zimbra offer, that the `DKIM` tab no longer displays the warning icon.

If after 24 hours your `DKIM` badge is still red, refer to the section "[Why is DKIM not working and appears red in the Control Panel?](#reddkim)" of this guide.
### Configure DKIM via API for an OVHcloud email offer
To configure Exchange or Email Pro DKIM, you will first need to retrieve the internal reference of your Exchange or Email Pro service.
Click on the tab below corresponding to your solution.
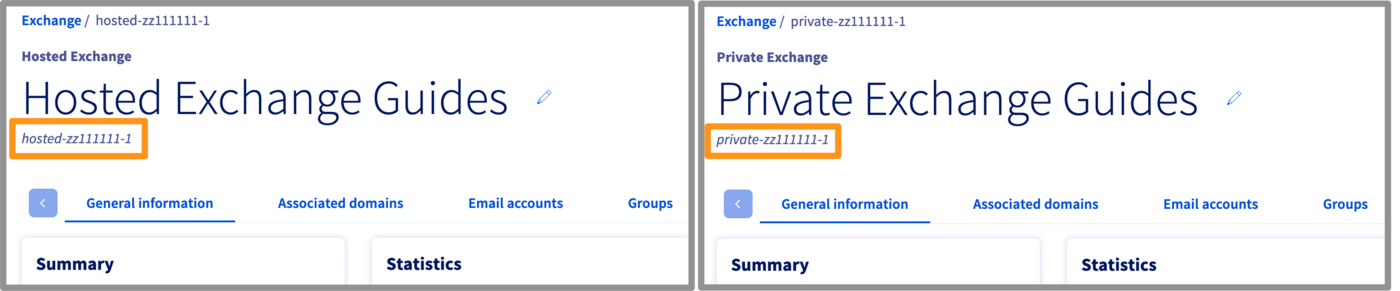
**Exchange**
1. Log in to your OVHcloud Control Panel.
2. Open the Web Cloud section.
3. In the `MICROSOFT` section, click Exchange.
4. Select the service concerned.
By default, your platform name will match its reference number, or it will be visible under the name you have given it (see image below).
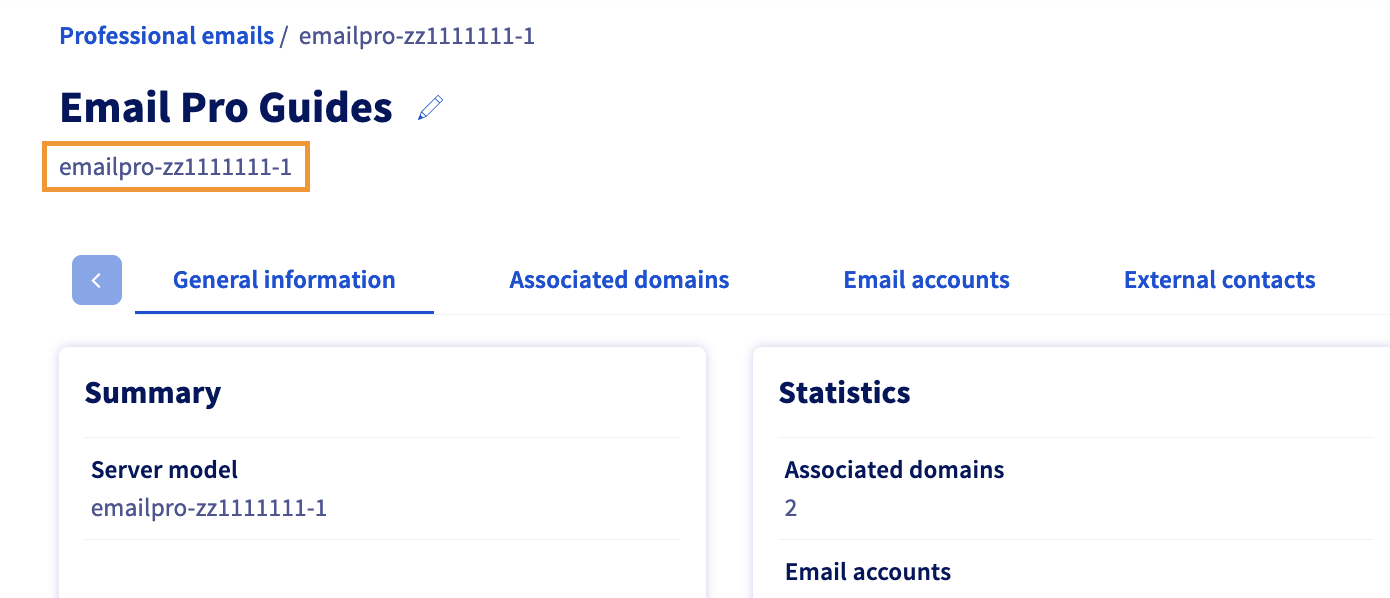
**E-mail Pro**
1. Log in to your OVHcloud Control Panel.
2. Open the Web Cloud section.
3. Click Email Pro.
4. Select the service concerned.
By default, your platform name will match its reference number, or it will be visible under the name you have given it (see image below).
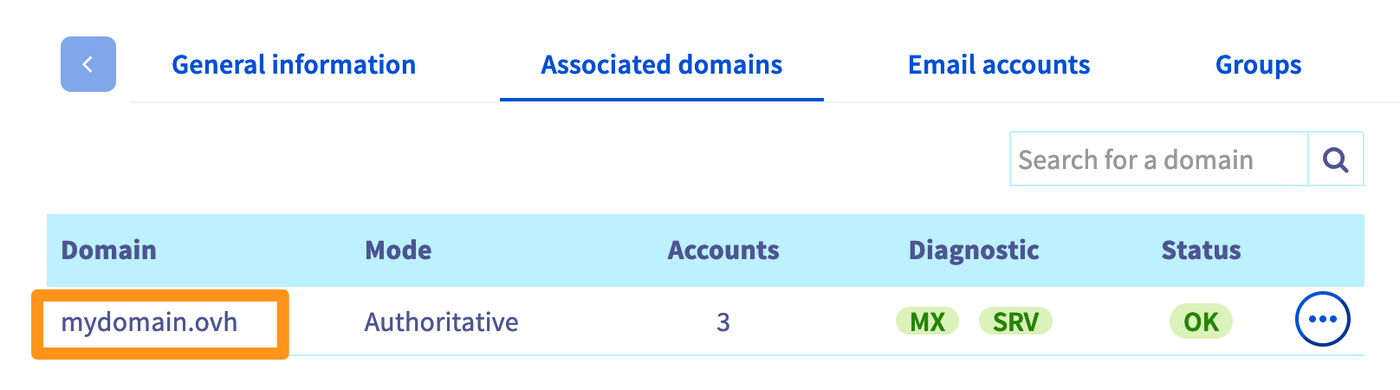
Also, make sure that the domain name you want to use for your emails is active in the `Associated domains
` section.
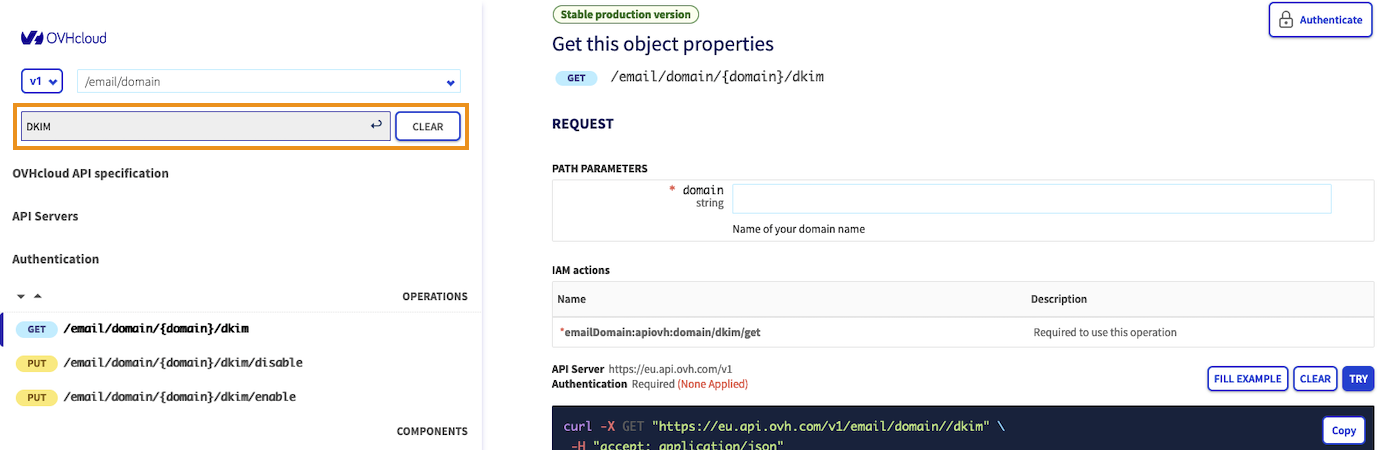
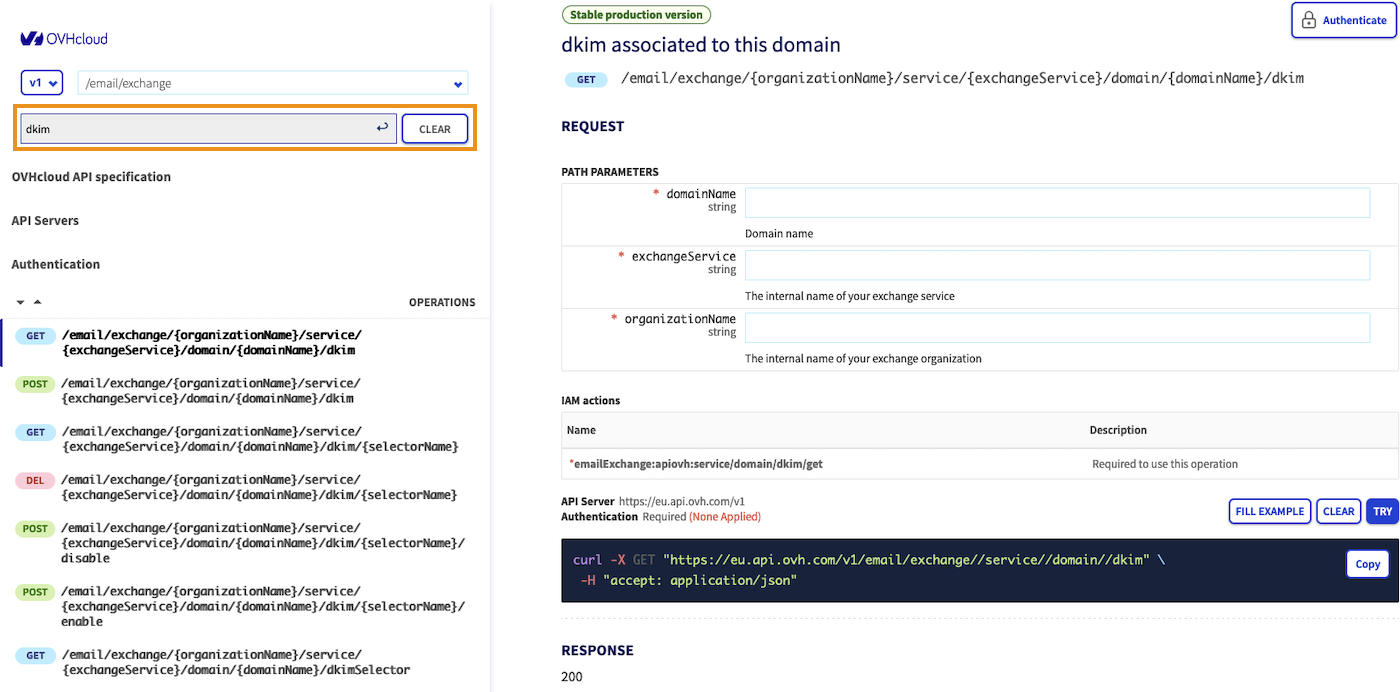
#### API - Full DKIM configuration [](#)
To configure DKIM, go to the [OVHcloud API page](https://eu.api.ovh.com/) and log in:
1. Click on Authentication in the top left.
2. Then click on Login with OVHcloud SSO.
3. Enter your OVHcloud credentials.
4. Click on the Authorize button to authorise API calls from this site.
:::info
Refer to our guide "[Getting started with OVHcloud APIs](/en/guides/manage-and-operate/api/first-steps.md)" if you have never used APIs before.
:::
Go to the API section `/email/domain/` (MX Plan and Zimbra offers), `/email/exchange` (Exchange offer) or `/email/pro` (E-mail Pro offer) and enter "dkim" in the `Filter` field to display only the API functions related to DKIM.
Click on the tab corresponding to your offer:
**MX Plan and Zimbra**
**Exchange**
**Email Pro**

##### **For MX Plan and Zimbra**
[](#)
Follow the **5 steps** by clicking on each of the 5 tabs below:
**1. Enable DKIM on your domain name**
To enable DKIM on your domain name, use the following API call:
🇪🇺EU▾
[PUT/email/domain/{domain}/dkim/enable](https://eu.api.ovh.com/console/?section=/email/domain/&branch=v1#put-/email/domain/-domain-/dkim/enable)
- `domain`: Enter the domain name attached to the email service on which you want to enable DKIM.
Click EXECUTE to activate.
_Sample result:_
```console
{
"domain": "mydomain.ovh",
"id": 123455789,
"function": "domain/enableDKIM",
"status": "todo"
}
```
You should get the same result as in the example above, with `"status": "todo"` indicating that DKIM will be activated.
**2. Check the status of the DKIM operation**
Once you have launched the DKIM activation process, follow the installation status to ensure that the installation completes, or to retrieve the DNS records if your DNS zone is managed outside of your OVHcloud Control Panel.
To do this, use the following API call:
🇪🇺EU▾
[GET/email/domain/{domain}/dkim](https://eu.api.ovh.com/console/?section=/email/domain/&branch=v1#get-/email/domain/-domain-/dkim)
- `domain`: Enter the domain name attached to the email service.
Click EXECUTE to view the result.
_Example result:_
```console
{
"activeSelector": null,
"autoconfig": true,
"selectors": [
{
"selectorName": "ovhmo3456789-selector2",
"status": "set",
"cname": "ovhmo3456789-selector2._domainkey.mydomain.ovh CNAME ovhmo3456789-selector2._domainkey.123402.aj.dkim.mail.ovh.net."
},
{
"selectorName": "ovhmo3456789-selector1",
"cname": "ovhmo3456789-selector1._domainkey.mydomain.ovh CNAME ovhmo3456789-selector1._domainkey.123403.aj.dkim.mail.ovh.net.",
"status": "set"
}
],
"status": "modifying"
}
```
In the example above, the last status line `"status": "modifying"` means that the configuration is in progress. Wait approximately **10 minutes** and restart the API call.
- If the value is `"status": "enabled"`, your configuration is complete and functional.
- If the value is `"status": "disabled"`, your configuration must be completed manually. Go to the next step.
**3. Retrieve the DNS record**
You must manually configure your domain name’s DNS zone **in the following cases**:
- Your email service is linked to a domain name that is managed by another OVHcloud customer account.
- Your email service is linked to a domain name that is managed by another registrar.
To configure your DNS zone, you must retrieve the values of the DNS record **from both selectors**. To do this, use the result of the API call from the previous step:
🇪🇺EU▾
[GET/email/domain/{domain}/dkim](https://eu.api.ovh.com/console/?section=/email/domain/&branch=v1#get-/email/domain/-domain-/dkim)
- `domain`: Enter the domain name attached to your email service.
Click EXECUTE to view the result.
_Example result:_
```console
{
"activeSelector": null,
"status": "disabled",
"autoconfig": false,
"selectors": [
{
"cname": "ovhmo3456789-selector1._domainkey.mydomain.ovh CNAME ovhmo3456789-selector1._domainkey.123403.aj.dkim.mail.ovh.net."
"status": "toSet",
"selectorName": "ovhmo4287928-selector1"
},
{
"selectorName": "ovhmo4287928-selector2",
"cname": "ovhmo3456789-selector2._domainkey.mydomain.ovh CNAME ovhmo3456789-selector2._domainkey.123402.aj.dkim.mail.ovh.net.",
"status": "toSet"
}
]
}
```
The values `"status": "toSet"` and `"status": "disabled"` mean that CNAME records are to be configured. Retrieve the 2 `cname` values in a text file and move on to the next step.
**4. Configure the DNS record**
From the OVHcloud Control Panel where the domain name of your email service is hosted, in the Web Cloud tab, click Domain names in the left-hand column and select the relevant domain name.
Go to the DNS zone tab, then click Add an entry in the window that appears. Choose `CNAME` and complete the fields according to the values you have noted.
If you break down the values in the example in step "**3. Retrieve the DNS record**":
- `ovhmo3456789-selector1._domainkey.mydomain.ovh` is the subdomain of the CNAME record. We only keep `ovhmo3456789-selector1._domainkey` because `.mydomain.ovh` is already present.
- `ovhmo3456789-selector1._domainkey.123403.aj.dkim.mail.ovh.net."` is the record target. Keep the period at the end to punctuate the value.
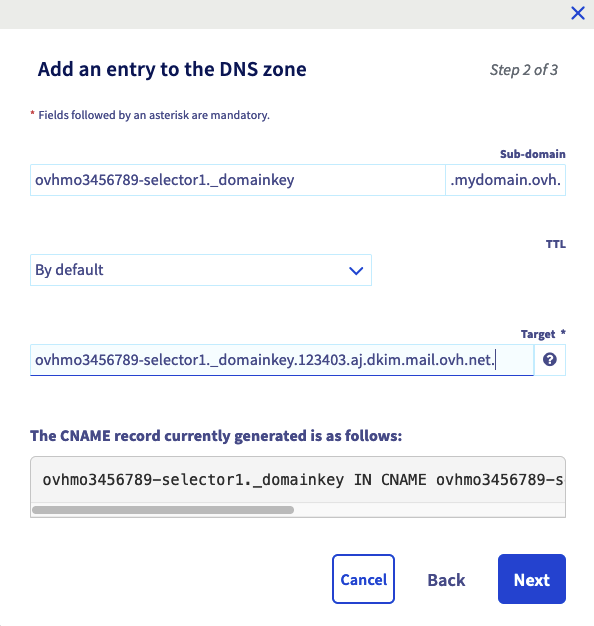Once you have entered the values, click Next then Confirm.
:::info
**Repeat for the second selector.**
:::
If you configure your DNS zone in a third-party interface outside of OVHcloud, your CNAME record must have the following form:
```console
ovhmo3456789-selector1._domainkey IN CNAME ovhmo3456789-selector1._domainkey.123403.aj.dkim.mail.ovh.net.
```
:::warning
Remember that any changes made to a DNS zone will have a propagation delay. It is usually short but can last up to 24 hours.
:::
**5. DKIM activation**
Once your DNS configuration has propagated, use the following API call again to enable the DKIM:
🇪🇺EU▾
[PUT/email/domain/{domain}/dkim/enable](https://eu.api.ovh.com/console/?section=/email/domain/&branch=v1#put-/email/domain/-domain-/dkim/enable)
- `domain`: Enter the domain name attached to your email service on which you want to enable DKIM.
Click EXECUTE to activate.
_Example result:_
```console
{
"selectors": [
{
"selectorName": "ovhmo3465680-selector2",
"cname": "ovhmo3456789-selector2._domainkey.mydomain.ovh CNAME ovhmo3456789-selector2._domainkey.123402.aj.dkim.mail.ovh.net.",
"status": "set"
},
{
"status": "set",
"cname": "ovhmo3456789-selector1._domainkey.mydomain.ovh CNAME ovhmo3456789-selector1._domainkey.123403.aj.dkim.mail.ovh.net."
"selectorName": "ovhmo3465680-selector1"
}
],
"activeSelector": "ovhmo3465680-selector1",
"autoconfig": true,
"status": "enabled"
}
```
- If you see `"status": "set"` on the 2 selectors, this means that they are correctly configured.
- If you see `"status": "toSet"` on the 2 selectors, this means that your DNS changes are not visible. Please go to **tab 4. Configure the DNS record**.
- If you see `"status": "toFix"` on the 2 selectors, this means that the CNAME records have been detected in your domain name’s DNS zone, but the values are incorrect. Please go to **tab 4. Configure the DNS record**.
:::tip
You have now made all the changes required to enable the DKIM. To ensure that it is enabled, check its status by going back to **tab 2. Check the status of the DKIM operation** to check that the value `status:` is `enabled`. If this is the case, your DKIM is now active.
:::
##### **For Exchange**
Follow the **5 steps** below by clicking on each tab.
**1. List of selectors**
Before you create one of the selectors for your domain name, you will need to retrieve the name automatically assigned to them by Exchange.
To do this, use the following API call:
🇪🇺EU▾
[GET/email/exchange/{organizationName}/service/{exchangeService}/domain/{domainName}/dkimSelector](https://eu.api.ovh.com/console/?section=/email/exchange&branch=v1#get-/email/exchange/-organizationName-/service/-exchangeService-/domain/-domainName-/dkimSelector)
- `domainName`: Enter the domain name attached to your Exchange service on which you want to enable DKIM.
- `exchangeService`: Type the name of your Exchange service in the form "hosted-zz1111111-1" or "private-zz111111-1".
- `organisationName`: Type the name of your Exchange service in the form "hosted-zz1111111-1" or "private-zz111111-1".
_Example result:_
```console
"ovhex123456-selector1"
"ovhex123456-selector2"
```
**2. Create a selector**
You will now create a selector, generate its key pair, and generate the DNS record associated with the domain name.
To do this, use the following API call:
🇪🇺EU▾
[POST/email/exchange/{organizationName}/service/{exchangeService}/domain/{domainName}/dkim](https://eu.api.ovh.com/console/?section=/email/exchange&branch=v1#post-/email/exchange/-organizationName-/service/-exchangeService-/domain/-domainName-/dkim)
- `domainName`: Enter the domain name attached to your Exchange service on which you want to enable DKIM.
- `exchangeService`: Type the name of your Exchange service in the form "hosted-zz1111111-1" or "private-zz111111-1".
- `organisationName`: Type the name of your Exchange service in the form "hosted-zz1111111-1" or "private-zz111111-1".
- `"selectorName"`: in the **EXAMPLE** tab of the **REQUEST BODY** section, enter the name of a selector that you noted in the previous step (example: "ovhex123456- selector1").
_Example of entry:_
```console
{
"autoEnableDKIM": false,
"configureDkim": false,
"selectorName": "ovhex123456-selector1"
}
```
Click EXECUTE to start creating the selector.
:::info
We recommend that you do this twice for each of the selectors listed above. The second selector will allow you to change the key pair when necessary. . Please refer to our use case [“How to change your DKIM key pair”](#2selectors) when you want to switch to the second selector.
:::
_Example of result:_
```console
status: "todo",
function: "addExchangeDomainDKIM",
id : 107924143,
"finishDate": null,
"todoDate": "2023-05-05T11:32:07+02:00"
```
**3. Retrieve the DNS record**
You must manually configure your domain name’s DNS zone **in the following cases**:
- Your Exchange service is linked to a domain name that is managed by OVHcloud customer account.
- Your Exchange service is linked to a domain name that is managed by another registrar.
To configure your DNS zone, you will need to retrieve the values of the DNS record **for each selector if you have created two selectors**. To do this, use the following API call:
🇪🇺EU▾
[GET/email/exchange/{organizationName}/service/{exchangeService}/domain/{domainName}/dkim/{selectorName}](https://eu.api.ovh.com/console/?section=/email/exchange&branch=v1#get-/email/exchange/-organizationName-/service/-exchangeService-/domain/-domainName-/dkim/-selectorName-)
- `domainName`: Enter the domain name attached to your Exchange service on which you want to configure DKIM.
- `exchangeService`: Type the name of your Exchange service in the form "hosted-zz1111111-1" or "private-zz111111-1".
- `organisationName`: Type the name of your Exchange service in the form "hosted-zz1111111-1" or "private-zz111111-1".
- `selectorName`: Enter the name of the selector you created in the previous step.
_Example of result:_
```console
targetRecord: "ovhex123456-selector1._domainkey.1675.ac.dkim.mail.ovh.net"
recordType: "CNAME"
header: "from;to;subject;date"
taskPendingId: 108712689
status: "waitingRecord"
cnameIsValid: false
lastUpdate: "1970-01-01T00:00:00+01:00"
customerRecord: "ovhex123456-selector1._domainkey.mydomain.ovh"
selectorName: "ovhex1234565-selector1"
```
Save the `customerRecord` and `targetRecord` values in a text file. Proceed to the next step.
:::info
It is possible that the `status:` is in `todo`, this will not affect your DNS zone’s configuration.
:::
**4. Configure the DNS record**
From the OVHcloud Control Panel where the domain name of your Exchange platform is hosted, in the Web Cloud tab, click Domain names in the left-hand column and select the relevant domain name.
Go to the DNS zone tab, then click Add an entry in the window that appears. Choose `CNAME` and complete the fields according to the values you have noted.
If we take the values of the example in step "**3. Retrieve the DNS record**":
- `customerRecord: "ovhex123456-selector1._domainkey.mydomain.ovh"` is the subdomain of the CNAME record. We only keep `ovhex123456-selector1._domainkey` because `.mydomain.ovh` is already present.
- `targetRecord: "ovhex123456-selector1._domainkey.1500.ab.dkim.mail.ovh.net"` is the target of the record. Add a period at the end to punctuate the value: `ovhex123456-selector1._domainkey.1500.ab.dkim.mail.ovh.net.`
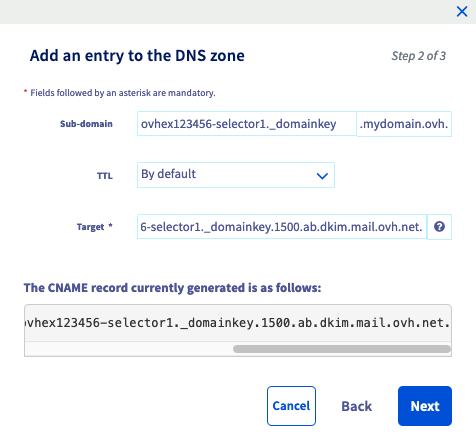
Once you have entered the values, click Next, then Confirm.
**Repeat for the second selector if you have created one.**
If you configure your DNS zone in a third-party interface other than OVHcloud, your CNAME record must have the following format:
```console
ovhex123456-selector1._domainkey IN CNAME ovhex123456-selector1._domainkey.1500.ab.dkim.mail.ovh.net.
```
:::warning
Remember that any changes made to a DNS zone will have a propagation delay. It is usually short but can last up to 24 hours.
:::
**5. Activating DKIM**
:::warning
In the section "[API - The different states of DKIM](#dkim-status)" of this guide, check that the value `status:` is `ready` before you activate DKIM.
:::
To enable DKIM, use the following API call:
🇪🇺EU▾
[POST/email/exchange/{organizationName}/service/{exchangeService}/domain/{domainName}/dkim/{selectorName}/enable](https://eu.api.ovh.com/console/?section=/email/exchange&branch=v1#post-/email/exchange/-organizationName-/service/-exchangeService-/domain/-domainName-/dkim/-selectorName-/enable)
- `domainName`: Enter the domain name attached to your Exchange service on which you want to enable DKIM.
- `exchangeService`: Type the name of your Exchange service in the form "hosted-zz1111111-1" or "private-zz111111-1".
- `organisationName`: Type the name of your Exchange service in the form "hosted-zz1111111-1" or "private-zz111111-1".
- `selectorName`: Enter the name of the selector you created.
_Example of result:_
```console
id: 108716876
todoDate: "2023-05-05T11:30:11+02:00"
finishDate: null
status: "todo"
function: "enableExchangeDKIM"
```
:::tip
You have now made all the changes to enable DKIM. To ensure that DKIM is enabled, please refer to the section [API - The different states of DKIM](#dkim-status) of this guide to check that the `status:` value is `inProduction`. If this is the case, your DKIM is now active.
**If you have created two selectors**, the second selector should have the `status:` value `ready`.
:::
##### **For Email Pro**
Follow the **5 steps** below by clicking on each tab.
**1. List of selectors**
Before you create one of the selectors for your domain name, you will need to retrieve the name automatically attributed to them by Email Pro.
To do this, use the following API call:
🇪🇺EU▾
[GET/email/pro/{service}/domain/{domainName}/dkim](https://eu.api.ovh.com/console/?section=/email/pro&branch=v1#get-/email/pro/-service-/domain/-domainName-/dkim)
- `service`: Enter the name of your Email Pro service, in the format "emailpro-zz1111111-1".
- `domainName`: Enter the domain name attached to your Email Pro service on which you want to enable DKIM.
_Example result:_
```console
"ovhemp123456-selector1"
"ovhemp123456-selector2"
```
**2. Create a selector**
You will now create a selector, generate its key pair, and generate the DNS record associated with the domain name.
:::info
We recommend that you do this twice for each of the selectors listed above. The second selector will allow you to change the key pair when necessary. Please refer to our use case ["How to change a DKIM key pair"](#2selectors).
:::
To do this, use the following API call:
🇪🇺EU▾
[POST/email/pro/{service}/domain/{domainName}/dkim](https://eu.api.ovh.com/console/?section=/email/pro&branch=v1#post-/email/pro/-service-/domain/-domainName-/dkim)
- `domainName`: Enter the domain name attached to your Email Pro service on which you want to enable DKIM.
- `service`: enter the name of your E-mail Pro platform in the form “emailpro-zz111111-1”.
- `"selectorName"`: In the **EXAMPLE** tab of the **REQUEST BODY** section, enter the name of a selector that you noted in the previous step. (example: “ovhemp123456-selector1”)
_Example of entry:_
```console
{
"autoEnableDKIM": false,
"configureDkim": false,
"selectorName": "ovhemp123456-selector1"
}
```
:::info
We recommend that you do this twice for each of the selectors listed above. The second selector will allow you to change the key pair when necessary. . Please refer to our use case [“How to change your DKIM key pair”](#2selectors) when you want to switch to the second selector.
:::
Click on EXECUTE to start creating the selector.
_Example of result:_
```console
status: "todo",
function: "addDomainDKIM",
id : 107924143,
"finishDate": null,
"todoDate": "2023-05-05T11:32:07+02:00"
```
**3. Retrieve the DNS record**
You must manually configure your domain name’s DNS zone **in the following cases**:
- Your Email Pro service is linked to a domain name that is managed in another OVHcloud customer account.
- Your Email Pro service is linked to a domain name that is managed by another registrar
To configure your DNS zone, you will need to retrieve the values of the **DNS record for each selector if you have created two**. To do this, use the following API call:
🇪🇺EU▾
[GET/email/pro/{service}/domain/{domainName}/dkim/{selectorName}](https://eu.api.ovh.com/console/?section=/email/pro&branch=v1#get-/email/pro/-service-/domain/-domainName-/dkim/-selectorName-)
- `service`: Enter the name of your Email Pro service, in the format "emailpro-zz1111111-1".
- `domainName`: Enter the domain name attached to your Email Pro service on which you want to configure DKIM.
- `selectorName`: Enter the name of the selector you created in the previous step.
_Example of result:_
```console
targetRecord: "ovhemp123456-selector1._domainkey.1675.ac.dkim.mail.ovh.net"
recordType: "CNAME"
header: "from;to;subject;date"
taskPendingId: 108712689
status: "waitingRecord"
cnameIsValid: false
lastUpdate: "1970-01-01T00:00:00+01:00"
customerRecord: "ovhemp123456-selector1._domainkey.mydomain.ovh"
selectorName: "ovhemp1234565-selector1"
```
Save the `customerRecord` and `targetRecord` values in a text file. Proceed to the next step.
:::info
It is possible that the `status:` is in `todo`, this will not affect your DNS zone’s configuration.
:::
**4. Configure the DNS record**
From the OVHcloud Control Panel where the domain name of your Email Pro platform is hosted, in the Web Cloud tab, click Domain names in the left-hand column and select the relevant domain name.
Go to the DNS zone tab, then click Add an entry in the window that appears. Choose `CNAME` and complete the fields according to the values you have noted.
If we take the values of the example in step **3. Retrieve the DNS record**:
- `customerRecord: "ovhemp123456-selector1._domainkey.mydomain.ovh"` is the subdomain of the CNAME record. We only keep `ovhemp123456-selector1._domainkey` because `.mydomain.ovh` is already present.
- `targetRecord: "ovhemp123456-selector1._domainkey.1500.ab.dkim.mail.ovh.net"` is the target of the record. Add a period at the end to punctuate the value: `ovhemp123456-selector1._domainkey.1500.ab.dkim.mail.ovh.net.`

Once you have entered the values, click Next, then Confirm.
**Repeat for the second selector if you have created one.**
If you configure your DNS zone in a third-party interface other than OVHcloud, your CNAME record must have the following format:
```console
ovhemp123456-selector1._domainkey IN CNAME ovhemp123456-selector1._domainkey.1500.ab.dkim.mail.ovh.net.
```
:::warning
Please remember that any changes made to a DNS zone will have a propagation delay. It is usually short but can last up to 24 hours.
:::
**5. Activating DKIM**
:::warning
In the section "[API - The different states of DKIM](#dkim-status)" of this guide, check that the value `status:` is `ready` before you activate DKIM.
:::
To enable DKIM, use the following API call:
🇪🇺EU▾
[GET/email/pro/{service}/domain/{domainName}/dkim/{selectorName}](https://eu.api.ovh.com/console/?section=/email/pro&branch=v1#get-/email/pro/-service-/domain/-domainName-/dkim/-selectorName-)
- `service`: Enter the name of your Email Pro service, in the format "emailpro-zz1111111-1".
- `selectorName`: Enter the name of the selector you created.
- `domainName`: Enter the domain name attached to your Email Pro platform on which you want to enable DKIM.
_Example of result:_
```console
id: 108716876
todoDate: "2023-05-05T11:30:11+02:00"
finishDate: null
status: "todo"
function: "enableDKIM"
```
:::tip
You have now made all the changes to enable DKIM. To ensure that DKIM is enabled, please refer to the [API - The different states of DKIM](#dkim-status) section of this guide to check that the value `status:` is `inProduction`. If this is the case, your DKIM is now active.
:::
#### API - The different states of DKIM [](#)
Select the email solution concerned in the following tabs:
**MX Plan and Zimbra**
When performing operations on your E-mail platform's DKIM, use the API call below to check the current DKIM status.
🇪🇺EU▾
[GET/email/domain/{domain}/dkim](https://eu.api.ovh.com/console/?section=/email/domain/&branch=v1#get-/email/domain/-domain-/dkim)
- `domain`: Enter the domain name attached to your email service on which DKIM must be present.
Then look at the general `status:` value in the result:
- `disabled`: DKIM is disabled, has not yet been configured or has been disabled by API.
- `modifying`: DKIM configuration is in progress, it is necessary to wait for the process to complete.
- `toConfigure`: DKIM configuration is pending domain name DNS settings. You must manually enter the DNS records in the domain name zone. To do this, go to [Step 4 of the “Complete DKIM Configuration” for MX Plan and Zimbra](#confemail).
- `enabled` - The DKIM is configured and functional.
- `error`: The installation process encountered an error. Please open a [support ticket](https://help.ovhcloud.com/csm?id=csm_get_help) with the domain name concerned.
At the level of the selectors you also have 3 possible states:
- `set`: The selector is correctly configured and active.
- `toSet`: The selector is not configured in the DNS zone of the domain name. See [Step 4 in "Configuring the DKIM in full" for MX Plan and Zimbra](#confemail).
- `toFix`: The selector has been configured in the domain name’s DNS zone, but the values are incorrect. See [Step 4 in "Configuring the DKIM in full" for Emails MX Plan and Zimbra](#confemail).
**Exchange**
When you are running DKIM on your Exchange service, use the API call below to check the current DKIM status.
🇪🇺EU▾
[GET/email/exchange/{organizationName}/service/{exchangeService}/domain/{domainName}/dkim/{selectorName}](https://eu.api.ovh.com/console/?section=/email/exchange&branch=v1#get-/email/exchange/-organizationName-/service/-exchangeService-/domain/-domainName-/dkim/-selectorName-)
- `domainName`: Enter the domain name attached to your Exchange service that the DKIM must be present on.
- `exchangeService`: Type the name of your Exchange service in the form "hosted-zz1111111-1" or "private-zz111111-1".
- `organisationName`: Type the name of your Exchange service in the form "hosted-zz1111111-1" or "private-zz111111-1".
- `selectorName`: Enter the name of the selector you created.
Then look at the value `status:` in the result:
- `todo`: The task has been initialised, it will begin.
- `WaitingRecord`: DNS records are pending configuration or being validated in the domain name’s DNS zone. A regular automatic check is performed to check if the DNS record is present and correctly entered.
- `ready`: DNS records are present in the zone. DKIM can now be enabled.
- `inProduction`: DKIM is well configured and activated, so it is fully operational.
- `disabling`: DKIM is being disabled.
- `deleting`: DKIM is being deleted.
If you encounter the following error when you make the API call, the selector does not exist or has been deleted. It will have to be created.
```console
Not Found (404)
{ `message`: `The requested object (selectorName = ovhemp123456-selector1) does not exist` }
```
**Email Pro**
When you are running DKIM on your Email Pro service, use the API call below to check the current DKIM status.
🇪🇺EU▾
[GET/email/pro/{service}/domain/{domainName}/dkim/{selectorName}](https://eu.api.ovh.com/console/?section=/email/pro&branch=v1#get-/email/pro/-service-/domain/-domainName-/dkim/-selectorName-)
- `service`: Enter the name of your Email Pro service, in the format "emailpro-zz1111111-1".
- `domainName`: Enter the domain name attached to your Email Pro service, on which the DKIM must be present.
- `selectorName`: Enter the name of the selector you created.
Then look at the value `status:` in the result:
- `todo`: The task has been initialised, it will begin.
- `WaitingRecord`: DNS records are pending configuration or being validated in the domain name’s DNS zone. A regular automatic check is performed to check if the DNS record is present and correctly entered.
- `ready`: DNS records are present in the zone. DKIM can now be enabled.
- `inProduction`: DKIM is well configured and activated, so it is fully operational.
- `disabling`: DKIM is being disabled.
- `deleting`: DKIM is being deleted.
If you encounter the following error when you make the API call, the selector does not exist or has been deleted. It will have to be created.
```console
Not Found (404)
{ `message`: `The requested object (selectorName = ovhemp123456-selector1) does not exist` }
```
#### API - Enable or change the DKIM selector [](#)
:::warning
The DKIM selector must be in `ready` status before it can be enabled.
:::
Select the email solution concerned in the following tabs:
**MX Plan and Zimbra**
To enable DKIM, use the following API call:
🇪🇺EU▾
[PUT/email/domain/{domain}/dkim/enable](https://eu.api.ovh.com/console/?section=/email/domain/&branch=v1#put-/email/domain/-domain-/dkim/enable)
- `domain`: Enter the domain name attached to your email service on which the DKIM must be present.
_Example result:_
```console
{
"function": "domain/enableDKIM",
"id": 123456789,
"domain": "guidesteam.ovh",
"status": "todo"
}
```
**Exchange**
To enable DKIM on a selector, use the following API call:
🇪🇺EU▾
[POST/email/exchange/{organizationName}/service/{exchangeService}/domain/{domainName}/dkim/{selectorName}/enable](https://eu.api.ovh.com/console/?section=/email/exchange&branch=v1#post-/email/exchange/-organizationName-/service/-exchangeService-/domain/-domainName-/dkim/-selectorName-/enable)
- `domainName`: Enter the domain name attached to your Exchange service on which you want to enable DKIM.
- `exchangeService`: Type the name of your Exchange service in the form "hosted-zz1111111-1" or "private-zz111111-1".
- `organisationName`: Type the name of your Exchange service in the form "hosted-zz1111111-1" or "private-zz111111-1".
- `selectorName`: Enter the name of an existing selector.
**Email Pro**
To enable DKIM on a selector, use the following API call:
🇪🇺EU▾
[POST/email/pro/{service}/domain/{domainName}/dkim/{selectorName}/enable](https://eu.api.ovh.com/console/?section=/email/pro&branch=v1#post-/email/pro/-service-/domain/-domainName-/dkim/-selectorName-/enable)
- `domainName`: Enter the domain name attached to your Email Pro service on which the DKIM must be present.
- `selectorName`: Enter the name of the selector you created.
- `service`: Enter the name of your Email Pro service, in the format "emailpro-zz1111111-1".
:::info
During a DKIM selector rotation, you can directly activate the second selector you have created to switch over to it, while keeping the first selector active until all emails delivered with it are properly scanned by their recipient.
:::
#### API - Disable and delete DKIM [](#)
:::warning
**For Exchange and Email Pro solutions**
The DKIM selector must be in `inProduction` or `ready` status before it can be disabled.
:::
Select the email solution concerned in the following tabs:
**MX Plan and Zimbra**
If you want to disable the DKIM without removing the selectors and their key pair, use the following API call:
🇪🇺EU▾
[PUT/email/domain/{domain}/dkim/disable](https://eu.api.ovh.com/console/?section=/email/domain/&branch=v1#put-/email/domain/-domain-/dkim/disable)
- `domain` : enter the domain name attached to your email service on which the DKIM must be present.
_Example result:_
```console
{
"domain": "guidesteam.ovh",
"id": 174219594,
"function": "domain/disableDKIM",
"status": "todo"
}
```
**Exchange**
If you want to disable DKIM without removing the selector and its key pair, use the following API call:
🇪🇺EU▾
[POST/email/exchange/{organizationName}/service/{exchangeService}/domain/{domainName}/dkim/{selectorName}/disable](https://eu.api.ovh.com/console/?section=/email/exchange&branch=v1#post-/email/exchange/-organizationName-/service/-exchangeService-/domain/-domainName-/dkim/-selectorName-/disable)
- `domainName`: Enter the domain name attached to your Exchange service.
- `exchangeService`: Type the name of your Exchange service in the form "hosted-zz1111111-1" or "private-zz111111-1".
- `organisationName`: Type the name of your Exchange service in the form "hosted-zz1111111-1" or "private-zz111111-1".
- `selectorName`: Enter the name of the selector you want to disable.
If you want to delete the DKIM selector and its key pair, use the following API call:
🇪🇺EU▾
[DELETE/email/exchange/{organizationName}/service/{exchangeService}/domain/{domainName}/dkim/{selectorName}](https://eu.api.ovh.com/console/?section=/email/exchange&branch=v1#delete-/email/exchange/-organizationName-/service/-exchangeService-/domain/-domainName-/dkim/-selectorName-)
- `domainName`: Enter the domain name attached to your Exchange service.
- `exchangeService`: Type the name of your Exchange service in the form "hosted-zz1111111-1" or "private-zz111111-1".
- `organisationName`: Type the name of your Exchange service in the form "hosted-zz1111111-1" or ">> private-zz1111111-1".
- `selectorName`: Enter the name of the selector you want to delete.
**Email Pro**
If you want to disable DKIM without removing the selector and its key pair, use the following API call:
🇪🇺EU▾
[POST/email/pro/{service}/domain/{domainName}/dkim/{selectorName}/disable](https://eu.api.ovh.com/console/?section=/email/pro&branch=v1#post-/email/pro/-service-/domain/-domainName-/dkim/-selectorName-/disable)
- `domainName`: Enter the domain name attached to your Email Pro service.
- `selectorName`: Enter the name of the selector you want to disable.
- `service`: Enter the name of your Email Pro service, in the format "emailpro-zz1111111-1".
If you want to delete the DKIM selector and its key pair, use the following API call:
🇪🇺EU▾
[DELETE/email/pro/{service}/domain/{domainName}/dkim/{selectorName}](https://eu.api.ovh.com/console/?section=/email/pro&branch=v1#delete-/email/pro/-service-/domain/-domainName-/dkim/-selectorName-)
- `domainName`: Enter the domain name attached to your Email Pro service.
- `selectorName`: Enter the name of the selector you want to delete.
- `service`: Enter the name of your Email Pro service, in the format "emailpro-zz1111111-1".
### Configuring DKIM for an email solution outside of your OVHcloud account [](#)
If you would like to configure your DNS zone to add a DKIM record to it for your solution, follow the instructions below.
From the OVHcloud Control Panel
, click the `Web Cloud
` tab, then `Domain names
` in the left-hand column and select the relevant domain name.
Click on the `DNS zones
` tab, then `Add an entry
`. There are 3 ways to add a record to set the DKIM in your DNS zone:
- [DKIM record](#dkim-record): A configuration that allows you to view all settings for a DKIM record.
- [TXT record](#txt-record): The record to use when all DKIM parameters have been provided to you.
- [CNAME record](#cname-record): A record used for an OVHcloud email solution or a Microsoft email server.
#### DKIM record [](#)
This record is named DKIM on the interface but it is actually a TXT record in the zone. The purpose of the DKIM record is to make it easier to read the various parameters of the DKIM by presenting them as independent fields.
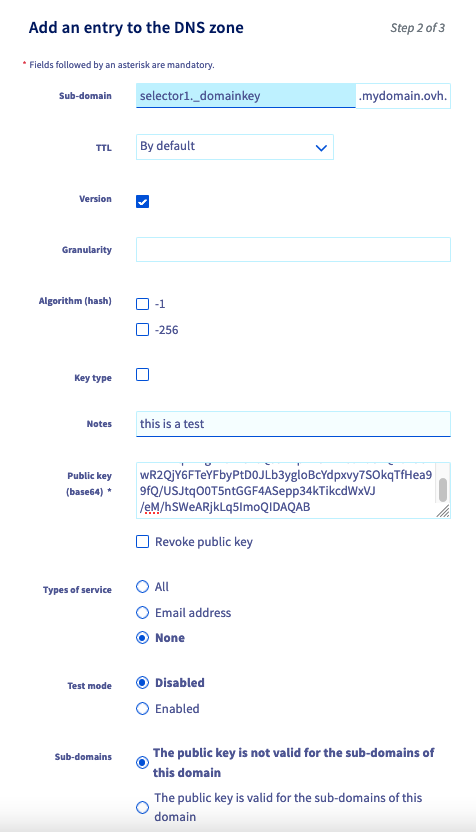
- **Sub-domain**: Enter the DKIM selector name and add `._domainkey` as a suffix. Your domain name will be added automatically at the end.
_Example:_
```console
selector-name._domainkey.mydomain.ovh.
```
- **Version (v=)**: It is used to specify the DKIM version. It is recommended that you use it and its default value is "DKIM1".
If specified, this tag must be placed first in the record and must be equal to "DKIM1" (without quotes). Records that begin with a "v=" tag with another value should be ignored.
- **Granularity (g=)**: Allows you to specify the "local" part of an email address, i.e. the part before the "@".
It allows you to specify the email address or email addresses that are authorised to sign an email message with the selector's DKIM key.
The default value for "g=" is "\*", which means that all email addresses are allowed to use the DKIM signature key.
By specifying a value for "g=", you can limit the use of the key to a specific local portion of an email address or a range of email addresses by using wildcards (for example: "\*-group").
- **Algorithm (hash) (h=)**: Directive to specify the hash algorithms used to sign email headers. Use this tag to define a list of hash algorithms that will be used to generate a DKIM signature for a given message.
- **Key type (k=)**: Specifies the signature algorithm used to sign outgoing email messages. It allows recipients to know how the message was signed and what method is used to verify its authenticity.
Possible values for the tag "k=" include "rsa" for the RSA signature algorithm and "ed25519" for the ed25519 signature algorithm. The choice of algorithm depends on the sender's security policy and the recipient's support.
- **Notes (n=)**: It is used to include notes of interest for administrators who manage the DKIM key system.
These notes may be useful for documentation purposes or to help administrators understand or manage how DKIM works. The notes in "n=" are not interpreted by software and do not affect the operation of DKIM.
- **Public key (base64) (p=)**: It is used to populate DKIM public key data, which is encoded in base64.
This tag is mandatory in the DKIM signature, and allows signature recipients to retrieve the public key needed to verify the authenticity of the signed message.
- **Revoke public key**: If a DKIM public key has been revoked (for example, if the private key is compromised), an empty value must be used for the "p=" tag, indicating that this public key is no longer valid. Recipients must then return an error for any DKIM signature that references a revoked key.
- **Type of service (s=)**: The "s=" tag is optional and is not present by default. It allows you to specify the type or types of services to which this DKIM record applies.
Service types are defined using a colon-separated list of keywords.
The recipient should ignore this record if the appropriate service type is not listed.
The "s=" tag is intended to restrict the use of keys for other purposes, in case the use of DKIM is defined for other services in the future.
The service types currently defined are "email" and "\*" (all service types).
- **Test mode (t=y)**: Allows domain name holders to test a DKIM setup without the risk of having messages rejected or marked as spam if DKIM signature verification fails.
When the "t=y" flag is used, the recipient should not treat test signed messages differently than unsigned messages. However, the recipient can follow the test result to help the signatories.
- **Sub-domains (t=s)**: Allows the use of the DKIM signature to be restricted to the domain name only (for example: @mydomain.ovh) or allow sending from the domain name and its subdomains (e.g.: @mydomain.ovh, @test.mydomain.ovh, @other.mydomain.ovh, etc.).
#### TXT record [](#)
This is the type of native record used to set the DKIM in your domain name’s DNS zone. You need to have a good understanding of its syntax to complete it.
This type of DKIM setting is recommended when the information to be entered has been communicated to you by the email service provider.
For a complete understanding of the composition of the DKIM record, see the previous part of this guide called "[DKIM Record](#dkim-record) ".
**Example of a DKIM record**
- Subdomain:
```console
selector-name._domainkey.mydomain.ovh.
```
- Target:
```console
v=DKIM1;t=s;p= MIIBIjANBgkqhkiG9w0BAQEFAAOCAQ8AMIIBCgKCAQEA77VDAIfyhjtoF0DIE5V7 rev1EKk4L0nxdBpD5O/jPrM4KP0kukeuB6IMpVplkkq52MSDeRcjoO50h0DmwZOr RUkyGjQwOnAh0VhY3fqkuwBYftEX7vWo8C2E1ylzimABkwPpSL62jZ1DheoXcil9 1M35wWBKtlYdXVedKjCQKOEnwTo+0hdNe38rU9NMgq6nbTIMjDntvxoVI+yF3kcx q/VpAY8BIYbcAXkVFvUyfUBABnnKpf0SfblsfcLW0Koy/FRxPDFOvnjNxXeOxMFR UI6K6PaW2WvtbJG2v+gHLY5M4tB0+/FNJU9emZfkPOk3DmRhZ8ENi7+oZa2ivUDj OQIDAQAB
```
#### CNAME record [](#)
The CNAME record is an alias. This means that the target value points to a URL that will itself provide the DKIM record to the server that will query the CNAME record. This type of CNAME record for setting the DKIM is common when using a Microsoft email server.
This record type is used to enable DKIM on a domain name declared for an OVHcloud Exchange solution. This way, your email solution provider can manage security and update the DKIM for you.
### Test your DKIM [](#)
We recommend sending an email from an account on your Exchange platform to an email address that verifies the DKIM signature on receipt.
Here is what you will find in the header of the received email:
```
ARC-Authentication-Results: i=1; mx.example.com;
dkim=pass header.i=@mydomain.ovh header.s=ovhex123456-selector1 header.b=KUdGjiMs;
spf=pass (example.com: domain of test-dkim@mydomain.ovh designates 54.36.141.6 as permitted sender) smtp.mailfrom=test-dkim@mydomain.ovh
Return-Path:
```
To retrieve the header of an email, please read our guide on [Retrieving email headers](/en/guides/web-cloud/email-and-collaborative-solutions/troubleshooting/diagnostic-headers.md).
### Use cases [](#)
#### How and why change the DKIM key pair on my solution? [](#)
:::warning
This question only applies to Exchange and Email Pro solutions.
:::
When you enable DKIM for the first time on your email service, you can create 2 selectors, each containing a pair of keys. The second selector acts as a successor to the one that is currently in use.
To avoid attempts to decrypt the DKIM key, it is recommended that you change the key pair periodically. To do this, make sure that you have configured your 2 selectors by checking that the first one is in `inProduction` status and the second one is in `ready` status. You can check this status by referring to the section [API - The different states of DKIM](#dkim-status).
Click on the tab below corresponding to your solution.
**Exchange**
To switch to the second selector, use the following API call:
🇪🇺EU▾
[POST/email/exchange/{organizationName}/service/{exchangeService}/domain/{domainName}/dkim/{selectorName}/enable](https://eu.api.ovh.com/console/?section=/email/exchange&branch=v1#post-/email/exchange/-organizationName-/service/-exchangeService-/domain/-domainName-/dkim/-selectorName-/enable)
- `domainName`: Enter the domain name attached to your Exchange service.
- `selectorName`: Enter the name of the selector you want to switch to.
- `organizationName`: Enter the name of your Exchange service, which is in the form of "hosted-zz111111-1" or "private-zz11111-1".
- `exchangeService`: Enter the name of your Exchange service, which is in the form of "hosted-zz111111-1" or "private-zz11111-1".
**Email Pro**
To switch to the second selector, use the following API call:
🇪🇺EU▾
[POST/email/pro/{service}/domain/{domainName}/dkim/{selectorName}/enable](https://eu.api.ovh.com/console/?section=/email/pro&branch=v1#post-/email/pro/-service-/domain/-domainName-/dkim/-selectorName-/enable)
- `domainName`: Enter the domain name attached to your Email Pro service on which DKIM must be present.
- `selectorName`: Enter the name of the selector you want to switch to.
- `service`: Enter the name of your Email Pro service, in the form "emailpro-zz111111-1".
After switching to the new selector, keep the old one for 7 days before deleting it and creating a new one.
#### Why is the DKIM not functional and appears in red in the Control Panel? [](#)
:::warning
This question only applies to Exchange and Email Pro solutions.
:::
If you notice that your emails have not been signed by the DKIM, despite its activation or configuration, log in to your Control Panel to check the status of the DKIM.
Click on the tab below corresponding to your solution to check the status of the DKIM on your email service.
**Exchange**
1. Log in to your OVHcloud Control Panel.
2. Open the Web Cloud section.
3. In the `MICROSOFT` section, click Exchange.
4. Select the service concerned.
5. Finally, go to the Associated domains tab.
In the Associated domains section, check the colour of the `DKIM` icon to the right of the domain name concerned (see the image below).

**E-mail Pro**
1. Log in to your OVHcloud Control Panel.
2. Open the Web Cloud section.
3. Click Email Pro.
4. Select the service concerned.
5. Finally, go to the Associated domains tab.
In the Associated domains section, check the colour of the `DKIM` icon to the right of the domain name concerned (see the image below).

Here are the 4 states that result in a red DKIM icon in your Control Panel. Click on the tab corresponding to your error code:
**501**
“**Only one DKIM selector has been initialized**”
Only a DKIM selector is present in your configuration. To allow us to switch to a new key when necessary, we are asked to configure the 2 selectors provided by the service.
To fix this error:
- Check the status of the DKIM selectors to determine which one needs to be configured. Use the section “[API - The different states of DKIM](#dkim-status)” of this guide.
- Once you have identified the selector you want to configure, follow the steps in the section “[API - Full DKIM configuration](#firststep)” of this guide, depending on your solution (Exchange or Email Pro), and apply it only to the selector concerned.
Wait a maximum of 24 hours after configuring the selector.
**502**
“**One DKIM configuration task is in error**”
An error has occurred configuring the DKIM. After 24 hours, if your configuration is still in this state, please open a [support ticket](https://help.ovhcloud.com/csm?id=csm_get_help).
**503**
“**CNAME record is wrong**”
The CNAME record value required to configure the DKIM was not entered correctly. You must configure the DNS zone of the attached domain name correctly.
To configure your DNS zone, retrieve the values of the CNAME record that appears:
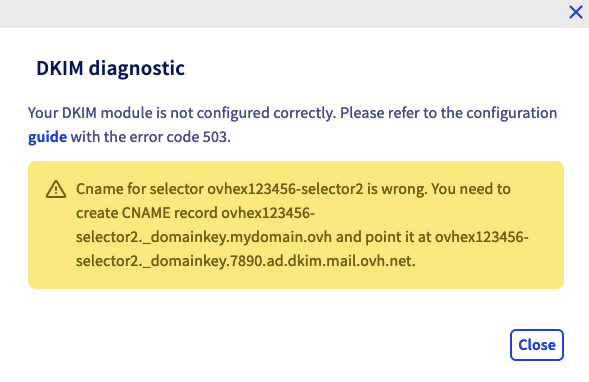If we take the example of the capture above, the domain name is "**mydomain.ovh**" and we are asked to configure the "**2**" selector. Here, add a CNAME record with the subdomain value `ovhex1234567-selector2.domainkey.mydomain.ovh` and as a target `ovhex1234567-selector2.domainkey.7890.dkim.mail.ovh.net`.
Once you have configured your DNS zone, wait for the DNS propagation (24 hours maximum).
**504**
“**One CNAME record is missing**”
The CNAME record value required to configure the DKIM is missing. You will need to configure the DNS zone for the domain name you are attaching.
To configure your DNS zone, retrieve the values of the CNAME record that appears:
If we take the example of the capture above, the domain name is "**mydomain.ovh**" and we are asked to configure the "**2**" selector. Here, add a CNAME record with the subdomain value `ovhex1234567-selector2.domainkey.mydomain.ovh` and as a target `ovhex1234567-selector2.domainkey.890123.dkim.mail.ovh.net`.
Once you have configured your DNS zone, wait for the DNS propagation (24 hours maximum).
#### From the OVHcloud API interface, how do I understand the status when DKIM is not working? [](#)
If you are using the OVHcloud API to configure your DKIM and it is not functional, please use the section “[API - The different states of DKIM](#dkim-status)” of this guide to identify the status of your selectors.
Below, you will find the states that may block your DKIM from working, and the appropriate solution for each situation.
**Exchange and Email Pro**
- `WaitingRecord`: The DNS records are pending configuration or being validated in the DNS zone. A regular automatic check is carried out to see if the DNS record is present and correctly entered. Depending on your solution, follow **step 5** in the section “[API - Full DKIM configuration](#firststep)” to configure the DNS zone correctly for the domain name concerned.
- `ready`: DNS records are present in the zone. DKIM can now be enabled. Simply activate the selector by going to the section [API - Activate or change a DKIM selector](#enable-switch).
- `deleting`: DKIM configuration is being deleted. Once you have deleted it, you will need to follow the section “[API - Full DKIM configuration](#firststep)”.
- `disabling`: DKIM is being disabled. Once you have done this, you can activate the selector by going to [API - Activate or change a DKIM selector](#enable-switch).
- `todo`: The task has been initialised, it must be launched. After 24 hours, if your selector is still in this state, please open a [support ticket](https://help.ovhcloud.com/csm?id=csm_get_help), specifying the number of the selector concerned.
**MX Plan and Zimbra**
- `disabled`: DKIM is disabled, has not yet been configured, or has been disabled by API.
- `modifying`: The DKIM configuration is in progress, you will need to wait for the process to complete.
- `toConfigure`: DKIM configuration is pending domain name DNS settings. You must manually enter the DNS records in the domain name zone. To do this, see the step “[API - Full DKIM configuration](#confemail)” in this guide.
- `error`: The installation process encountered an error. Please open a [support ticket](https://help.ovhcloud.com/csm?id=csm_get_help), specifying the domain name concerned.
At the level of the selectors you also have 2 states relating to an error:
- `toSet`: The selector is not configured in the DNS zone of the domain name. See [Step 4 in "Configuring the DKIM in full" for MX Plan and Zimbra](#confemail).
- `toFix`: The selector has been configured in the domain name’s DNS zone, but the values are incorrect. See [Step 4 in "Configuring the DKIM in full" for MX Plan and Zimbra](#confemail).
## Go further
Join our [community of users](https://community.ovhcloud.com/).