---
title: "Configuring IPv6 on a Public Cloud instance"
description: "Configuration tutorial for IPv6 on a Public Cloud instance"
url: https://docs.ovhcloud.com/en/guides/public-cloud/network-services/ipv6-configuration
lang: en
lastUpdated: 2025-12-16
---
# Configuring IPv6 on a Public Cloud instance
## Objective
Internet Protocol version 6 (IPv6) is the latest version of Internet Protocol (IP). It is designed to resolve the long-anticipated exhaustion of IPv4 addresses, by using addresses made up of 128-bits rather than the standard 32-bits of IPv4.
Each Public Cloud instance is delivered with an IPv4 address and an IPv6 address.
**This guide will show you how to configure an IPv6 address on a Public Cloud instance.**
:::info
Floating IP and Gateway currently do not support IPv6. You can only use IPv6 with instances in [Public Mode](/en/guides/public-cloud/network-services/concepts.md#publicmode).
:::
## Requirements
- A Public Cloud instance (any model)
- Administrative access (sudo) via SSH or remote desktop (Windows) to your server
- A basic understanding of networking
***
### OVHcloud Control Panel Access
- **Direct link:** Public Cloud Projects
- **Navigation path:** Public Cloud > Select your project
***
## Instructions
The following sections contain configurations for the distributions we currently offer, as well as the most commonly used distributions/operating systems. The first step is always to log in to your server via SSH or a GUI login session (RDP for a Windows instance).
:::warning
Please note that the IPv6 address is configured by default on our Public Cloud instances. Be sure to check the operating system configuration file before making any changes.
:::
### Glossary
Here is a short glossary of the terms used in this tutorial:
| Glossary | Description |
| ------------- | ----------------------------------------------------------------------------- |
| YOUR\_IPV6 | The IPv6 address assigned to your service. (e.g. 2607:5300:60:62ac:abcd) |
| IPV6\_PREFIX | The prefix of your IPv6 block (e.g. 2607:5300:60:62ac::/128 -> netmask = 128) |
| IPV6\_GATEWAY | The gateway of your IPv6 block.(e.g. 2607:5300:60:62ac::1) |
### Retrieve your network information
In your Public Cloud project, click on `Instances
` in the left-hand menu.
Click on `...
` next to the corresponding instance and click on `Instance details
`.
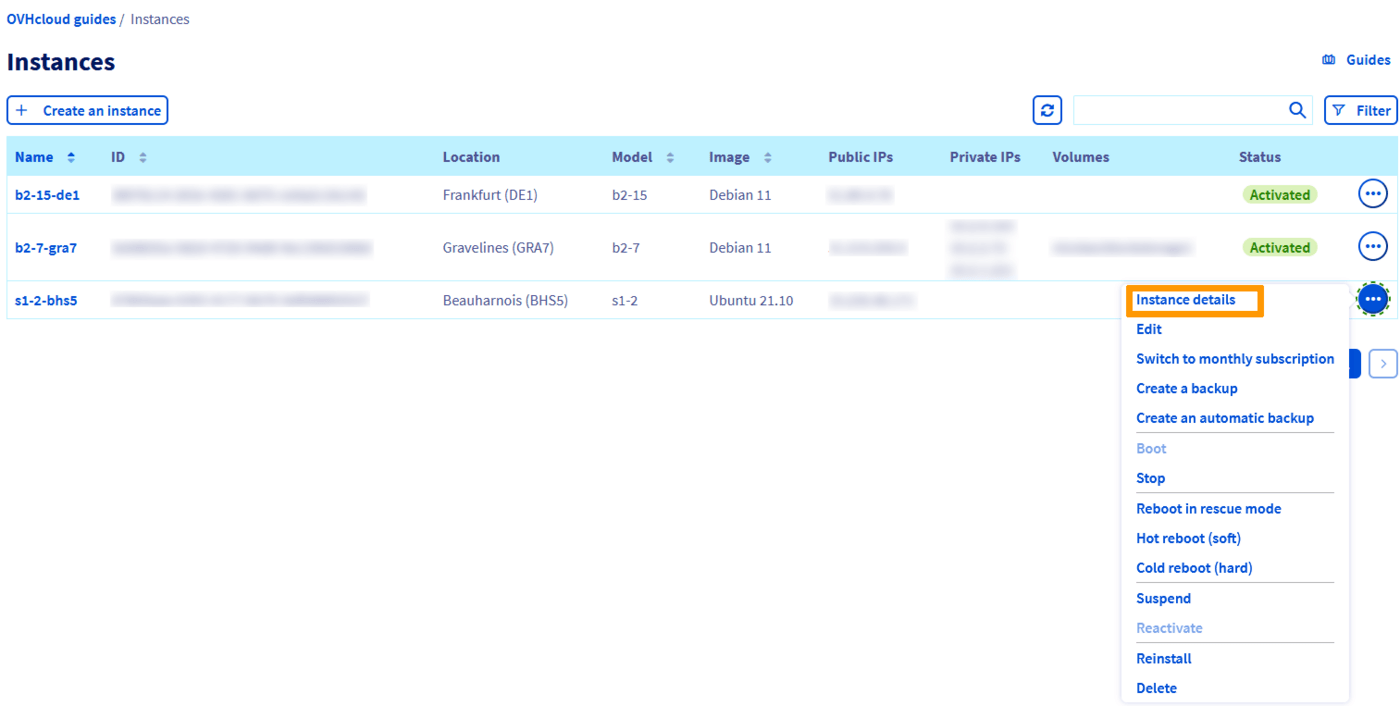
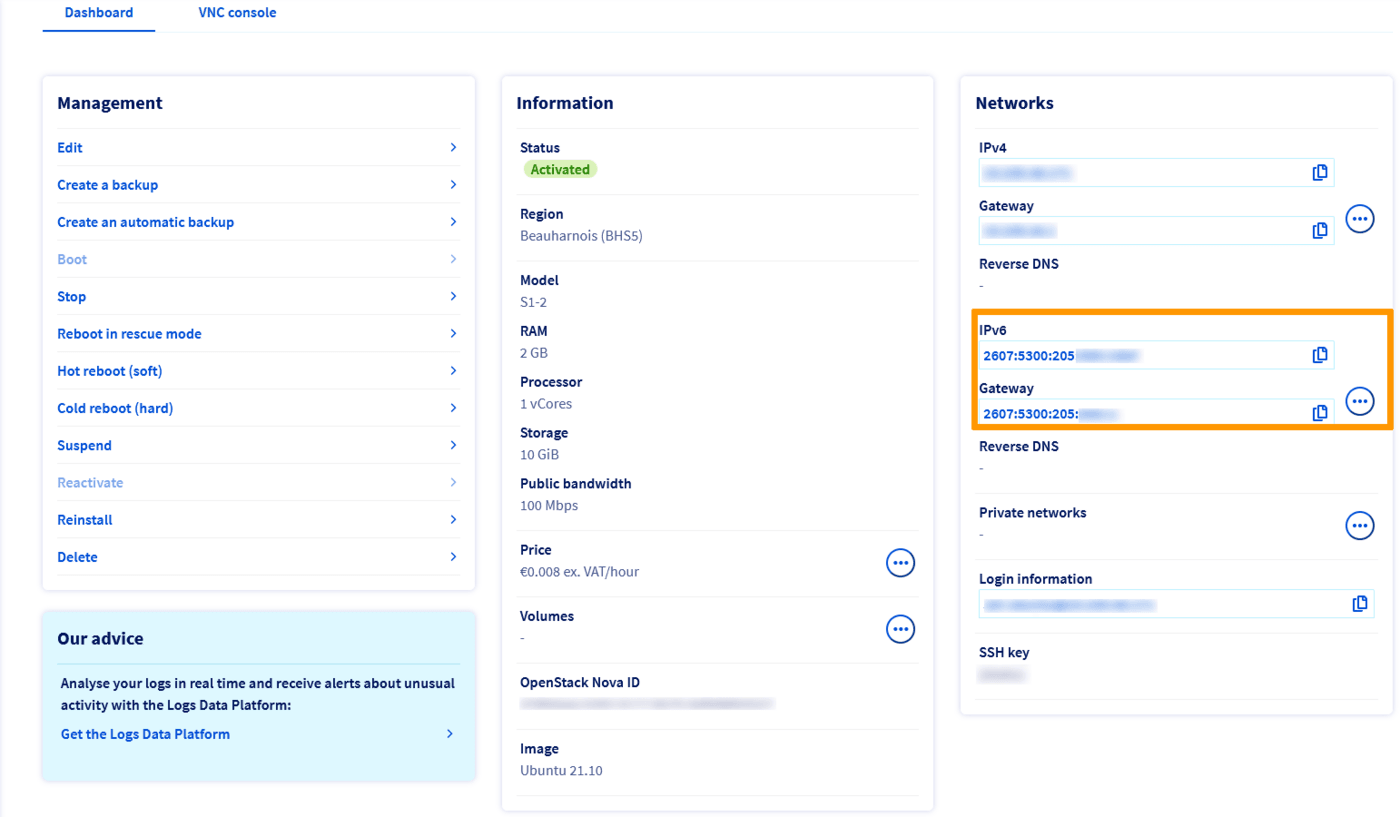
All the information you need is in the **Networks** section.
### Examples of persistent configuration
:::info
**Examples**
The information below is provided as an example.
Since you are the admin of your services, you will need to adapt the information to match your distribution or operating system.
:::
:::warning
Before modifying a configuration file always create a backup of the original.
:::
First of all, connect to your instance via SSH.
:::tip
Select the tab corresponding to your operating system.
:::
**Debian (excluding Debian 12)**
By default, the configuration files are located in `/etc/network/interfaces.d/`.
The best practice is to create a separate configuration file in the `/etc/network/interfaces.d/` directory to configure IPV6. In our example, our file is called `51-cloud-init-ipv6`:
```bash
sudo nano /etc/network/interfaces.d/51-cloud-init-ipv6
```
This separates the IPv6 configuration and lets you revert changes easily if needed.
Add the following lines to the file. Replace the generic elements (i.e. `YOUR_IPV6`, `IPV6_PREFIX` and `IPV6_GATEWAY`) as well as the network interface (if your server is not using **eth0**) with your specific values:
```console
iface eth0 inet6 static
address YOUR_IPV6
netmask IPV6_PREFIX
post-up /sbin/ip -6 route add IPV6_GATEWAY dev eth0
post-up /sbin/ip -6 route add default via IPV6_GATEWAY dev eth0
pre-down /sbin/ip -6 route del default via IPV6_GATEWAY dev eth0
pre-down /sbin/ip -6 route del IPV6_GATEWAY dev eth0
```
Configuration example
```console
iface eth0 inet6 static
address 2607:5300:201:abcd::7c5
netmask 128
post-up /sbin/ip -6 route add 2607:5300:201:abcd::1 dev eth0
post-up /sbin/ip -6 route add default via 2607:5300:201:abcd::1 dev eth0
pre-down /sbin/ip -6 route del default via 2607:5300:201:abcd::1 dev eth0
pre-down /sbin/ip -6 route del 2607:5300:201:abcd::1 dev eth0
```
Then restart your network service with one of the following commands:
```bash
sudo service networking restart
```
```bash
sudo systemctl restart networking
```
**Ubuntu and Debian 12**
The network configuration files are located in the `/etc/netplan/` directory.
The best practice is to create a separate configuration file in the `/etc/netplan/` directory to configure IPV6. In our example, our file is called `51-cloud-init-ipv6.yaml`:
```bash
sudo nano /etc/netplan/51-cloud-init-ipv6.yaml
```
This separates the IPv6 configuration and lets you revert changes easily if needed.
Add the following lines to the file. Replace the generic elements (i.e. `YOUR_IPV6`, `IPV6_PREFIX` and `IPV6_GATEWAY`) as well as the network interface (if your server is not using **eth0**) with your specific values:
```yaml
network:
version: 2
ethernets:
eth0:
dhcp6: no
match:
name: eth0
addresses:
- YOUR_IPV6/IPv6_PREFIX
routes:
- to: ::/0
via: IPv6_GATEWAY
```
:::warning
It is important to respect the alignment of each element in this file as represented in the example above. Do not use the tab key to create your spacing. Only the space key is needed.
:::
Configuration example
```yaml
network:
version: 2
ethernets:
eth0:
dhcp6: no
match:
name: eth0
addresses:
- 2607:5300:201:abcd::7c5/128
routes:
- to: ::/0
via: 2607:5300:201:abcd::1
```
You can test your configuration using this command:
```bash
sudo netplan try
```
If it is correct, apply it using the following command:
```bash
sudo netplan apply
```
**RedHat / CloudLinux / Rocky Linux (8 & 9) / AlmaLinux (8 & 9)**
The network configuration files are located in the `/etc/sysconfig/network-scripts/` directory. We recommend that you start by backing up the relevant configuration file.
In our example, our file is called `ifcfg-eth0`, so we make a backup of the `ifcfg-eth0` file using the following commands. Remember to replace **eth0** with your actual interface if necessary.
```bash
cd /etc/sysconfig/network-scripts/
sudo mkdir backup
sudo cp ifcfg-eth0 backup/ifcfg-eth0
```
You will then be able to revert the changes, using the commands below:
```bash
sudo rm -f /etc/sysconfig/network-scripts/ifcfg-eth0
sudo cp /etc/sysconfig/network-scripts/backup/ifcfg-eth0 /etc/sysconfig/network-scripts/ifcfg-eth0
```
Then we edit the `ifcfg-eth0` file, adding only the lines for the IPv6 configuration of the server. Replace the generic elements (i.e. `YOUR_IPV6`, `IPV6_PREFIX` and `IPV6_GATEWAY`) with your specific values.
```console
IPV6INIT=yes
IPV6ADDR=YOUR_IPV6/IPV6_PREFIX
IPV6_DEFAULTGW=IPV6_GATEWAY
```
We have omitted the IPv4 configuration to avoid confusion, but the IPv6 configuration is made in the same configuration file.
Configuration example
```console
IPV6INIT=yes
IPV6ADDR=2607:5300:201:abcd::7c5/128
IPV6_DEFAULTGW=2607:5300:201:abcd::1
```
Restart the network interface using one of the following commands:
```bash
sudo service networking restart
```
```bash
sudo systemctl restart networking
```
**Fedora / Rocky Linux (10) / AlmaLinux (10)**
The network configuration file is located in the `/etc/NetworkManager/system-connections/`. We recommend that you start by backing up the relevant configuration file.
In our example, our file is called `cloud-init-eth0.nmconnection`, so we make a copy of the `cloud-init-eth0.nmconnection` file using the following commands. Remember to replace **eth0** with your actual interface if necessary.
```bash
cd /etc/NetworkManager/system-connections/
sudo mkdir backup
sudo cp cloud-init-eth0.nmconnection backup/cloud-init-eth0.nmconnection
```
Then we edit the `cloud-init-eth0.nmconnection` file, adding only the lines for the IPv6 configuration of the server. Replace the generic elements (i.e. `YOUR_IPV6`, `IPV6_PREFIX` and `IPV6_GATEWAY`) with your specific values.
If we assume that your interface is eth0, the configuration should look like this:
```console
[ipv6]
method=manual
may-fail=true
address1=YOUR_IPV6/IPV6_PREFIX
route1=::/0,IPV6_GATEWAY
```
We have omitted the IPv4 configuration to avoid confusion, but the IPv6 configuration is made in the same configuration file.
Configuration example
```console
[ipv6]
method=manual
may-fail=true
address1=2607:5300:201:abcd::7c5/128
route1=::/0,2607:5300:201:abcd::1
```
**Windows**
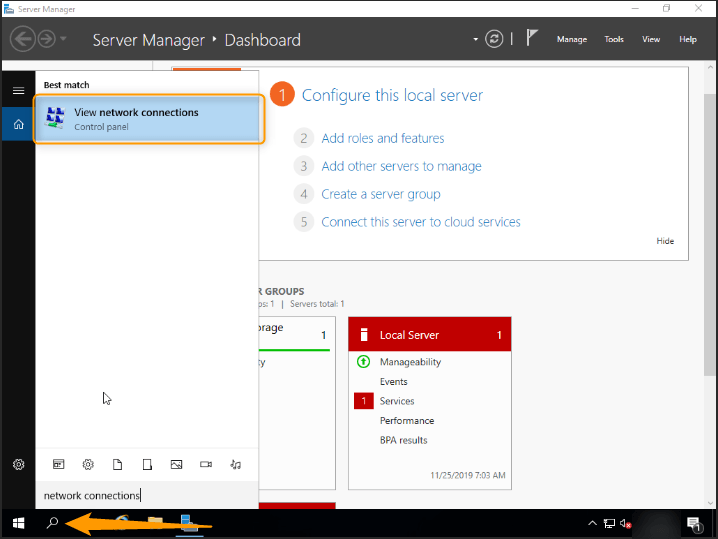
By default, IPv6 is not configured on Windows Servers. To enable it, perform the following steps:
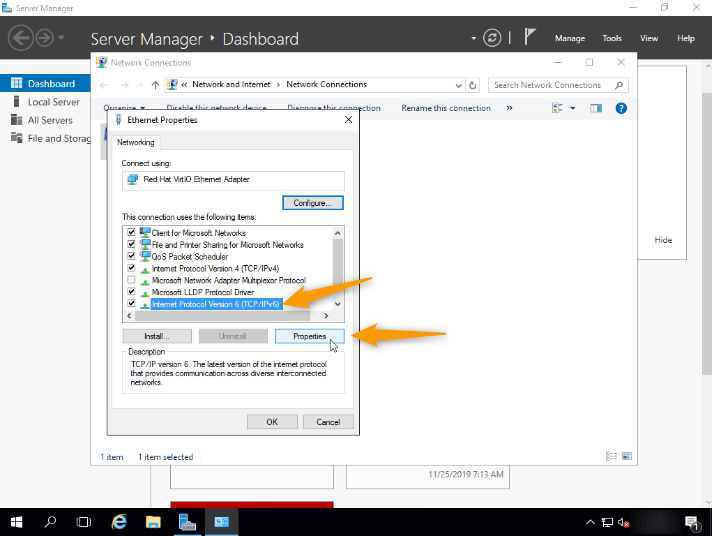
Go to Network Connections in Windows.
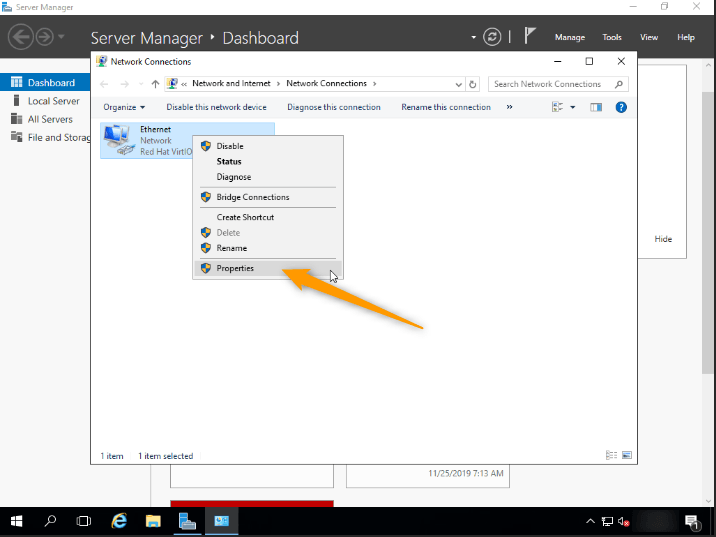
Then go to Properties of your network card by right-clicking on it.
Next, click on Internet Protocol Version 6 (TCP/IPv6), then on the Properties button.
Lastly, enter your IPv6 details.
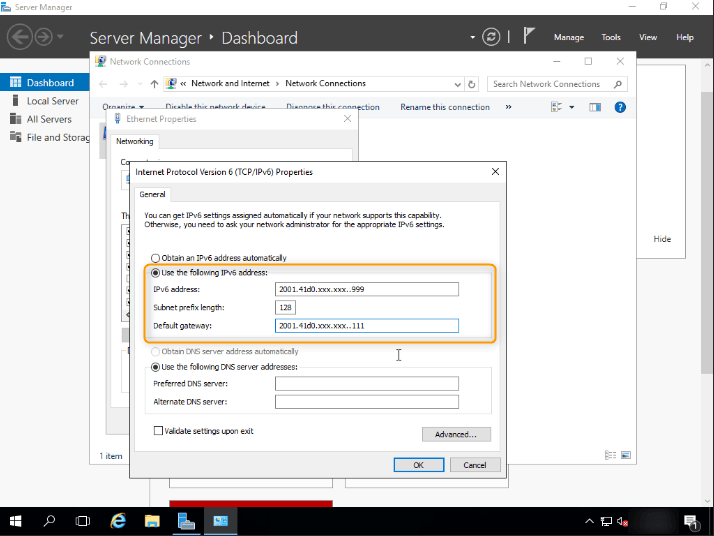Once done, tick the `Validate settings upon exit` box and click the OK button to validate your changes.
### Diagnostic
Have you configured your IPv6, but found that nothing works?
To determine whether the error is in your configuration or on the OVHcloud network, run this simple test.
First, [put your instance into rescue-pro mode](/en/guides/public-cloud/compute/put-an-instance-in-rescue-mode.md).
Next, use the template commands below to configure your IPv6 non-persistently, replacing `YOUR_IPV6`, `IPV6_PREFIX` and `IPV6_GATEWAY` with your own details:
```bash
ip addr add YOUR_IPV6/IPV6_PREFIX dev eth0
ip -6 route add IPV6_GATEWAY dev eth0
ip -6 route add default via IPV6_GATEWAY dev eth0
```
Test your network again via a ping6, for example:
```bash
ping6 ipv6.google.com
```
If your instance responds, it is likely that there is an error in one of the steps taken for your initial configuration.
In any case, please feel free to reach out to our [support team](https://help.ovhcloud.com/csm?id=csm_get_help) with the elements tested above, and we can perform an analysis on our end.
## Go further
If you need training or technical assistance to implement our solutions, contact your sales representative or click on [this link](https://www.ovhcloud.com/en-gb/professional-services/) to get a quote and ask our Professional Services experts to assist you with your use case.
Join our [community of users](https://community.ovhcloud.com/).