---
title: "Changing the DNS servers of Public Cloud instances"
description: "Find out how to change the default DNS servers on a Public Cloud instance"
url: https://docs.ovhcloud.com/en/guides/public-cloud/network-services/change-instance-dns-servers
lang: en
lastUpdated: 2021-10-29
---
# Changing the DNS servers of Public Cloud instances
## Objective
The default DNS server configured on instances you create will be the OVHcloud server (213.186.33.99 for example). You can add a secondary server or replace this configuration with your own. However, the DNS servers are configured automatically by a DHCP server and you will not be able to change the DNS configuration by editing the `resolv.conf` file.
**This guide explains how to change the DHCP configuration of an instance in order to change the DNS servers.**
:::warning
OVHcloud is providing you with services for which you are responsible, with regard to their configuration and management. You are therefore responsible for ensuring they function correctly.
This guide is designed to assist you in common tasks as much as possible. Nevertheless, we recommend that you contact a [specialist service provider](https://partner.ovhcloud.com/en-gb/directory/) if you have difficulties or doubts concerning the administration, usage or implementation of services on a server. You can find more information in the [Go further](#gofurther) section of this guide.
:::
## Requirements
- A [Public Cloud instance](https://www.ovhcloud.com/en-gb/public-cloud/) in your OVHcloud account
- Administrative access to the instance via SSH or RDP
- Basic networking and administration knowledge
***
### OVHcloud Control Panel Access
- **Direct link:** Public Cloud Projects
- **Navigation path:** Public Cloud > Select your project
***
## Instructions
Log in to your instance via SSH. Refer to our guide on [Connecting to a Public Cloud instance](/en/guides/public-cloud/compute/getting-started.md#connect-instance) if necessary.
### Debian/Ubuntu
Using a text editor of your choice, edit the file `/etc/dhcp/dhclient.conf` in order to configure the DNS servers you want.
Here you can use different "statements" to add your desired DNS servers. Add the respective line and replace IP1/IP2 with their IP addresses.
- To add DNS servers that will effectively replace the one configured by default, add this line:
```console
supersede domain-name-servers IP1, IP2;
```
- To add DNS servers that will be preferred to the one configured by default:
```console
prepend domain-name-servers IP1, IP2;
```
- To add DNS servers that will only be used if the one configured by default is unavailable:
```console
append domain-name-servers IP1, IP2;
```
Save your changes to the config file and exit the editor.
Check that the configuration has been applied properly with the following command:
```bash
cat /etc/resolv.conf
```
```console
domain openstacklocal
search openstacklocal
nameserver IP1
nameserver IP2
```
### CentOS/Fedora
Check the current configuration with the command `nmcli`:
```bash
nmcli
eth0: connected to System eth0
"Red Hat Virtio"
ethernet (virtio_net), FA:16:3E:B6:FB:89, hw, mtu 1500
ip4 default
inet4 51.77.205.51/32
route4 0.0.0.0/0
route4 51.77.205.51/32
route4 51.77.204.1/32
inet6 fe80::f816:3eff:feb6:fb89/64
route6 ff00::/8
route6 fe80::/64
lo: non-managed
"lo"
loopback (unknown), 00:00:00:00:00:00, sw, mtu 65536
DNS configuration:
servers: 127.0.0.1 213.186.33.99
interface: eth0
```
Retrieve the name of your public interface:
```bash
nmcli connection show
```
```console
NAME UUID TYPE DEVICE
System eth0 5fb06bd0-0bb0-7ffb-45f1-d6edd65f3e03 ethernet eth0
```
Disable the automatic DNS modification and add the IP addresses (replace IP1/IP2) of the DNS servers you want to configure. (Replace `System eth0` with the actual value retrieved previously.)
```bash
nmcli con mod "System eth0" ipv4.ignore-auto-dns yes
nmcli con mod "System eth0" ipv4.dns "IP1 IP2"
```
Apply the configuration. (Replace `System eth0` with the actual value retrieved previously.)
```bash
nmcli con down "System eth0" && nmcli con up "System eth0"
```
Check that the configuration has been properly applied:
```bash
nmcli | grep -E 'DNS|server|interface'
DNS configuration:
servers: IP1 IP2
interface: eth0
```
### On Windows
Connect to the instance via remote desktop session or with the VNC console. Refer to our guide on [Connecting to a Public Cloud instance](/en/guides/public-cloud/compute/getting-started.md#connect-instance) if necessary.
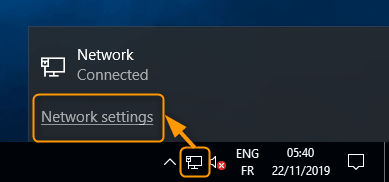
Open the `Network settings
`.
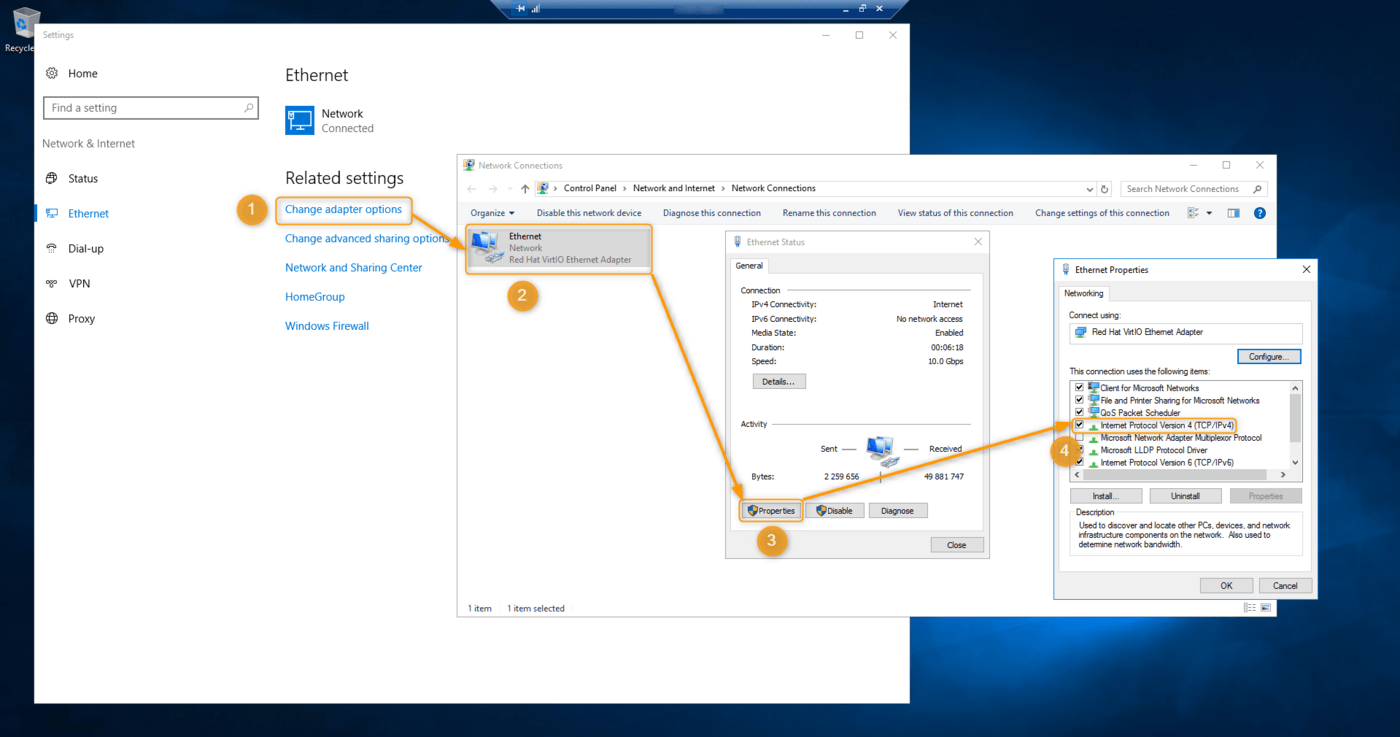
Go to your public network adapter’s IPv4 configuration via the control panel.
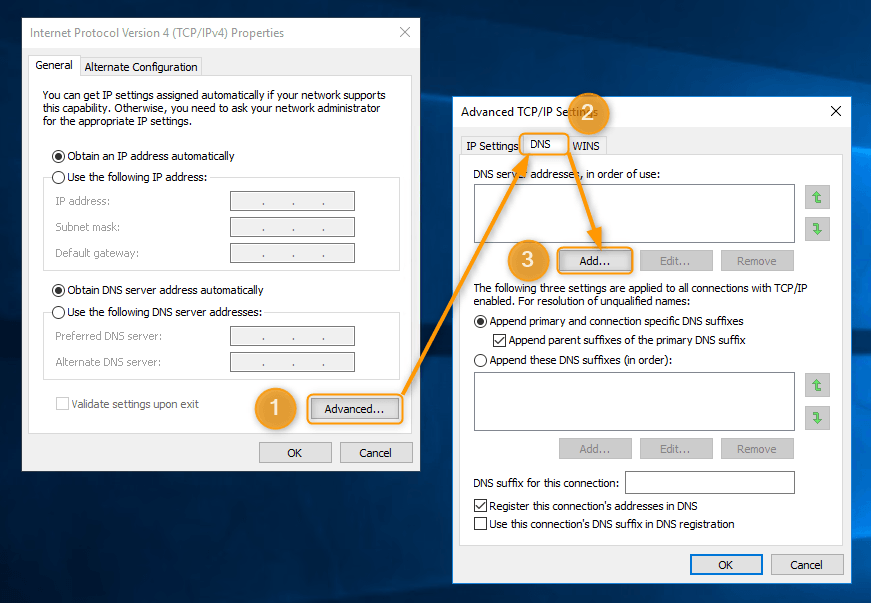
Add the servers you want to use in the `Advanced
` settings.
:::info
In PowerShell, you can use the command `nslookup` to check which DNS server is used by default.
:::
## Go further [](#)
[First steps with Public Cloud instances](/en/guides/public-cloud/compute/first-steps-with-public-cloud-instance.md)
[Changing the hostname of a Public Cloud instance](/en/guides/public-cloud/compute/changing-the-hostname-of-an-instance.md)
Join our [community of users](https://community.ovhcloud.com/).