---
title: "Deploying AI workloads on an 8x NVIDIA H200 NVL GPU instance"
description: "Find out how to deploy AI workloads on an 8x NVIDIA H200 NVL GPU instance while respecting its NVLink topology"
url: https://docs.ovhcloud.com/en/guides/public-cloud/compute/deploy-8-h200-nvl-gpu-instance
lang: en
lastUpdated: 2026-10-01
---
> For AI agents: the complete documentation index is available at https://docs.ovhcloud.com/en/llms.txt, the full documentation bundle is available at https://docs.ovhcloud.com/en/llms-full.txt.
# Deploying AI workloads on an 8x NVIDIA H200 NVL GPU instance
## Objective
We recommend that you follow this guide if you have an **h200-1920-eph** or **h200-1920** instance. 8x NVIDIA H200 NVL instances (**h200-1920** and **h200-1920-eph** flavors) are organised into two groups of 4 GPUs, with NVLink connectivity only within each group and PCIe between the two groups. Taking this topology into account helps you get the best performance and stability for your AI workloads.
:::info
At the moment, 8x NVIDIA H200 NVL instances are only available in the Paris region (**EU-WEST-PAR**).
:::
**This guide explains how to deploy and operate AI workloads on an 8x NVIDIA H200 NVL GPU instance**
## Requirements
- A [Public Cloud project](https://docs.ovhcloud.com/en/guides/public-cloud/cross-functional/create-a-public-cloud-project.md) with access to the region where the **h200-1920** and **h200-1920-eph** instance models are available (**EU-WEST-PAR**)
- [An SSH key](https://docs.ovhcloud.com/en/guides/public-cloud/compute/creating-ssh-keys.md) created to deploy a Linux GPU instance
***
### OVHcloud Control Panel Access
- **Direct link:** All my Public Cloud projects
- **Navigation path:** Public Cloud > Select your project > Instances
***
## Instructions
You will find below the information needed to deploy an 8x NVIDIA H200 NVL instance, understand its topology, then run and monitor your AI workloads on it.
### Deploying the instance
In the **Quick access**
section, click `Create an instance
`. Then select the **EU-WEST-PAR**
region and choose the **h200-1920**
or **h200-1920-eph**
instance model in the **Cloud GPU**
category.
Next, follow the remaining steps as detailed in the [How to create a Public Cloud instance and connect to it](https://docs.ovhcloud.com/en/guides/public-cloud/compute/getting-started.md#step-4-create-the-instance) guide. This process may take a few minutes.
Once the instance is delivered, install the NVIDIA driver as detailed in the [Deploying a GPU instance](https://docs.ovhcloud.com/en/guides/public-cloud/compute/deploy-a-gpu-instance.md) guide.
### Hardware overview
| Characteristic | h200-1920 | h200-1920-eph |
| ------------------------ | ----------------------------------------------- | ------------------------------------------- |
| GPUs | 8x NVIDIA H200 NVL | 8x NVIDIA H200 NVL |
| GPU memory | 141 GB HBM3e per GPU (1,128 GB in total) | 141 GB HBM3e per GPU (1,128 GB in total) |
| GPU topology | 2 groups of 4 GPUs | 2 groups of 4 GPUs |
| Intra-group interconnect | NVLink, within each group of 4 GPUs | NVLink, within each group of 4 GPUs |
| Inter-group interconnect | PCIe | PCIe |
| vCores | 224 | 224 |
| Memory (RAM) | 1,920 GB | 1,920 GB |
| Storage | 400 GB (root disk) + **4x 7.68 TB passthrough** | 400 GB (root disk) + **1x 20 TB ephemeral** |
| Public network | 25 Gbit/s | 25 Gbit/s |
| Private network | Up to 25 Gbit/s | Up to 25 Gbit/s |
### Ephemeral disk (h200-1920-eph)
The ephemeral disk of the **h200-1920-eph** instance model is already formatted with an Ext4 filesystem. It may already be mounted automatically under `/mnt` by [cloud-init](https://docs.cloud-init.io/en/latest/reference/modules.html#mounts).
To check whether the ephemeral disk is mounted, run the following command:
```sh
lsblk -f
```
If the 20 TB disk shows `/mnt` as its mount point, it is ready to use. Otherwise, mount it manually, replacing `/dev/` with the device name shown by `lsblk -f`:
```sh
sudo mount /dev/ /mnt
```
:::warning
Data stored on the ephemeral disk is not included in [instance backups](https://docs.ovhcloud.com/en/guides/public-cloud/compute/save-an-instance.md) and is lost when the instance is deleted or shelved. We recommend backing up your important data to an external storage solution, such as [Object Storage](https://docs.ovhcloud.com/en/guides/storage-and-backup/object-storage/s3-getting-started-with-object-storage.md).
:::
### GPU topology and NVLink architecture
The 8 GPUs are organised as follows:
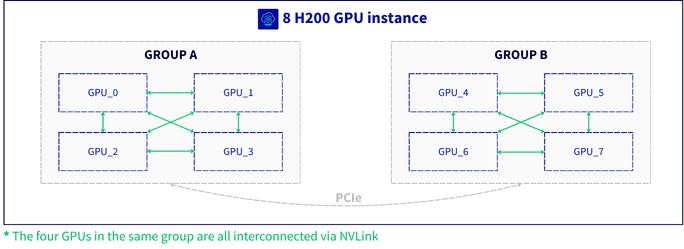
| NVLink group | GPUs | Interconnect within the group | Interconnect between groups |
| ------------ | -------------- | ---------------------------------------- | --------------------------- |
| Group A | GPU 0, 1, 2, 3 | NVLink (all 4 GPUs fully interconnected) | PCIe |
| Group B | GPU 4, 5, 6, 7 | NVLink (all 4 GPUs fully interconnected) | PCIe |
When allocating workloads on this instance, we recommend the following:
- Whenever possible, run each job within a single NVLink group (4 GPUs).
- When a single model needs all **8 GPUs**, treat the two groups as two separate clusters: keep communication-intensive parallelism (such as tensor parallelism) within each group, and only use lighter communication (such as pipeline parallelism) between the two groups. An example is given in the recommended configurations below.
- Keep in mind that NVLink performance benefits apply **within each group of 4 GPUs** only.
:::info
Keeping communication-intensive operations within each NVLink group avoids heavy traffic on the PCIe bus, which ensures both better performance and better stability.
:::
Before dispatching a workload, we recommend checking which GPUs belong to which NVLink group:
```sh
nvidia-smi topo -m
```
In the matrix, GPUs connected by NVLink show an `NV#` value between them (# being the number of NVLink links). GPUs connected through PCIe only show a PCIe path type instead (for example `PHB`, `NODE` or `SYS`). The 4 GPUs showing `NV#` values between them form one NVLink group.
You can also display the NVLink status of a given GPU (here GPU 0):
```sh
nvidia-smi nvlink --status -i 0
```
### Recommended configurations
The examples below use [vLLM](https://docs.vllm.ai/) to illustrate how to deploy a model on 4 or 8 GPUs while respecting the NVLink topology.
**4 GPUs (single NVLink group)**
To deploy on 4 GPUs, explicitly specify the device IDs to make sure they all belong to the same NVLink group:
```sh
# Number GPUs in the same order as nvidia-smi (PCI bus order)
export CUDA_DEVICE_ORDER=PCI_BUS_ID
# Restrict the deployment to the first NVLink group (use 4,5,6,7 for the second group)
export CUDA_VISIBLE_DEVICES=0,1,2,3
# Set the tensor parallel size to 4
vllm serve --tensor-parallel-size 4 ...
```
**8 GPUs (both NVLink groups)**
To deploy very large models across all 8 GPUs, combine pipeline parallelism and tensor parallelism:
```sh
# Number GPUs in the same order as nvidia-smi (PCI bus order)
export CUDA_DEVICE_ORDER=PCI_BUS_ID
# Set both the pipeline parallel size and the tensor parallel size
vllm serve --pipeline-parallel-size 2 --tensor-parallel-size 4 ...
```
Assuming GPUs 0–3 and 4–7 form the two NVLink groups (see `nvidia-smi topo -m`), this configuration splits the model layers into two stages (pipeline parallelism), one per NVLink group: GPUs 0–3 run the first stage and GPUs 4–7 the second. Within each group, the weights of each layer are split across the 4 GPUs (tensor parallelism). The frequent tensor-parallel exchanges stay on NVLink, while PCIe mainly carries the activations passed from one stage to the next.
:::warning
Avoid using `--tensor-parallel-size 8`, which would apply tensor parallelism across the two groups.
:::
**Two replicas (one per NVLink group)**
If the model fits on 4 GPUs, you can also run two independent replicas of the model, one per NVLink group, and distribute requests between them. This doubles throughput without any traffic between the two groups. Run each command in its own terminal session, as `vllm serve` keeps running in the foreground:
```sh
export CUDA_DEVICE_ORDER=PCI_BUS_ID
# First replica on the first NVLink group
CUDA_VISIBLE_DEVICES=0,1,2,3 vllm serve --tensor-parallel-size 4 --port 8000 ...
# Second replica on the second NVLink group
CUDA_VISIBLE_DEVICES=4,5,6,7 vllm serve --tensor-parallel-size 4 --port 8001 ...
```
### Operational best practices
We recommend that you:
- confirm the GPU-to-NVLink group mapping before dispatching a workload (`nvidia-smi topo -m`).
- keep all GPUs used by a single job within the same NVLink group, unless you use a cross-group configuration such as the pipeline-parallel one described above.
- monitor NVLink status and kernel logs (`dmesg`) while your workloads are running.
- regularly back up your important data.
### Recommended monitoring
We recommend monitoring the following metrics while your workloads are running:
| Metric | Method | Recommendation |
| ------------------------- | ----------------------------------------------------- | -------------- |
| NVLink status and errors | `nvidia-smi nvlink --status` / `nvidia-smi nvlink -e` | Recommended |
| GPU detection and health | `nvidia-smi -q` / NVIDIA DCGM (`dcgmi health`) | Recommended |
| GPU errors in kernel logs | `sudo dmesg -T \| grep -iE "xid\|nvrm"` | Recommended |
:::info
GPU and NVLink errors are reported by the NVIDIA driver in the kernel logs as **Xid** messages. For continuous monitoring, [NVIDIA DCGM](https://developer.nvidia.com/dcgm) can export these metrics to your monitoring stack. The `smartctl` and `nvme` commands are provided by the `smartmontools` and `nvme-cli` packages (for example `sudo apt-get install smartmontools nvme-cli` on Debian or Ubuntu).
:::
## Go further
[Deploying a GPU instance](https://docs.ovhcloud.com/en/guides/public-cloud/compute/deploy-a-gpu-instance.md)
Join our [community of users](https://community.ovhcloud.com/).