---
title: "AI Training - Tutorial - Get started with NVIDIA Triton Inference Server and AI Training"
description: "How to use optimally AI models with NVIDIA Triton Inference Server and AI Training"
url: https://docs.ovhcloud.com/en/guides/public-cloud/ai-machine-learning/ai-training-nvidia-triton-inference-server
lang: en
lastUpdated: 2025-06-27
---
# AI Training - Tutorial - Get started with NVIDIA Triton Inference Server and AI Training
## Objective
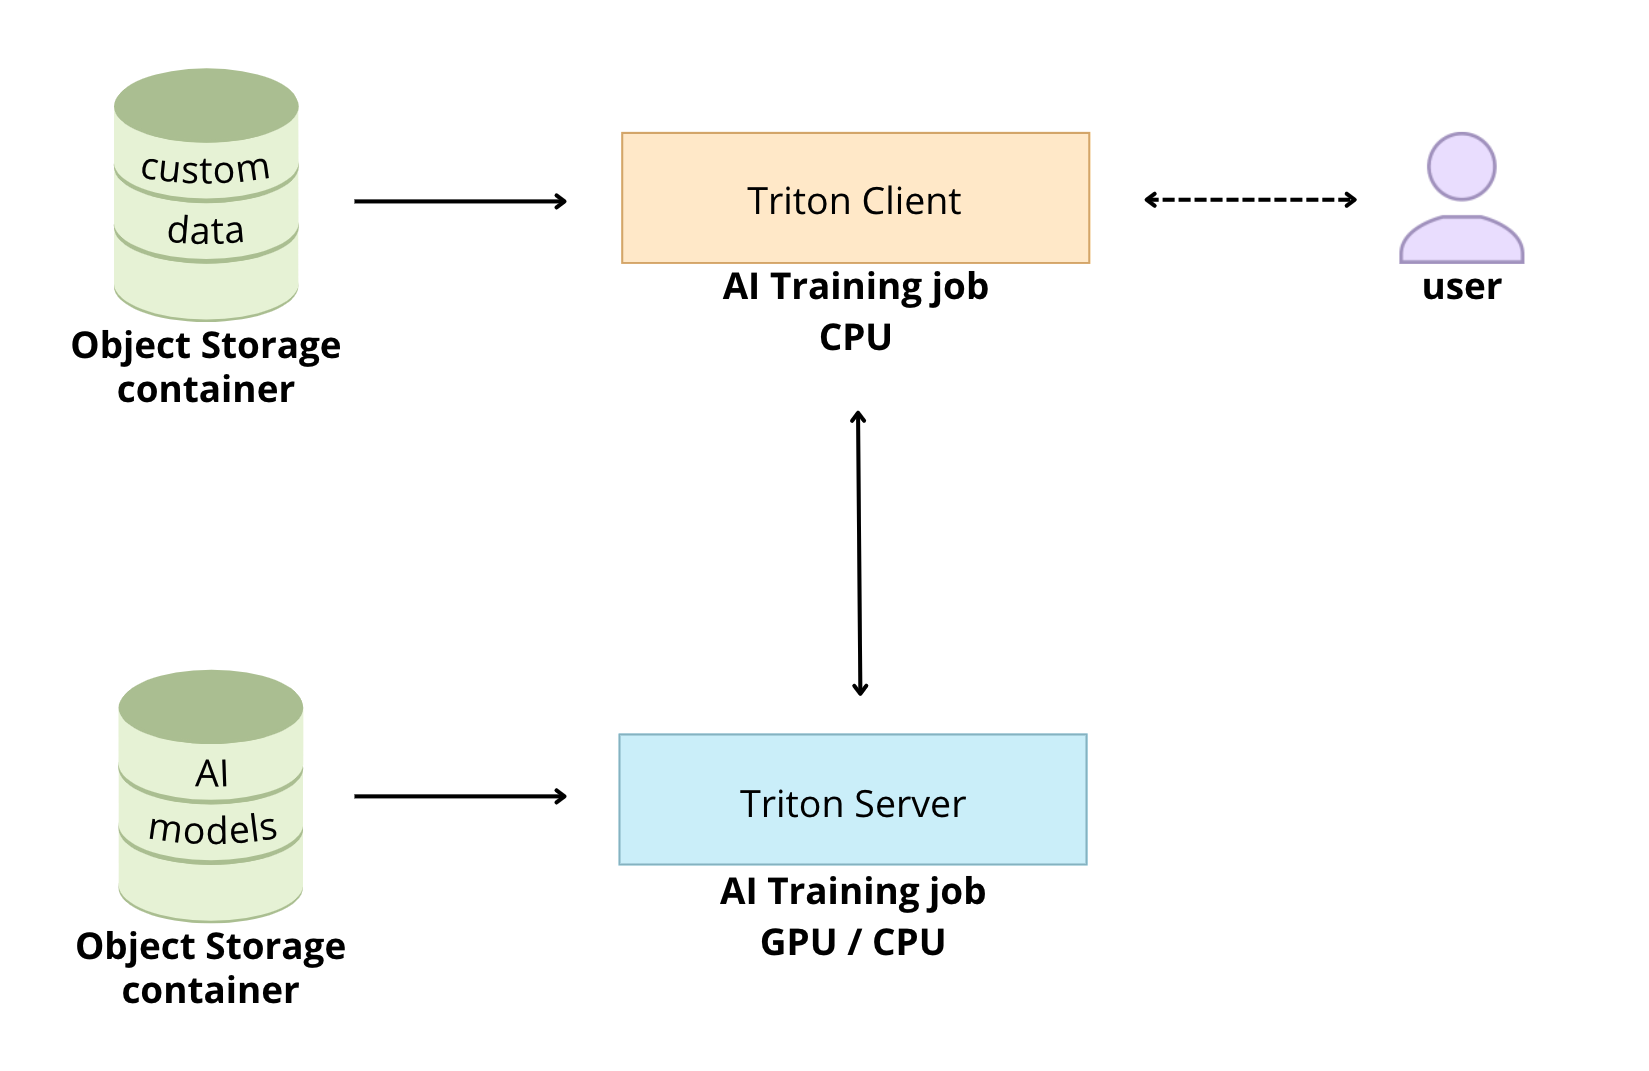
**Triton Inference Server** from NVIDIA allows you to streamline and standardize AI inference.
Triton enables users to _deploy_, _run_ and _scale_ trained AI models from any framework and on any type of resources: **GPU** or **CPU**. It also allows developers to deliver high-performance inference in the Cloud.
The goal of this tutorial is to see how it is possible to deploy **Triton Inference Server** easily thanks to the OVHcloud **AI Training** tool.
## Requirements
- Access to the OVHcloud Control Panel
- [ovhai CLI](/en/guides/public-cloud/ai-machine-learning/ai-cli-install-client.md) installed
- An AI Training project created inside a [Public Cloud project](https://www.ovhcloud.com/en-gb/public-cloud/) in your OVHcloud account
- A [user for AI Training](/en/guides/public-cloud/ai-machine-learning/ai-users.md)
- [Docker](https://www.docker.com/get-started) installed on your local computer or on a Virtual Machine
- Some knowledge about Docker images and [Dockerfile](https://docs.docker.com/engine/reference/builder/)
- Some basics on [NVIDIA Triton Inference Server](https://docs.nvidia.com/deeplearning/triton-inference-server/user-guide/docs/getting_started/quickstart.html)
## Instructions
### Create the model repository
The model repository is the directory in which you place the AI models you want **Triton Inference Server** to serve.
#### Custom models
**Triton Inference Sever** allows you to deploy several models from multiple Deep Learning and Machine Learning frameworks. For example, Triton Inference Server can serve the following model formats: TensorRT, TensorFlow, PyTorch, ONNX, ...
Follow the NVIDIA Triton Inference Server [user guide](https://docs.nvidia.com/deeplearning/triton-inference-server/user-guide/docs/index.html) to know more about the capabilities.
To use custom AI models, the directories and files that compose a model repository must follow a **required layout**.
```console
├── /
└── /
└── [config.pbtxt]
└── [ ...]
└── /
└──
└── /
└──
...
└── /
└── [config.pbtxt]
└── [ ...]
└── /
└──
└── /
└──
...
...
```
Find more information on how to use custom models with Triton in this [documentation](https://docs.nvidia.com/deeplearning/triton-inference-server/user-guide/docs/user_guide/model_repository.html).
An example model repository is included in the `docs/examples/model_repository`.
:::info
We will use these [models already trained](https://github.com/triton-inference-server/server/tree/main/docs/examples/model_repository) in this tutorial.
:::
#### Sample models
First of all, you have to clone locally the Triton Inference Server GitHub repository.
:::info
In this command, specify also the version of Triton you are interested in. For this example, we will use the `r23.03`.
:::
Clone the GitHub repository:
```console
git clone -b r23.03 https://github.com/triton-inference-server/server.git
```
Before using the repository, you have to fetch any missing model definition files from their public model zoos via the provided script: `fetch_models.sh`.
The following models will be downloaded:
- densenet\_onnx
- inception\_graphdef
- simple
- simple\_dyna\_sequence
- simple\_identity
- simple\_int8
- simple\_sequence
- simple\_string
```console
cd server/docs/examples
./fetch_models.sh
```
Check the content and architecture of your model repository with the `tree` command:
```console
tree model_repository/
```
You should get:
```console
model_repository/
├── densenet_onnx
│ ├── 1
│ │ └── model.onnx
│ ├── config.pbtxt
│ └── densenet_labels.txt
├── inception_graphdef
│ ├── 1
│ │ └── model.graphdef
│ ├── config.pbtxt
│ └── inception_labels.txt
├── simple
│ ├── 1
│ │ └── model.graphdef
│ └── config.pbtxt
├── simple_dyna_sequence
│ ├── 1
│ │ └── model.graphdef
│ └── config.pbtxt
├── simple_identity
│ ├── 1
│ │ └── model.savedmodel
│ │ └── saved_model.pb
│ └── config.pbtxt
├── simple_int8
│ ├── 1
│ │ └── model.graphdef
│ └── config.pbtxt
├── simple_sequence
│ ├── 1
│ │ └── model.graphdef
│ └── config.pbtxt
└── simple_string
├── 1
│ └── model.graphdef
└── config.pbtxt
17 directories, 18 files
```
#### Upload the models to an Object Storage container
To upload the models to an OVHcloud Object Storage container, you can use the `ovhai` [CLI](/en/guides/public-cloud/ai-machine-learning/ai-cli-access-data.md).
:::warning
Warning! In order to use **Triton Inference Server**, you must ensure that your model repository is correctly architected. For example, _keep the empty directories_, they are necessary for the proper functioning.
:::
```console
ovhai bucket object upload my-models@GRA model_repository/ --remove-prefix model_repository/
```
Once your models have been uploaded, check that all your models are available:
```console
ovhai bucket object list my-models@GRA
```
You should obtain:
```console
DATE BYTES NAME DESCRIPTION ETAG
2023-05-04T12:45:41.643960 31.2 MiB densenet_onnx/1/model.onnx Object c037b5c86fdfc940900b309299657f92
2023-05-04T12:45:41.663860 387 B densenet_onnx/config.pbtxt Object d0479dc66442434320897957068e5d51
2023-05-04T12:45:41.668330 10.1 KiB densenet_onnx/densenet_labels.txt Object 8ea0e7b022e01f34c5cccecbdf90b14f
2023-05-04T12:45:41.664780 91.3 MiB inception_graphdef/1/model.graphdef Object 4b0459bcf60c61cf2ec759ff89ebbbb7
2023-05-04T12:45:41.672190 340 B inception_graphdef/config.pbtxt Object 7c62d703609e2db1145cbb709ed0bf35
2023-05-04T12:45:41.659140 10.1 KiB inception_graphdef/inception_labels.txt Object aafe29c3854eda34886973b95036e66d
2023-05-04T12:45:41.668390 310 B simple/1/model.graphdef Object de0bafd39f604ea09ca677fc79c70bb5
2023-05-04T12:45:41.663640 370 B simple/config.pbtxt Object c805202e04542e47a8473181f9dcd0b9
2023-05-04T12:45:41.778020 879 B simple_dyna_sequence/1/model.graphdef Object bce7d0674c80275ccb865a14eaa0c29a
2023-05-04T12:45:41.786770 2.6 KiB simple_dyna_sequence/config.pbtxt Object ffe0ca21fb2fd3352f976d139869a87e
2023-05-04T12:45:41.783670 531 B simple_identity/1/model.savedmodel/saved_model.pb Object eb2ce10be33de0013d98b26348cc8818
2023-05-04T12:45:41.789540 242 B simple_identity/config.pbtxt Object 5994e38fdf5f2789a0dc942dfdeff422
2023-05-04T12:45:41.822000 281 B simple_int8/1/model.graphdef Object ff193cfa1d711e1e0d647e7f0d09965d
2023-05-04T12:45:41.888750 371 B simple_int8/config.pbtxt Object fa24596d26d5d03b6c78c02dacabe039
2023-05-04T12:45:41.949530 621 B simple_sequence/1/model.graphdef Object 9c3c5501f283e1a1c955b299b027811c
2023-05-04T12:45:41.971580 2.1 KiB simple_sequence/config.pbtxt Object fd5b8ae1375aef54998845c4690b7af9
2023-05-04T12:45:42.042580 696 B simple_string/1/model.graphdef Object 4b8239460b9c647e71e0d79e3f42d1c1
2023-05-04T12:45:42.056610 382 B simple_string/config.pbtxt Object 840206b87fb3259eabdc3bb6478ab687
```
### Launch Triton Inference Server with AI Training
Triton is optimized to provide the best inferencing performance by using **GPUs**. In this tutorial, it will be running with one GPU thanks to the OVHcloud **AI Training** tool.
First of all, pull the **Triton Inference Server** Docker image from the [NGC repository](https://catalog.ngc.nvidia.com/orgs/nvidia/containers/tritonserver). In this tutorial, we will use the `23.03-py3` container version.
```console
docker pull nvcr.io/nvidia/tritonserver:23.03-py3
```
#### Customize the Triton Inference Server Docker image for OVHcloud AI Tools
To make Triton Inference Server image compatible with AI Training, you have to rebuild the image by giving the OVHcloud user rights on the `/workspace` content.
:::info
For more information on how to build Docker images compatible with OVHcloud AI solutions, please refer to this [documentation](/en/guides/public-cloud/ai-machine-learning/ai-training-build-use-custom-image.md).
:::
##### Create the Dockerfile
Your **Dockerfile** should start with the `FROM` instruction indicating the parent image to use. In our case we choose to start from the `FROM nvcr.io/nvidia/tritonserver:23.03-py3` pulled image:
```console
FROM nvcr.io/nvidia/tritonserver:23.03-py3
```
Create the home directory and copy your files to it:
```console
WORKDIR /workspace
COPY . /workspace
```
Give correct access rights to the OVHcloud user (42420:42420):
:::warning
Don't forget the `--user=42420:42420` argument if you want to simulate the exact same behaviour that will occur on **AI Training jobs**. It executes the Docker container as the specific OVHcloud user (user **42420:42420**).
:::
```console
RUN chown -R 42420:42420 /workspace
ENV HOME=/workspace
```
Find the complete Dockerfile below:
```console
FROM nvcr.io/nvidia/tritonserver:23.03-py3
WORKDIR /workspace
COPY . /workspace
RUN chown -R 42420:42420 /workspace
ENV HOME=/workspace
```
##### Build the Docker image from the Dockerfile
From the directory containing your **Dockerfile**, run one of the following commands to build your application image:
```console
# Build the image using your machine's default architecture
docker build . -t triton-inference-server:23.03-py3
# Build image targeting the linux/amd64 architecture
docker buildx build --platform linux/amd64 -t triton-inference-server:23.03-py3 .
```
- The **first command** builds the image using your system’s default architecture. This may work if your machine already uses the `linux/amd64` architecture, which is required to run containers with our AI products. However, on systems with a different architecture (e.g. `ARM64` on `Apple Silicon`), the resulting image will not be compatible and cannot be deployed.
- The **second command** explicitly targets the `linux/AMD64` architecture to ensure compatibility with our AI services. This requires `buildx`, which is not installed by default. If you haven’t used `buildx` before, you can install it by running: `docker buildx install`
:::info
The dot `.` argument indicates that your build context (place of the **Dockerfile** and other needed files) is the current directory.
The `-t` argument allows you to choose the identifier to give to your image. Usually image identifiers are composed of a **name** and a **version tag** `:`. For this example we chose **triton-inference-server:23.03-py3**.
:::
##### Push the server image into the shared registry
:::warning
The shared registry of AI Training should only be used for testing purposes. Please consider attaching your own registry. More information about this can be found [here](/en/guides/public-cloud/ai-machine-learning/ai-manage-registries.md). The images pushed to this registry are for AI Tools workloads only, and will not be accessible for external uses.
:::
Find the address of your shared registry by launching this command:
```console
ovhai registry list
```
Log in on the shared registry with your usual AI Platform user credentials:
```console
docker login -u -p
```
Push the compiled image into the shared registry:
```console
docker tag triton-inference-server:23.03-py3 /triton-inference-server:23.03-py3
docker push /triton-inference-server:23.03-py3
```
#### Launch Triton Inference Server in a dedicated job
Triton Inference Server exposes both **HTTP/REST** and **gRPC** endpoints. Therefore, clients can communicate with Triton using either an HTTP/REST and GRPC protocols.
Launch Triton Inference Server with **OVHcloud AI Training tool** to benefit from the GPU power:
```console
ovhai job run --default-http-port 8000 \
--gpu 1 \
--volume my-models@GRA:/workspace/models:RO \
/triton-inference-server:23.03-py3 \
-- bash -c 'tritonserver --model-repository=/workspace/models'
```
So that the client can communicate with the Triton Inference Server, you must retrieve the **server job IP and URL**.
If necessary, install `jq` as follows:
```console
sudo apt-get install jq
```
To get the **server job url**, run the following command:
```console
ovhai job get -o json | jq '.status.url' -r
```
You can verify that Triton Inference Server is running properly.
```console
curl -v /v2/health/ready
```
Then, you can get the **server job ip**:
```console
ovhai job get -o json | jq '.status.ip' -r
```
### Send inference requests
First, you have to use a `docker pull` to get the client libraries and examples image from NGC.
```console
docker pull nvcr.io/nvidia/tritonserver:23.03-py3-sdk
```
:::info
In the following example, we'll use **densenet**, an image classification model. We'll see the results obtained on the following image:
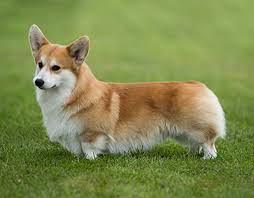
:::
#### Test it locally (optional)
```console
docker run -it --rm --net=host nvcr.io/nvidia/tritonserver:23.03-py3-sdk
```
Then, test the **densenet\_onnx** model on the example image.
:::warning
To test it locally, you have to specify the **server\_job\_url** to be able to send http requests.You can get it by using the following command:
`ovhai job get -o json | jq '.status.url' -r`
:::
```console
/workspace/install/bin/image_client -u -m densenet_onnx -c 3 -s INCEPTION /workspace/images/mug.jpg
```
You should obtain the following result:
```console
Image '/workspace/images/dog.jpg':
12.465825 (264) = CARDIGAN
11.567661 (263) = PEMBROKE
9.468060 (151) = CHIHUAHUA
```
#### Customize the Triton client Docker image for OVHcloud AI Tools
Here, the method is exactly the same as the one used previously for the **Triton server**. Refer to the part concerning Triton server Docker image for more details.
##### Create the Dockerfile
```console
FROM nvcr.io/nvidia/tritonserver:23.03-py3-sdk
WORKDIR /workspace
COPY . /workspace
RUN chown -R 42420:42420 /workspace
ENV HOME=/workspace
```
##### Build the Docker image from the Dockerfile
Launch the following command from the **Dockerfile** directory to build your application image:
```console
docker build . -t triton-inference-server:23.03-py3-sdk
```
##### Push the client image into the shared registry
Push the compiled image into the shared registry:
```console
docker tag triton-inference-server:23.03-py3-sdk /triton-inference-server:23.03-py3-sdk
docker push /triton-inference-server:23.03-py3-sdk
```
#### Launch a Triton Client job for inference
Run the example image client inside an AI Training job to perform image classification using the example **densenet\_onnx** model.
To be able to classify your own images, you can create an Object Container in the **OVHcloud Object Storage** and add your images there:
:::warning
In this example, we add the image `dog.jpg` into the bucket.
:::
```console
ovhai bucket object upload my-images@GRA image_repository/ --remove-prefix image_repository/dog.jpg
```
To send a request for the **densenet\_onnx** model, use an image from the `/workspace/images` directory. In this case we ask for the top 3 classifications.
##### HTTP/REST protocol
You just have to use the `-u` flag to point at the gRPC endpoint on Triton. The inference server URL will be your **server job URL**.
:::warning
You should have obtained this **server job IP** when launching the Triton Inference Server with AI Training in the step _Launch Triton Server in a dedicated job_.
You have to specify the port `8000` if you want to use the HTTP/REST protocol.
:::
Launch the inference job for HTTP protocol:
```console
ovhai job run \
--cpu 1 \
--volume my-images@GRA:/workspace/images:RO \
/triton-inference-server:23.03-py3-sdk \
-- bash -c '/workspace/install/bin/image_client -u :8000 -m densenet_onnx -c 3 -s INCEPTION /workspace/images/'
```
Once your job is `RUNNING`, check the logs to obtain the results of the classification.
```console
ovhai job logs --from job
```
You should obtain something like that:
```console
2023-08-21T14:47:03Z [job] Image '/workspace/images//dog.jpg':
2023-08-21T14:47:03Z [job] 12.465825 (264) = CARDIGAN
2023-08-21T14:47:03Z [job] 11.567661 (263) = PEMBROKE
2023-08-21T14:47:03Z [job] 9.468060 (151) = CHIHUAHUA
```
##### gRPC protocol
If you want to use the **gRPC protocol** by providing the `-i` flag, you must also use the `-u` flag to point at the gRPC endpoint on Triton. The inference server URL will be your **server job IP**.
:::warning
You should have obtained this **server job IP** when launching the Triton Inference Server with AI Training in the step _Launch Triton Server in a dedicated job_.
You have to specify the port `8001` if you want to use the gRPC protocol.
:::
Launch the inference job for gRPC protocol:
```console
ovhai job run \
--cpu 1 \
--volume my-images@GRA:/workspace/images:RO \
/triton-inference-server:23.03-py3-sdk \
-- bash -c '/workspace/install/bin/image_client -i grpc -u :8001 -m densenet_onnx -c 3 -s INCEPTION /workspace/images/'
```
Once your job is `RUNNING`, check the logs to obtain the results of the classification.
```console
ovhai job logs --from job
```
You should get the following result:
```console
2023-08-21T14:47:03Z [job] Image '/workspace/images/dog.jpg':
2023-08-21T14:47:03Z [job] 12.465825 (264) = CARDIGAN
2023-08-21T14:47:03Z [job] 11.567661 (263) = PEMBROKE
2023-08-21T14:47:03Z [job] 9.468060 (151) = CHIHUAHUA
```
## Go further
- To go further with **Triton Inference Server** and OVHcloud AI Tools, you can follow these [tutorials](https://github.com/triton-inference-server/tutorials).
## Feedback
Please send us your questions, feedback and suggestions to improve the service:
- On the OVHcloud [Discord server](https://discord.gg/ovhcloud)