---
title: "Migrating OmniOS datastores"
description: "Identify your OmniOS datastores and migrate your virtual machines to supported storage using VMware Storage vMotion."
url: https://docs.ovhcloud.com/en/guides/hosted-private-cloud/powered-by-vmware/vmware-migration-omnios
lang: en
lastUpdated: 2025-09-18
---
# Migrating OmniOS datastores
## Objective
This guide explains how to identify OmniOS datastores in your Hosted Private Cloud and migrate the virtual machines they contain to supported datastores using **VMware Storage vMotion**.
***
### OVHcloud Control Panel Access
- **Direct link:** [VMware vSphere](https://manager.eu.ovhcloud.com/#/dedicated/dedicated_cloud)
- **Navigation path:** Hosted Private Cloud > Managed VMware vSphere > Select your vSphere service
***
## Requirements
- Access to the OVHcloud Control Panel
- Administrator access to your vSphere environment (via vScope)
- Basic knowledge of VMware vSphere and Storage vMotion
- Available supported datastores as migration targets
:::info
OVHcloud will provide the necessary freespare storage space as part of the migration process led by our teams.
:::
## Instructions
### Step 1 - Identify OmniOS datastores
1. Log in to the OVHcloud Control Panel.
2. Click on Hosted Private Cloud and select your PCC service.
 3. Go to the
 Datacenters tab.
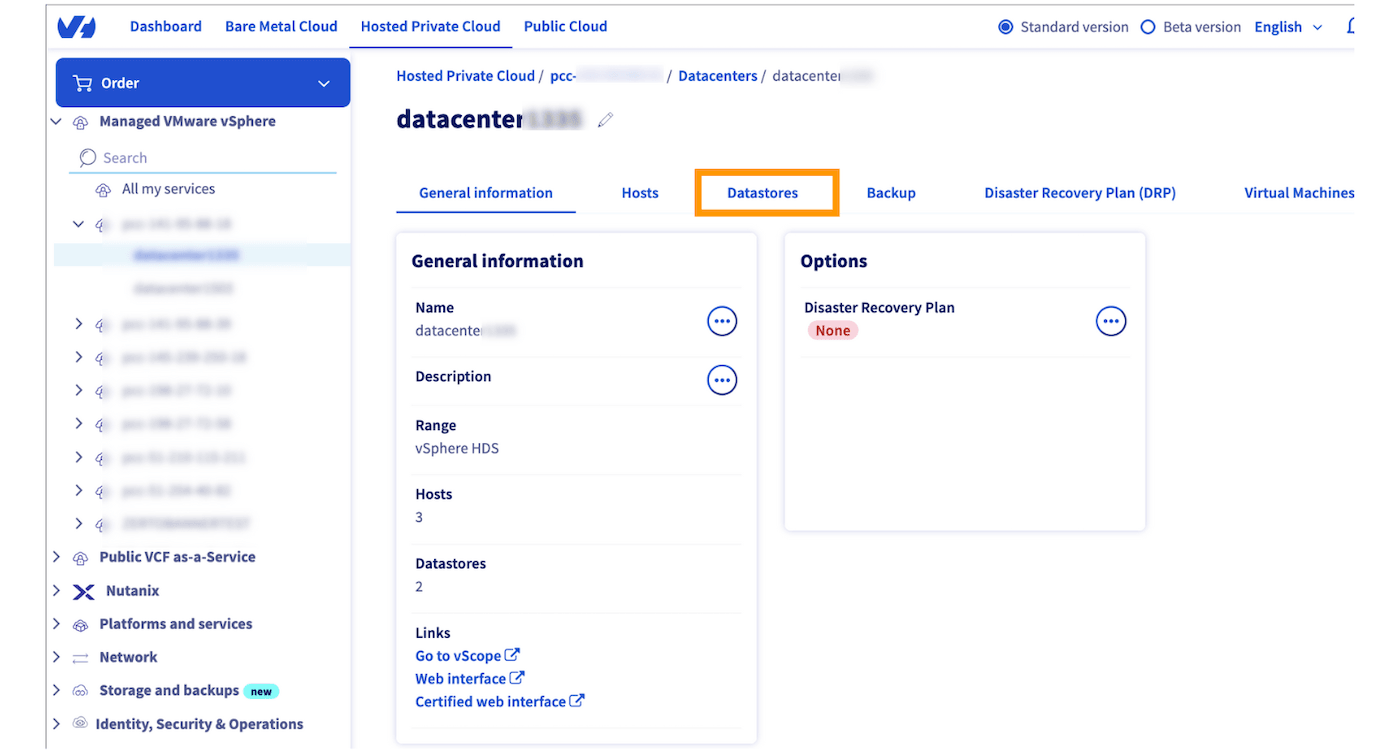
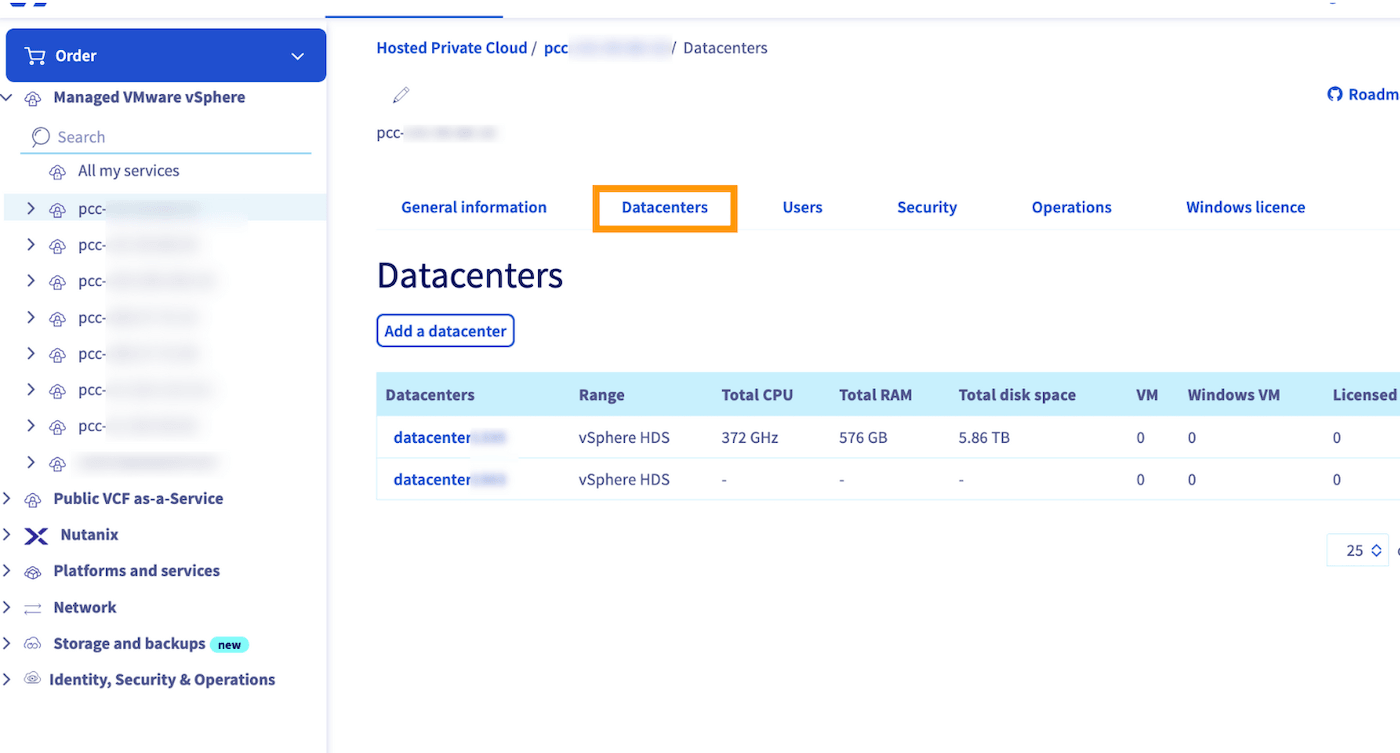 4. On the datacenter page, open the
 Datastores tab.
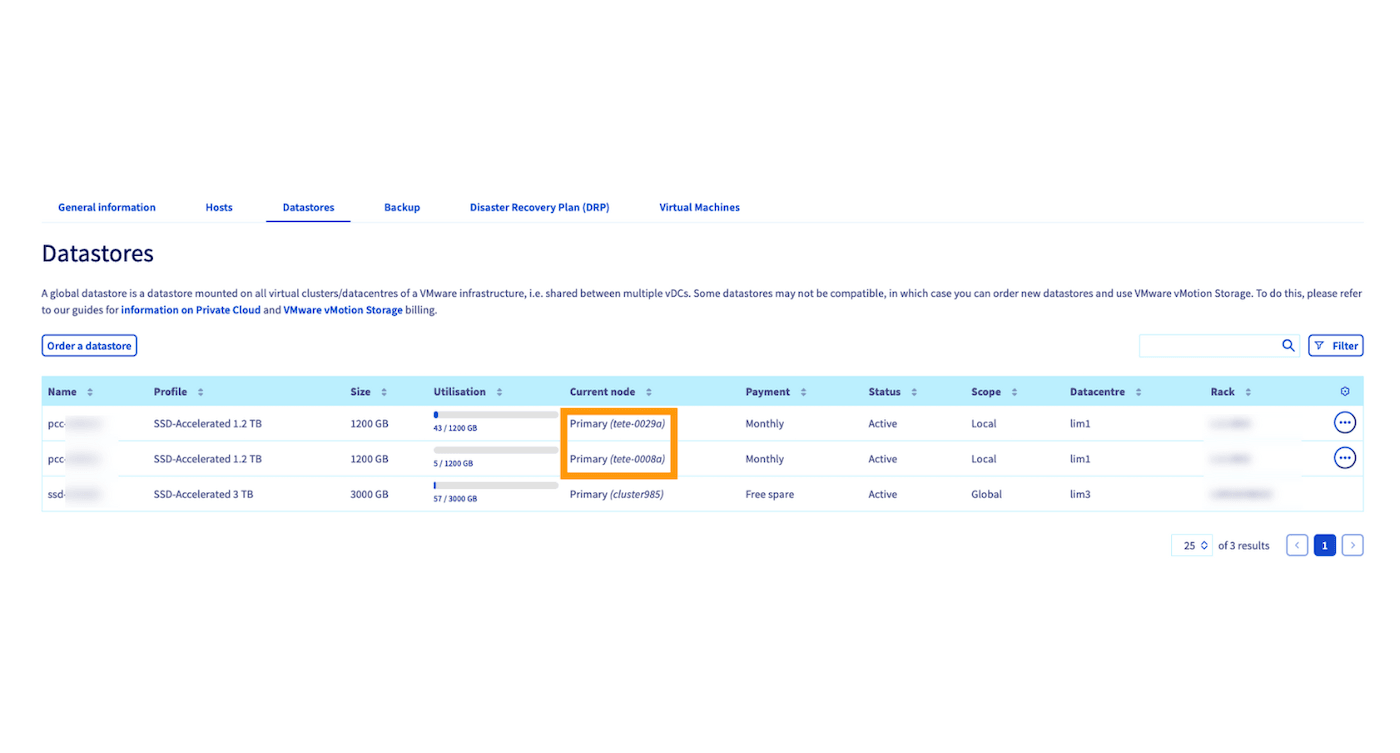
 - Datastores with the prefix **tete-xxxx** are **OmniOS** datastores.
- Datastores with the prefix **cluster-xxxx** are **FreeBSD** datastores.
- Datastores with the prefix **tete-xxxx** are **OmniOS** datastores.
- Datastores with the prefix **cluster-xxxx** are **FreeBSD** datastores.
 :::info
OmniOS datastores must be migrated to supported storage to ensure service continuity.
:::
5. Before starting a vMotion, make sure that you have a supported datastore available in your infrastructure.
- If you need to add a datastore, refer to the [Add a datastore](/en/guides/hosted-private-cloud/powered-by-vmware/how-to-add-storage.md) guide.
- If you need to remove an unused datastore, refer to the [Delete a datastore](/en/guides/hosted-private-cloud/powered-by-vmware/delete-datastore.md) guide.
In some cases, OVHcloud may already have provided you with a supported datastore. Check your configuration before moving on to the next step.
### Step 2 - Access vSphere through vScope
1. From the PCC
:::info
OmniOS datastores must be migrated to supported storage to ensure service continuity.
:::
5. Before starting a vMotion, make sure that you have a supported datastore available in your infrastructure.
- If you need to add a datastore, refer to the [Add a datastore](/en/guides/hosted-private-cloud/powered-by-vmware/how-to-add-storage.md) guide.
- If you need to remove an unused datastore, refer to the [Delete a datastore](/en/guides/hosted-private-cloud/powered-by-vmware/delete-datastore.md) guide.
In some cases, OVHcloud may already have provided you with a supported datastore. Check your configuration before moving on to the next step.
### Step 2 - Access vSphere through vScope
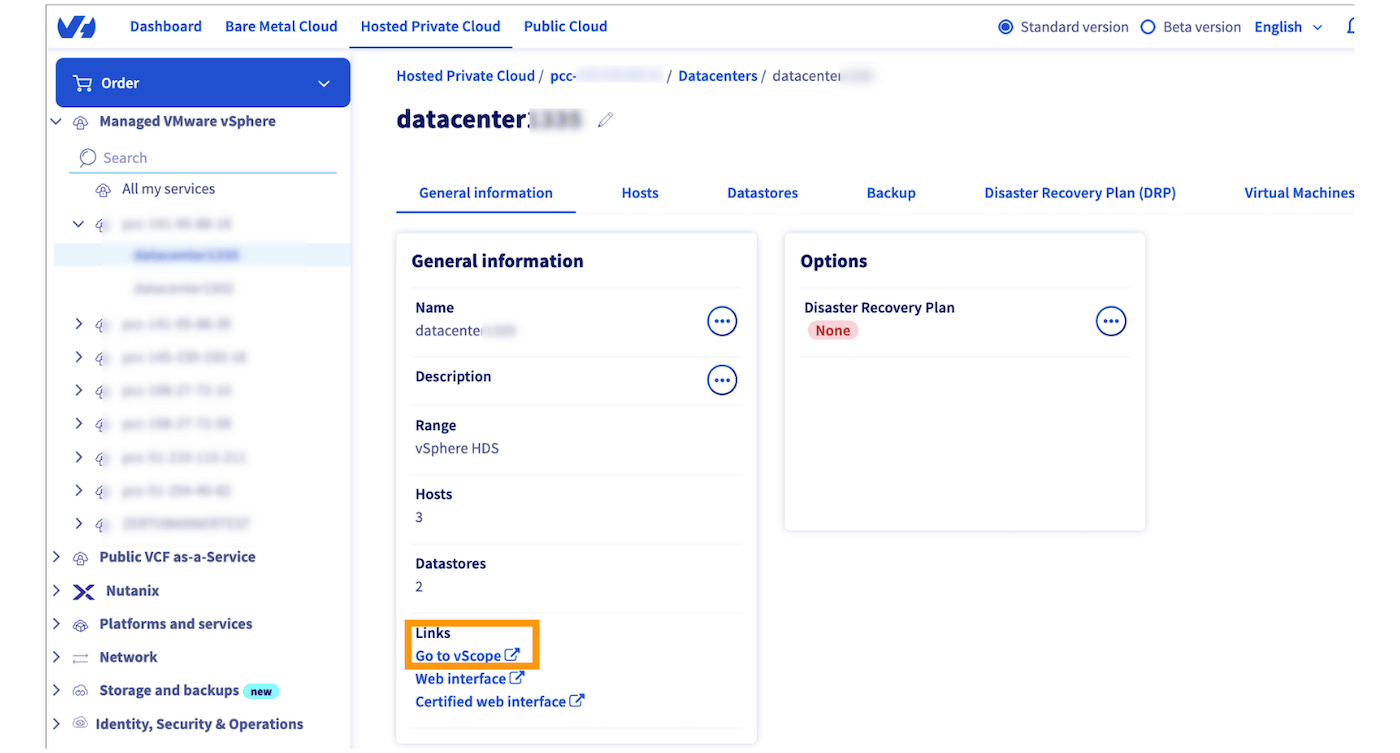
1. From the PCC General information tab, scroll down to **Management interfaces**.
2. Click on vScope.
 You are now connected to the vSphere interface and can perform a Storage vMotion.
### Step 3 - Migrate a virtual machine with Storage vMotion
:::warning
Performing a Storage vMotion may cause temporary performance disruptions.
For best results:
- Reduce I/O activity during migration (stop intensive workloads if possible).
- Plan the migration during off-peak or non-working hours.
- Always ensure you have at least two supported datastores in your infrastructure for resiliency.
:::
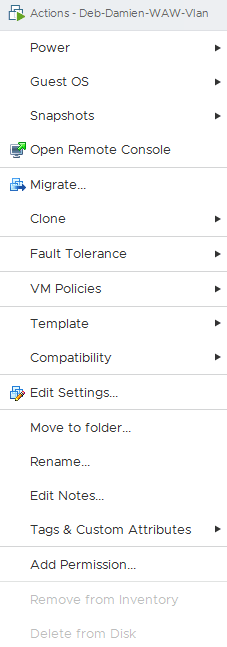
1. In vSphere, right-click the virtual machine to migrate and select
You are now connected to the vSphere interface and can perform a Storage vMotion.
### Step 3 - Migrate a virtual machine with Storage vMotion
:::warning
Performing a Storage vMotion may cause temporary performance disruptions.
For best results:
- Reduce I/O activity during migration (stop intensive workloads if possible).
- Plan the migration during off-peak or non-working hours.
- Always ensure you have at least two supported datastores in your infrastructure for resiliency.
:::
1. In vSphere, right-click the virtual machine to migrate and select Migrate....
 2. Choose **Change storage only**.
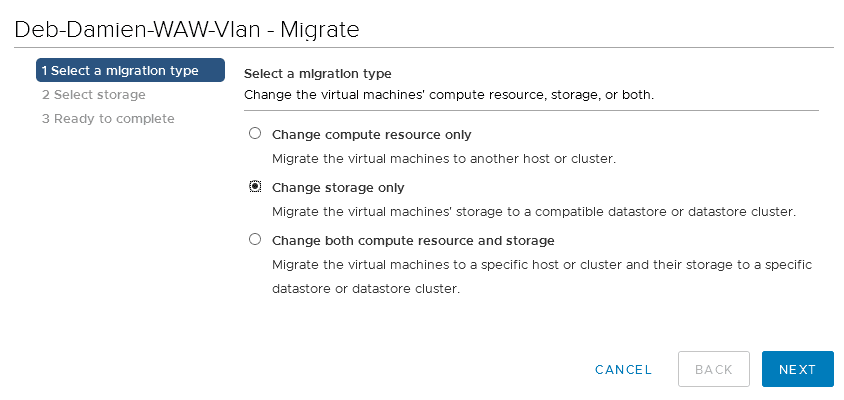 3. Select a supported datastore as the destination.
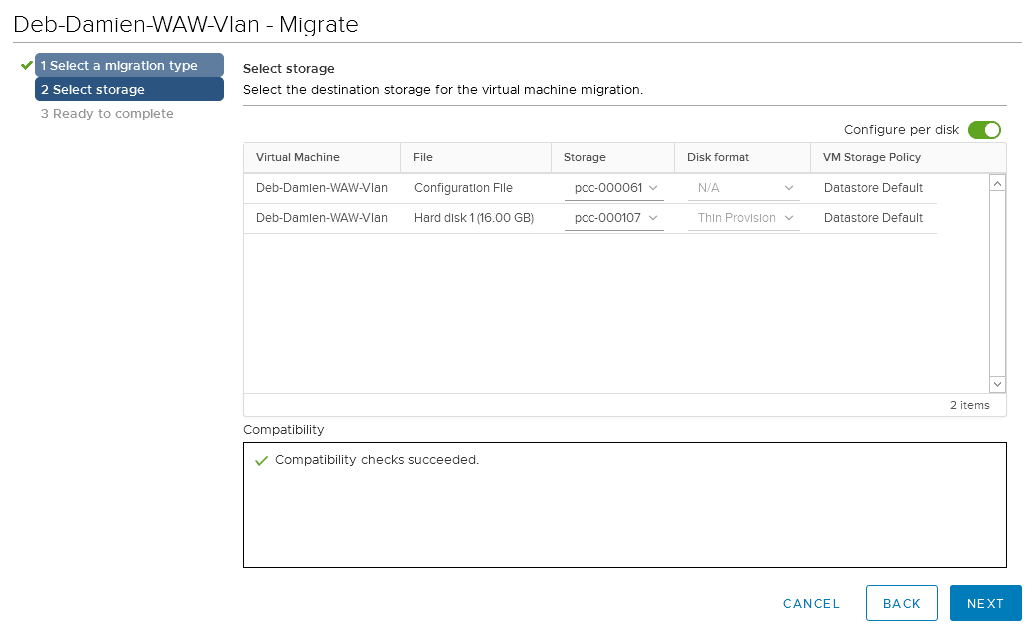
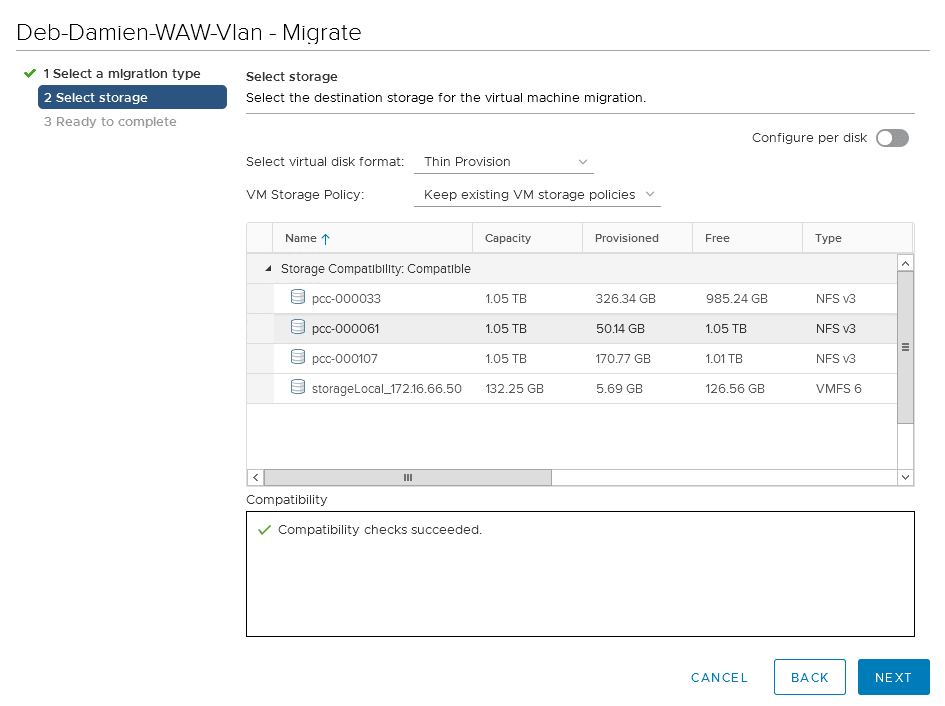 You can also use the `Advanced
` option to migrate only one disk if the VM has multiple disks.
4. Click
You can also use the `Advanced
` option to migrate only one disk if the VM has multiple disks.

4. Click Finish to start the migration.
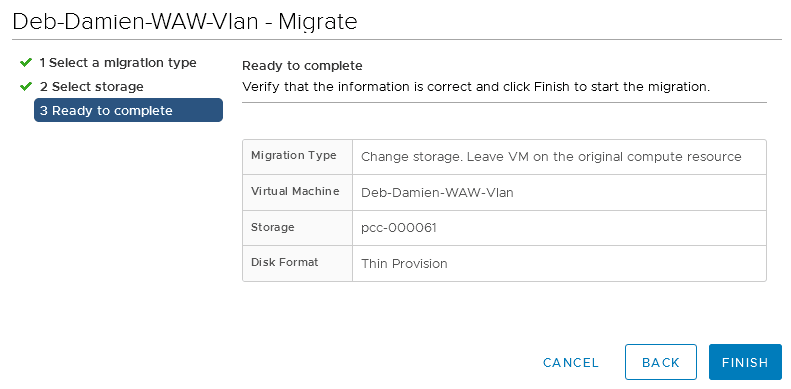 5. Monitor the migration progress in the **Recent Tasks** panel. Duration depends on VM size, IO activity, and available bandwidth.
 :::info
After migration, consolidate your workloads on supported datastores. Always keep at least two active datastores in your infrastructure to ensure service availability and redundancy.
:::
### Step 4 - Migrate VM templates
1. In vSphere, go to
:::info
After migration, consolidate your workloads on supported datastores. Always keep at least two active datastores in your infrastructure to ensure service availability and redundancy.
:::
### Step 4 - Migrate VM templates
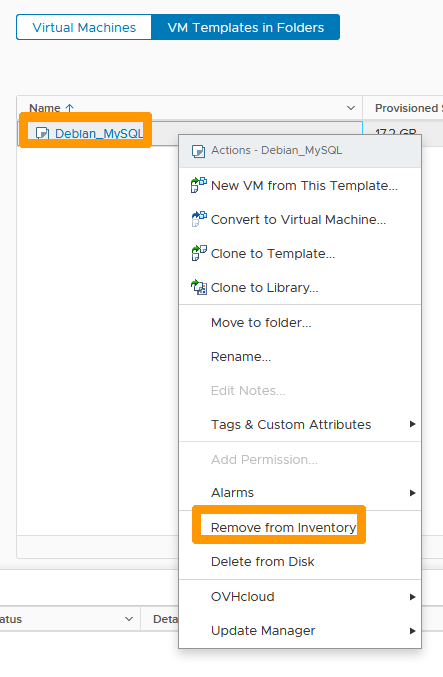
1. In vSphere, go to VM template in folders to display the templates stored on your datastore.
 2. Right-click each template and select
 Remove from Inventory.
 :::warning
The template is removed from the inventory but remains stored in the datastore.
You can retrieve it and move it to another datastore, or delete it if no longer needed.
:::
3. Go to the
:::warning
The template is removed from the inventory but remains stored in the datastore.
You can retrieve it and move it to another datastore, or delete it if no longer needed.
:::
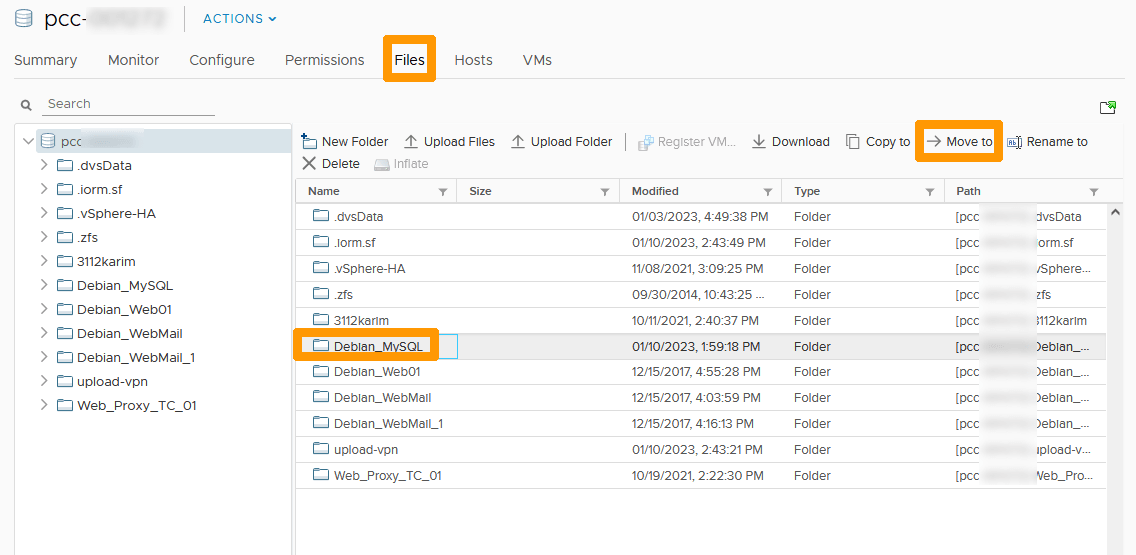
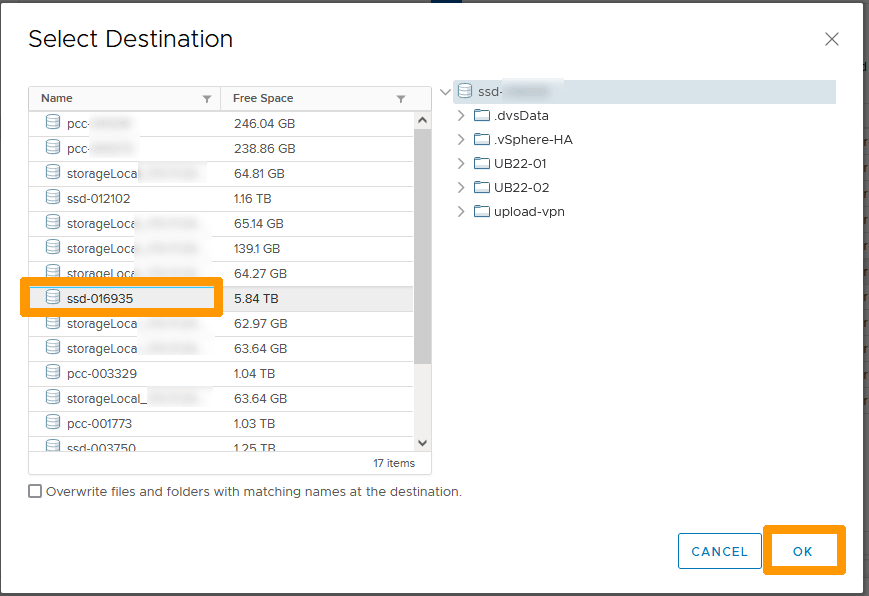
3. Go to the Files tab, select the template folder, and click Move to.
 4. Choose the destination datastore and confirm with
 OK.
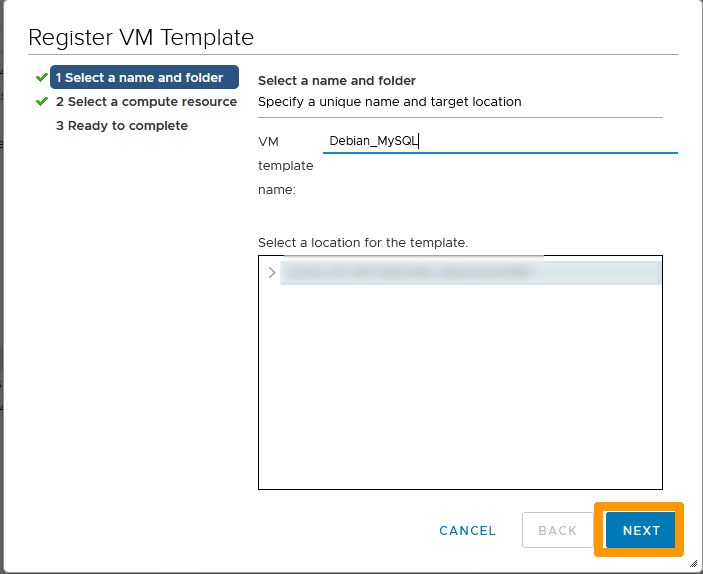
 5. Once the files are moved, go to the new datastore, select the template file, and click
 Register VM.
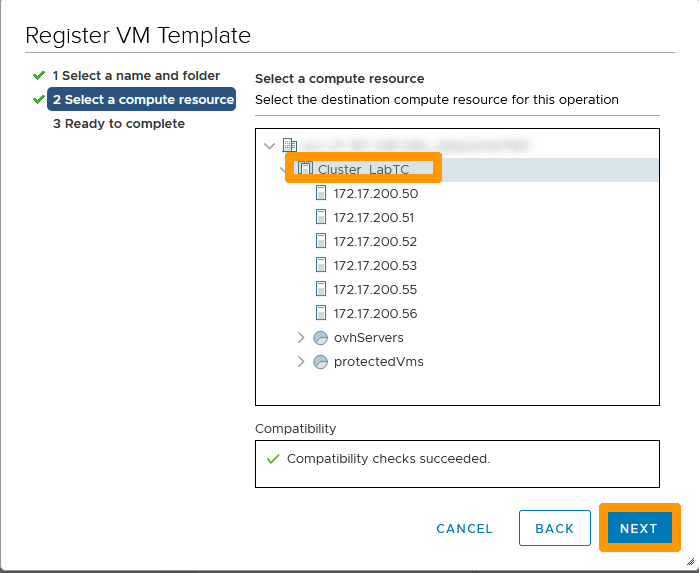
 6. Follow the wizard: click
 Next → Next → Finish.
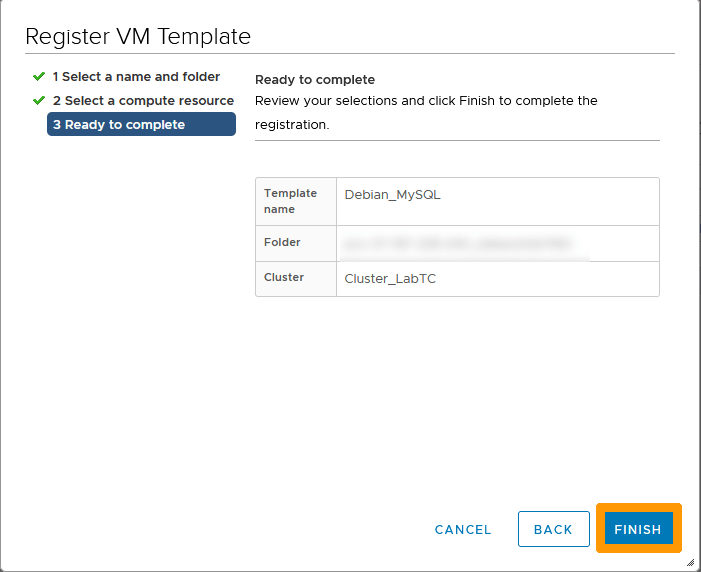 7. The template will appear in the
 VM & templates view.
 ## Migration timeline
The migration schedule is as follows:
- **September 2025**: Official communication sent to all customers.
- **October to November 2025**: Period during which the customer can perform the migration autonomously.
- **November to December 2025**: 40-day window for OVHcloud-led migration. A notification email is sent 3 to 4 days before the maintenance operation.
- **January 2026**: Start of billing for the new datastore.
- **February 2026**: Closure of the migration process.
## Go further
If you need training or technical assistance to implement our solutions, contact your sales representative or click on [this link](https://www.ovhcloud.com/en-gb/professional-services/) to get a quote and ask our Professional Services experts for a custom analysis of your project.
Ask questions, give your feedback and interact directly with the team building our Hosted Private Cloud services on the dedicated [Discord](https://discord.gg/ovhcloud) channel.
Join our [community of users](https://community.ovhcloud.com/community/en).
## Migration timeline
The migration schedule is as follows:
- **September 2025**: Official communication sent to all customers.
- **October to November 2025**: Period during which the customer can perform the migration autonomously.
- **November to December 2025**: 40-day window for OVHcloud-led migration. A notification email is sent 3 to 4 days before the maintenance operation.
- **January 2026**: Start of billing for the new datastore.
- **February 2026**: Closure of the migration process.
## Go further
If you need training or technical assistance to implement our solutions, contact your sales representative or click on [this link](https://www.ovhcloud.com/en-gb/professional-services/) to get a quote and ask our Professional Services experts for a custom analysis of your project.
Ask questions, give your feedback and interact directly with the team building our Hosted Private Cloud services on the dedicated [Discord](https://discord.gg/ovhcloud) channel.
Join our [community of users](https://community.ovhcloud.com/community/en).