---
title: "How to increase the size of an additional disk"
description: "Find out how to increase the size of an additional volume and enlarge its main partition"
url: https://docs.ovhcloud.com/en/guides/bare-metal-cloud/virtual-private-servers/increase-additional-disk
lang: en
lastUpdated: 2025-07-24
---
# How to increase the size of an additional disk
## Objective
If you have reached the maximum capacity on your additional disk, you can add more storage by increasing its size.
**This guide explains how to increase the size of an additional disk and extend the main partition accordingly.**
## Requirements
- A [VPS](https://www.ovhcloud.com/en-gb/vps/) in your OVHcloud account
- An [additional disk](/en/guides/bare-metal-cloud/virtual-private-servers/config-additional-disk.md) configured on the VPS
- Administrative access via SSH or RDP to your VPS
***
### OVHcloud Control Panel Access
- **Direct link:** VPS management
- **Navigation path:** Bare Metal Cloud > Virtual private servers > Select your VPS
***
:::warning
This feature is currently unavailable for Virtual Private Servers in [Local Zones](https://www.ovhcloud.com/en-gb/lp/vps-localzone/).
:::
## Instructions
The following steps presume that you have configured an additional disk according to [our guide](/en/guides/bare-metal-cloud/virtual-private-servers/config-additional-disk.md).
### Modifying the size of the disk [](#)
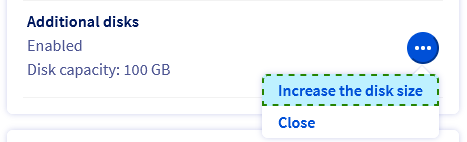
In the `Home
` tab, go to the section labelled **Your configuration**
. Click on `...
` next to the option `Additional disks`
and in the context menu click on `Increase the disk size
`.
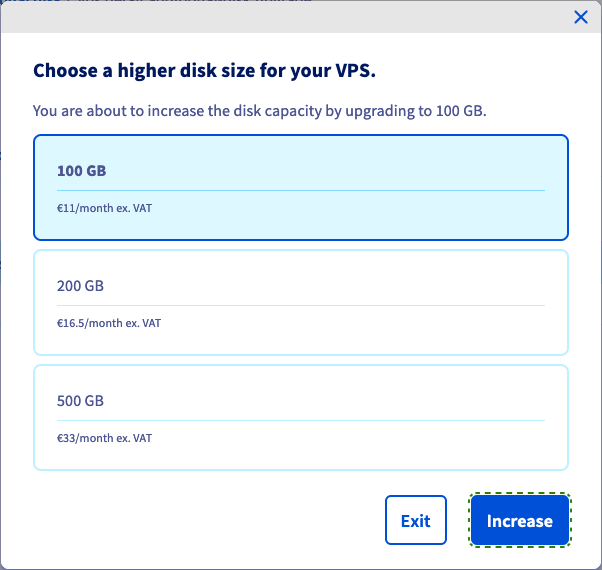
Choose the new disk size in the popup window, then click on `Increase
`.
A message will appear to confirm your request. Click on the link inside the message box and follow the order process. A new browser tab opens to finalize the order.

After the payment is confirmed, the disk upgrade will take a few minutes. You can check the progress in the tab `Additional disks
`: If your chosen new size is displayed, the disk is ready.

:::warning
Back up your data located on the additional disk before continuing.
:::
### Extending the partition
:::warning
OVHcloud provides services for which you are responsible, with regard to their configuration and management. It is therefore your responsibility to ensure that they function correctly.
This guide is designed to assist you in common tasks as much as possible. Nevertheless, we recommend contacting a [specialist service provider](https://partner.ovhcloud.com/en-gb/directory/) or reaching out to [our community](https://community.ovhcloud.com/community/en) if you experience any issues.
:::
#### On a Linux VPS
:::info
Note that this section describes a general approach to the necessary steps, based on an Ubuntu server OS. Some commands may require customisation for the distribution or operating system you are using.
:::
If a GNU/Linux distribution is installed on your VPS, establish an SSH connection to your server from the command line terminal or by using a SSH client application.
The examples below presume you are logged in as a user with elevated permissions.
Ensure that the disk is not mounted by using this command:
```bash
ubuntu@server:~$ sudo umount /mnt/disk
```
Replace `/mnt/disk` with your actual mount path to the additional disk, if needed.
Determine the names of disks and partitions:
```bash
ubuntu@server:~$ lsblk
NAME MAJ:MIN RM SIZE RO TYPE MOUNTPOINTS
loop0 7:0 0 63.2M 1 loop /snap/core20/1623
loop1 7:1 0 63.3M 1 loop /snap/core20/1828
loop2 7:2 0 111.9M 1 loop /snap/lxd/24322
loop3 7:3 0 49.8M 1 loop /snap/snapd/18357
loop4 7:4 0 103M 1 loop /snap/lxd/23541
sda 8:0 0 160G 0 disk
├─sda1 8:1 0 159.9G 0 part /
├─sda14 8:14 0 4M 0 part
└─sda15 8:15 0 106M 0 part /boot/efi
sdc 8:32 0 100G 0 disk
└─sdc1 8:33 0 50G 0 part
```
In this example, the disk is named `sdc` and it has the correct new disk size of 100 GB after the upgrade explicated in the [first part](#extend) of this guide. The partition `sdc1` exists on the disk and uses 50 GB.
Recreate the partition on the disk by running `fdisk`:
```bash
ubuntu@server:~$ sudo fdisk /dev/sdc
```
Enter the following commands at the `fdisk` prompt:
```console
Welcome to fdisk (util-linux 2.37.2).
Changes will remain in memory only, until you decide to write them.
Be careful before using the write command.
Command (m for help): d
Selected partition 1
Partition 1 has been deleted.
Command (m for help): n
```
Confirm each of the default values by pressing `Enter`:
```console
Partition type
p primary (0 primary, 0 extended, 4 free)
e extended (container for logical partitions)
Select (default p):
Using default response p.
Partition number (1-4, default 1):
First sector (2048-209715199, default 2048):
Last sector, +/-sectors or +/-size{K,M,G,T,P} (2048-209715199, default 209715199):
Created a new partition 1 of type 'Linux' and of size 100 GiB.
```
Enter `n` and finally `w`:
```console
Partition #1 contains a ext4 signature.
Do you want to remove the signature? [Y]es/[N]o: n
Command (m for help): w
The partition table has been altered.
Calling ioctl() to re-read partition table.
Syncing disks.
```
Verify the partition and extend the file system:
```bash
ubuntu@server:~$ sudo e2fsck -f /dev/sdc1
e2fsck 1.46.5 (30-Dec-2021)
/dev/sdc1: recovering journal
Pass 1: Checking inodes, blocks, and sizes
Pass 2: Checking directory structure
Pass 3: Checking directory connectivity
Pass 4: Checking reference counts
Pass 5: Checking group summary information
/dev/sdc1: 11/3276800 files (0.0% non-contiguous), 284558/13106944 blocks
```
```bash
ubuntu@server:~$ sudo resize2fs /dev/sdc1
resize2fs 1.46.5 (30-Dec-2021)
Resizing the filesystem on /dev/sdc1 to 26214144 (4k) blocks.
The filesystem on /dev/sdc1 is now 26214144 (4k) blocks long.
```
Finally, mount the disk:
```bash
ubuntu@server:~$ sudo mount /dev/sdc1 /mnt/disk/
```
Partition 1 is now using the full size of the disk.
```bash
ubuntu@server:~$ df -h
Filesystem Size Used Avail Use% Mounted on
tmpfs 776M 992K 776M 1% /run
/dev/sda1 155G 2.2G 153G 2% /
tmpfs 3.8G 0 3.8G 0% /dev/shm
tmpfs 5.0M 0 5.0M 0% /run/lock
/dev/sda15 105M 5.3M 100M 5% /boot/efi
tmpfs 776M 4.0K 776M 1% /run/user/1000
/dev/sdc1 99G 24K 94G 1% /mnt/disk
```
#### On a Windows VPS
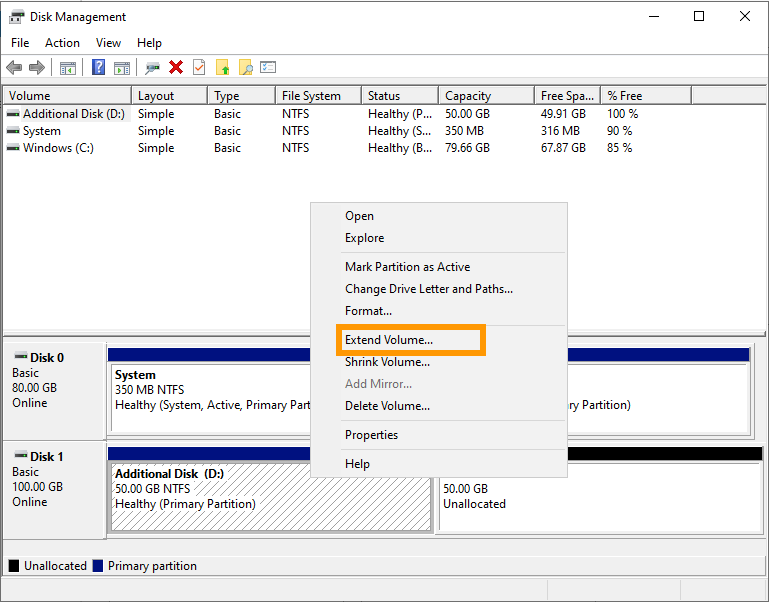
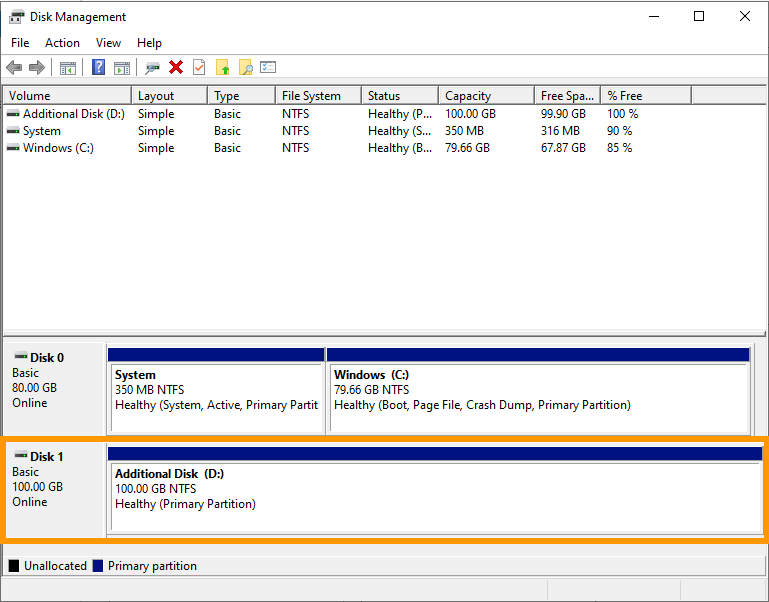
If a Windows OS is installed on your VPS, establish a remote desktop (RDP) connection to your server.
Once logged in, right-click on the `Start Menu
` button and open `Disk Management
`.

The [extended disk](#extend)
displays the additional capacity as unallocated space. Right-click on the volume of your additional disk and select `Extend Volume
` from the context menu.
In the "Extend Volume Wizard", click on `Next
` to proceed.
You can modify the disk space in this step if necessary. Click on `Next
`.
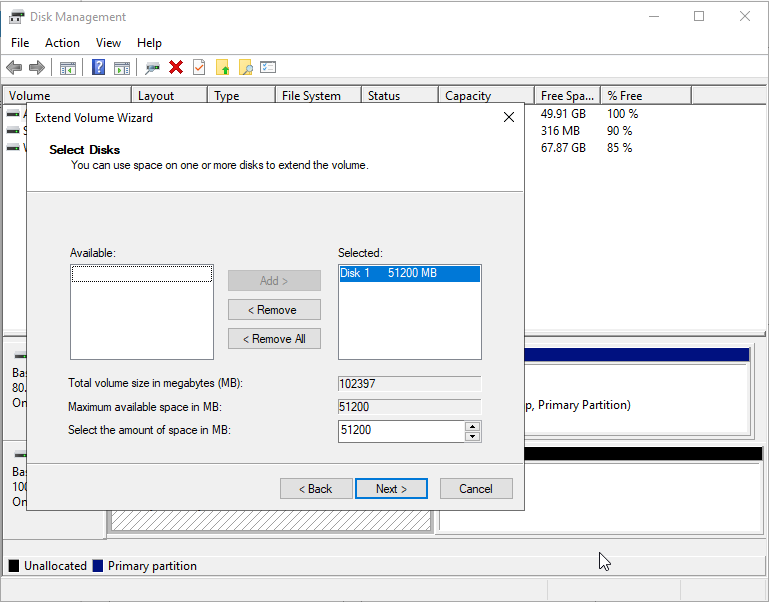
Click on `Finish
` to complete the process.
The resized volume now includes the additional disk space.
## Go further
Join our [community of users](https://community.ovhcloud.com/).