---
title: "How to activate and use rescue mode"
description: "Find out how to use the OVHcloud customer rescue system to troubleshoot your dedicated server"
url: https://docs.ovhcloud.com/en/guides/bare-metal-cloud/dedicated-servers/rescue-mode
lang: en
lastUpdated: 2026-01-09
---
# How to activate and use rescue mode
## Objective
Rescue mode is a tool provided by OVHcloud that allows you to boot into a temporary operating system for the purpose of diagnosing and resolving issues on your server.
Usual tasks the rescue mode is appropriate for include:
- [Resetting your user password](/en/guides/bare-metal-cloud/dedicated-servers/replacing-user-password.md)
- [Diagnosing network problems](/en/guides/bare-metal-cloud/dedicated-servers/hardware-diagnose.md)
- Repairing a broken operating system
- Fixing a software firewall misconfiguration
- [Testing disk performance](/en/guides/bare-metal-cloud/dedicated-servers/hardware-diagnose.md)
- [Testing CPU and RAM](/en/guides/bare-metal-cloud/dedicated-servers/hardware-diagnose.md)
:::warning
Backing up your data should be the first step in rescue mode if you do not already have recent backups available.
If you have any services still online, rescue mode will interrupt them as the machine is being rebooted into the auxiliary rescue environment.
:::
**This guide explains how to boot a server into rescue mode and how to use it.**
## Requirements
- A [dedicated server](https://www.ovhcloud.com/en-gb/bare-metal/) in your OVHcloud account
***
### OVHcloud Control Panel Access
- **Direct link:** Dedicated Servers
- **Navigation path:** Bare Metal Cloud > Dedicated servers > Select your server
***
## Instructions
To use rescue mode, you need to edit the sever's `Netboot` setting. Then the server has to be restarted.
Click on your server's name to open the `General information
` tab.
### Activating rescue mode
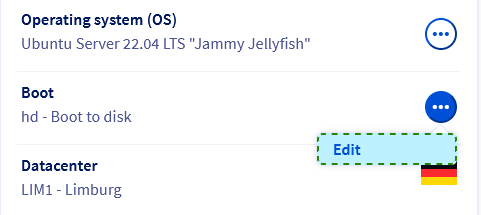
In the **General information**
box, click the button `...
` next to `Boot`
. Click on `Edit
` in the context menu.
[](#)
#### 1: Rescue mode options
On the page **Change the netboot**
, select `Boot in rescue mode
`.

The available options for rescue mode depend on the server type and the **operating system** installed.
- Customer rescue system (always available)
- Rescue system for Windows (available for Windows servers)
- [iPXE](https://ipxe.org) / ipxe-shell (external open-source tool, always available)
- [Legacy Windows rescue system](#windows_legacy) (deprecated WinPE system, only relevant if your server does not meet the requirements for the current rescue system for Windows)
:::info
The instructions below will only cover the **customer rescue system** which is the most commonly used option.
Please refer to our [dedicated guide for a detailed explanation on using the **rescue system for Windows**](/en/guides/bare-metal-cloud/dedicated-servers/rescue-customer-windows.md).
:::
Select `Customer rescue system
` in the drop-down menu.
#### 2: Authentication options
The next choice determines the method of authentication for the SSH connection to the rescue mode system. This is mainly a matter of convenience since each rescue mode session is meant to be transitory and will be discarded once you reboot the server from its disk.
- **Password authentication**: You will be sent login credentials via email.
- **Key authentication**: You can use a public authentication key of your choice (compatible formats: `RSA`, `ECDSA`, `ED25519`).
Click on the relevant tab for your connection method:
**Password authentication**
Click Password authentication.
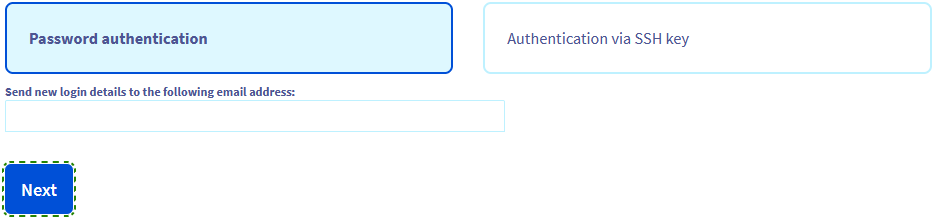The rescue mode notification email including its login details will be sent to the contact email address of your OVHcloud account. To use a different email address, enter it in the field `Send new login details to the following email address`.
Click Next.
**Key authentication**
Click Authentication via SSH key.
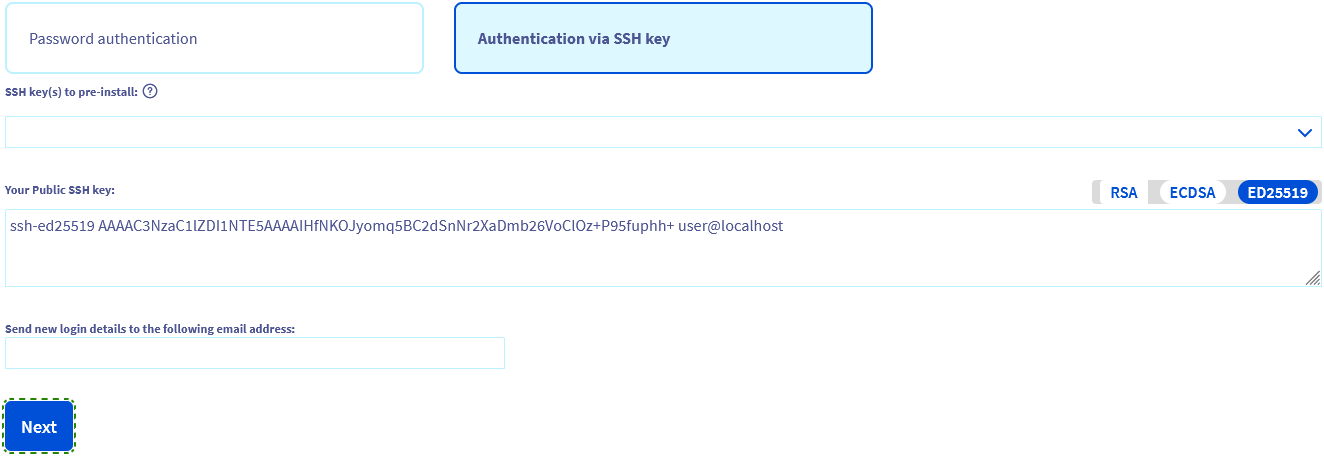You have two options:
- Select a key from the drop-down menu. You need to have at least one [public key stored in the OVHcloud Control Panel](/en/guides/bare-metal-cloud/dedicated-servers/import-keys-control-panel.md) already.
- Manually copy the public key string and paste it into the field `Your Public SSH key`.
To find out more about this topic, consult our guides:
- [How to create and use keys for SSH authentication](/en/guides/bare-metal-cloud/dedicated-servers/creating-ssh-keys.md)
- [How to create and use keys for SSH authentication with PuTTY](/en/guides/web-cloud/web-hosting/ssh-using-putty-on-windows.md)
:::tip
You can add a default public key for the customer rescue system to a server via the OVHcloud API. See the [guide section below](#rescuessh) for details.
:::
Click Next.
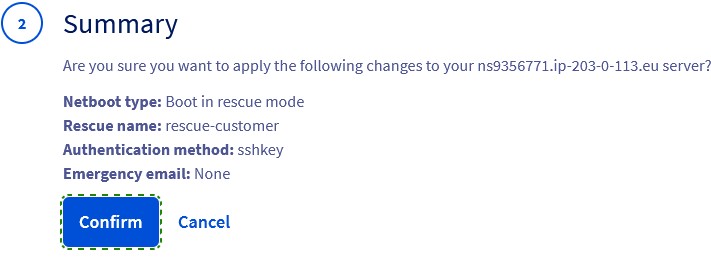
#### 3: Final steps to activate rescue mode
In the **Summary**
step, click `Confirm
`.
You should now have a notification regarding the `Netboot`
setting in the `General information
` tab.

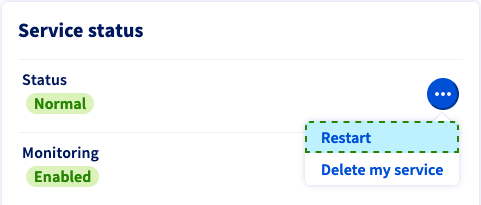
The final step is to restart the server. Click the button `...
` next to "Status" in the **Service status**
box, then click `Restart
`. Click `Confirm
` in the popup window.
This "hard reboot" will take a few minutes to complete. You can check the current status in the tab named `Tasks
`.
:::info
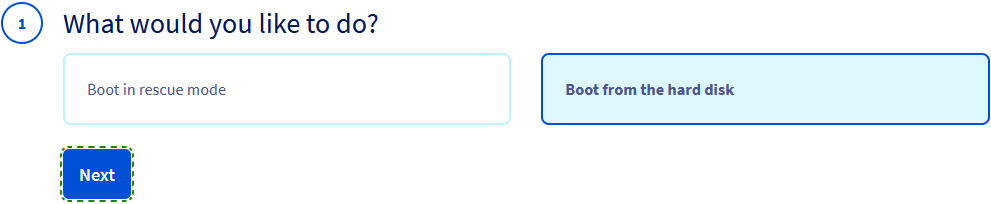
After you have finished your actions in rescue mode, remember to change the `Netboot`
setting back to `Boot from the hard disk
` before restarting the server.
:::
### Accessing your server in rescue mode via SSH
Once you have received the email informing you that rescue mode is enabled, you can log on to the rescue mode system and access your server.\
This email is also available in your OVHcloud Control Panel
as soon as it is sent. Click on the name associated with your NIC handle (Customer ID) in the menu bar in the top right-hand corner, then select `Service emails
`.
:::info
Your SSH client will normally block the connection at first due to a mismatch of the ECDSA fingerprint. This is normal because the rescue mode uses its own temporary SSH server. To resolve this, you need to edit the file `known_hosts` of your local `.ssh` folder.\
You have two options:
- **Delete the fingerprint from the file.** Your SSH client will then add a new fingerprint entry for the server when you are no longer using rescue mode. For a detailed explanation, refer to the section "Login and fingerprint" in our [SSH introduction guide](/en/guides/bare-metal-cloud/dedicated-servers/ssh-introduction.md).
- **Temporarily disable the fingerprint.** Open the file `known_hosts` with a text editor and identify the fingerprint string of your server by its IP address. Add the character `#` at the start of the line. As a result, this line is now a "comment" and will be ignored by applications reading the file. Remember to revert this change before switching the `Netboot` back to the "normal" mode.
:::
Click on the relevant tab for your selected connection method:
**Password authentication**
Open the command line application on your local device and enter the following command:
```bash
ssh root@SERVER_IP
```
Example:
```bash
ssh root@203.0.113.100
```
Enter the temporary rescue mode password when prompted.
```console
root@ns9356771.ip-203-0-113.eu's password:
root@rescue-customer-eu (ns9356771.ip-203-0-113.eu) ~ #
```
Find more information about SSH connections in our [SSH introduction guide](/en/guides/bare-metal-cloud/dedicated-servers/ssh-introduction.md).\
You can also use any SSH connection tool, such as [PuTTY](/en/guides/web-cloud/web-hosting/ssh-using-putty-on-windows.md).
**Key authentication**
Open the command line application on your local device and enter the following command:
```bash
ssh -i USER_FOLDER/.ssh/KEY_FILE_NAME root@SERVER_IP
```
Example:
```bash
ssh -i ~/.ssh/MyAuthKey root@203.0.113.100
```
If prompted, enter your password to decrypt the private key file.
To learn more about this topic, consult our guides:
- [How to create and use keys for SSH authentication](/en/guides/bare-metal-cloud/dedicated-servers/creating-ssh-keys.md)
- [How to create and use keys for SSH authentication with PuTTY](/en/guides/web-cloud/web-hosting/ssh-using-putty-on-windows.md)
### Mounting partitions to access your files
Unless you intend to configure the server's disks in a way that requires them to be detached (unmounted), you need to first **mount the system partition** in order to access your data from rescue mode.
Firstly, list all partitions in order to retrieve the name of the partition you need to mount:
```bash
lsblk
```
Output examples:
```console
NAME MAJ:MIN RM SIZE RO TYPE MOUNTPOINT
sda 8:0 0 1.8T 0 disk
├─sda1 8:1 0 511M 0 part
├─sda2 8:2 0 1.8T 0 part
│ └─md127 9:127 0 1.8T 0 raid1
├─sda3 8:3 0 512M 0 part
└─sda4 8:4 0 2M 0 part
sdb 8:16 0 1.8T 0 disk
├─sdb1 8:17 0 511M 0 part
├─sdb2 8:18 0 1.8T 0 part
│ └─md127 9:127 0 1.8T 0 raid1
└─sdb3 8:19 0 512M 0 part
```
```console
NAME MAJ:MIN RM SIZE RO TYPE MOUNTPOINT
nvme1n1 259:0 0 894.3G 0 disk
├─nvme1n1p1 259:2 0 511M 0 part
├─nvme1n1p2 259:3 0 1G 0 part
│ └─md2 9:2 0 1022M 0 raid1
├─nvme1n1p3 259:4 0 892.3G 0 part
│ └─md3 9:3 0 892.1G 0 raid1
└─nvme1n1p4 259:5 0 512M 0 part
nvme0n1 259:1 0 894.3G 0 disk
├─nvme0n1p1 259:6 0 511M 0 part
├─nvme0n1p2 259:7 0 1G 0 part
│ └─md2 9:2 0 1022M 0 raid1
├─nvme0n1p3 259:8 0 892.3G 0 part
│ └─md3 9:3 0 892.1G 0 raid1
├─nvme0n1p4 259:9 0 512M 0 part
└─nvme0n1p5 259:10 0 2M 0 part
```
Then mount the pertinent partition accordingly:
```bash
mount /dev/PARTITION_NAME /MOUNT_POINT/
```
The partition to mount should be easily identifiable by the **SIZE** indicated in the table (`sda2` in the first example, `nvme1n1p3` in the second). However, in a [softRAID configuration](/en/guides/bare-metal-cloud/dedicated-servers/raid-soft.md) (a default `raid1` in the examples), you will need to use the identifier of the RAID volume (`mdX`).\
Using the folder name `mnt` as mount point, for the first example the `mount` command would therefore be as follows:
```bash
mount /dev/md127 /mnt/
```
Command to enter for the second example:
```bash
mount /dev/md3 /mnt/
```
:::warning
The examples above are merely illustrating the necessary steps based on a typical server configuration. The information in the output table depends on your server's hardware and its partition scheme. When in doubt, consult the documentation of your operating system.
If you require professional assistance with server administration, consider the details in the [Go further](#gofurther) section of this guide.
:::
To see more technical information about the server's disks and partitions, enter:
```bash
fdisk -l
```
Some tasks may require that disks or partitions are detached. To do this, use the unmount command:
```bash
umount /mnt
```
#### VMware - Mounting a datastore
Unfold this section
You can mount a VMware datastore in a similar way as described in the previous segment.
List your partitions in order to retrieve the name of the datastore partition:
```bash
lsblk
```
```bash
fdisk -l
```
Mount the partition with the following command, replacing `sdbX` with the value identified in the previous step:
```bash
vmfs-fuse /dev/sdbX /mnt
```
If you have `VMFS 6` datastores, access the `sbin` folder and create the mount folder:
```bash
cd /usr/local/sbin/
mkdir /mnt/datastore
```
List your partitions in order to retrieve the name of the datastore partition:
```bash
lsblk
```
```bash
fdisk -l
```
Mount the partition with the following command, replacing `sdbX` with the value identified in the previous step:
```bash
vmfs6-fuse /dev/sdbX /mnt/datastore/
```
Once the mounting operation is done, you can access your files and carry out troubleshooting tasks inside the folder you have defined as mount point. Example:
```bash
cd /mnt
```
Certain operations on the file system (such as configuring user accounts) will require an additional step. Create a temporary `chroot` environment at the mount point with this command:
```bash
chroot /mnt/
```
You should now be able now apply all necessary changes to your system, for example to [regain server access](#gofurther).
### Link Aggregation configuration in rescue mode
Link Aggregation (LACP) is highly beneficial, as it increases your server's total bandwidth while providing network redundancy in case a network interface fails.
Although rescue mode is based on the Debian 12 operating system, its network configuration relies on the `ifupdown` utility, instead of `Netplan`.
If you have a server that supports link aggregation and you wish to configure it in rescue mode, please refer to [this guide](/en/guides/bare-metal-cloud/dedicated-servers/ola-enable-debian9.md).
### Exiting rescue mode
If relevant, return to the rescue mode login shell by entering:
```bash
exit
```
In your OVHcloud Control Panel
, [change the boot mode](#netboot)
back to `Boot from the hard disk
` and confirm.
You can now restart the server from the rescue mode shell:
```bash
reboot
```
Alternatively, use the `Restart
` function in the OVHcloud Control Panel.
[](#)
### How to add a default authentication key for rescue mode
Unfold this section
To speed up the process, you can add a public key as default for rescue mode SSH access to your server. This is only possible via the [OVHcloud API](/en/guides/manage-and-operate/api/first-steps.md).
To do this in the API web console, open the following API endpoint:
🇪🇺EU▾
[PUT/dedicated/server/{serviceName}](https://eu.api.ovh.com/console/?section=/dedicated/server&branch=v1#put-/dedicated/server/-serviceName-)
Enter the internal name of your server (`ns1111111.ip-203-0-113.eu`) in the appropriate field.
Then edit the text field below as follows:
```bash
{
"rescueSshKey": "string"
}
```
Replace `string` with your full public key string.
The result should look as shown in the following example:
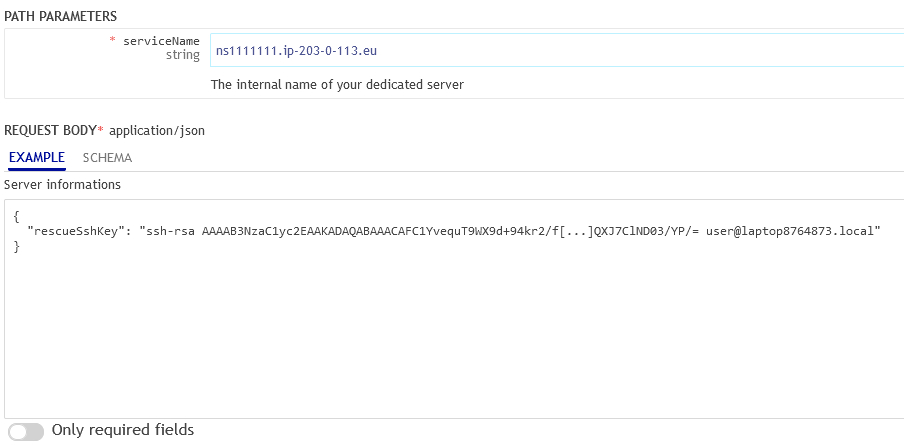When you have entered your values correctly, click the button EXECUTE.
The field `Your Public SSH key:` will now be filled automatically with this key string when [changing the `Netboot` mode](#netboot).
[](#)
### Legacy Windows rescue system (WinPE rescue mode)
Unfold this section
Once you have received the email informing you that rescue mode is enabled, you can log on to the rescue mode system and access your server.\
This email is also available in your OVHcloud Control Panel as soon as it is sent. Click on the name associated with your NIC handle (Customer ID) in the menu bar in the top right-hand corner, then select Service emails.
To use the Windows PE rescue mode GUI, you will need to download and install a VNC console or use the [IPMI module](/en/guides/bare-metal-cloud/dedicated-servers/ipmi.md) (not available on all server models).
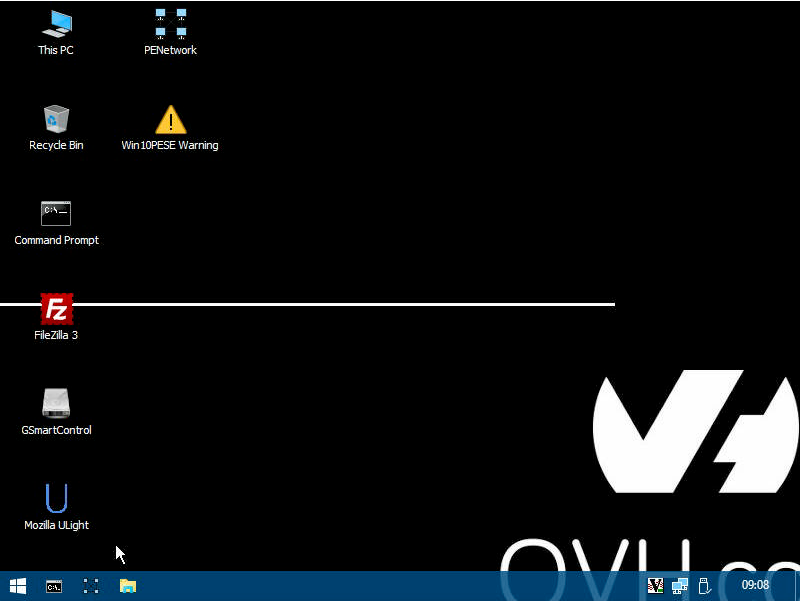The following tools are already installed in this mode:
| Tool | Description |
| ----------------------- | -------------------------------------------------------------------------------------------------------------------------------------------------------------------------------------------------------------------------------------------------------------------------------------------------------------------------------------- |
| Mozilla ULight | A web browser. |
| Memory Diagnostics Tool | A Windows tool to test the RAM. |
| Explorer\_Q-Dir | An alternative file explorer. |
| GSmartControl | A tool to check HDDs and SSDs. |
| PhotoRec | A tool to recover possibly lost files from a disk. |
| SilverSHielD | A SSH2 and SFTP server. |
| System Recovery | The built-in Windows system restore and troubleshooting tool. |
| TestDisk | A powerful data recovery application. You can use it to recover and modify corrupted partitions, find lost partitions, repair a boot sector and even rebuild a defective MBR. |
| FileZilla | An open-source FTP client. It supports SSH and SSL protocols, and has a clear and intuitive drag-and-drop interface. You can use it to transfer your data to an FTP server, like the FTP backup service included with most OVHcloud server models. |
| 7-Zip | A utility for compressing and archiving files, which reads the following formats: ARJ, CAB, CHM, CPIO, CramFS, DEB, DMG, FAT, HFS, ISO, LZH, LZMA, MBR, MSI, NSIS, NTFS, RAR, RPM, SquashFS, UDF, VHD, WIM, XAR and Z. You can also use it to create your own archives in the following formats: BZIP2, GZIP, TAR, WIM, XZ, Z and ZIP. |
[](#)
## Go further
[How to use the rescue mode for Windows](/en/guides/bare-metal-cloud/dedicated-servers/rescue-customer-windows.md)
[How to recover server access if your user password is lost](/en/guides/bare-metal-cloud/dedicated-servers/replacing-user-password.md)
[How to replace your authentication keys for SSH access if a key is lost](/en/guides/bare-metal-cloud/dedicated-servers/replacing-lost-ssh-key-pair.md)
[How to configure and rebuild software RAID](/en/guides/bare-metal-cloud/dedicated-servers/raid-soft.md)
[How to diagnose server hardware issues](/en/guides/bare-metal-cloud/dedicated-servers/hardware-diagnose.md)
[How to use the IPMI console with a dedicated server](/en/guides/bare-metal-cloud/dedicated-servers/ipmi.md)
For specialized services (SEO, development, etc.), contact [OVHcloud partners](https://partner.ovhcloud.com/en-gb/directory/).
If you would like assistance using and configuring your OVHcloud solutions, please refer to our [support offers](https://www.ovhcloud.com/en-gb/support-levels/).
Join our [community of users](https://community.ovhcloud.com/).