---
title: "Manage your server reboot with the OVHcloud Link Aggregation feature"
description: "Find out how to reboot your OVHcloud servers, working through your active private aggregation"
url: https://docs.ovhcloud.com/en/guides/bare-metal-cloud/dedicated-servers/pxe-with-full-private-dedicated
lang: en
lastUpdated: 2026-01-27
---
# Manage your server reboot with the OVHcloud Link Aggregation feature
## Objective
This guide is designed to help you deploy all of the components and services you need to launch your OVHcloud solutions successfully in a **fully private**
environment.
Get a private infrastructure without having to change the default configuration for your [OVHcloud dedicated servers](https://www.ovhcloud.com/en-gb/bare-metal/)
.
:::warning
We have already carried out all our tests, qualifications and configuration validations, based on well-defined parameters and operating criteria, in order to offer you technical environments that are best adapted to your hardware.
Netboot (Network Boot) consists of using your network interface (in low-level mode) as a tool to select the boot of your operating system.
You can boot any system from a network volume, such as SAN or NFS. However, the system usually boots from a local volume: local disk, CD/DVD or USB.
As a reminder, we strongly advise against changing the default configurations: BIOS configuration, Boot Order, etc.
We have pre-configured this startup mechanism in our solutions, and have integrated all of our tools into it: netboot, monitoring, recycling, etc.
If these settings were to be modified, our teams would no longer be able to perform the tasks dedicated to them under the conditions we have chosen, and above all, you could render the boot inoperative.
:::
With [OVHcloud dedicated servers](https://www.ovhcloud.com/en-gb/bare-metal/)
, you can configure/declare your own networks.
Each server is equipped with at least 2 network interfaces, effectively functioning as aggregated links, ensuring redundancy in the event of failure.
You can therefore use/declare your _public_
and _private_
networks via our solution [vRack](/en/guides/bare-metal-cloud/dedicated-servers/vrack-configuring-on-dedicated-server.md)
.
We will present the case of [dedicated server(s)](https://www.ovhcloud.com/en-gb/bare-metal/)
configured in **OLA**
mode, i.e. with **only**
private networks.
This choice offers your infrastructure the best possible isolation/protection for your hosted service.
The only significant difference is that [private networks](/en/guides/network/ovhcloud-connect/overview.md#private-connection)
do not have access to everything that does not belong to your infrastructure.
As a result, a server isolated by its private network prevents the boot mechanism. This means that when systems are booted via the **Netboot**
(Network Boot) method, they are based on OVHcloud’s internal network and shared services.
### Netboot startup overview
A major component exists in 2 versions:
- **PXE**: Using a standardised client/server environment, based on BOOTP/DHCP/TFTP protocols, to enable boot/deployment through the client system network.
- **iPXE**: Using a more advanced, standardised client/server environment, based on HTTP, iSCSI, AoE, FCoE, Wi-Fi protocols to enable client system network boot/deployment.
### A quick overview of Netboot startup at OVHcloud
List of components involved during startup:
- A **DHCP** server: Assigns a network configuration (lease with IP address) for a client machine that is attempting to boot.
- A **TFTP** service: Resources available across the network that will be queried by PXE and iXPE.
- The **rEFInd** solution, in the form of a **BootLoader**, was chosen because it was perfectly adapted. It will allow the search of boot sectors of client machines: local disk, USB, etc.
Here is a (logical) Netboot boot schema:

| Description/Details |
| ----------------------------------------------------------------------------------------------------- |
| 1. Sending a discover request to DHCP from the client machine (in broadcast) |
| 2. DHCP assigns an IP address to the client machine (offer/request/ack). iPXE binary recovery request |
| 3. iPXE binary TFTP recovery |
| 4. Loading iPXE binary as firmware |
| 5. iPXE firmware recovery request |
| 6. Retrieving the associated iPXE script in TFTP |
| 7. Running the iPXE script. Retrieving rEFInd resources: required binary and configuration file |
| 8. Running and loading the rEFInd binary |
| 9. rEFInd launches its scan task to identify boot sectors for local disks |
:::info
This description is as generic as possible, in order to remain clear, and so as not to add technical elements or constraints that go beyond our example. The aim of this scheme is to provide an overall view of the operating principle.
:::
## Requirements
:::warning
This article is intended for experienced users who have at least basic knowledge of the open-source world, as well as knowledge of system and network administration.
:::
- At least one [dedicated server](https://www.ovhcloud.com/en-gb/bare-metal/) with an operating system **already installed**.
- An additional dedicated server with the default network interfaces configured, namely public and private network access. This server will host all services (**DHCP** and **TFTP**). The operating system will be one of your choice.
- You must have all of the network interfaces for this server in **private** mode, which implies that you have already configured [our OLA feature](/en/guides/bare-metal-cloud/dedicated-servers/ola-enable-manager.md).
***
### OVHcloud Control Panel Access
- **Direct link:** Dedicated Servers
- **Navigation path:** Bare Metal Cloud > Dedicated servers > Select your server
***
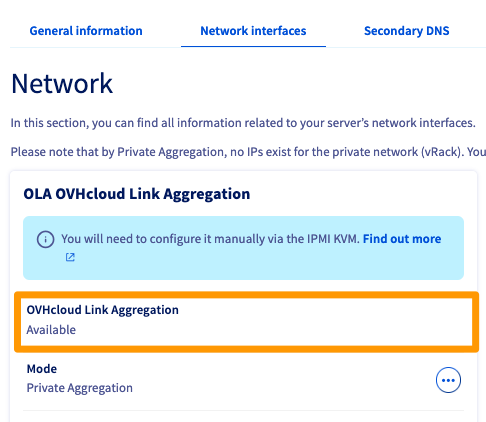
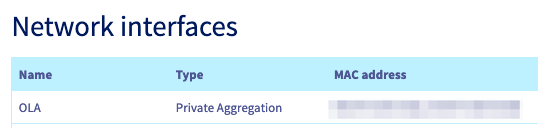
Select your server and check that it is eligible for `OLA: OVHcloud Link Aggregation` in the Network interfaces tab.
## Instructions
### Deploy your DHCP and TFTP services
1. Install the packages for DHCP/TFTP services.
2. Perform the basic configuration for each service.
3. Turn on your server.
Below is an example of a basic private infrastructure (layer 2 diagram):

**Example:**
- Services hosted/shared on **Node 0**.
- Only one **Node 1** client machine with active OLA.
:::info
After booting the systems, and in order for DHCP services and optional services (DNS and NTP) to be fully functional, consider declaring/adding rules in the local firewall, via the private network interface of the machine hosting the services.
:::
#### DHCP service
Below is a sample configuration file for your **DHCP**
service.
Depending on your distribution, the tree may be different (`kea-dhcp4.conf`
).
In general, it is sufficient to:
- Declare a network interface for listening (waiting for requests).
- Specify the IP protocol version (v4 or v6).
- Enter a primary configuration file (as an example, see file below).
```bash
{
"Dhcp4": {
"interfaces-config": {
"interfaces": [ "eth1" ]
},
"control-socket": {
"socket-type": "unix",
"socket-name": "kea4-ctrl-socket"
},
"lease-database": {
"type": "memfile",
"lfc-interval": 3600
},
"expired-leases-processing": {
"reclaim-timer-wait-time": 10,
"flush-reclaimed-timer-wait-time": 25,
"hold-reclaimed-time": 3600,
"max-reclaim-leases": 100,
"max-reclaim-time": 250,
"unwarned-reclaim-cycles": 5
},
"renew-timer": 900,
"rebind-timer": 1800,
"valid-lifetime": 3600,
"client-classes": [
{
"name": "iPXE script",
"test": "option[user-class].exists and substring(option[user-class].hex,0,4) == 'iPXE' and option[client-system].hex == 0x0007", # Determines the type of architecture, in this case 64 bits
"next-server": "192.168.1.1", # Determines the IP of your tftp server
"boot-file-name": "refind.pxe", # Determines the script loaded by the iPXE binary
},
{
"name": "PXE UEFI",
"test": "not option[user-class].exists and option[client-system].hex == 0x0007", # Determines the type of architecture, in this case 64 bits
"next-server": "192.168.1.1", # Determines the IP of your tftp server
"boot-file-name": "ipxe.efi" # Determines iPXE binary
},
],
"subnet4": [
{
"id": 1,
"subnet": "192.168.1.0/28",
"pools": [ { "pool": "192.168.1.2 - 192.168.1.14" } ],
"option-data": [
{
"name": "routers",
"data": "192.168.1.1"
},
],
}
],
"loggers": [
{
"name": "kea-dhcp4",
"output-options": [
{
"output": "stdout",
"pattern": "%-5p %m\n",
}
],
"severity": "INFO",
"debuglevel": 0
}
]
}
}
```
**Details:**
- Private network (e.g. 192.168.1.0/28)
- `subnet_mask`: 255.255.255.240
- `broadcast_address`: 192.168.1.15
- `dns_servers`: See optional chapter
- `ntp_servers`: See optional chapter
- `default_router` : 192.168.1.1
- `next-server`: 192.168.1.1
- `host`: Client machine name
- `hardware ethernet`: Client machine hardware address (MAC)
- `server-name`: Client hostname machine
#### TFTP service
Depending on your distribution, there are several packages performing the TFTP server function.
For example: _tftp-server_
, _tftpd_
, _tftpd-hpa_
or _atftpd_
.
:::info
The installation tree may be different depending on the version of the package and the operating system you are using.
:::
What you need to know:
- This service uses port 69 (UDP).
- It is mandatory to declare a "target" directory, corresponding to a local tree that will be used for receiving and downloading files.
Configuration example with `tftpd-hpa` software:
```bash
# /etc/default/tftpd-hpa
TFTP_USERNAME="tftp"
TFTP_DIRECTORY="/srv/tftp"
TFTP_ADDRESS="TFTP_server_address:69"
TFTP_OPTIONS="--secure"
```
We will use the path `/srv/tftp` as an example, and upload the necessary files:
```bash
root@node_0:/srv/tftp# tree
.
|-- ipxe.efi
|-- refind.conf
|-- refind.pxe
`-- refind_x64.efi
```
#### The rEFInd bootloader
- File contents `refind.pxe`:
```bash
#!ipxe
echo Boot to local disk
iseq ${platform} efi && goto is_efi_x86_64 || goto end
:is_efi_x86_64
echo EFI boot mode
# Retrieve configuration file
imgfetch --name refind.conf tftp://${next-server}/refind.conf
# Load rEFIND binary
imgfetch --name refind tftp://${next-server}/refind_x64.efi
chain refind
:end
echo Chain on hard drive failed
sleep 10
exit 1
```
- File contents `refind.conf`:
_This involves integrating the minimum guidelines for proper integration with OVHcloud SI._
```bash
timeout 1
default_selection 1
hideui hwtest
hideui hints
banner_scale
textonly
scanfor internal
uefi_deep_legacy_scan
scan_delay 0
```
### Getting started
Below is a preview of what you get when displaying a UEFI Netboot (default):
_Corresponds to steps 1 through 8._
_Corresponds to the result of steps 8 and 9._

Above, we have the **rEFInd** bootloader loaded on a machine with a _debian_ system installed.
You will find on [this link
](https://raw.githubusercontent.com/ovh/docs/develop/pages/bare_metal_cloud/dedicated_servers/pxe-with-full-private-dedicated/files/src.zip) the resources used to develop our tests and examples throughout this presentation. They can be used as templates, depending on your needs.
#### Optional
We also recommend deploying DNS and NTP services.
These are not necessary for the system startup phases, so not imposed in this procedure. They are, however, among the services that will be important in the future, especially for the stability of your infrastructure.
##### **Service DNS**
You can use the local table for each _Node_, i.e. the `/etc/hosts` file, or you can use a service like [dnsmasq](https://en.wikipedia.org/wiki/Dnsmasq).
##### **Service NTP**
It is strongly recommended that you use an NTP service, especially if your infrastructure includes several machines.
- List of ports to authorise on your local firewall (on the machine hosting the services):
- NTP port 123
- DNS port 53
## Go further
[Understanding and customising your DHCP service](https://wiki.debian.org/DHCP_Server)
[Understanding and customising your iPXE service](https://ipxe.org/docs)
[Understanding and customising your rEFInd service](https://en.wikipedia.org/wiki/REFInd)
[Discovering and understanding NTP](https://en.wikipedia.org/wiki/Network_Time_Protocol)
[Discovering and understanding Dnsmasq](https://wiki.debian.org/dnsmasq)
Join our [community of users](https://community.ovhcloud.com/).