---
title: "Changing the admin password on a Windows dedicated server"
description: "Find out how to use the OVHcloud rescue mode to reset the password of the Administrator account on a Windows dedicated server"
url: https://docs.ovhcloud.com/en/guides/bare-metal-cloud/dedicated-servers/changing-admin-password-on-windows
lang: en
lastUpdated: 2024-06-26
---
# Changing the admin password on a Windows dedicated server
## Objective
When you install or reinstall a Windows operating system, you are provided with a password for administrative access. We strongly recommend that you change this initial password, as detailed in our guide about [securing a dedicated server](/en/guides/bare-metal-cloud/dedicated-servers/securing-a-dedicated-server.md). In case you have lost your admin password, it needs to be reset using rescue mode.
**This guide explains how to reset the password of the admin account of a Windows Server OS via the OVHcloud rescue mode.**
:::warning
This guide is not applicable to the rescue boot mode `Windows customer rescue system`.
Follow [this guide](/en/guides/bare-metal-cloud/dedicated-servers/rcw-changing-admin-password-on-windows.md) when using the option `Windows customer rescue system (Windows2022-based)` in the OVHcloud Control Panel.
:::
## Requirements
- A [dedicated server](https://www.ovhcloud.com/en-gb/bare-metal/) with Windows installed in your OVHcloud account
***
### OVHcloud Control Panel Access
- **Direct link:** Dedicated Servers
- **Navigation path:** Bare Metal Cloud > Dedicated servers > Select your server
***
## Instructions
The following steps describe the process of changing the local admin password by using the OVHcloud rescue mode (Linux-based). If you would like to use Windows PE (WinRescue) instead, skip to the pertinent section [at the end of this guide](#resetting-the-admin-password-using-winrescue).
### Step 1: Rebooting the server into rescue mode
The system has to be started in rescue mode before the admin password can be changed.
For detailed instructions, please refer to the [rescue mode guide](/en/guides/bare-metal-cloud/dedicated-servers/rescue-mode.md).
### Step 2: Mounting the system partition
Connect to your server via SSH. (Consult the [SSH introduction guide](/en/guides/bare-metal-cloud/dedicated-servers/ssh-introduction.md) if necessary.) Since it is a Windows server, you will see partitions labelled "Microsoft LDM data".
```bash
fdisk -l
```
```text
Disk /dev/sda: 1.8 TiB, 2000398934016 bytes, 3907029168 sectors
Units: sectors of 1 * 512 = 512 bytes
Sector size (logical/physical): 512 bytes / 512 bytes
I/O size (minimum/optimal): 512 bytes / 512 bytes
Disklabel type: gpt
Disk identifier: 54A5B25A-75B9-4355-9185-8CD958DCF32A
Device Start End Sectors Size Type
/dev/sda1 2048 718847 716800 350M EFI System
/dev/sda2 718848 720895 2048 1M Microsoft LDM metadata
/dev/sda3 720896 980991 260096 127M Microsoft reserved
/dev/sda4 980992 3907028991 3906048000 1.8T Microsoft LDM data
/dev/sda5 3907028992 3907029134 143 71.5K Microsoft LDM data
```
In the example output, "sda4" must be the (file) system partition, as determined by its size. Usually, there is a mirrored second output which in this case would be "/dev/sdb**X**". That is because in most cases, the server will have multiple disks with identical partition schemes. For the password reset process, only the first one is important. Next, mount this partition:
```bash
mount /dev/sda4 /mnt
```
Verify the mountpoint:
```bash
lsblk
```
```text
NAME MAJ:MIN RM SIZE RO TYPE MOUNTPOINT
sdb 8:16 0 1.8T 0 disk
├─sdb4 8:20 0 1.8T 0 part
├─sdb2 8:18 0 1M 0 part
├─sdb5 8:21 0 71.5K 0 part
├─sdb3 8:19 0 127M 0 part
└─sdb1 8:17 0 350M 0 part
sda 8:0 0 1.8T 0 disk
├─sda4 8:4 0 1.8T 0 part /mnt
├─sda2 8:2 0 1M 0 part
├─sda5 8:5 0 71.5K 0 part
├─sda3 8:3 0 127M 0 part
└─sda1 8:1 0 350M 0 part
```
In the example above, the operation succeeded. If the mounting failed, you might receive an error message like this:
```text
The disk contains an unclean file system (0, 0).
Metadata kept in Windows cache, refused to mount.
Failed to mount '/dev/sda4': Operation not permitted
The NTFS partition is in an unsafe state. Please resume and shutdown
Windows fully (no hibernation or fast restarting), or mount the volume
read-only with the 'ro' mount option.
```
In this case, use the following command and then try to mount again.
```bash
ntfsfix /dev/sda4
```
```bash
mount /dev/sda4 /mnt
```
### Step 3: Clearing the current password
This step involves manipulating the _SAM_ file with a tool to clear the admin user's password. Change to the appropriate directory and list the Windows users:
```bash
cd /mnt/Windows/System32/config
/mnt/Windows/System32/config#
```
```bash
chntpw -l SAM
```
```text
chntpw version 140201, (c) Petter N Hagen
Hive name (from header): <\SystemRoot\System32\Config\SAM>
ROOT KEY at offset: 0x001020 * Subkey indexing type is: 686c
File size 65536 [10000] bytes, containing 8 pages (+ 1 headerpage)
Used for data: 359/39024 blocks/bytes, unused: 33/18064 blocks/bytes.
| RID -|---------- Username ------------| Admin? |- Lock? --|
| 03e8 | admin | ADMIN | dis/lock |
| 01f4 | Administrator | ADMIN | dis/lock |
| 01f7 | DefaultAccount | | dis/lock |
| 01f5 | Guest | | dis/lock |
| 01f8 | WDAGUtilityAccount | | dis/lock |
```
If the command does not work, install the tool first: `apt install chntpw`.
Clear the password for the admin user with the following command. (Choose "Administrator" if "admin" does not exist.)
```bash
chntpw -u admin SAM
```
```text
chntpw version 140201, (c) Petter N Hagen
Hive name (from header): <\SystemRoot\System32\Config\SAM>
ROOT KEY at offset: 0x001020 * Subkey indexing type is: 686c
File size 65536 [10000] bytes, containing 8 pages (+ 1 headerpage)
Used for data: 361/39344 blocks/bytes, unused: 35/13648 blocks/bytes.
================= USER EDIT ====================
RID : 1000 [03e8]a
Username: admin
fullname:
comment :
homedir :
00000221 = Users (which has 3 members)
00000220 = Administrators (which has 2 members)
Account bits: 0x0010 =
[ ] Disabled | [ ] Homedir req. | [ ] Passwd not req. |
[ ] Temp. duplicate | [X] Normal account | [ ] NMS account |
[ ] Domain trust ac | [ ] Wks trust act. | [ ] Srv trust act |
[ ] Pwd don't expir | [ ] Auto lockout | [ ] (unknown 0x08) |
[ ] (unknown 0x10) | [ ] (unknown 0x20) | [ ] (unknown 0x40) |
Failed login count: 0, while max tries is: 0
Total login count: 5
- - - - User Edit Menu:
1 - Clear (blank) user password
(2 - Unlock and enable user account) [seems unlocked already]
3 - Promote user (make user an administrator)
4 - Add user to a group
5 - Remove user from a group
q - Quit editing user, back to user select
Select: [q] >
```
Type "1" and press Enter. (Make use of option 2 first if there is an "X" next to "Disabled".)
```text
Select: [q] > 1
Password cleared!
================= USER EDIT ====================
RID : 1000 [03e8]
Username: admin
fullname:
comment :
homedir :
00000221 = Users (which has 3 members)
00000220 = Administrators (which has 2 members)
Account bits: 0x0010 =
[ ] Disabled | [ ] Homedir req. | [ ] Passwd not req. |
[ ] Temp. duplicate | [X] Normal account | [ ] NMS account |
[ ] Domain trust ac | [ ] Wks trust act. | [ ] Srv trust act |
[ ] Pwd don't expir | [ ] Auto lockout | [ ] (unknown 0x08) |
[ ] (unknown 0x10) | [ ] (unknown 0x20) | [ ] (unknown 0x40) |
Failed login count: 0, while max tries is: 0
Total login count: 5
** No NT MD4 hash found. This user probably has a BLANK password!
** No LANMAN hash found either. Try login with no password!
- - - - User Edit Menu:
1 - Clear (blank) user password
(2 - Unlock and enable user account) [seems unlocked already]
3 - Promote user (make user an administrator)
4 - Add user to a group
5 - Remove user from a group
q - Quit editing user, back to user select
Select: [q] >
```
Type "q" and press Enter to quit the tool. Type "y" when prompted and press Enter.
```text
Select: [q] > q
Hives that have changed:
# Name
0
Write hive files? (y/n) [n] : y
0 - OK
```
### Step 4: Rebooting the server
First, change the netboot back to **Boot from the hard disk**
in your OVHcloud Control Panel
(see [step 1](#step-1-rebooting-the-server-into-rescue-mode)
).
Back in the CLI, unmount the partition and restart the server with these commands:
```bash
cd
```
```bash
umount /mnt
```
```bash
reboot
```
```text
Broadcast message from root@rescue.ovh.net on pts/0 (Wed 2020-05-27 11:28:53 CEST):
The system is going down for reboot NOW!
```
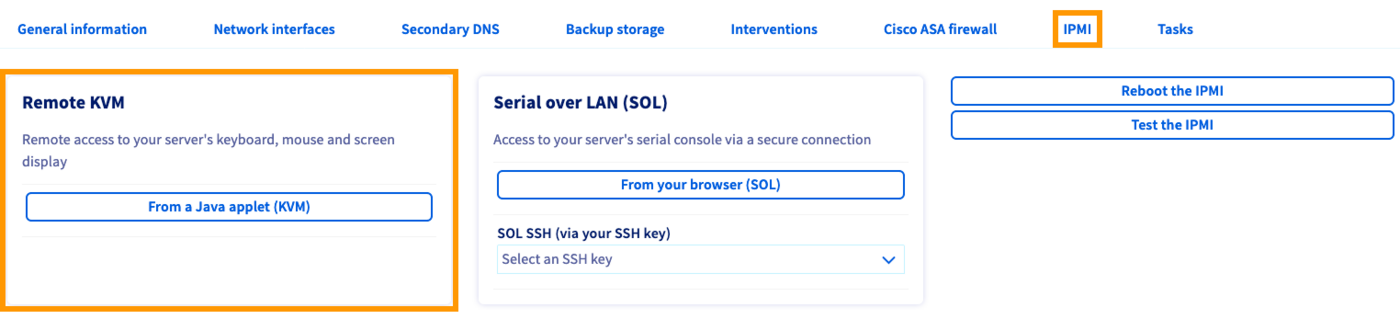
### Step 5: Setting a new password (IPMI)
In your OVHcloud Control Panel
, navigate to the `IPMI
` tab to open a KVM session.
#### Step 5.1: For a newer version of Windows
There should be a password expiration message in the login interface.
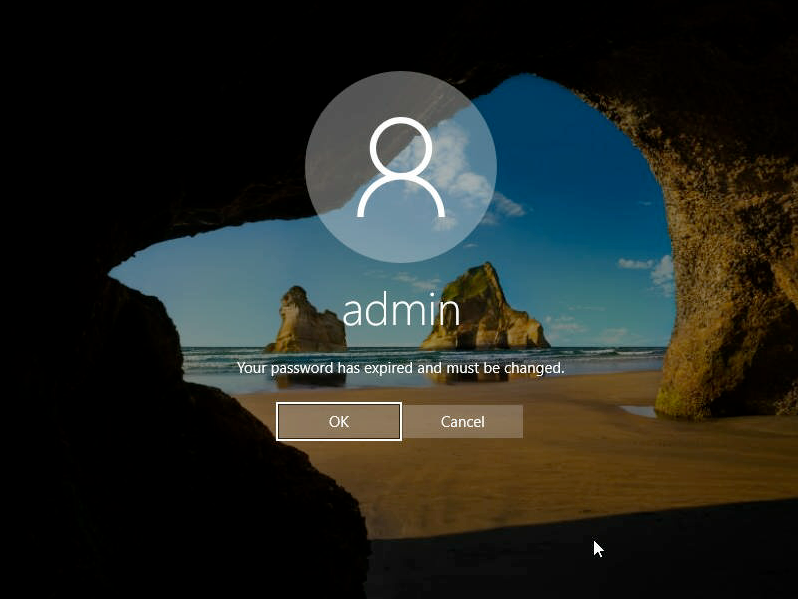
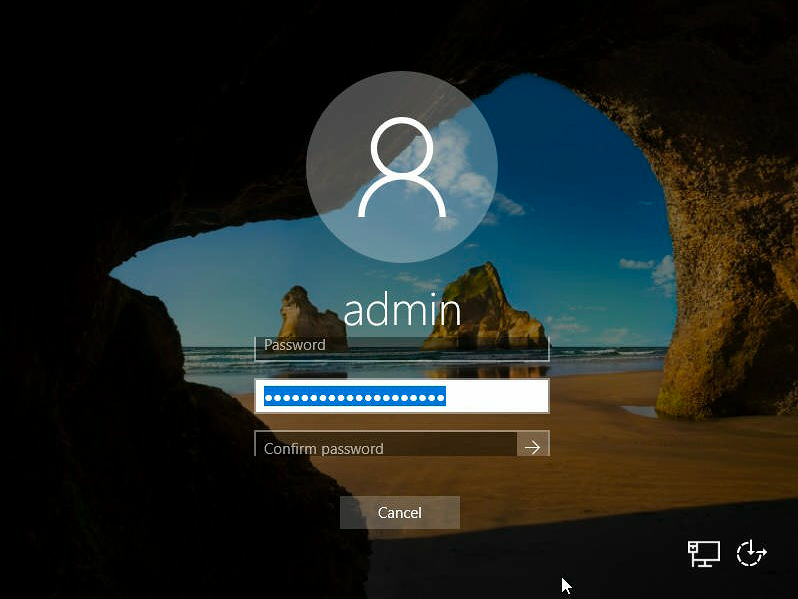
The new password for the admin user must now be entered twice. However, the confirmation field is not yet visible, meaning you need to leave the first field blank, type your new password into the second field, then use the tabulator key ("↹") on the (virtual) keyboard to switch to the third field ("Confirm password"). Type the password again and click on the arrow to save it.
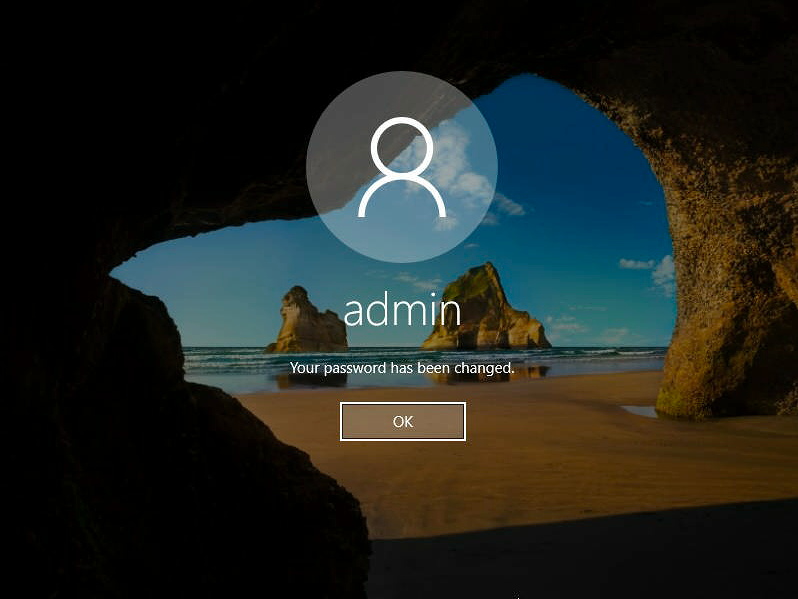
Click on `OK
` and you will be logged in.
#### Step 5.2: For an older version of Windows
A command line window (cmd) should open when the KVM session is established.
Set the password for the current user ("Administrator"):
```powershell
net user Administrator *
```

:::info
It is advisable to use the virtual keyboard when typing passwords in this interface.
:::
### Resetting the admin password using WinRescue
#### Step 1: Rebooting the server into rescue mode
The system has to be started in rescue mode (WinRescue) before the admin password can be changed.
For detailed instructions, please refer to the [rescue mode guide](/en/guides/bare-metal-cloud/dedicated-servers/rescue-mode.md).
#### Step 2: Clearing the current password
In your OVHcloud Control Panel
, navigate to the `IPMI
` tab to open a KVM session.

To reset passwords, the tool NTPWEdit is required. Once you are connected via KVM, open the browser and download it from the [official website](http://www.cdslow.org.ru/en/ntpwedit/). Navigate to the folder where the downloaded ZIP file is located and extract the contents. Next, open the _ntpwedit64_ executable to start the application.
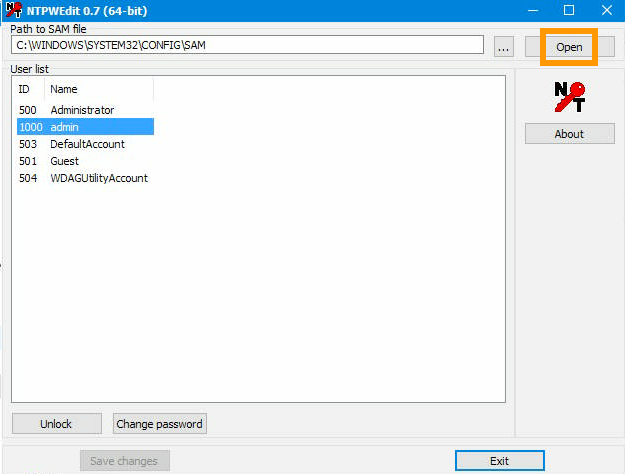
In this interface, you can manipulate the _SAM_
file in order to clear the admin user's password. The default file path in the _WINDOWS_
directory is pre-filled. Open the file to display the list of users by clicking on `Open
`.
The relevant user will either be "admin" or "Administrator", depending on the Windows version. If both are present, choose "admin". Then click on `Change password
`.
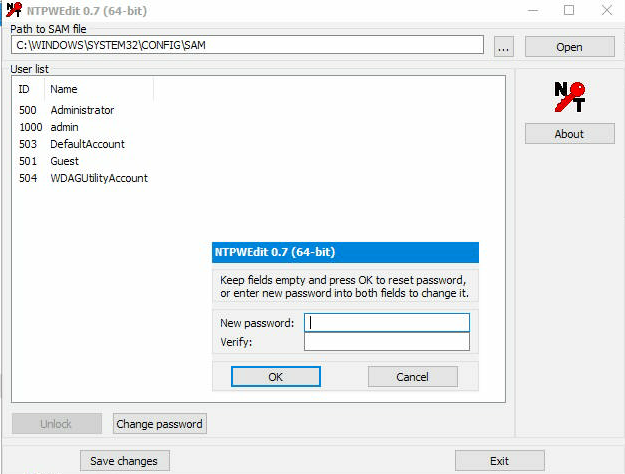
In the popup window, leave the fields blank and click `OK
`. Finish by clicking on `Save changes
` and `Exit
`.
After this, the server needs to be rebooted again.
#### Step 3: Rebooting the server
First, change the netboot back to **Boot from the hard disk**
in your OVHcloud Control Panel
(see [step 1](#step-1-rebooting-the-server-into-rescue-mode)
).
Back in the KVM window, select the shutdown option `Restart
` via the Windows "Start" button on the bottom left.
Continue with [Step 5: Setting a new password (IPMI)](#step-5-setting-a-new-password-ipmi).
## Go further
[Activating and using rescue mode](/en/guides/bare-metal-cloud/dedicated-servers/rescue-mode.md)
[Using the IPMI with dedicated servers](/en/guides/bare-metal-cloud/dedicated-servers/ipmi.md)
Join our [community of users](https://community.ovhcloud.com/).