---
title: "Deploying an application from the catalogue on a Dedicated Server"
description: "Find out how to deploy a ready-to-use application on your bare metal server through automatic post-installation with the application catalogue"
url: https://docs.ovhcloud.com/en/guides/bare-metal-cloud/dedicated-servers/application-catalog
lang: en
lastUpdated: 2026-07-29
---
# Deploying an application from the catalogue on a Dedicated Server
## Objective
The application catalogue lets you install a ready-to-use application on your OVHcloud dedicated server without any prior system administration knowledge. You choose an application when you (re)install your server, then complete a short configuration form in a secure web interface. The application is installed natively on the server, secured with HTTPS, and made available in minutes.
**This guide explains how to use the application catalogue on your OVHcloud dedicated server.**
## Requirements
- A [dedicated server](https://www.ovhcloud.com/en-gb/bare-metal/) in your OVHcloud account
- Access to the OVHcloud Control Panel
- Access to the OVHcloud API (for the "[OVHcloud API](#viaapi)" section of this guide)
- Access to the email address of your OVHcloud account, to receive the link to the configuration interface
- A web browser to reach the configuration interface once the installation has completed
***
### OVHcloud Control Panel Access
- **Direct link:** Dedicated Servers
- **Navigation path:** Bare Metal Cloud > Dedicated servers > Select your server
***
:::warning
As with any classical OS installation, a new installation with the application catalogue will erase all the data on the server. Back up any data you want to keep before you start.
:::
## Instructions
### How the application catalogue works
Deploying an application happens in two steps:
1. **Selection (at installation):** you (re)install your server with an application catalogue image and select **one** application. This is where you choose _which_ application you want.
2. **Configuration (after first boot):** once the server has restarted, a single-use configurator starts automatically and serves a secure web interface on port `10143`. You fill in a short form (for example a site name and an administrator password), then the application is installed automatically and published over HTTPS.
Once the installation succeeds, the configurator **removes itself completely** from the server: its binary, its service and its working data are deleted. You are left with only your application and full root access to the server.
Applications are installed **natively** — with system packages and `systemd` services, on a server dedicated to that single purpose — and not inside a container platform.
**Technical limitations:**
- **Only one application** can be deployed through the application catalogue.
- **Custom partitioning and hardware RAID configuration are not available** for this installation.
:::warning
This does not mean that you cannot run other applications on the server. It means that only **ONE** application can be installed through the catalogue. If you want to run additional applications, you will need to install them manually.
:::
### Available applications
The catalogue is regularly updated, so when you launch an installation, refer to the list displayed in the OVHcloud Control Panel. The following applications are available:
| Application | Category | Description |
| ------------------- | ------------- | ----------------------------------------------------------- |
| WordPress | CMS | Content management system for websites and blogs |
| Drupal | CMS | Content management system with MySQL and Nginx |
| Nextcloud | Cloud storage | Self-hosted file sync, calendar, contacts and collaboration |
| PrestaShop | E-commerce | E-commerce platform for online stores |
| Discourse | Community | Modern community forum platform |
| Matomo | Web analytics | Privacy-focused web analytics platform |
| n8n | Automation | Workflow automation platform with 400+ integrations |
| OpenClaw | AI | Personal AI assistant gateway running on your server |
| HestiaCP | Control panel | Open-source web server control panel |
| FastPanel | Control panel | Web hosting control panel |
| Coolify | Control panel | Self-hostable PaaS alternative to Heroku or Vercel |
| Dokploy | Control panel | Self-hosted PaaS to deploy apps from Git or Docker |
| Easypanel | Control panel | Modern Docker-powered server control panel |
| OVHcloud Game Panel | Control panel | Web panel to manage Docker-based game servers |
### Selecting your application at installation
Two deployment methods are available, described in the tabs below: install your application from the OVHcloud Control Panel, or use the OVHcloud API to integrate the installation into your own scripts and automate deployments.
**OVHcloud Control Panel**
#### Launching the installation
1. Select your server under Bare Metal Cloud > Dedicated servers.
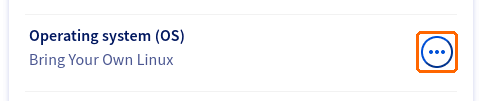
2. In the General information tab, next to **Operating system (OS)**, click the ... button, then click Reinstall my server.
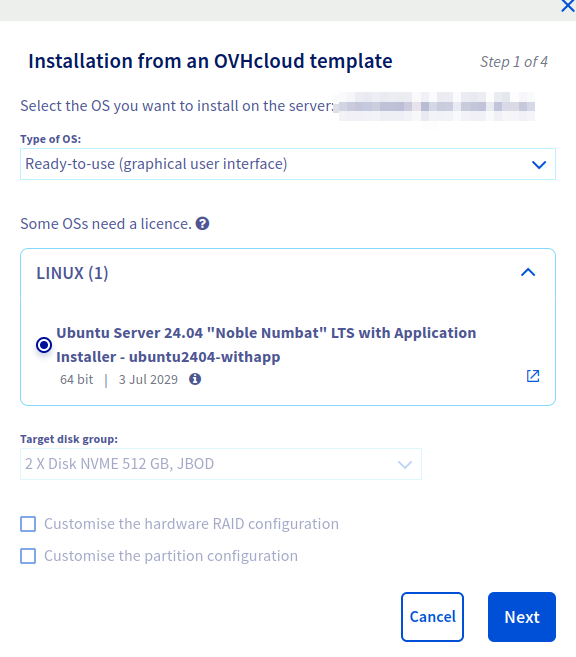
 3. In the **Installation from an OVHcloud template** window, set **Type of OS** to
 Ready-to-use (graphical user interface), then select the **Ubuntu Server 24.04 "Noble Numbat" LTS with Application Installer** template. Choose the **Target disk group** and click Next.
:::info
Custom partitioning and hardware RAID configuration are not available with this template, so these options remain disabled.
:::
 4. Continue through the installation steps to enter the general settings, such as the server hostname and the SSH key to be added to the server.
5. At the **Application to install** step, select the **single application** you want to deploy from the drop-down list, then click
4. Continue through the installation steps to enter the general settings, such as the server hostname and the SSH key to be added to the server.
5. At the **Application to install** step, select the **single application** you want to deploy from the drop-down list, then click Confirm to launch the installation.
 The server reinstalls and then starts the configurator automatically. Once the installation has completed, follow the "[Configuring and accessing your application](#configure)" section below to finish the setup.
**OVHcloud API**
#### Launching the installation
To list the operating systems available for your server, use the following API call:
🇪🇺EU▾
[GET/dedicated/server/{serviceName}/install/compatibleTemplates](https://api.eu.ovhcloud.com/console/?section=/dedicated/server&branch=v1#get-/dedicated/server/-serviceName-/install/compatibleTemplates)
In the response, the application catalogue templates are the ones whose name ends with `-withapp`. Always take the identifier from this call rather than hardcoding it, as the catalogue of templates evolves.
You can then trigger the installation with the following API call:
🇪🇺EU▾
[POST/dedicated/server/{serviceName}/reinstall](https://api.eu.ovhcloud.com/console/?section=/dedicated/server&branch=v1#post-/dedicated/server/-serviceName-/reinstall)
Set the operating system you obtained in the previous step and the application to install in the `appToInstall` customization:
```json
{
"operatingSystem": "ubuntu2404-withapp",
"customizations": {
"hostname": "myApplicationServer",
"sshKey": "mySshKey",
"appToInstall": "wordpress"
}
}
```
The `appToInstall` value is the identifier of the application you want to deploy — for example `wordpress`, `drupal`, `nextcloud`, `prestashop`, `discourse`, `matomo`, `n8n`, `openclaw`, `hestiacp`, `fastpanel`, `coolify`, `dokploy`, `easypanel` or `game-panel`. Only one application can be specified.
Follow the installation task to completion as described in [Install an OS via the OVHcloud API on a Dedicated Server](/en/guides/bare-metal-cloud/dedicated-servers/api-os-installation.md), then continue with the "[Configuring and accessing your application](#configure)" section below.
### Configuring and accessing your application [](#)
After the installation, your server boots the single-use configurator automatically. You do not need Linux, SSH or system administration skills for this step — only a web browser.
#### Step 1: Opening the configurator
Once the installation has completed, you receive an email containing the link to your configurator. It has the following form:
```text
https://:10143/static/deploy.html?app=&token=
```
Open that link in your web browser. The token it carries authenticates you, and a secure, session-only cookie is stored, so you can then navigate the configurator without the token in the address bar. Opening the configurator without a valid token returns an `Unauthorized` page.
:::warning
Treat this link like a password and do not share it: it grants access to the setup interface of your server.
:::
:::info
If your browser shows a certificate warning on the very first load, the configurator is still obtaining its Let's Encrypt certificate and is serving a temporary self-signed one in the meantime. Wait a minute and reload — the switch to the final certificate is automatic.
:::
#### Step 2: Filling in the configuration form
The configurator opens directly on the application you selected at installation. Depending on that application, you either deploy straight away or fill in a short form first:
- **Applications with no fields** — Coolify, Dokploy, Easypanel, FastPanel, HestiaCP, Discourse, Matomo and n8n — generate any credentials they need and display them at the end. Click
The server reinstalls and then starts the configurator automatically. Once the installation has completed, follow the "[Configuring and accessing your application](#configure)" section below to finish the setup.
**OVHcloud API**
#### Launching the installation
To list the operating systems available for your server, use the following API call:
🇪🇺EU▾
[GET/dedicated/server/{serviceName}/install/compatibleTemplates](https://api.eu.ovhcloud.com/console/?section=/dedicated/server&branch=v1#get-/dedicated/server/-serviceName-/install/compatibleTemplates)
In the response, the application catalogue templates are the ones whose name ends with `-withapp`. Always take the identifier from this call rather than hardcoding it, as the catalogue of templates evolves.
You can then trigger the installation with the following API call:
🇪🇺EU▾
[POST/dedicated/server/{serviceName}/reinstall](https://api.eu.ovhcloud.com/console/?section=/dedicated/server&branch=v1#post-/dedicated/server/-serviceName-/reinstall)
Set the operating system you obtained in the previous step and the application to install in the `appToInstall` customization:
```json
{
"operatingSystem": "ubuntu2404-withapp",
"customizations": {
"hostname": "myApplicationServer",
"sshKey": "mySshKey",
"appToInstall": "wordpress"
}
}
```
The `appToInstall` value is the identifier of the application you want to deploy — for example `wordpress`, `drupal`, `nextcloud`, `prestashop`, `discourse`, `matomo`, `n8n`, `openclaw`, `hestiacp`, `fastpanel`, `coolify`, `dokploy`, `easypanel` or `game-panel`. Only one application can be specified.
Follow the installation task to completion as described in [Install an OS via the OVHcloud API on a Dedicated Server](/en/guides/bare-metal-cloud/dedicated-servers/api-os-installation.md), then continue with the "[Configuring and accessing your application](#configure)" section below.
### Configuring and accessing your application [](#)
After the installation, your server boots the single-use configurator automatically. You do not need Linux, SSH or system administration skills for this step — only a web browser.
#### Step 1: Opening the configurator
Once the installation has completed, you receive an email containing the link to your configurator. It has the following form:
```text
https://:10143/static/deploy.html?app=&token=
```
Open that link in your web browser. The token it carries authenticates you, and a secure, session-only cookie is stored, so you can then navigate the configurator without the token in the address bar. Opening the configurator without a valid token returns an `Unauthorized` page.
:::warning
Treat this link like a password and do not share it: it grants access to the setup interface of your server.
:::
:::info
If your browser shows a certificate warning on the very first load, the configurator is still obtaining its Let's Encrypt certificate and is serving a temporary self-signed one in the meantime. Wait a minute and reload — the switch to the final certificate is automatic.
:::
#### Step 2: Filling in the configuration form
The configurator opens directly on the application you selected at installation. Depending on that application, you either deploy straight away or fill in a short form first:
- **Applications with no fields** — Coolify, Dokploy, Easypanel, FastPanel, HestiaCP, Discourse, Matomo and n8n — generate any credentials they need and display them at the end. Click Deploy.
- **Applications with fields** — WordPress, Drupal, Nextcloud, PrestaShop, OpenClaw and OVHcloud Game Panel — ask for a few values, such as a site name, an administrator password or a database password. Required fields are marked and optional ones may have sensible defaults.
An `Installation details
` panel above the form lists what will be installed and why, along with a link to the vendor's official documentation.
Each field is validated before the deployment starts (for example an email field must contain a valid email address, and passwords have a minimum length). Fix any highlighted field and submit again.
:::tip
Choose strong passwords: the values you enter here become your real application credentials.
:::
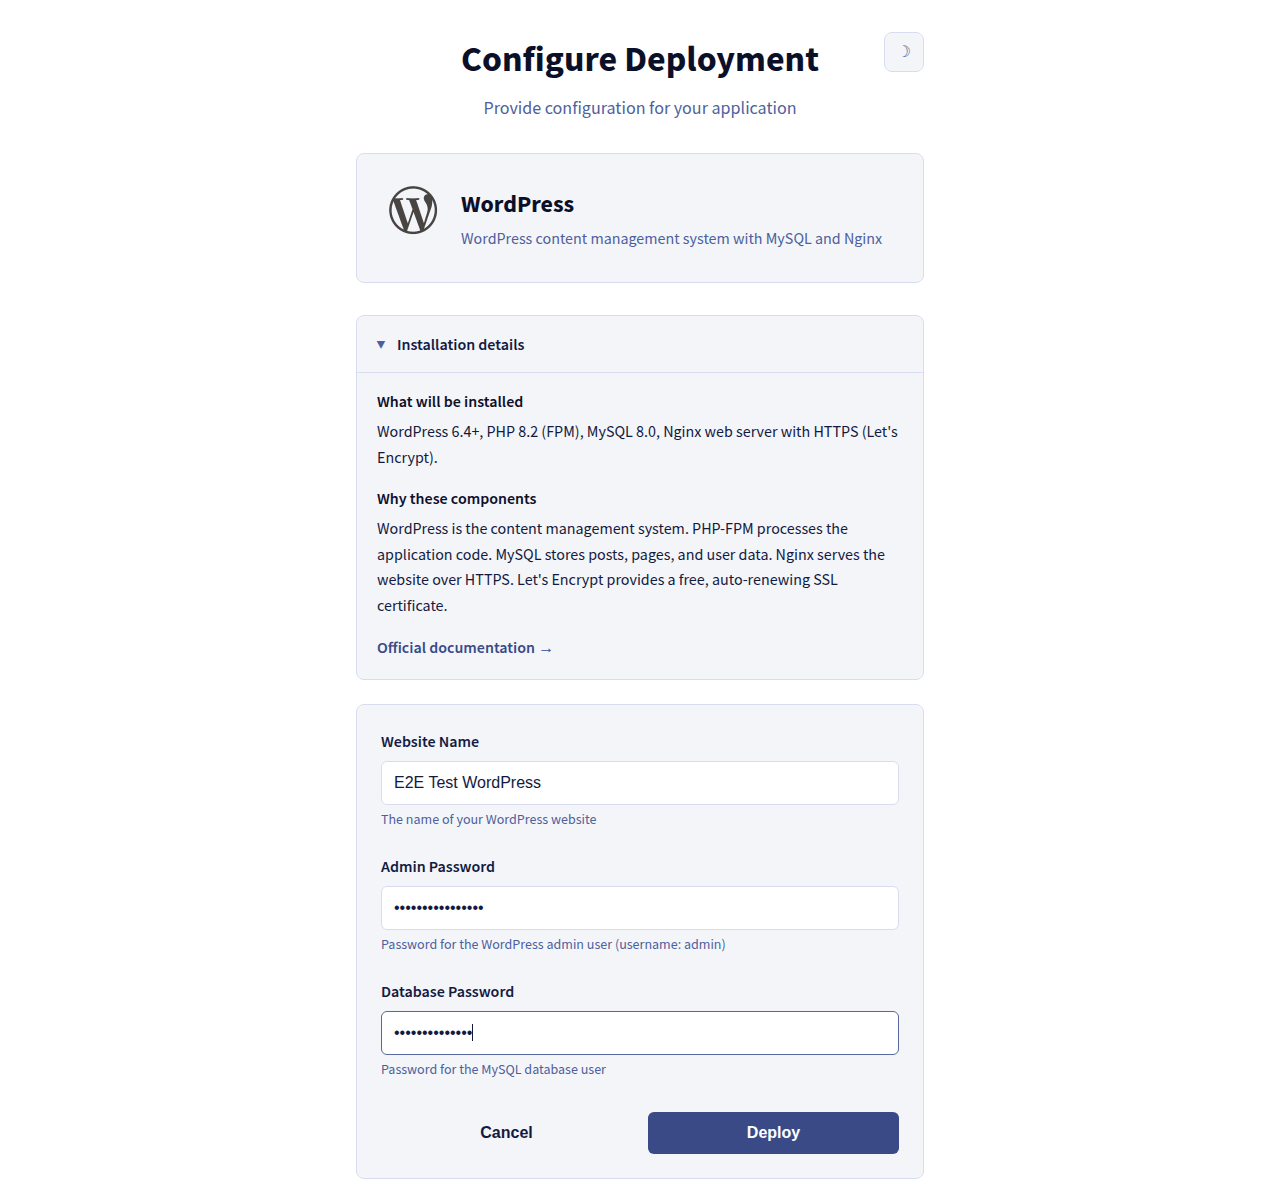
Then click `Deploy
`.
#### Step 3: Following the deployment
The configurator runs the installation and streams the progress live: a status (`pending`, then `running`, then `completed` or `failed`), a progress bar, and the installation logs. Values you entered in the form are masked in the logs.
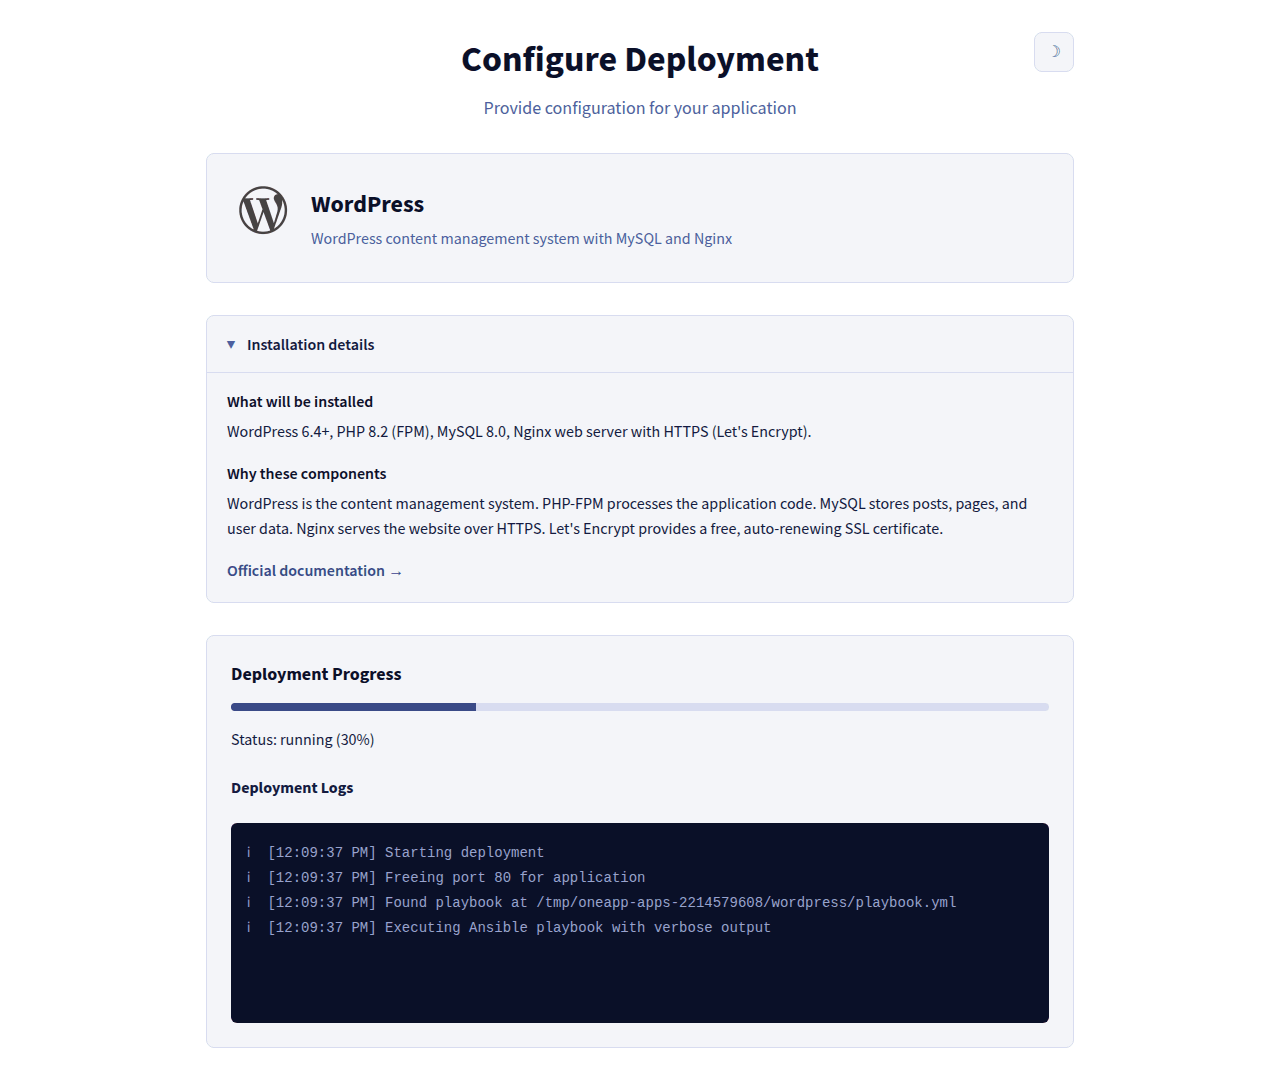
A deployment usually takes a few minutes; heavier applications such as Discourse take longer. You can keep the tab open, but the installation continues on the server even if your browser disconnects — reopen your link to resume watching.
:::info
Only one deployment runs at a time. If a deployment is already in progress and you start another, the configurator sends you back to the one in progress instead of starting a second. This is what enforces the "one application per server" rule.
:::
#### Step 4: Retrieving your access details
When the status reaches `completed`, the configurator displays a success page with:
- the link to your application, on the standard HTTPS port — `https:///`;
- any credentials or details the application generated for you, such as an administrator username, a database name or a generated password.
A free, auto-renewing [Let's Encrypt](https://letsencrypt.org/) certificate is issued for your server's hostname during the installation, and the deployed application manages its renewal itself.
:::warning
Copy your credentials now. The success page is only available during the grace period that follows a successful deployment (5 minutes by default). Once the configurator has removed itself, it can no longer display them — you would have to recover them from within the application itself, or reinstall the server.
:::
#### Step 5: The configurator removes itself
Shortly after a successful deployment, the configurator deletes its own binary, its service and its working data. From then on:
- the configurator interface on port `10143` stops responding — **this is expected, not a failure**;
- your application, its data and its HTTPS certificate are kept;
- your server runs only your application, with no leftover setup tool or administration interface.
You have full ownership of the server, including root access over SSH if you added a key at installation time. The configurator does not manage anything after this point.
:::info
If the deployment **fails**, the configurator does _not_ remove itself: it stays up so that the problem can be diagnosed from the live logs. A failed deployment generally requires reinstalling the server and starting over.
:::
To deploy a different application, reinstall your server from the application catalogue and select the new application.
### Troubleshooting
| Symptom | Cause | Solution |
| --------------------------------------------------------------------- | ------------------------------------------------------------------------------------------------------------------------------------------- | ---------------------------------------------------------------------------------------------------------------------------------------------------------------------------------------------------------------------------------------------------- |
| The configurator page does not load at `https://:10143/` | The installation is not finished yet, or inbound access to port `10143` is blocked. | Wait for the installation to complete, then retry. Make sure any firewall (including the OVHcloud [Edge Network Firewall](/en/guides/bare-metal-cloud/dedicated-servers/firewall-network.md)) allows inbound traffic to your server on port `10143`. |
| The configurator page stopped loading after a successful deployment | The configurator removed itself, as designed. | This is expected. Use your application's own address instead: `https:///`. |
| `Unauthorized` when opening the configurator | The access token is missing or incorrect. | Reopen the configurator using the exact link and token provided with your installation. |
| A certificate warning appears on the first load | The Let's Encrypt certificate has not been issued yet; a temporary self-signed certificate is being served. | Wait a minute and reload the page. |
| The application is not reachable over HTTPS after the installation | The Let's Encrypt certificate could not be issued, usually because inbound port `80` or `443` is blocked, or the hostname does not resolve. | Ensure ports `80` and `443` are open inbound and that your server's hostname resolves publicly, then reinstall if needed. |
| You want to deploy a second application from the catalogue | Only one application can be deployed through the catalogue. | Reinstall the server to deploy a different application, or install the additional application manually. |
## Go further
[Install an OS via the OVHcloud API on a Dedicated Server](/en/guides/bare-metal-cloud/dedicated-servers/api-os-installation.md)
[Understanding the dedicated server boot process](/en/guides/bare-metal-cloud/dedicated-servers/boot-process.md)
[Enabling and configuring the Edge Network Firewall](/en/guides/bare-metal-cloud/dedicated-servers/firewall-network.md)
Join our [community of users](https://community.ovhcloud.com/).