---
title: "Creating a cluster"
description: "Find out how to create a Kubernetes cluster managed by OVHcloud using the OVHcloud Control Panel, API, CLI, Terraform, Pulumi or CDK for Terraform"
url: https://docs.ovhcloud.com/de/guides/public-cloud/containers-orchestration/managed-kubernetes/create-cluster
lang: de
lastUpdated: 2026-06-03
---
# Creating a cluster
## Objective
The OVHcloud Managed Kubernetes service lets you deploy production-ready clusters without the operational overhead of setting them up or maintaining them. Create a cluster through the OVHcloud Control Panel, API, or CLI, or automate the process using Infrastructure as Code tools like Terraform, Pulumi or CDK for Terraform.
## Requirements
- A [Public Cloud project](/de/guides/public-cloud/cross-functional/create-a-public-cloud-project.md) in your OVHcloud account
:::tip
Take advantage of reduced prices by committing to a period of 1 to 36 months on your Public Cloud resources. More information on our [Savings Plans](https://www.ovhcloud.com/de/public-cloud/savings-plan/) page.
:::
***
### OVHcloud Control Panel Access
- **Direct link:** Public Cloud Projects
- **Navigation path:** Public Cloud > Select your project
***
:::info
The OVHcloud API, CLI, Terraform, CDK for Terraform, and Pulumi all require OVHcloud API credentials (`application_key`, `application_secret`, `consumer_key`). Follow [First steps with the OVHcloud APIs](/de/guides/manage-and-operate/api/first-steps.md) to generate them.
:::
## Instructions
**Via OVHcloud Control Panel**
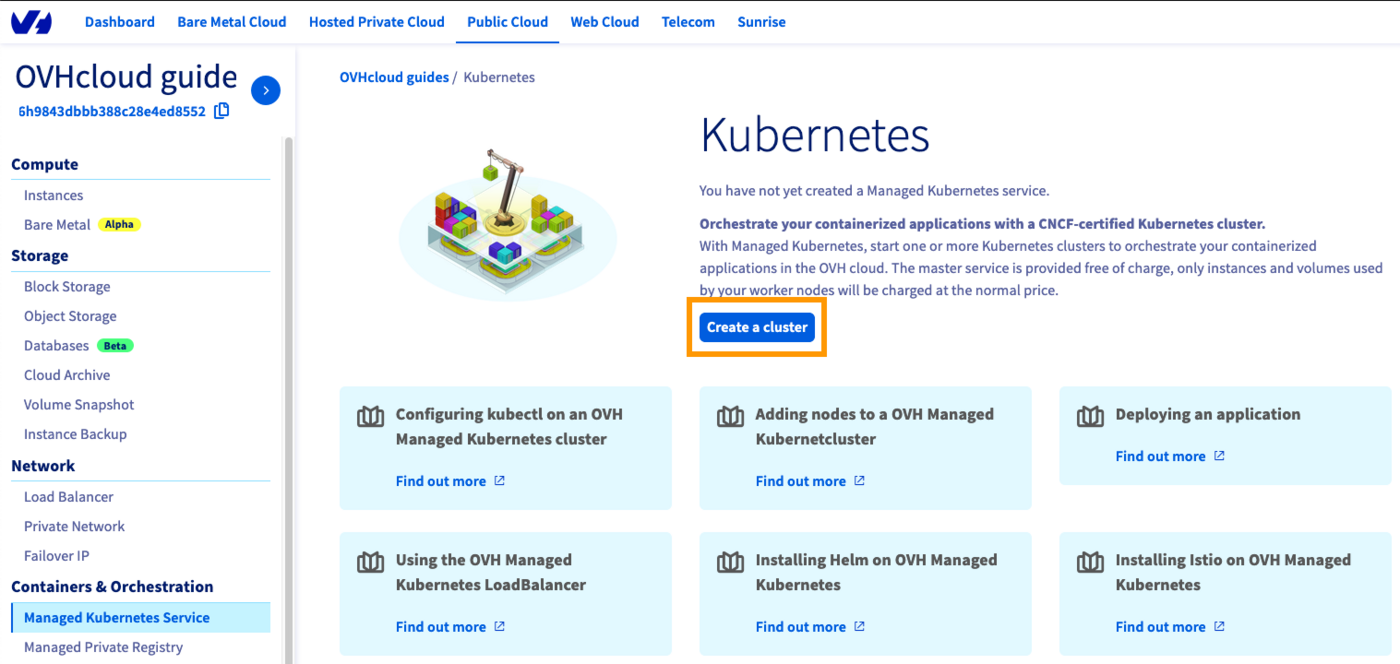
Click on Managed Kubernetes Service in the left-hand menu and click Create a cluster.
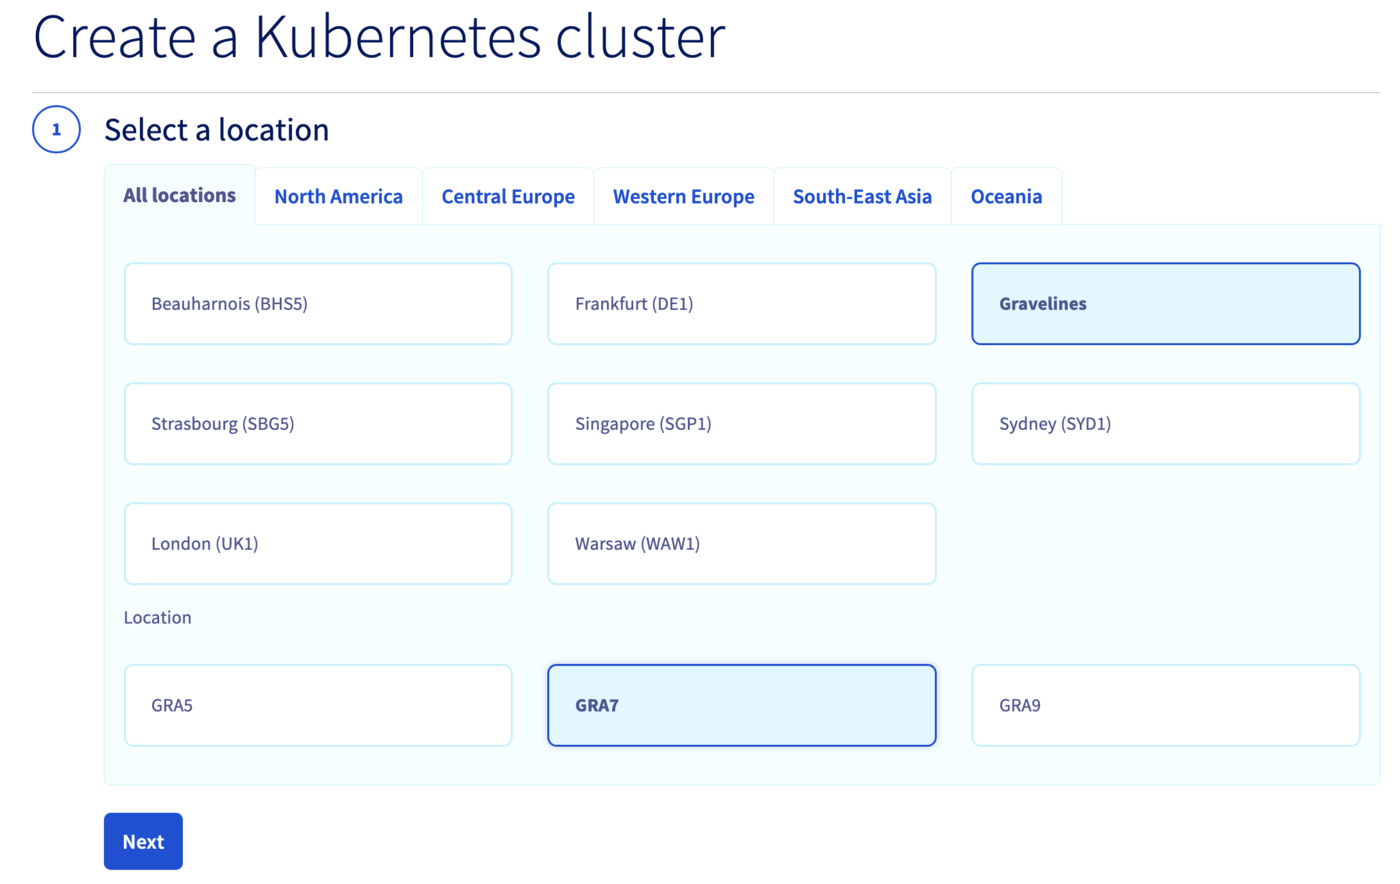
Select a location for your new cluster.
Choose the minor version of Kubernetes.
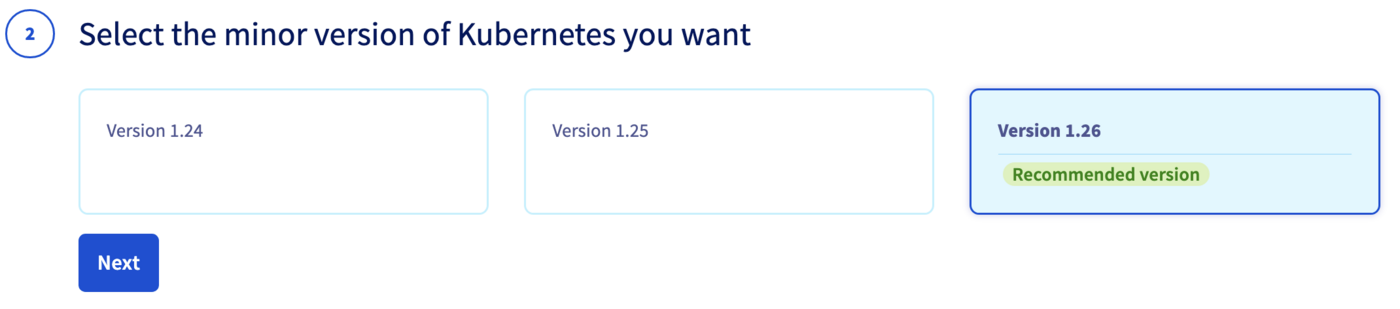:::info
We recommend always using the latest stable version. Please read our [End of life / end of support](/de/guides/public-cloud/containers-orchestration/managed-kubernetes/eos-eol-policies.md) page to understand our version policy.
:::
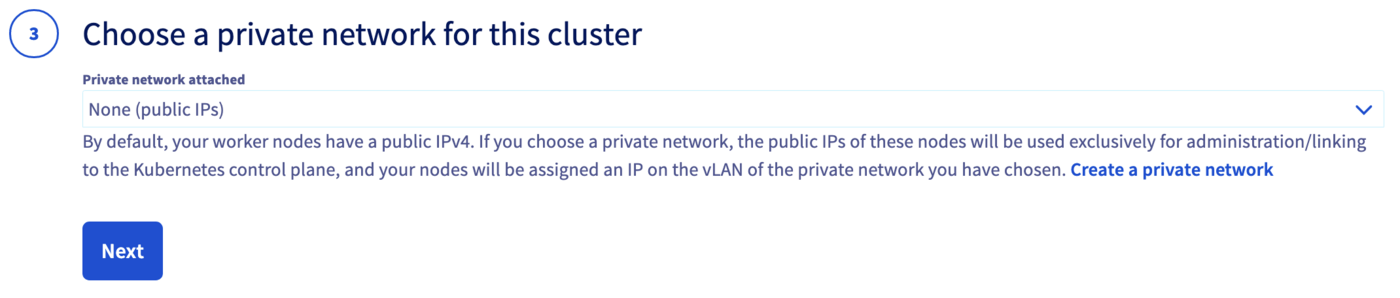
Optionally, integrate your cluster into a private network using OVHcloud vRack. For more information, read our guide [Using the vRack](/de/guides/public-cloud/containers-orchestration/managed-kubernetes/using-vrack.md).
Configure the default node pool. A node pool is a group of nodes sharing the same configuration. Read the [Managing node pools](/de/guides/public-cloud/containers-orchestration/managed-kubernetes/managing-nodes.md) guide for more information.
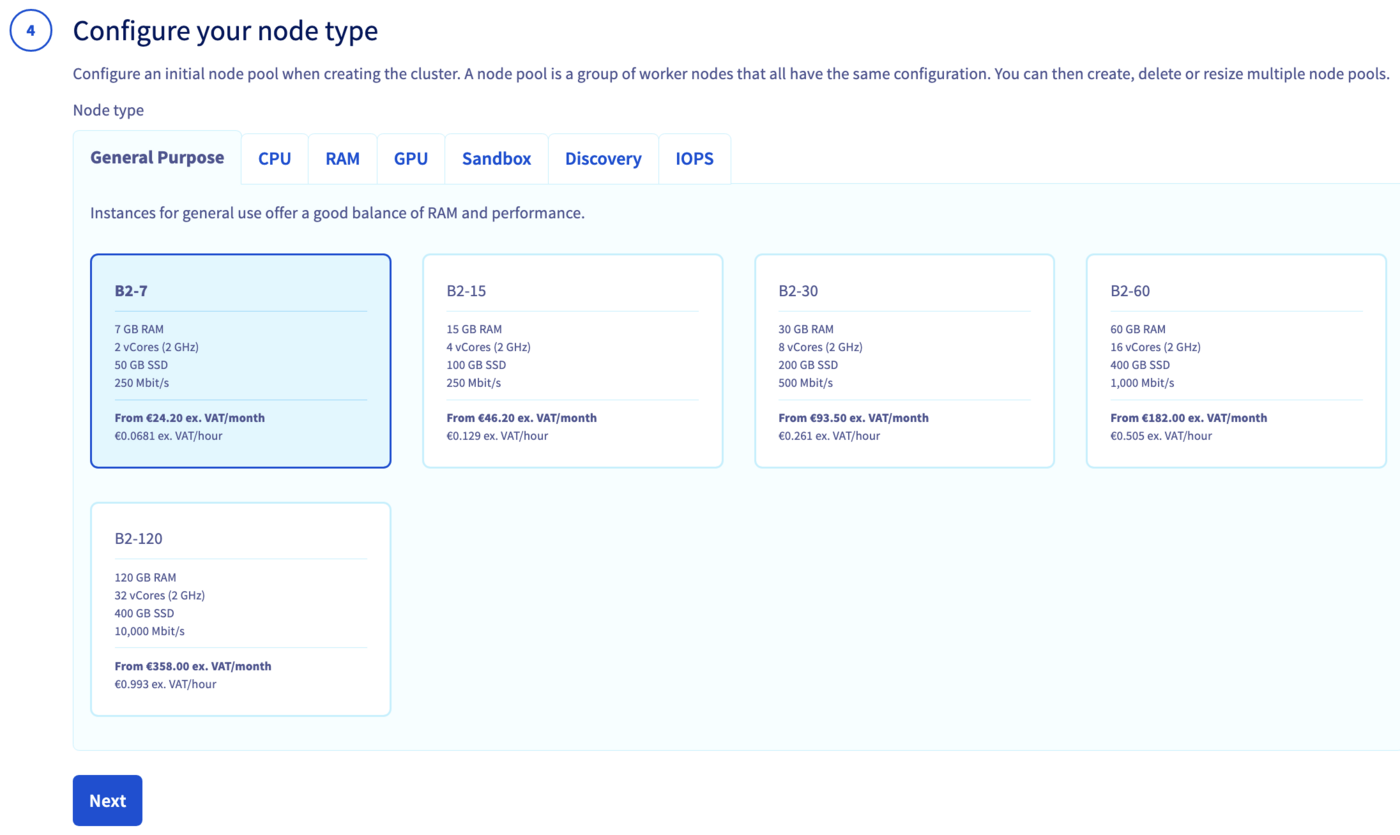Define the size of the default node pool.
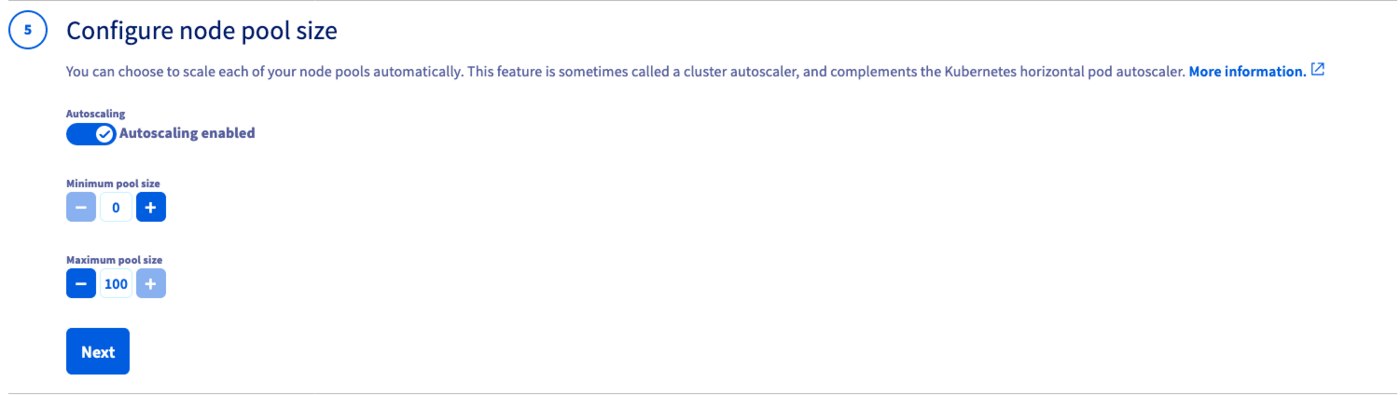
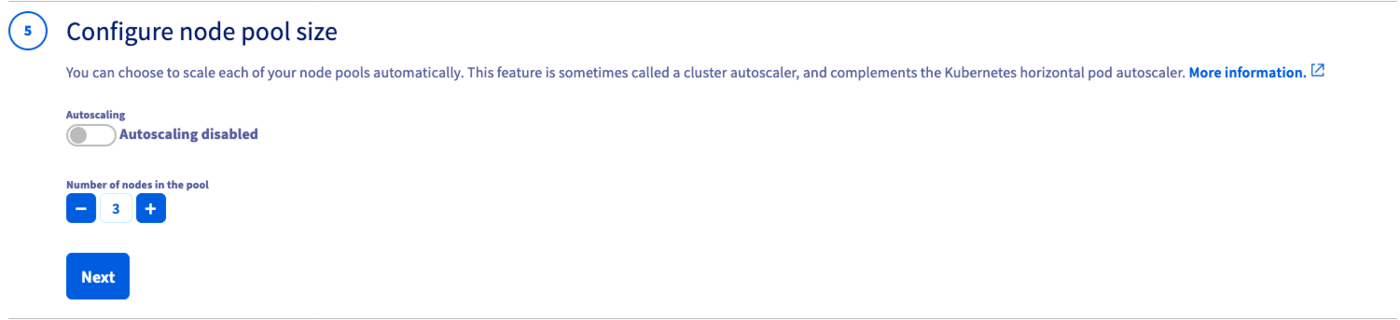Optionally, enable Autoscaling and define the minimum and maximum pool size.
Choose the billing mode (monthly or hourly) and optionally enable anti-affinity mode.
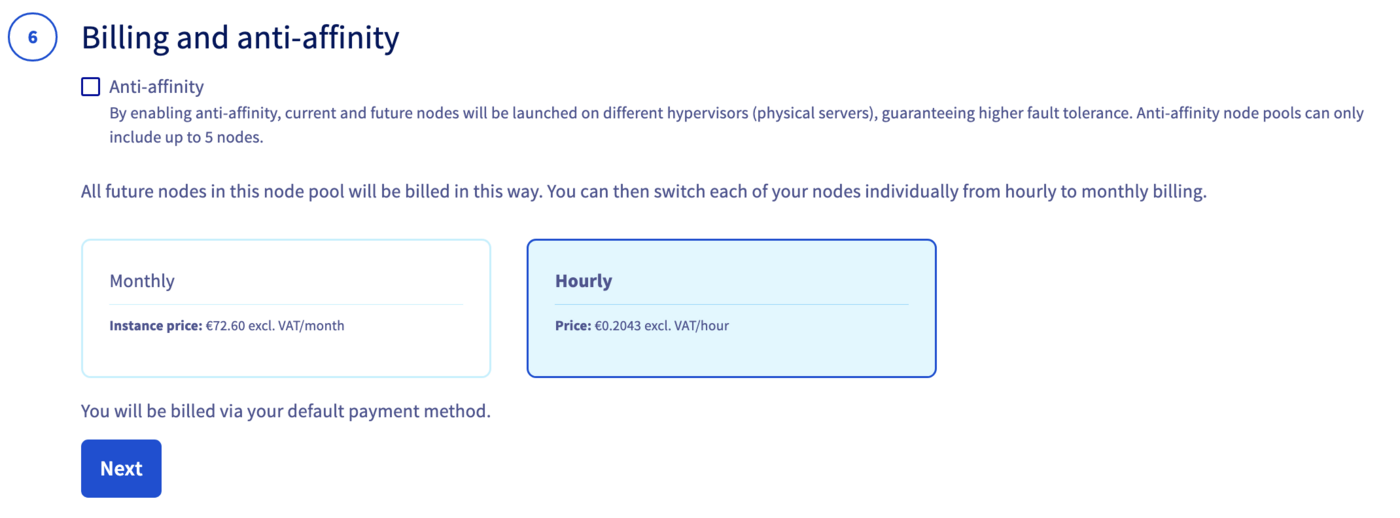:::info
Anti-affinity distributes nodes across different hypervisors for higher fault tolerance. Anti-affinity node pools are limited to 5 nodes. Monthly billing cannot be switched to hourly afterwards.
:::
Enter a name for your cluster and click Send.
The cluster is available within a few minutes.
:::warning
After a cluster is created, the region and private network ID cannot be changed.
:::
**Via the OVHcloud API**
Log in to the [OVHcloud API Explorer](https://api.ovh.com/console/).
**Create the cluster:**
Call the following endpoint with this body:
🇪🇺EU▾
[POST/cloud/project/{serviceName}/kube](https://eu.api.ovh.com/console/?section=/cloud&branch=v1#post-/cloud/project/-serviceName-/kube)
```json
{
"name": "my-cluster",
"region": "GRA7",
"version": "1.34"
}
```
:::info
We recommend always using the latest stable version. Please read our [End of life / end of support](/de/guides/public-cloud/containers-orchestration/managed-kubernetes/eos-eol-policies.md) page to understand our version policy.
:::
Note the `id` in the response — you will need it to create the node pool.
**Create a node pool:**
Call the following endpoint with this body:
🇪🇺EU▾
[POST/cloud/project/{serviceName}/kube/{kubeId}/nodepool](https://eu.api.ovh.com/console/?section=/cloud&branch=v1#post-/cloud/project/-serviceName-/kube/-kubeId-/nodepool)
```json
{
"name": "my-pool",
"flavorName": "b2-7",
"desiredNodes": 3,
"minNodes": 3,
"maxNodes": 3
}
```
:::warning
Node pool names only accept lowercase characters, digits and `-`. Underscores and dots are not supported.
:::
:::warning
After a cluster is created, the region and private network ID cannot be changed.
:::
**Via the OVHcloud CLI**
:::info
Install the [OVHcloud CLI](https://github.com/ovh/ovhcloud-cli) and configure your credentials before proceeding.
:::
**Create the cluster:**
```bash
ovhcloud cloud kube create \
--cloud-project \
--name my-cluster \
--region GRA7 \
--version 1.34
```
:::info
We recommend always using the latest stable version. Please read our [End of life / end of support](/de/guides/public-cloud/containers-orchestration/managed-kubernetes/eos-eol-policies.md) page to understand our version policy.
:::
Note the `id` in the output — you will need it to create the node pool.
**Create a node pool:**
```bash
ovhcloud cloud kube nodepool create \
--cloud-project \
--name my-pool \
--flavor-name b2-7 \
--desired-nodes 3 \
--min-nodes 3 \
--max-nodes 3
```
:::warning
Node pool names only accept lowercase characters, digits and `-`. Underscores and dots are not supported.
:::
:::warning
After a cluster is created, the region and private network ID cannot be changed.
:::
**Via Terraform**
:::info
Install [Terraform CLI](https://www.terraform.io/docs/cli/index.html) (version 0.12.x minimum) before proceeding.
:::
OVHcloud provides a [Terraform provider](https://registry.terraform.io/providers/ovh/ovh/latest) available in the official Terraform registry.
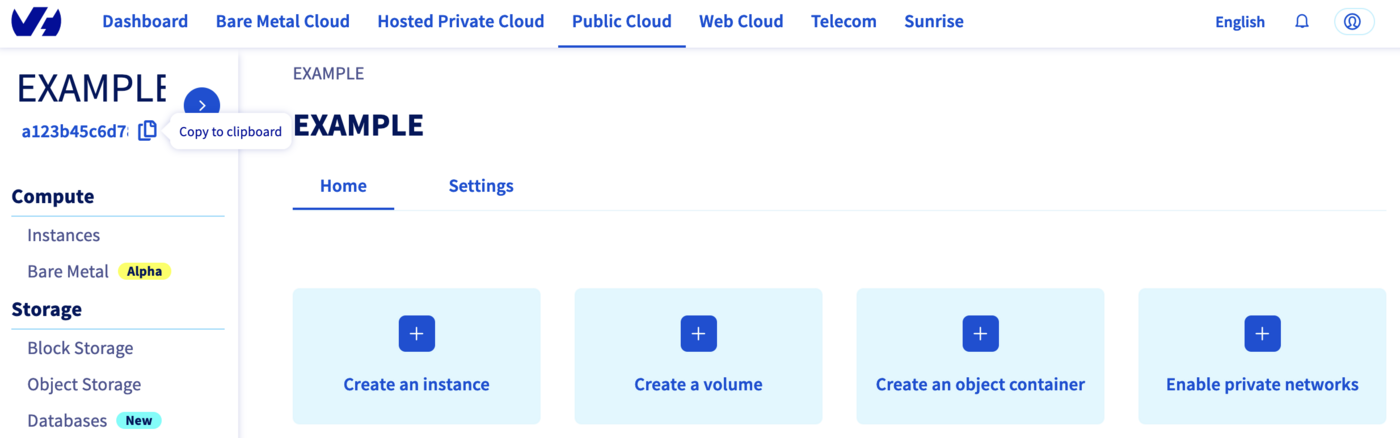
Your Public Cloud project ID is the `service_name`. Retrieve it using the Copy to clipboard button in the Public Cloud section.
**provider.tf:**
```bash
terraform {
required_providers {
ovh = {
source = "ovh/ovh"
}
}
}
provider "ovh" {
endpoint = "ovh-eu"
application_key = ""
application_secret = ""
consumer_key = ""
}
```
Alternatively, use environment variables to avoid storing secrets in source code: `OVH_ENDPOINT`, `OVH_APPLICATION_KEY`, `OVH_APPLICATION_SECRET`, `OVH_CONSUMER_KEY`.
**variables.tf:**
```bash
variable service_name {
type = string
default = ""
}
```
**ovh\_kube\_cluster.tf:**
```bash
resource "ovh_cloud_project_kube" "my_kube_cluster" {
service_name = "${var.service_name}"
name = "my_kube_cluster"
region = "GRA7"
version = "1.34"
}
resource "ovh_cloud_project_kube_nodepool" "node_pool" {
service_name = "${var.service_name}"
kube_id = ovh_cloud_project_kube.my_kube_cluster.id
name = "my-pool"
flavor_name = "b2-7"
desired_nodes = 3
max_nodes = 3
min_nodes = 3
}
```
**output.tf:**
```bash
output "kubeconfig" {
value = ovh_cloud_project_kube.my_kube_cluster.kubeconfig
sensitive = true
}
```
:::warning
Node pool names only accept lowercase characters, digits and `-`. Underscores and dots cause a `gzip: invalid header` error.
:::
Deploy:
```bash
terraform init && terraform apply
```
**Via CDK for Terraform**
:::info
You need [kubectl](https://kubernetes.io/docs/tasks/tools/), [CDK for Terraform CLI](https://developer.hashicorp.com/terraform/tutorials/cdktf/cdktf-install) and [Go](https://go.dev/doc/install) installed.
:::
CDKTF translates Go code into Terraform HCL and uses the OVHcloud Terraform provider. Set the required credentials as environment variables:
```bash
export OVH_ENDPOINT="ovh-eu"
export OVH_APPLICATION_KEY="xxx"
export OVH_APPLICATION_SECRET="xxx"
export OVH_CONSUMER_KEY="xxx"
export OVH_CLOUD_PROJECT_SERVICE="xxx"
```
Initialize the project:
```bash
mkdir ovhcloud-kube && cd ovhcloud-kube
cdktf init --template=go --providers="ovh/ovh@~>0.37.0" "hashicorp/local" --providers-force-local --local --project-name=ovhcloud-kube
```
Edit `main.go`:
```go
package main
import (
"os"
"path"
"cdk.tf/go/stack/generated/hashicorp/local/file"
local "cdk.tf/go/stack/generated/hashicorp/local/provider"
"cdk.tf/go/stack/generated/ovh/ovh/cloudprojectkube"
"cdk.tf/go/stack/generated/ovh/ovh/cloudprojectkubenodepool"
ovh "cdk.tf/go/stack/generated/ovh/ovh/provider"
"github.com/aws/constructs-go/constructs/v10"
"github.com/aws/jsii-runtime-go"
"github.com/hashicorp/terraform-cdk-go/cdktf"
)
func NewMyStack(scope constructs.Construct, id string) cdktf.TerraformStack {
stack := cdktf.NewTerraformStack(scope, &id)
ovh.NewOvhProvider(stack, jsii.String("ovh"), &ovh.OvhProviderConfig{
Endpoint: jsii.String("ovh-eu"),
})
local.NewLocalProvider(stack, jsii.String("local"), &local.LocalProviderConfig{})
serviceName := os.Getenv("OVH_CLOUD_PROJECT_SERVICE")
kube := cloudprojectkube.NewCloudProjectKube(stack, jsii.String("my_desired_cluster"), &cloudprojectkube.CloudProjectKubeConfig{
ServiceName: jsii.String(serviceName),
Name: jsii.String("my_desired_cluster"),
Region: jsii.String("GRA5"),
})
cdktf.NewTerraformOutput(stack, jsii.String("cluster_version"), &cdktf.TerraformOutputConfig{
Value: kube.Version(),
})
pwd, _ := os.Getwd()
file.NewFile(stack, jsii.String("kubeconfig"), &file.FileConfig{
Filename: jsii.String(path.Join(pwd, "kubeconfig.yaml")),
Content: kube.Kubeconfig(),
FilePermission: jsii.String("0644"),
})
nodePool := cloudprojectkubenodepool.NewCloudProjectKubeNodepool(stack, jsii.String("my-pool"), &cloudprojectkubenodepool.CloudProjectKubeNodepoolConfig{
ServiceName: kube.ServiceName(),
KubeId: kube.Id(),
Name: jsii.String("my-pool"),
DesiredNodes: jsii.Number(1),
MaxNodes: jsii.Number(3),
MinNodes: jsii.Number(1),
FlavorName: jsii.String("b2-7"),
})
cdktf.NewTerraformOutput(stack, jsii.String("nodePoolID"), &cdktf.TerraformOutputConfig{
Value: nodePool.Id(),
})
return stack
}
func main() {
app := cdktf.NewApp(nil)
NewMyStack(app, "ovhcloud")
app.Synth()
}
```
Deploy:
```bash
cdktf deploy
```
**Via Pulumi**
:::info
You need [Pulumi CLI](https://www.pulumi.com/docs/install/), a [Pulumi account](https://www.pulumi.com/) with an [access token](https://app.pulumi.com/account/tokens), and [kubectl](https://kubernetes.io/docs/tasks/tools/) installed.
:::
The OVH Pulumi provider supports Go, Python, Node.js/TypeScript, C# and Java. See [examples](https://github.com/ovh/pulumi-ovh/tree/main/examples/kubernetes).
Set credentials as environment variables:
```bash
export OVH_ENDPOINT="ovh-eu"
export OVH_APPLICATION_KEY="xxx"
export OVH_APPLICATION_SECRET="xxx"
export OVH_CONSUMER_KEY="xxx"
```
Create and initialize the project:
```bash
mkdir pulumi_ovh_kube && cd pulumi_ovh_kube
pulumi new go -y
go get github.com/ovh/pulumi-ovh/sdk/go/...
```
Edit `Pulumi.yaml` to add the service name:
```yaml
config:
serviceName:
```
Edit `main.go`:
```go
package main
import (
"github.com/pulumi/pulumi/sdk/v3/go/pulumi"
"github.com/pulumi/pulumi/sdk/v3/go/pulumi/config"
"github.com/ovh/pulumi-ovh/sdk/go/ovh/cloudproject"
)
func main() {
pulumi.Run(func(ctx *pulumi.Context) error {
serviceName := config.Require(ctx, "serviceName")
myKube, err := cloudproject.NewKube(ctx, "my_desired_cluster", &cloudproject.KubeArgs{
ServiceName: pulumi.String(serviceName),
Name: pulumi.String("my_desired_cluster"),
Region: pulumi.String("GRA5"),
})
if err != nil {
return err
}
ctx.Export("kubeconfig", pulumi.ToSecret(myKube.Kubeconfig))
nodePool, err := cloudproject.NewKubeNodePool(ctx, "my-desired-pool", &cloudproject.KubeNodePoolArgs{
ServiceName: pulumi.String(serviceName),
KubeId: myKube.ID(),
Name: pulumi.String("my-desired-pool"),
DesiredNodes: pulumi.Int(1),
MaxNodes: pulumi.Int(3),
MinNodes: pulumi.Int(1),
FlavorName: pulumi.String("b2-7"),
})
if err != nil {
return err
}
ctx.Export("nodePoolID", nodePool.ID())
return nil
})
}
```
Run `go mod tidy` then deploy:
```bash
pulumi up
```
## Connect to the cluster
**Via OVHcloud Control Panel**
In your cluster page, open the Service tab and download the `kubectl` configuration file to connect to your cluster.
**Via the OVHcloud API**
Call the following endpoint to retrieve the kubeconfig content and save it to a file:
🇪🇺EU▾
[POST/cloud/project/{serviceName}/kube/{kubeId}/kubeconfig](https://eu.api.ovh.com/console/?section=/cloud&branch=v1#post-/cloud/project/-serviceName-/kube/-kubeId-/kubeconfig)
```bash
kubectl --kubeconfig=kubeconfig.yaml get nodes
```
**Via the OVHcloud CLI**
```bash
ovhcloud cloud kube kubeconfig generate \
--cloud-project > kubeconfig.yaml
kubectl --kubeconfig=kubeconfig.yaml get nodes
```
**Via Terraform**
```bash
terraform output -raw kubeconfig > ~/.kube/my_kube_cluster.yml
kubectl --kubeconfig=~/.kube/my_kube_cluster.yml get nodes
```
**Via CDK for Terraform**
The kubeconfig file was saved locally as `kubeconfig.yaml` during deployment:
```bash
kubectl --kubeconfig=kubeconfig.yaml get nodes
```
**Via Pulumi**
```bash
pulumi stack output kubeconfig --show-secrets -s dev > kubeconfig.yaml
kubectl --kubeconfig=kubeconfig.yaml get nodes
```
## Known issues
### "not enough xxx quotas"
By default, Public Cloud resource quotas (RAM, CPU, disk space, number of instances, etc.) are limited for security reasons. If you run out of resources when creating a node pool, follow [Increasing Public Cloud quotas](/de/guides/public-cloud/cross-functional/increasing-public-cloud-quota.md) to increase them.
**Via Terraform**
**"gzip: invalid header"**
This error occurs when a node pool name or flavor name contains `_` or `.`. Only lowercase characters, digits and `-` are accepted:
```bash
name = "my-pool"
flavor_name = "b2-7"
```
**Via Pulumi**
**"Provider is missing a required configuration key"**
You forgot to export the required OVHcloud environment variables:
```bash
export OVH_ENDPOINT="ovh-eu"
export OVH_APPLICATION_KEY="xxx"
export OVH_APPLICATION_SECRET="xxx"
export OVH_CONSUMER_KEY="xxx"
```
**"Node pool name xxx is invalid"**
Only lowercase characters, digits and `-` are accepted in node pool names. Rename your node pool using a valid value:
```go
Name: pulumi.String("my-desired-pool"),
```
## Destroy (cleanup)
**Via OVHcloud Control Panel**
In the Managed Kubernetes Service section, click the ... button next to your cluster and select Delete.
**Via the OVHcloud API**
Call the following endpoint to delete the cluster and all its associated resources:
🇪🇺EU▾
[DELETE/cloud/project/{serviceName}/kube/{kubeId}](https://eu.api.ovh.com/console/?section=/cloud&branch=v1#delete-/cloud/project/-serviceName-/kube/-kubeId-)
**Via the OVHcloud CLI**
```bash
ovhcloud cloud kube delete --cloud-project
```
**Via Terraform**
```bash
terraform destroy
```
**Via CDK for Terraform**
```bash
cdktf destroy
```
**Via Pulumi**
```bash
pulumi destroy
```
To also remove the Pulumi stack history:
```bash
pulumi stack rm dev
```
## Go further
To have an overview of OVHcloud Managed Kubernetes service, you can go to the [OVHcloud Managed Kubernetes page](https://www.ovhcloud.com/de/public-cloud/kubernetes/).
To deploy your first application on your Kubernetes cluster, we invite you to follow our guide to [configuring default settings for `kubectl`](/de/guides/public-cloud/containers-orchestration/managed-kubernetes/configure-kubectl.md) and [deploying a Hello World application](/de/guides/public-cloud/containers-orchestration/managed-kubernetes/deploy-hello-world.md).
- If you need training or technical assistance to implement our solutions, contact your sales representative or go to the [Professional Services](https://www.ovhcloud.com/de/professional-services/) page to get a quote and ask our Professional Services experts to assist you with your project.
- Join our [community of users](https://community.ovhcloud.com/).