---
title: "How to configure SMTP on a Load Balancer service"
description: "Find out how to use SMTP with the OVHcloud Load Balancer"
url: https://docs.ovhcloud.com/de/guides/network/load-balancer/case-smtp
lang: de
lastUpdated: 2025-10-24
---
# How to configure SMTP on a Load Balancer service
## Objective
**This guide outlines how to configure the OVHcloud Load Balancer to distribute traffic across multiple SMTP servers.**
## Requirements
- An [OVHcloud Load balancer](https://www.ovhcloud.com/en-gb/network/load-balancer/) service in your OVHcloud account.
- A Postfix-type SMTP service installed and configured on your servers.
- Posséder une offre [OVHcloud Load balancer](https://www.ovhcloud.com/fr/network/load-balancer/) dans votre compte OVHcloud.
- Être connecté à votre espace client OVHcloud.
- Posséder un service SMTP de type Postfix installé et configuré sur vos serveurs.
### OVHcloud Control Panel Access
- **Direct link:** Load Balancer
- **Navigation path:** Network > Load Balancer > Select your service
***
## Instructions
:::warning
This guide assumes a working knowledge of SMTP protocol and service operation.
:::
As a reminder, each protocol (HTTP, TCP and UDP) in the OVHcloud Load Balancer service has its own associated front-ends, farms and servers.
:::warning
The order in which elements are created is important. In particular, the server farms must be configured before servers can be attached to them.
:::
In the Control Panel, you will see the features detailed below:
Via the OVHcloud API, use the following call:
🇪🇺EU▾
[GET/ipLoadbalancing](https://eu.api.ovh.com/console/?section=/ipLoadbalancing&branch=v1#get-/ipLoadbalancing)
For more information on the API features, you can refer to [the following guide](/de/guides/network/load-balancer/use-api-reference.md).
### Add a server farm
A TCP server farm must be added to the service; this component manages traffic balancing across the servers.
#### Via the OVHcloud Control Panel
In the `Farms
` tab for servers, click on the `+TCP/TLS
` button.
Fill in the fields. The mandatory fields for a basic configuration are _Port_ and _Zone_. For SMTP, port 25 is used. If no ports are specified, your OVHcloud Load Balancer will automatically use the same port as the corresponding front-end.
Optionally, you can add an SMTP probe on your farm.
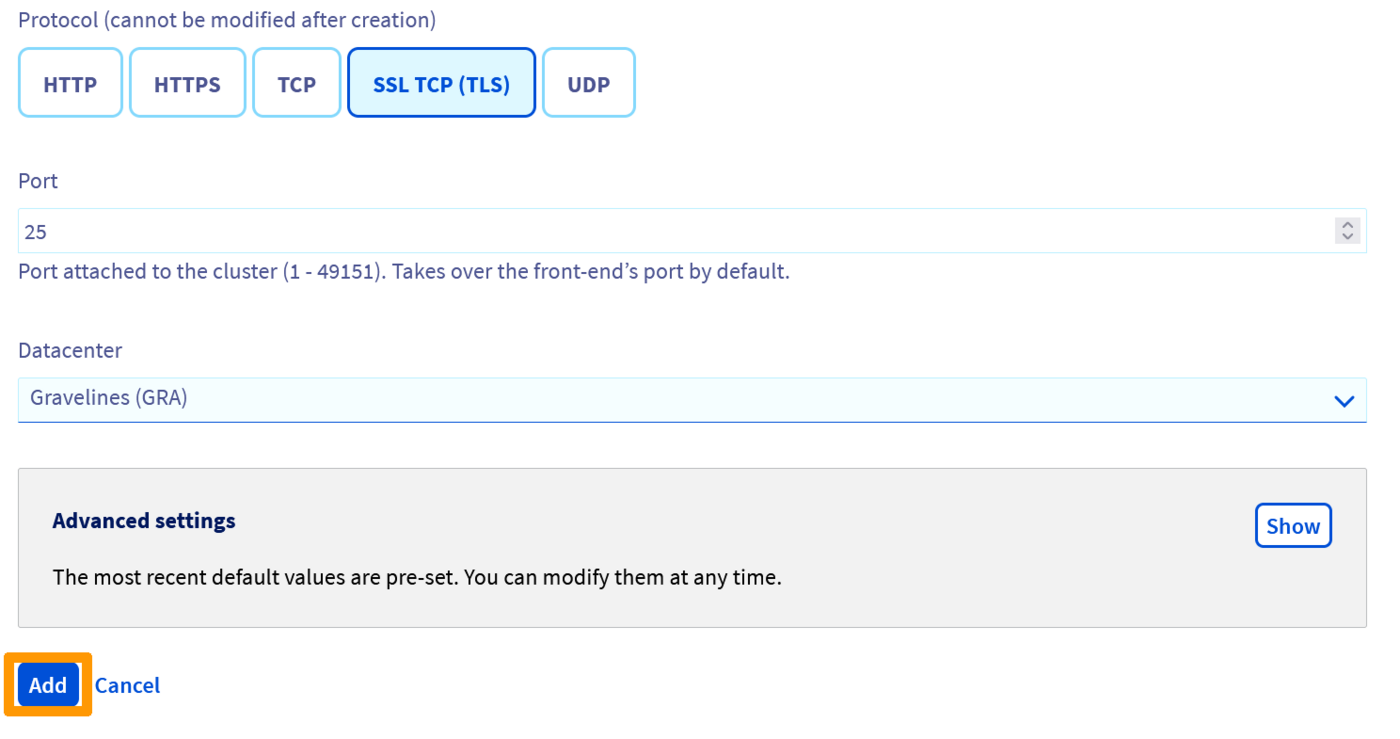
Click on `Add
` once you have filled in the fields.
Your server farm should appear in the list, in the `Farms
` tab.
#### Via the OVHcloud API
- List of TCP server farms:
🇪🇺EU▾
[GET/ipLoadbalancing/{serviceName}/tcp/farm](https://eu.api.ovh.com/console/?section=/ipLoadbalancing&branch=v1#get-/ipLoadbalancing/-serviceName-/tcp/farm)
- Details of a specific TCP server farm:
🇪🇺EU▾
[GET/ipLoadbalancing/{serviceName}/tcp/farm/{farmId}](https://eu.api.ovh.com/console/?section=/ipLoadbalancing&branch=v1#get-/ipLoadbalancing/-serviceName-/tcp/farm/-farmId-)
- Add a new TCP server farm:
🇪🇺EU▾
[POST/ipLoadbalancing/{serviceName}/tcp/farm](https://eu.api.ovh.com/console/?section=/ipLoadbalancing&branch=v1#post-/ipLoadbalancing/-serviceName-/tcp/farm)
- Modify a specific server farm:
🇪🇺EU▾
[PUT/ipLoadbalancing/{serviceName}/tcp/farm/{farmId}](https://eu.api.ovh.com/console/?section=/ipLoadbalancing&branch=v1#put-/ipLoadbalancing/-serviceName-/tcp/farm/-farmId-)
- Delete a specific server farm:
🇪🇺EU▾
[DELETE/ipLoadbalancing/{serviceName}/tcp/farm/{farmId}](https://eu.api.ovh.com/console/?section=/ipLoadbalancing&branch=v1#delete-/ipLoadbalancing/-serviceName-/tcp/farm/-farmId-)
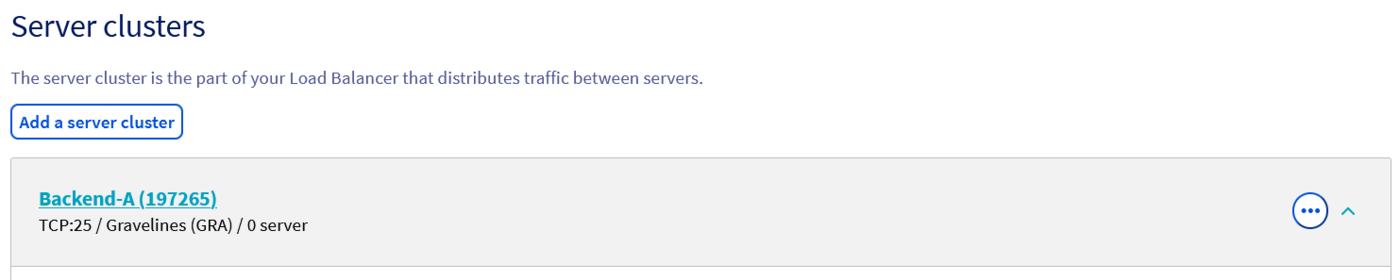
### Add a server
A server must now be added to the server farm.
#### Via the OVHcloud Control Panel
In the `Farms
` tab, select the farm you want to add a server to by clicking on the corresponding line. The list of servers already configured in the farm will appear beneath the list of farms, along with the `Add a server
` button. Click this button to add a new server.
The mandatory fields are the _IPv4 address_, _Status_, and _ProxyProtocol version_. If a server port is configured, it will override the port defined in the farm. To keep the configuration as standard as possible and easy to maintain, we recommend only using this parameter in advanced cases.
:::warning
It is important to configure ProxyProtocol in version v1 so that you can retrieve the real source IP on your SMTP service. Postfix is compatible with this protocol.
:::
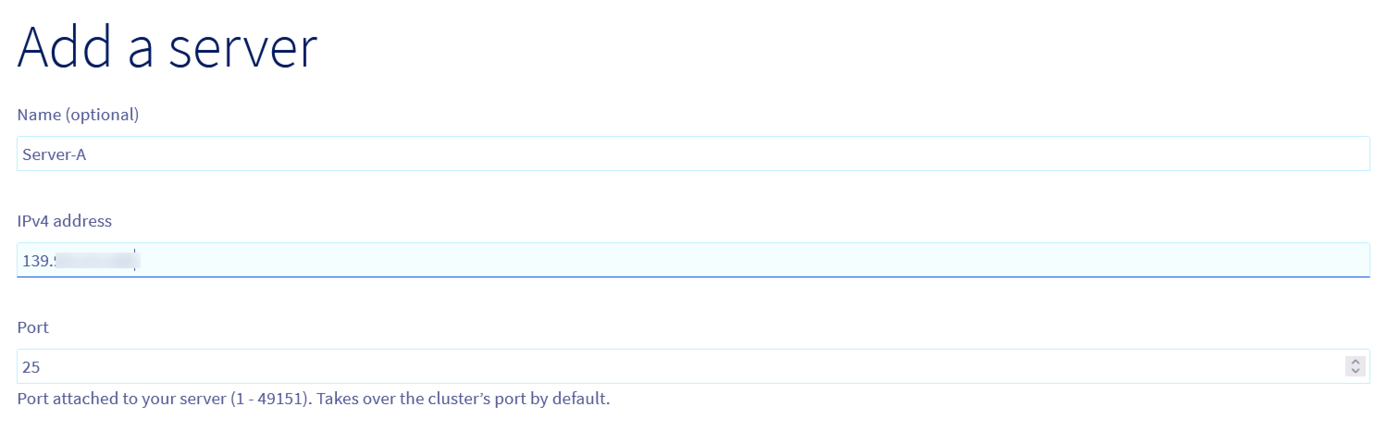
Click on `Add
` once you have filled in the fields.
Your server should appear in the server list, in the `Farms
` tab, just below the list of farms.

#### Via the OVHcloud API
- List of servers in the farm:
🇪🇺EU▾
[GET/ipLoadbalancing/{serviceName}/tcp/farm/{farmId}/server](https://eu.api.ovh.com/console/?section=/ipLoadbalancing&branch=v1#get-/ipLoadbalancing/-serviceName-/tcp/farm/-farmId-/server)
- Details of a specific server:
🇪🇺EU▾
[GET/ipLoadbalancing/{serviceName}/tcp/farm/{farmId}/server/{serverId}](https://eu.api.ovh.com/console/?section=/ipLoadbalancing&branch=v1#get-/ipLoadbalancing/-serviceName-/tcp/farm/-farmId-/server/-serverId-)
- Add a new server:
🇪🇺EU▾
[POST/ipLoadbalancing/{serviceName}/tcp/farm/{farmId}/server](https://eu.api.ovh.com/console/?section=/ipLoadbalancing&branch=v1#post-/ipLoadbalancing/-serviceName-/tcp/farm/-farmId-/server)
- Modify a specific server:
🇪🇺EU▾
[PUT/ipLoadbalancing/{serviceName}/tcp/farm/{farmId}/server](https://eu.api.ovh.com/console/?section=/ipLoadbalancing&branch=v1#put-/ipLoadbalancing/-serviceName-/tcp/farm/-farmId-/server)
- Delete a specific server:
🇪🇺EU▾
[DELETE/ipLoadbalancing/{serviceName}/tcp/farm/{farmId}/server](https://eu.api.ovh.com/console/?section=/ipLoadbalancing&branch=v1#delete-/ipLoadbalancing/-serviceName-/tcp/farm/-farmId-/server)
### Add a front-end
A `front-end
` must now be added to the service and connected to the server farm. The front-end is the component of your OVHcloud Load Balancer that exposes your service to the internet.
#### Via the OVHcloud Control Panel
Go to the `\+ Front-ends
` tab, and click `+TCP/TLS
`.
Fill in the fields. The mandatory fields for a basic configuration are _Port_ (25 for a standard SMTP service), _Zone_, _Default farm_ and _Probe_ (if a probe was configured on your farm). If you want your service to be available across several ports at once, you can specify a list of ports, separated by commas, or a port range, in the format "``-``".
If you have routed Additional IPs to your OVHcloud Load Balancer service, you can also attach a front-end to one or more specific Additional IPs.
Ensure the farm you created earlier is specified as the “default farm”.
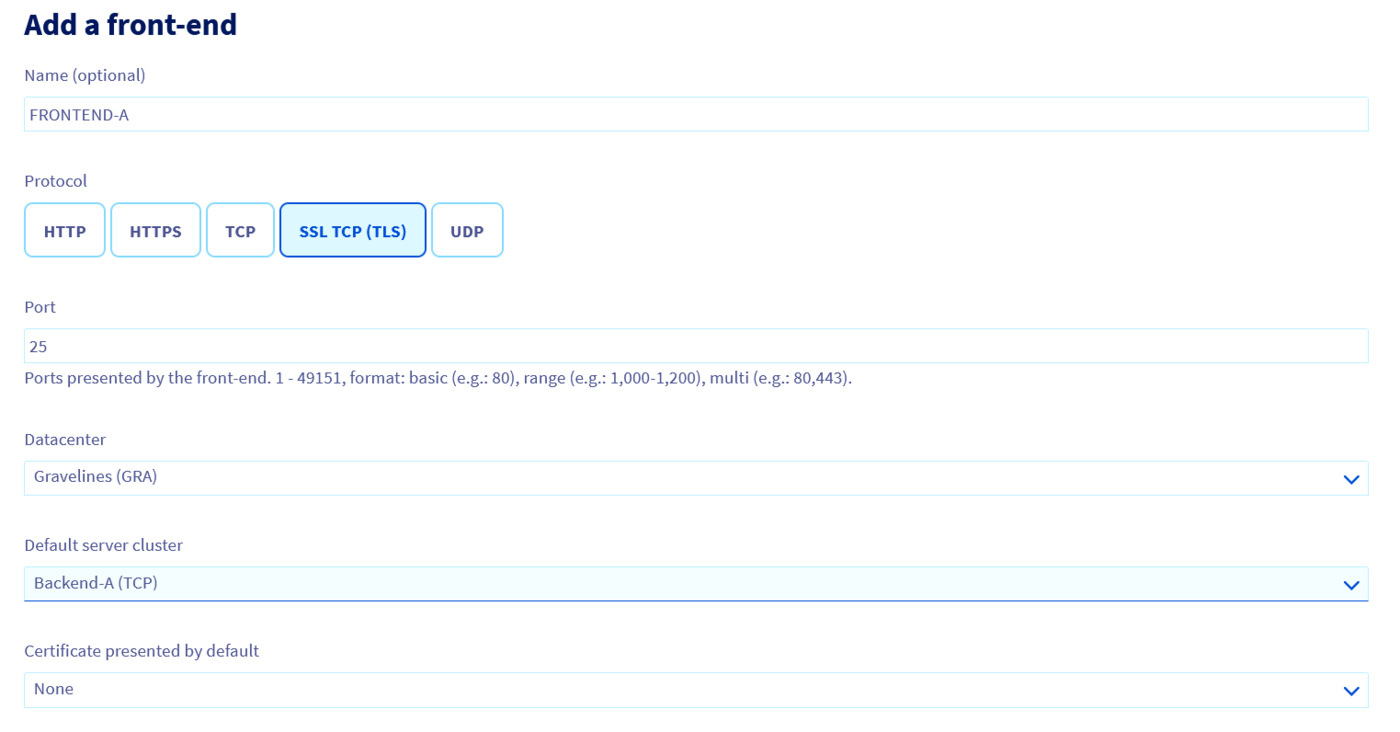
Click `Add
` once the fields are filled.
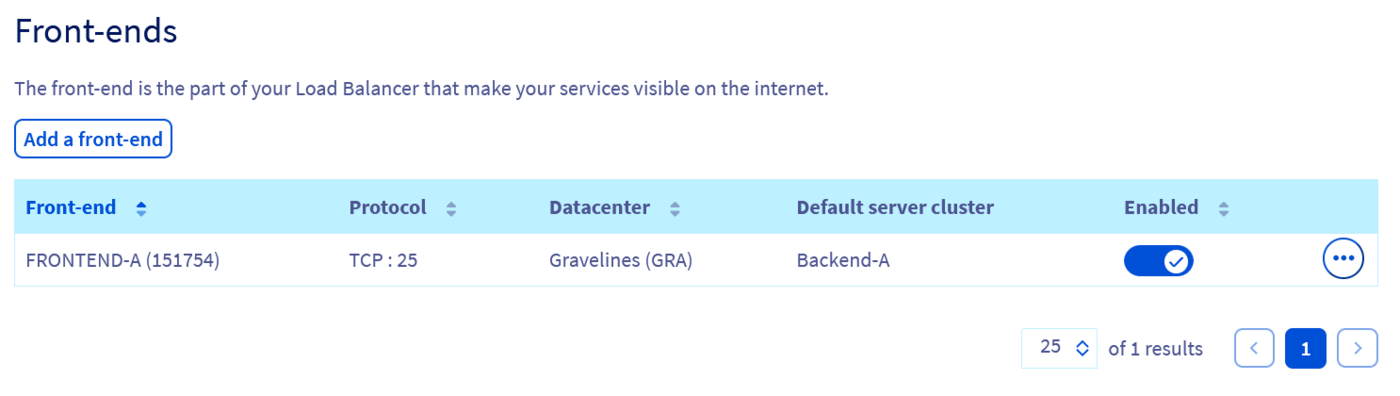
Your front-end must appear in the list, in the `Front-ends
` tab.
#### Via the OVHcloud API
- List of TCP front-ends:
🇪🇺EU▾
[GET/ipLoadbalancing/{serviceName}/tcp/frontend](https://eu.api.ovh.com/console/?section=/ipLoadbalancing&branch=v1#get-/ipLoadbalancing/-serviceName-/tcp/frontend)
- Details of a specific front-end:
🇪🇺EU▾
[GET/ipLoadbalancing/{serviceName}/tcp/frontend/{frontendId}](https://eu.api.ovh.com/console/?section=/ipLoadbalancing&branch=v1#get-/ipLoadbalancing/-serviceName-/tcp/frontend/-frontendId-)
- Add a new front-end:
🇪🇺EU▾
[POST/ipLoadbalancing/{serviceName}/tcp/frontend](https://eu.api.ovh.com/console/?section=/ipLoadbalancing&branch=v1#post-/ipLoadbalancing/-serviceName-/tcp/frontend)
- Modify a specific front-end:
🇪🇺EU▾
[PUT/ipLoadbalancing/{serviceName}/tcp/frontend/{frontendId}](https://eu.api.ovh.com/console/?section=/ipLoadbalancing&branch=v1#put-/ipLoadbalancing/-serviceName-/tcp/frontend/-frontendId-)
- Delete a specific front-end:
🇪🇺EU▾
[DELETE/ipLoadbalancing/{serviceName}/tcp/frontend/{frontendId}](https://eu.api.ovh.com/console/?section=/ipLoadbalancing&branch=v1#delete-/ipLoadbalancing/-serviceName-/tcp/frontend/-frontendId-)
### Apply the modifications
Modifications made to your OVHcloud Load Balancer must be **explicitly applied** in each of the zones configured for your service. They will only become visible to your users at this point. This process allows for complex configuration changes to be prepared and applied only when fully ready.
If you have several zones, the same configuration must be applied to each.
#### Via the OVHcloud Control Panel
Go to the homepage for the OVHcloud Load Balancer, and click `Apply:Zone
` for each of the zones concerned.
#### Via the OVHcloud API
- Refresh a zone:
🇪🇺EU▾
[POST/ipLoadbalancing/{serviceName}/refresh](https://eu.api.ovh.com/console/?section=/ipLoadbalancing&branch=v1#post-/ipLoadbalancing/-serviceName-/refresh)
### Postfix configuration
To make Postfix compatible with HAProxy _ProxyProtocol_, an option is required in the postfix main.cf configuration file:
```bash
smtp_upstream_proxy_protocol = haproxy
```
The Postfix daemon must then be restarted.
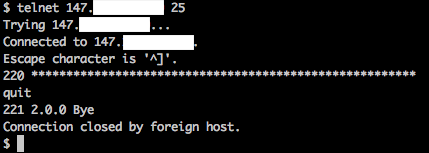
### Confirmation
Upon completing these steps, you will have a functional Load Balancer service for your SMTP servers. The service status can now be checked by requesting your IP Load Balancer as an SMTP server.
## Go further
Join our [community of users](https://community.ovhcloud.com/).